Introduction to Google Cloud SQL
Google Cloud SQL is a powerful and easy-to-use managed database service that lets you run MySQL and PostgreSQL databases on the Google Cloud Platform. With Cloud SQL, you can focus on building your applications without worrying about the underlying infrastructure, and you can scale your databases seamlessly as your applications grow. One of the things that stands out about Cloud SQL is its ease of use. With just a few clicks in the Google Cloud Console, you can create a fully managed database instance and start using it right away. Cloud SQL takes care of all the technical jargon and complexity of database administration, so you can focus on your application logic.
To get started with Cloud SQL, simply go to the Google Cloud website and navigate to the Cloud SQL product page. From there, you can create a new Cloud SQL instance, select your preferred database engine (MySQL or PostgreSQL), and choose your desired instance size and storage capacity. In this article, we will focus on getting started with Google Cloud SQL and cover the following topics:
- Creating a Cloud SQL instance
- Configuring the instance settings
- Connecting to the instance using various tools and technologies
By the end of this article, you will have a working Cloud SQL instance that you can use to store and retrieve data for your applications. Let's get started!
Benefits of using Google Cloud SQL
Google Cloud SQL is a fully-managed relational database service that provides several benefits to users. Here are some of the benefits of using Google Cloud SQL:
- Scalability: Google Cloud SQL allows you to scale your database resources up or down as per your requirement. It can handle a large number of users and transactions, and it can automatically adjust the resources to match your usage. You can choose from different scalable sizes, such as small, medium, large, and xlarge, depending on your needs.
- High availability and reliability: Google Cloud SQL provides a highly available and reliable database service. It automatically replicates your data across multiple zones to ensure that your data is always available, even in the event of a regional outage. It also provides automated backups and point-in-time recovery, ensuring that your data is safe and secure.
- Security: Google Cloud SQL provides several security features to protect your data. It uses encrypted connections to secure data in transit, and it provides encryption at rest for your data. It also allows you to set up firewall rules to control access to your database.
- Easy to deploy: Google Cloud SQL makes it easy to deploy and manage your database. You can use the Google Cloud Console or the Cloud SQL API to create and manage your databases. You can also use a wide range of tools and technologies, such as MySQL, PostgreSQL, and SQL Server.
- Cost-effective: Google Cloud SQL offers a pay-as-you-go pricing model, which means that you only pay for the resources you use. It also provides a free tier that includes 30GB of storage and 1GB of RAM per month, making it an affordable option for small-scale applications.
In summary, Google Cloud SQL provides a scalable, highly available, and secure database service that is easy to deploy and cost-effective.
Getting started with Google Cloud SQL
To get started with Google Cloud SQL, you need to create a Google Cloud project and enable the Google Cloud SQL API. Here are the steps to get started:
- Create a Google Cloud project: A Google Cloud project is required to use Google Cloud SQL. If you don't already have a project, you can create one by following the instructions in the Google Cloud documentation.
- Enable the Google Cloud SQL API: To use Google Cloud SQL, you need to enable the Cloud SQL API. You can do this by navigating to the Google Cloud Console and clicking on the "APIs & Services" tab. Then, search for "Cloud SQL" and click on the "Cloud SQL Admin API" to enable it.
- Choose a database engine: Google Cloud SQL supports several database engines, including MySQL, PostgreSQL, and SQL Server. You can choose the engine that best suits your needs. In this guide, we will use MySQL as an example.
- Create a Cloud SQL instance: To create a Cloud SQL instance, go to the Google Cloud Console and navigate to the Cloud SQL page. Click on "Create Instance" and select the database engine, location, and instance type. You can choose from different instance types, such as small, medium, and large, depending on your needs. You can also choose the number of CPUs, RAM, and storage size for your instance.
- Connect to your Cloud SQL instance: Once your Cloud SQL instance is created, you can connect to it using a variety of tools and technologies. You can use the Google Cloud Console, the Cloud SQL Proxy, or any MySQL client that supports SSL connections.
Getting started with Google Cloud SQL is a straightforward process that requires creating a Google Cloud project, enabling the Google Cloud SQL API, choosing a database engine, creating a Cloud SQL instance, and connecting to your instance. Google Cloud SQL is a scalable, reliable, and secure database service that offers a wide range of features and benefits.
Configuring a Cloud SQL Instance
- Go to the Cloud SQL Instances page in the Google Cloud console.
- Click Create instance.
- On the Choose your database engine panel, select the type of database you want to create.
- In the Instance ID field, enter a unique name for your instance.
- Set a password for the root user.
- Select the region and zone where you want to create your instance.
- (Optional) Select the Enable high availability checkbox to create a failover replica for your instance.
- (Optional) Select the Enable Cloud Audit Logging checkbox to enable Cloud Audit Logging for your instance.
- Click Create instance.
Once your instance is created, you can configure the firewall, set backups, and configure the maintenance window.
Configuring the Firewall
The firewall controls which IP addresses can access your Cloud SQL instance. To configure the firewall, go to the Firewall tab for your instance.
- In the Firewall rules section, click Add rule.
- In the Rule name field, enter a name for your rule.
- In the IP address ranges field, enter the IP addresses or ranges that you want to allow access to your instance.
- In the Protocols and ports field, select the protocols and ports that you want to allow access to.
- Click Save.
Setting Backups
Cloud SQL automatically backs up your instances every day. You can also configure manual backups. To configure backups, go to the Backups tab for your instance.
- In the Backup schedule section, select the frequency with which you want to create backups.
- In the Storage location section, select the location where you want to store your backups.
- Click Save.
Configuring the Maintenance Window
The maintenance window is a period of time during which Cloud SQL can perform maintenance on your instance. To configure the maintenance window, go to the Maintenance window tab for your instance.
- In the Start time field, enter the start time of the maintenance window.
- In the End time field, enter the end time of the maintenance window.
- Click Save.
Here are some additional considerations when configuring a Cloud SQL instance:
- Choose the right database engine. Cloud SQL supports a variety of database engines, including MySQL, PostgreSQL, and SQL Server. Choose the engine that is best suited for your application.
- Set a strong password. The root user password is used to manage your Cloud SQL instance. Make sure to set a strong password that is difficult to guess.
- Enable high availability. High availability ensures that your database is always available, even if there is an outage in your region.
- Enable Cloud Audit Logging. Cloud Audit Logging records all changes made to your Cloud SQL instance. This can be helpful for troubleshooting problems or auditing access to your database.
- Configure the firewall. The firewall controls which IP addresses can access your Cloud SQL instance. Make sure to only allow access from trusted IP addresses.
- Set backups. Cloud SQL automatically backs up your instances every day. You can also configure manual backups.
- Configure the maintenance window. The maintenance window is a period of time during which Cloud SQL can perform maintenance on your instance. Make sure to schedule the maintenance window during a time when your application is not in use.
Connecting to your Cloud SQL instance
Here are the steps on how to connect to your Cloud SQL instance using MySQL Workbench:
- Download and install MySQL Workbench.
- Open MySQL Workbench.
- Click on the Server tab.
- In the Connection section, enter the following information:
- Hostname or IP address: The IP address of your Cloud SQL instance.
- Port: The port number of your Cloud SQL instance.
- Username: The username of the root user for your Cloud SQL instance.
- Password: The password for the root user for your Cloud SQL instance.
- SSL: Select Yes to use SSL to connect to your Cloud SQL instance.
- Click on the Connect button.
If you have configured your firewall correctly, you should be able to connect to your Cloud SQL instance. You should see a list of databases in the left-hand pane of MySQL Workbench. You can then create tables, insert data, and run queries against your database.
To connect to your Cloud SQL instance using a MySQL client, follow these steps below. To get a certificate for your Cloud SQL instance, you can use the Google Cloud Console or the gcloud command-line tool.
Using the Google Cloud Console
- Go to the Cloud SQL Instances page in the Google Cloud Console.
- Select your instance.
- Click on the Certificates tab.
- Click on the Create certificate button.
- In the Create certificate dialog, enter the following information:
- Name: The name of your certificate.
- Type: The type of certificate you want to create.
- Key algorithm: The key algorithm you want to use for your certificate.
- Validity period: The validity period for your certificate.
- Click on the Create button.
Using the gcloud command-line tool
- Install the gcloud command-line tool.
- Run the following command to create a certificate:
gcloud sql instances create-certificate [INSTANCE_NAME] [CERTIFICATE_NAME]
Where:
[INSTANCE_NAME]is the name of your Cloud SQL instance.[CERTIFICATE_NAME]is the name of your certificate.
For example, to create a certificate named
my-certificatefor the instance namedmy-instance, you would run the following command:gcloud sql instances create-certificate my-instance my-certificate
Once you have created a certificate, you can enter the details in MySQL Workbench.
To do this, follow these steps:
- Open MySQL Workbench.
- Click on the Server tab.
- In the Connection section, enter the following information:
- Hostname or IP address: The IP address of your Cloud SQL instance.
- Port: The port number of your Cloud SQL instance.
- Username: The username of the root user for your Cloud SQL instance.
- Password: The password for the root user for your Cloud SQL instance.
- SSL: Select Yes to use SSL to connect to your Cloud SQL instance.
- Certificate: Select the certificate you created.
- Click on the Connect button.
If you have configured your firewall correctly, you should be able to connect to your Cloud SQL instance. You should see a list of databases in the left-hand pane of MySQL Workbench. You can then create tables, insert data, and run queries against your database.
Testing the connection
To test the connection, you can run the following query:
SELECT VERSION();
If the query returns a version number, then the connection is successful.
Creating and managing databases
To create a database in Cloud SQL, you can use the Google Cloud Console or the gcloud command-line tool.
Using the Google Cloud Console
- Go to the Cloud SQL Instances page in the Google Cloud Console.
- Select your instance.
- Click on the Databases tab.
- Click on the Create database button.
- In the Create database dialog, enter the following information:
- Name: The name of your database.
- Character set: The character set for your database.
- Collation: The collation for your database.
- Click on the Create button.
Using the gcloud command-line tool
- Install the gcloud command-line tool.
- Run the following command to create a database:
gcloud sql databases create [DATABASE_NAME]
Where [DATABASE_NAME] is the name of your database.
For example, to create a database named my-database, you would run the following command:
gcloud sql databases create my-database
Once you have created a database, you can create tables, insert data, and run queries against your database.
To create a table, you can use the following syntax:
CREATE TABLE [TABLE_NAME] (
  [COLUMN_NAME] [DATA_TYPE] [COLUMN_OPTIONS],
  [COLUMN_NAME] [DATA_TYPE] [COLUMN_OPTIONS],
  ...
);
For example, to create a table named users with two columns, id and name, you would run the following command:
CREATE TABLE users (
  id INT NOT NULL AUTO_INCREMENT,
  name VARCHAR(255) NOT NULL,
  PRIMARY KEY (id)
);
To insert data into a table, you can standard INSERT syntax. For example, to insert a row into the users table with the values 1 and John Doe, you would run the following command:
INSERT INTO users (id, name) VALUES (1, 'John Doe');
To run a query against a database, you can use the SELECT syntax. For example, to select all rows from the users table where the name column is equal to John Doe, you would run the following command:
SELECT name FROM users WHERE name = 'John Doe';
Backing Up and Restoring Databases
To take a backup of your database, follow these steps:
- Launch SQL Server Management Studio (SSMS) and connect to your SQL Server instance.
- Expand the Databases node in Object Explorer.
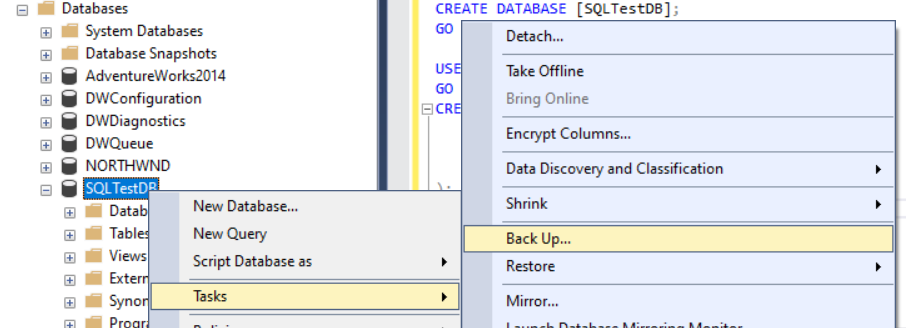
- Right-click the database, hover over Tasks, and select Back up....
- Under Destination, confirm that the path for your backup is correct. If you need to change the path, select Remove to remove the existing path, and then Add to type in a new path. You can use the ellipses to navigate to a specific file.
- Select OK to take a backup of your database.
Alternatively, you can run the following Transact-SQL command to back up your database. The path may be different on your computer:
USE [master];
GO
BACKUP DATABASE [SQLTestDB]
TO DISK = N'C:\Program Files\Microsoft SQL Server\MSSQL14.MSSQLSERVER\MSSQL\Backup\SQLTestDB.bak'
WITH NOFORMAT, NOINIT,
NAME = N'SQLTestDB-Full Database Backup', SKIP, NOREWIND, NOUNLOAD, STATS = 10;
GO
Restore a Backup
To restore your database, follow these steps:
- Launch SQL Server Management Studio (SSMS) and connect to your SQL Server instance.
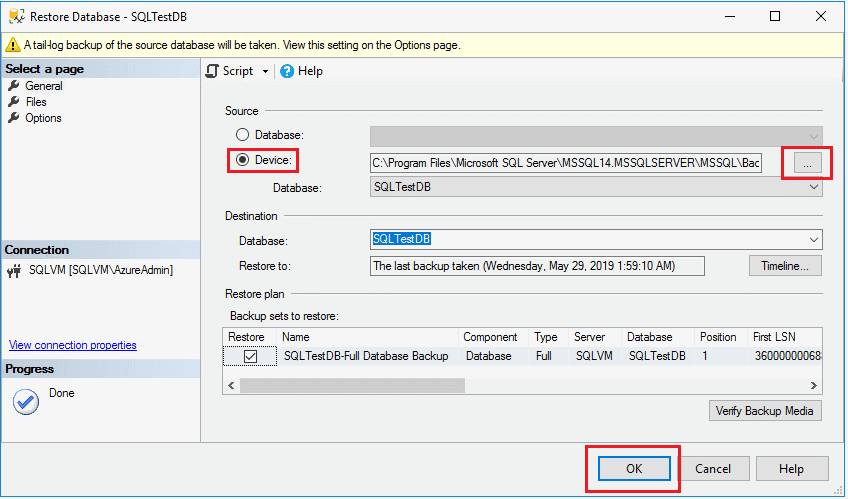
- Right-click the Databases node in Object Explorer and select Restore Database....

- Select Device:, and then select the ellipses (...) to locate your backup file.
- Select Add and navigate to where your
.bakfile is located. Select the.bakfile and then select OK. - Select OK to close the Select backup devices dialog box.
- Select OK to restore the backup of your database.

Alternatively, you can run the following Transact-SQL script to restore your database. The path may be different on your computer:
USE [master]; GO BACKUP DATABASE [SQLTestDB] TO DISK = N'C:\Program Files\Microsoft SQL Server\MSSQL14.MSSQLSERVER\MSSQL\Backup\SQLTestDB.bak' WITH NOFORMAT, NOINIT, NAME = N'SQLTestDB-Full Database Backup', SKIP, NOREWIND, NOUNLOAD, STATS = 10; GO
Integrating with other Google Cloud services
Integrating with other Google Cloud services means connecting two or more Google Cloud services together so that they can share data and communicate with each other. This can be done using a variety of methods, such as:
- Using APIs: Google Cloud services expose APIs that can be used to programmatically connect to them. This is the most common method for integrating Google Cloud services.
- Using connectors: Google Cloud offers a variety of connectors that can be used to connect to other services, such as Salesforce, Oracle, and SAP.
- Using Cloud Tasks: Cloud Tasks can be used to schedule tasks that run on a schedule or in response to an event. This can be used to integrate Google Cloud services that don't have a direct connection.
There are many benefits to integrating Google Cloud services. For example, it can help you:
- Improve efficiency by automating tasks and processes.
- Increase agility by making it easier to deploy new features and applications.
- Reduce costs by consolidating infrastructure and resources.
- Improve security by centralizing access control and monitoring.
If you're looking for ways to improve your business with Google Cloud, integrating with other Google Cloud services is a great place to start.
What Does Integrate Mean?
In the context of Google Cloud, integration means connecting two or more Google Cloud services together so that they can share data and communicate with each other. This can be done using a variety of methods, such as:
- Using APIs: Google Cloud services expose APIs that can be used to programmatically connect to them. This is the most common method for integrating Google Cloud services.
- Using connectors: Google Cloud offers a variety of connectors that can be used to connect to other services, such as Salesforce, Oracle, and SAP.
- Using Cloud Tasks: Cloud Tasks can be used to schedule tasks that run on a schedule or in response to an event. This can be used to integrate Google Cloud services that don't have a direct connection.
How to Integrate Google Cloud services
There are many ways to integrate Google Cloud services. The best way for you will depend on your specific needs and requirements. Here are a few things to consider when choosing a method for integrating Google Cloud services:
- The complexity of the integration: Some integrations are simple and can be done using a few API calls. Others are more complex and may require the use of connectors or Cloud Tasks.
- The frequency of the integration: Some integrations need to happen only once, such as when you're setting up a new database. Others need to happen on a regular basis, such as when you're syncing data between two applications.
- The security requirements: Some integrations require a high level of security, such as when you're integrating with a financial application. Others don't require as much security, such as when you're integrating with a marketing application.
Once you've considered these factors, you can choose the best method for integrating Google Cloud services for your needs.
Benefits of integrating Google Cloud services
There are many benefits to integrating Google Cloud services. Here are a few of the most common benefits:
- Improved efficiency: Integration can help you automate tasks and processes, which can save you time and money.
- Increased agility: Integration can make it easier to deploy new features and applications, which can help you respond to changes in the market more quickly.
- Reduced costs: Integration can help you consolidate infrastructure and resources, which can save you money on your IT costs.
- Improved security: Integration can help you centralize access control and monitoring, which can help you improve the security of your data.
Conclusion and Next Steps
Congratulations! You have successfully created a Cloud SQL instance and connected to it. By following the steps outlined in this tutorial, you have learned how to create a Cloud SQL instance using the Google Cloud Console, configure its settings, and connect to it using various tools and technologies.
Now that you have a working Cloud SQL instance, you can start using it to store and retrieve data for your applications. You can use any programming language or framework that supports MySQL or PostgreSQL to interact with your Cloud SQL instance.
If you want to learn more about Cloud SQL and how to use it for your applications, here are some suggested next steps:
- Explore the Google Cloud documentation: Google Cloud provides comprehensive documentation for Cloud SQL, including guides, tutorials, and reference documentation. You can find the documentation on the Google Cloud website.
- Build a sample application: To get hands-on experience with Cloud SQL, you can build a sample application that uses Cloud SQL to store and retrieve data. Google Cloud provides sample applications and code snippets for popular programming languages, such as Node.js, Python, Java, and Go.
- Learn about advanced features: Cloud SQL provides advanced features, such as high availability, read replicas, and automatic backups. You can learn more about these features and how to use them in your applications by reading the documentation.