
In Stairway Level 27, I wrapped up my review of the Time Intelligence functions with the Data Analysis Expressions (“DAX”) PARALLELPERIOD() and SAMEPERIODLASTYEAR() functions. Beginning the related subseries with Level 17: Time Intelligence Functions: The DAX DATEADD() Function, you were introduced to the DAX Time Intelligence functions as a group. Throughout the subseries of Levels, you learned that Time Intelligence represents a subset of the DAX formula language that supports the generation of time-specific analysis and the manipulation of data using time periods, including days, months, quarters, and years, and that the DAX Time Intelligence functions enable us to build and compare calculations over those periods.
In Stairway Level 27, you met DAX PARALLELPERIOD() and SAMEPERIODLASTYEAR(), the last of our coverage of DAX Time Intelligence. We noted that, operating upon a date column, both PARALLELPERIOD() and SAMEPERIODLASTYEAR() evaluate an expression parallel to dates in a specified column. We saw that, while PARALLELPERIOD() allowed us to specify operational specifications, SAMEPERIODLASTYEAR() is a bit more “hard-coded” to a specialized purpose, and is significantly more limited. (I noted that my intent was to cover the functions separately due to these differences, although it was my opinion that they perform similarly enough for us to pair them for consideration within a single Level of the series.)
In this Level, I introduce a set of Data Analysis Expressions (“DAX”) functions that work largely with text. While I’ve seen these functions covered as members of a single (and relatively large) “text-related functions” group, I prefer to consider them within bite-sized subgroups, where I might present them each in sets where they are among functions that perform similar types of manipulations and operations. To this end, we will consider them grouped, each within its own respective, operational context. These are not hard-and-fast classifications, but seem, to me, to serve the purpose well, and to help organize an approach for introducing the operations of similarly behaving functions together.
We will examine the Text-related functions, then, within the following general groups, each with its own Level of the Stairway to DAX and Power BI series:
DAX Text Functions, by Operational Group
| Extract & Modify | LEFT(), RIGHT(), MID(), REPLACE(), SUBSTITUTE() |
| Clean & Standardize | TRIM(), UPPER(), LOWER() |
| Combine & Aggregate | CONCATENATE(), CONCATENATEX(), COMBINEVALUES() |
| Format & Display | FORMAT(), FIXED() |
| Search & Compare | FIND(), SEARCH(), EXACT() |
| Other | UNICHAR(), UNICODE(), LEN() |
In general, the Text functions in DAX are based upon a library of Excel string functions that have been enhanced to work with columns and tables in Tabular models. At least some of these functions will be familiar to the anyone who regularly uses Excel at the functions level. And, while different approaches can be employed to achieve similar effects with different functions, most of these deliver straightforward outcomes except in the occasional, out-of-the-ordinary requirement.
In the next sections, I’ll detail the operation of each Text function member of the Extract and Modify operational group. As usual, we will examine working examples for each function we examine – examples that can be recreated, and executed, in the downloadable practice .pbix file. As is always the case with the Levels of this Stairway, the objective is to introduce each function within the setting of a relatively straightforward business need. You will likely encounter them in the business environment, as a part of various requirements that arise for the extraction and modification of data already within a model, in perhaps various stages of dress / undress. The Extract and Modify operational group of the DAX Text functions will almost certainly come in handy in any but the most fixed structures and steady-state data conditions.

Illustration 1: DAX Text Functions: Extract and Modify Group – Examples We Will Encounter
You’ll create a calculation with each function, as you work through each in this Level, that demonstrates the use of the respective function in a simple scenario, within a consolidated Table visualization, similar to the one above, that you’ll construct. Combining the functions within the same Table report will allow comparison and contrast, particularly, in this case, between the pre-existing state of the data and the desired end objective. Moreover, this affords us the opportunity to explore, in a hands-on manner, multiple functions efficiently, within a simple model and, ideally, in this Level, even within the same visual.
DAX Text Functions: The Extract & Modify Functions
Hands-on practice with the Extract & Modify operational group of the DAX Text functions throughout the next sections will make their respective objectives and operations clearer. You’ll see, within this combined (while comparative, as it suits) exploration of these functions, how each can be easily employed to return data, within the active filter context, to enable you to meet the requirements of clients or employers in the business environment. You’ll get an understanding of the purpose of each function, and gain hands-on insight into how it performs, via measures you’ll construct.
You will:
- Examine the syntax involved in exploiting each function;
- Undertake an illustrative example of the use of each function in a practice exercise;
- Review a discussion of the results you obtain in each of the steps of the practice exercise.
Preparation for the Practice Exercises in this Level
Assuming that you have installed Power BI Desktop (the illustrations in this Stairway Level reflect the November 2025 release), you are ready to download and open the sample Power BI Desktop file that you will use for hands-on practice with the concepts introduced in this Level.
NOTE: The latest version of the Power BI Desktop application is available for free download at www.powerbi.com.
Download Sample Power BI File (.pbix) for Use in this Level
The sample Power BI file for this Level, which you’ll be using for the exercises with the various respective functions, contains fully imported data, and, in subsequent Levels of the ongoing work we accomplish with the DAX Text functions, any pre-existing calculations and visualizations that might be helpful to you in general for the given Level. Calculations created in other Levels of the Text Functions subseries, at least up to the time of your download, will also appear (with a “z_” prefix, so you can follow the steps in the Level directly and create the functions as you proceed, with no regard to the conflict with the originals that are already in place as a reference). You will add the calculations and visualizations that form the focus in this step-by-step Level as you go. At the end of the Text functions sub-series, you will be able to download a fully completed model with all our constituent modeling included.
To complete the exercises in a given Level, I suggest that, working on a blank tab as directed throughout, you complete the steps, and then compare your results with those pre-existing in the sample, as applicable. Using the sample dataset provided will ensure that the results you obtain, in following the detailed steps of the exercises, agree to the results I obtained (and which I have depicted) in writing this Stairway Level.
About the File Download: In the downloaded Power BI model for this Level, three tabs have been created at the bottom, labelled as follows:
- PRACTICE CANVASES ---->
- EXERCISE EXAMPLES ---->
- DAX Text Funcs- Extract & Modify
The first two of these will serve as “dividers” as we progress through the various Levels of the DAX String functions. Each Level will have its own tab, where we will create the Power BI collateral created for functions of the associated Level. The end result will be a complete set of working String functions at the end of the Levels, dedicated to each subset of those functions. We will perform the assembly of working calculations to represent each of the functions over the given Level, always within a page we add for the given .pbix file we download for the Level exercises. The completed Level’s artifacts will then reappear in the downloads for subsequent functions, when beginning the subsequent Level.
The objective is to have a complete set of all the work we have accomplished to date in the Level, as we begin the prospective assembly we undertake in the “current” Level as it is downloaded. The “answer key” for the current and preceding Levels will be available for reference to the right of the “Exercise Examples” tab as we complete the steps in the respective Level lesson. And, finally, once the Level is complete, the entire set functions’ collateral will be available in the download of the final Level model for the DAX string functions.
This approach will likely produce the best learning outcome, as well as future reusability.
Once the sample .pbix file is downloaded, take the following steps to open it in Power BI Desktop.
- Navigate to the file you have downloaded.
- Right-click the file.
- Select File -à Open from the splash dialog that appears, as shown.
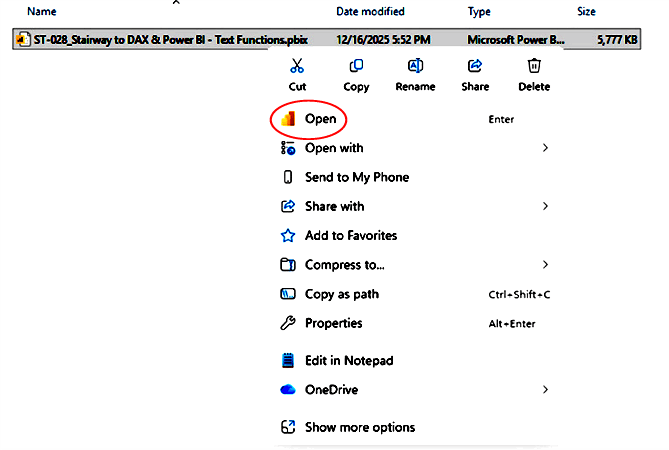
Illustration 2: Select Open on the Splash Dialog that Appears
The .pbix file opens and you arrive within the Report view, which consists of a tab named “EXERCISE EXAMPLES,” primarily as a divider (“current Level” work will go to the left of the divider), as well as solutions for past Text Functions Levels, depending upon the date of your downloading the sample for this Level. As you are likely aware, you can tell you are in the Report view because the current view (of the three views available in the upper left corner, Report, Data, and Model) is indicated by the bar to the left of the icon, with caption appearing with mouseover, as depicted.
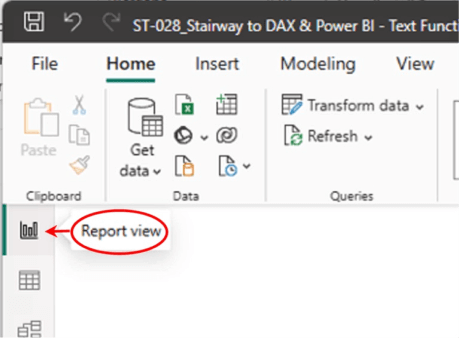
Illustration 3: Report View Indicator …
- Click the Report, Table and Model view icons, as desired, along the upper left frame of the Power BI Desktop canvas, as desired, to become familiar with the sample model.
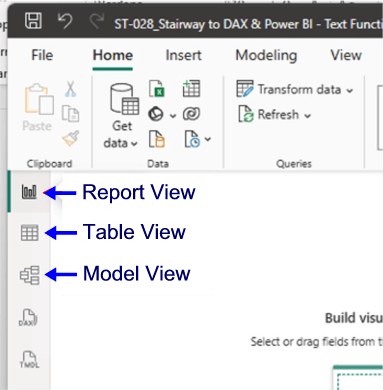
Illustration 4: Other View Options …
- Return to the Report view when ready.
The DAX “Text: Extract & Modify” Functions
In Power BI and DAX modeling, the text data we encounter quite often comes from less-then-pristine, consistently maintained environments. Real-world sources can be messy and inconsistent in nature (emails, product codes, addresses, names, etc.). The DAX Text: Extract & Modify functions provide us the tools we need to turn raw, or less-than-ideal, text into data that is more structured and usable to meet organizational needs and requirements (only a few examples include support for joining tables, creating calculated columns and supporting other calculations, and supporting polished visuals.)
The DAX Text: Extract & Modify functions are designed to extract specified portions of text strings (like substrings / character counts) and to support reshaping the transformation, or other adjustments, of text values for cleaning, analysis, or presentation. These functions enable our precise control over how text data is handled in Power BI models. The Text: Extract & Modify functions go well beyond the simple trimming of text strings - they empower us to manipulate them, enable us to extend our operations with the data we encounter, and / or enable us recast it to better fit our business and other requirements.
I have seen more than one “membership list” for the DAX Text: Extract & Modify functions, and I have compared and contrasted the associated groupings carefully. My reading in several instances leads me to formulate the following membership list for the functions I address in this Level of the Stairway to Dax and Power BI – functions that might arguably belong in this subset of the text functions might also appear to belong in others, depending upon the granularity of function that is used as grouping criteria, among other classification differences. Suffice it to say that all the DAX text functions will find coverage within the various text function Levels, as I define them, and so a reader can remain confident that all will be addressed, under one text function sub-classification or another.
The functions that we will examine in this Level include the following:
- LEFT()
- RIGHT()
- MID()
- REPLACE()
- SUBSTITUTE()
As I have begun to note, generally agreed-upon practical goals of these functions include the following:
- Cleansing: Removing unwanted spaces, correcting case, or standardizing text values.
- Extraction: Pulling out codes, identifiers, or substrings embedded in larger text fields.
- Transformation: Reshaping text into a format suitable for reporting or analysis.
- Validation: Checking lengths or positions to ensure data integrity.
- Presentation: Formatting text for dashboards, making reports more readable.
As I will demonstrate, we can employ the members of the “Text: Extract and Modify” group to achieve numerous common cleansing, extracting and reshaping needs. We will discuss the objectives, syntax, operation and further considerations for each function individually in the respective sections that follow.
Let’s discuss each of the members of the “Text: Extract and Modify” function group individually, each with a brief introduction, and then a look at distinguishing characteristics and specifics.
Preparation and Practice
You can easily gain an understanding of each of the LEFT(), RIGHT(), MID(), REPLACE(), and SUBSTITUTE functions by putting them into action, as we do throughout most of this Stairway, within the compact sample data set I have provided within the downloadable Power BI model. You will work via simple measures you create in Power BI, and be able to gain confidence that the practice measures perform correctly through viewing the results you obtain via a “self-checking” scenario. Because the five functions with which you will be working in this section are identical with regard to input (that is, the measures we create to demonstrate the different outcomes attributable to the application of each respective function to the same text string), you can combine your practice efforts with the group into one Table visual, as you will see.
You’ll begin with a simple reporting requirement: to present results of each of the five functions I have discussed above, based upon a data string you pull into a simple Power BI report. The focus here is to work with naming strings, and not values, so this will be a somewhat simple visual display. First, make sure that the layout of the canvas, with the Build and Data sections to the right of the pane appear as shown:
Illustration 5: Canvas Layout …
Note the presence of the canvas tab, to the right of the tab marked PRACTICE CANVASES, which is labelled DAX Text Funcs - Extract & Modify. It is here that we will complete the practice build of a table throughout this Level.
First, let’s place a Table data region on the canvas.
- Select the DAX Text Funcs - Extract & Modify tab, to the right of the PRACTICE CANVASES
- Click the 1) Build icon (second from the top on the rightmost side of the canvas), and then click-drag the 2) Table visualization icon to drop a table onto the canvas, as depicted in Illustration 6.

Illustration 6: Drop a Table Region onto the Canvas …
Once you have a Table visual in place to house them, you will create five new columns: one each. to demonstrate the operation of the DAX LEFT(), RIGHT(), MID(), REPLACE(), and SUBSTITUTE functions. Adding these measures to the same Table will provide instant visual verification that the functions deliver the appropriate data values in the manner that you expect. Moreover, the fact you’re presenting the calculation output in a Table visualization will allow you to generate and examine multiple outputs in a single view.
Preparation for Our Exploration of the DAX Text: Extract & Modify Functions
To prepare for some hands-on exposure to the DAX Text: Extract & Modify Functions, we’ll work with a single Table visualization, to which we will add member functions as we introduce them so as to contain all functions we meet in the respective Level within a tab of a single Power BI .pbix file – and ultimately a single file that contains all our samples for the entire DAX Text Functions subseries.
Our goal with the next few sections is to generate a table visualization that resembles the one depicted in Illustration 7.
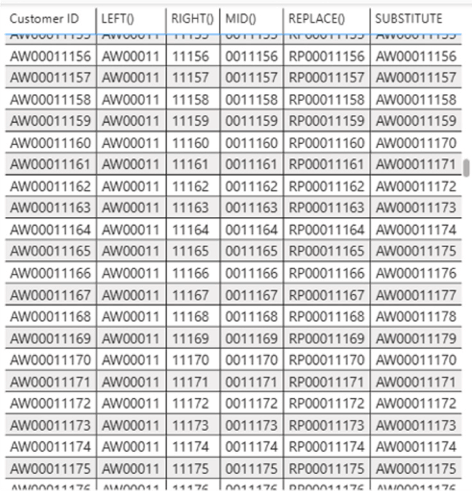
Illustration 7: Our End Objective with the Practice Table …
NOTE: You may be new to the Power BI Table, and want to review its general operations, in connection with my walk through of the atomic steps of constructing the sample Table in the following sections. Here is a good place to start for Table Visualization Details.
Pre-populate the Table Data Region for Display of the Calculations for Columns to Be Created
Let’s initially populate the primary column of the newly added primary table for the end presentation of our calculations using the DAX Text: Extract & Modify Functions.
- With the empty Table still selected, click the empty box titled Add data underneath the Suggestions collection in the Build section (to the right of the Report canvas).
The Suggest a visual dialog box appears to the right of the Table.
- Click the Add Data box in the Columns section underneath the Suggestions box of the Build
- In the Data popup to the left of the Build tab, select Customer> Customer ID as shown in Illustration 8.
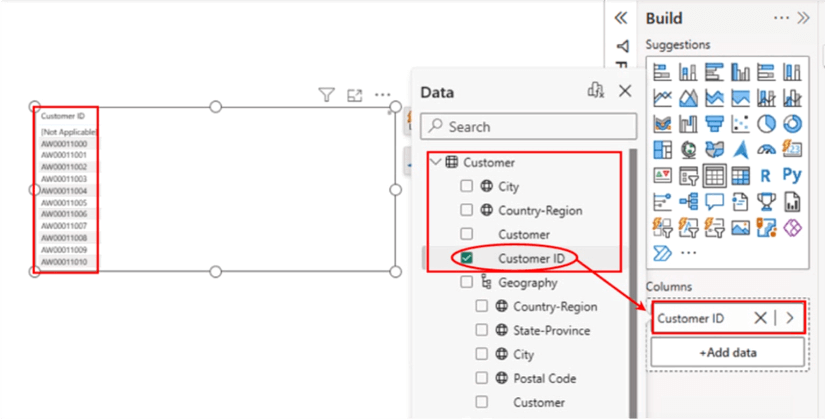
Illustration 8: Select Customer ID to Add to the Table …
The Table is now in place, with Customer ID as the leftmost column, as a later destination for the calculations we assemble. Let’s add a little formatting here, before we appoint the respective DAX calculations to their new homes.
- Right-click into the vacant space of the Table.
- Select Format from the context menu that appears.
The Format settings appear to the far right, as depicted in Illustration 9.
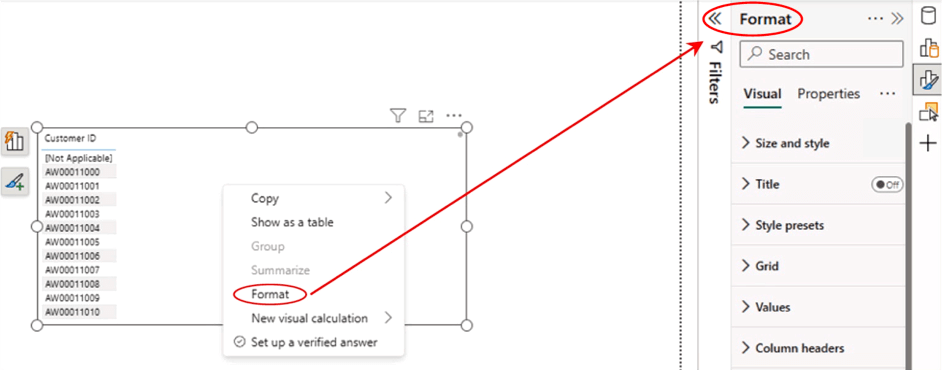
Illustration 9: The Expanded Format Settings
- Click the carat (“>” ) symbol to the left of the Values tab, within the Format settings we have opened, then click the carat to the left of the Values tab that appears underneath it, to open the Visual Values properties settings.
- Within the top setting in the list that appears, select Font, leave the setting at Sego UI, and increase the size to “11.”
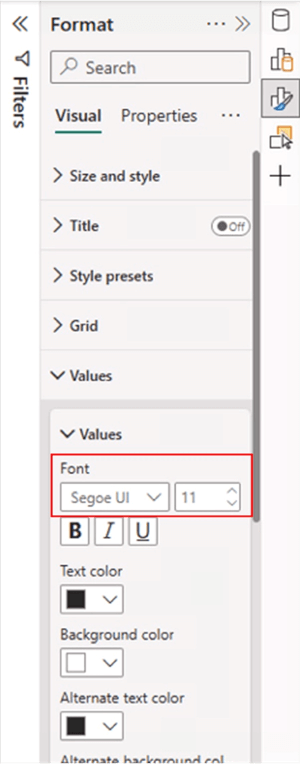
Illustration 10: Exposing the Visual Values Settings …
- Click the carat (“>” ) symbol to the left of the upper Values tab, once again, to collapse the Values section within the Format settings we have opened.
- Click the carat (“>” ) symbol to the left of the upper Grid
- Click each of the carat (“>” ) symbols to the left of each of the Horizontal and Vertical gridlines.
- Turn “On” both Horizontal and Vertical gridlines, as shown.
- Set the Color of each of the two settings to Black.
- Ensure a Width of “1” for each.
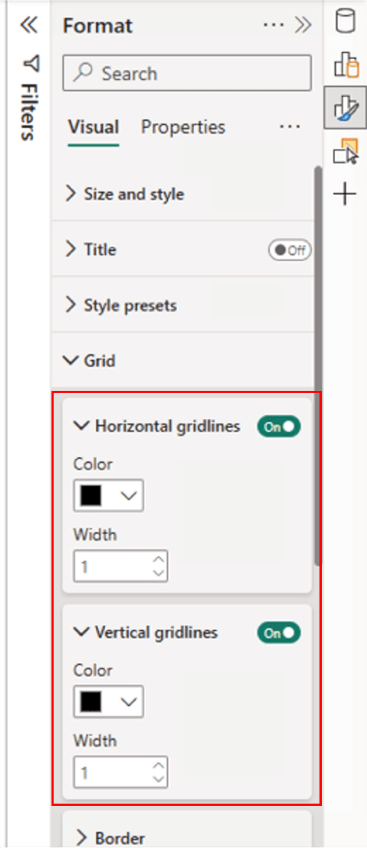
Illustration 11: Turn On and Set the Horizontal and Vertical Gridlines …
- Click each of the carat (“>” ) symbols to the left of each of the Horizontal and Vertical gridlines to close them.
- Click the carat (“>” ) symbol to the left of the upper Grid tab, once again, to close the Grid
Having created a simple Table to present the results of our work in this Level, we are ready to proceed to the creation of columns to illustrate the operation of the selected DAX functions in a side-by-side setting. Our next focus will be to put the “Text: Extract and Modify” functions to work, using a string of text, Customer ID, that we have selected as the basis for our examination of the use of the following DAX functions:
- LEFT()
- RIGHT()
- MID()
- REPLACE()
- SUBSTITUTE()
To this end, we’ll devote an “explore and practice” subsection to each function, within which we examine the operational details behind individual members of the “Text: Extract and Modify” group. Then, within each respective subsection, we will undertake a quick, hands-on Power BI walkthrough for the respective function, as we put it to use in the table we have created.
Let’s position ourselves, at this point, to create calculations to demonstrate the operation of the DAX “Text: Extract and Modify” functions.
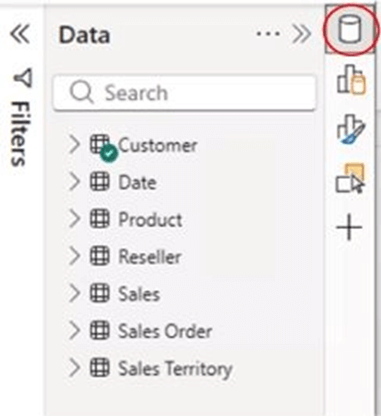
- Click the top right “Data” icon to open the Data selection pane, as shown in Illustration 12.
- Click the carat (“>”) to the left of the Customer table entry, to expose the columns therein, as depicted in Illustration 13.
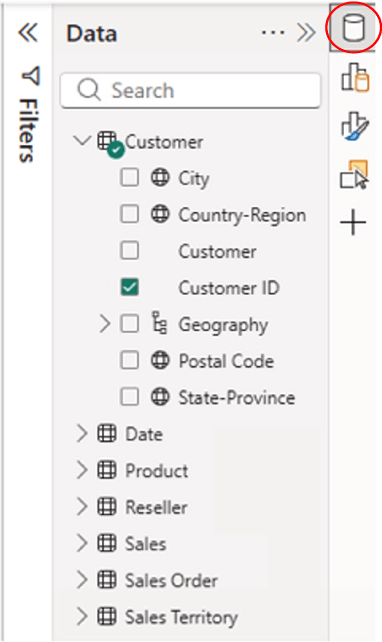
Illustration 13: Customer Table Columns
From here we will be adding one calculation per function member of the “Text: Extract and Modify” group.
One-on-One with the DAX Text: Extract & Modify Functions
Let’s get started with the LEFT() function, and perform the same series of steps for each thereafter.
The LEFT() Function
Purpose: To extract a specified number of characters from the beginning (left side) of a text string.
DAX Syntax
LEFT(<text>, <num_chars>)
<text> - The string containing the characters we wish to extract, or a reference to a column containing text
<num_chars> - OPTIONAL The number of characters targeted for extraction from the left (or start) side of the string. (default value is 1, and must be a positive integer)
Return Value: The requested number of characters from the start / left of a text string.
Further Remarks and Considerations – LEFT()
- DAX LEFT() works with Unicode, simultaneously storing all characters as the same length. (A single
- The DAX LEFT() function is not supported for use in DirectQuery mode within row-level security (RLS) rules or within calculated columns.
The LEFT() Function in Action
Returning to the sample Power BI model that we began to prepare above, let’s create a calculation that gives us desired output to meet a sample business need.
LEFT(): The Business Need
The business need at hand involves a “reduction” of the CustomerID: That is, we have a need to limit the existing CustomerID to the first seven characters only, to meet a client need. The client will use this new character set as a subgrouping key upon which they will perform analysis of various sorts.
Meeting the Business Need with LEFT()
To perform the requested “character set reduction,” we will apply the DAX LEFT() function, which, as we have learned earlier in this section, will extract the numbers we designate. Let’s see how this works by performing the operation within the Table visualization as we have left it in the Report View.
- Click the carat (“>”) to the left of the Customer table in the Data area on the right side of the Data view. The Customer table opens, and contains the Customer ID column that we will be working with throughout this Level. The column will ultimately also contain one string each for the DAX “Text: Extract and Modify” functions that comprise the focus of this Level.
- Right-click the Customer table in the Data area, and select New Column from the context menu that appears, as depicted in Illustration 14.
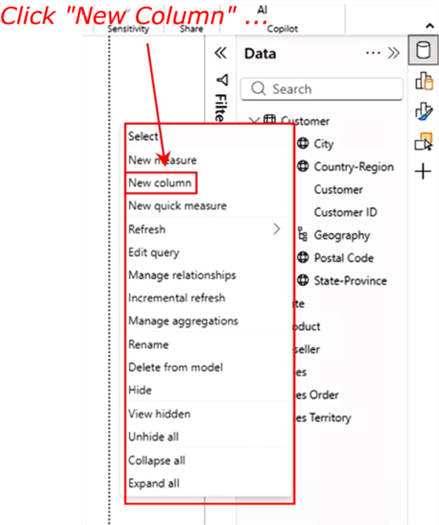
Illustration 14: Beginning the Creation of a New Column …
A new column (named “Column,” by default) appears, within the exploded Customer table, whose columns appear as shown. This column has been created to house the output of the calculation we will input. Moreover, the calculation editor has appeared atop the canvas. It is here that we will define the new calculated column. NOTE: If the calculation editor does not appear / disappears, simply single-click the new Column column, and the editor will return to view, as shown in Illustration 15.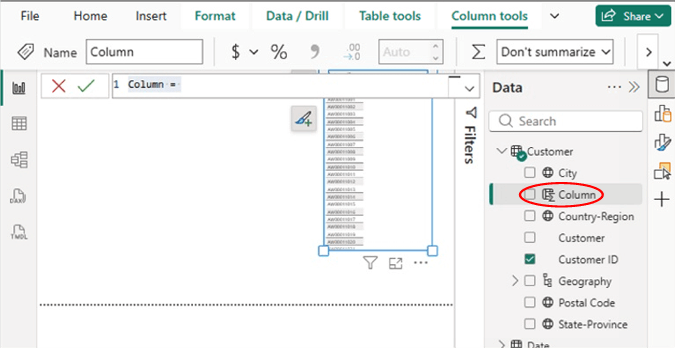

Illustration 15: Creation of a New Column …
- Type (or cut and paste) the following DAX, into the place of the Column = ,
LEFT() = LEFT(Customer[Customer ID],7)
in the formula bar.
- Click the green check symbol to the left of the formula, once it is added. The new LEFT() column appears underneath the Customer table within the Data view. Other settings reset automatically at this point, as system detections are made, etc. The calculation appears in the editor as depicted:
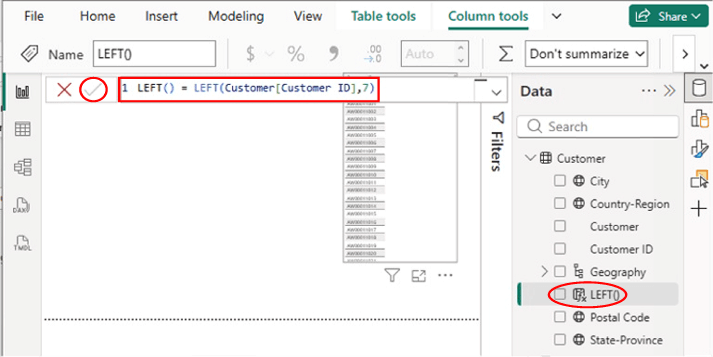
Illustration 16: Creating a Calculation Using LEFT() …
- Place an “X” in the checkbox next to the new LEFT() column that now appears among the Customer table members. Once the “X” is placed in the checkbox, we see the intended DAX results appear in the Table visualization, as shown:
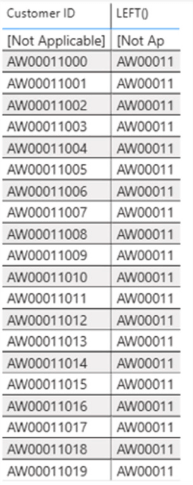
Illustration 17: The Business Requirement is Met via a Calculation Using LEFT() (Partial view)
NOTE: If you don’t see the column titles, touch the table, and click the Add or remove visual elements button to turn them on …)
We can easily see that the new calculation has accomplished its defined objective, and that the new LEFT() column is populated by a string that consists of the first (“from the front”) seven characters in the Customer ID.
Let’s examine the RIGHT() function next.
The RIGHT() Function
Purpose: To extract a specified number of characters from the end (right side) of a text string.
DAX Syntax
RIGHT(<text), <num_chars>)
<text> - The string containing the characters we wish to extract, or a reference to a column containing text
<num_chars> - OPTIONAL The number of characters targeted for extraction from the right / end side of the string. (default value is 1, and must be a positive integer)
Return Value: The requested number of characters from the end / right of a text string.
Further Remarks and Considerations – RIGHT()
- Whether single- or double-byte, RIGHT() always counts each character as 1, regardless of the default language setting.
- The RIGHT() function is not supported for use in DirectQuery mode within row-level security (RLS) rules or within calculated columns.
The RIGHT() Function in Action
Returning to the Power BI model that we began to set up above, let’s create a calculation that gives us desired output to meet a sample business need.
RIGHT(): The Business Need
The business need at hand, like the one we met for the RIGHT() function above, involves a “reduction” of the CustomerID: This time, we have a need to limit the existing CustomerID to the last five characters only, to meet a client need. The client will use this new character set as another subgrouping key upon which they will perform analysis of various sorts.
Meeting the Business Need with RIGHT()
To perform the requested character set reduction, we will apply the DAX RIGHT() function, which, as we have learned earlier in this section, will extract the characters we designate. Let’s see how this works by performing the operation within the model itself.
- Right-click the Customer table in the Data area, once again, and select New Column from the context menu that appears, as we did in our exercise with the LEFT() function earlier. The calculation editor appears, with the default text Column =, and a new column to house the output of the calculation in the Data pane, among the Customer table columns, as we saw in our steps with the LEFT() function.
- Type (or cut and paste) the following DAX into the calculation editor, in the place of the Column = text, into the formula bar:
RIGHT() = RIGHT(Customer[Customer ID],5)
The calculation appears in the editor as depicted:

Illustration 18: Creating a Calculation Using RIGHT() …
- Click the green “check” sign to the immediate left of the formula bar, once again.
- Place an “X” in the checkbox next to the new RIGHT() calculation that appears in the Data
- Once the green “check” arrow is pressed, we see the intended DAX results appear in the new RIGHT() column, as shown:
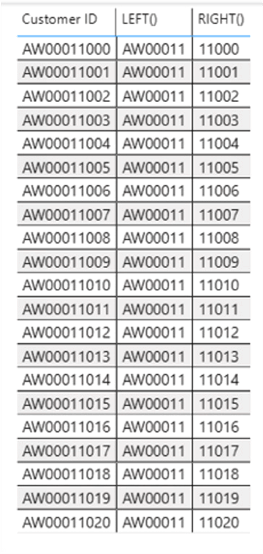
Illustration 19: The Business Requirement is Met via a Calculation Using RIGHT() …
The new calculation appears to have accomplished its defined objective, leaving the new RIGHT() column populated by a string that consists of the “five characters from the end” in the Customer ID.
Let’s examine the MID() function next.
The MID() Function
Purpose: To extract a specified number of characters from the middle of a text string, given a specified starting position and length.
DAX Syntax
MID(<text), <start_num>, <num_chars>)
<text> - The string containing the characters we wish to extract, or a reference to a column containing text
<start_num> - The position of the first character whose extraction is targeted. (Positions start at 1.)
<num_chars> - The number of characters targeted for return.
Return Value: A text string of the specified length.
Further Remarks and Considerations – MID()
- DAX works with Unicode, simultaneously storing all characters as the same length.
The MID() Function in Action
Let’s create another calculation that gives us an output to meet another sample business need.
MID(): The Business Need
The business need at hand, like those we met for the LEFT() and RIGHT() functions above, involves yet another “reduction” of the CustomerID. This time, we have a need to limit the existing CustomerID to several middle characters only, to meet a client need. The client will use this new character set as another subgrouping key upon which they will perform analysis of various sorts.
Meeting the Business Need with MID()
To perform the requested character set changes, we will apply the DAX MID() function, which, as we have learned earlier in this section, will extract the characters we designate. Let’s see how this works by performing the operation within the model itself.
- Right-click the Customer table in the Data area, once again, and select New Column from the context menu that appears, as we did in our exercise with the RIGHT() function earlier.
The calculation editor appears, with the default text Column =, and a new column to house the output of the calculation in the Data pane, among the Customer table columns, as we saw in our steps with the RIGHT() function.
- Type (or cut and paste) the following DAX into the calculation editor, in the place of the Column = text:
MID() = MID(Customer[Customer ID], 4, 7)
into the formula bar, ensuring that you click the green “check” sign to the immediate left of the formula bar, as shown, once completed. Other settings reset automatically at that point, as system detections are made, etc.
The calculation appears in the editor as depicted:

Illustration 20: Creating a Calculation Using MID() …
- Click the green “check” sign to the immediate left of the formula bar, once again.
- Place an “X” in the checkbox next to the new MID() calculation that appears in the Data pane.
- Once the green “check” arrow is pressed, we see the intended DAX results appear in the new MID() column, as shown:
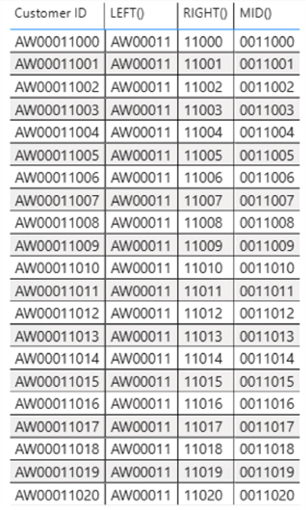
Illustration 21: The Business Requirement is Met via a Calculation Using MID() …
We can again easily see that the new calculation has accomplished its defined objective, and that the new MID() column is populated by a string that consists of the characters at a point in the “middle” of a string, given a starting position (“4) and length (“7”), within the Customer ID.
Next, let’s leverage the REPLACE() function.
The REPLACE() Function
Purpose: To replace a part of a text string with a different text string, based upon the number of characters specified.
DAX Syntax
REPLACE(<old_text>, <start_num>, <num_chars>, <new_text>)
<old_text> - The string containing the characters we wish to replace, or a reference to a column containing text.
<start_num> - The position of the character within <old_text> that we wish to replace with <new_text>.
<num_chars> - The number of characters targeted for replacement. (Important: If the argument, <num_chars>, is blank, or references a column that evaluates to a blank, the string for <new_text> is inserted at the position, <start_num>, without any character replacement.)
<new_text> - The replacement text for the characters that have been specified in <old_text>.
Return Value: The specified text string.
Further Remarks and Considerations – REPLACE()
- DAX works with Unicode, simultaneously storing all characters as the same length.
- The REPLACE() function is not supported for use in DirectQuery mode within row-level security (RLS) rules or within calculated columns.
The REPLACE() Function in Action
Let’s create another calculation that gives us an output to meet another sample business need.
REPLACE(): The Business Need
The business need at hand, unlike those we met with the LEFT(), RIGHT() and MID() functions above, involves, not a “reduction” of the CustomerID, but a complete replacement of a subset of characters within it. In the instances where the REPLACE() function comes in handy, we have a need to replace a part of a full text string with a different text string – a part that we can describe as a given number of contiguous characters within that full character set.
We supply a substring (the “old” string that contains characters targeted for replacement) – or a reference to a column containing that text – and follow that with a start number within the “old” string that contains the characters we wish to replace, followed by the “number of characters” we want to replace. This “number of characters to change is then followed in the REPLACE() function by its last element, the “new” text which we wish to exchange for the characters we have specified in the “old” text we have referenced first within the function.
Meeting the Business Need with REPLACE()
To perform the requested character set replacement, we will apply the DAX REPLACE() function, which, as we have learned earlier, will replace a part of a text string with a different text string than what is already there, based upon the number of characters we specify. We’ll see the REPLACE() function in action, as we have done with the earlier functions, by performing the operation within the training model itself.
- Right-click the Customer table in the training sample Data area, once again, and select New Column from the context menu that appears, as we did in our exercise with the LEFT(), RIGHT(), and MID() functions earlier.
Once again, the calculation editor appears, along with a new column to house the output of the calculation we will input, which appears to the right of the existing Customer table columns, as we saw in our steps with the LEFT(), RIGHT(). and MID() functions.
- Type (or cut and paste) the following DAX into the calculation editor, in the place of the Column = default:
REPLACE()= REPLACE('Customer'[Customer ID],1,2,"RP")The calculation appears in the editor as depicted:

Illustration 22: Creating a Calculation Using REPLACE() …
- Click the green “check” sign to the immediate left of the formula bar, once again.
- Place an “X” in the checkbox next to the new REPLACE() calculation that appears in the Data pane.
Once the “X” is placed in the checkbox, we see the newly updated DAX results appear in the new REPLACE() column, as shown:
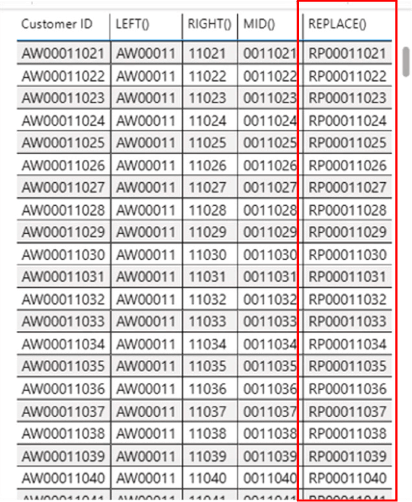
Illustration 23: The Business Requirement is Met via a Calculation Using REPLACE() …
The new calculation has accomplished its mission, and the new REPLACE() column is populated by a string that “swaps out” the first two letters of the CustomerID string (the formula instructs, “for the CustomerID string, starting with position 1 and given a length of two characters …” which, in this simple example equates to the old starting letters of “AW”) replace these two letters with the letters RP.” (I chose the two letters to make the action of REPLACE() obvious for purposes of the exercise.)
Finally, let’s examine the SUBSTITUTE() function next to conclude our introduction to the Extract & Modify functions.
The SUBSTITUTE() Function
Purpose: To replace existing text with new text in a text string.
DAX Syntax
SUBSTITUTE(text>,<old_text>,(new_text>),<instance_num>)
<text> - The text containing the characters we wish to substitute, or a reference to a column containing text.
<old_text> - The existing text we wish to replace.
<new_text> - The text with which we wish to replace the <old_text>.
<instance_num> - OPTIONAL The characters of <old_text> targeted for replacement. (NOTE: If the argument is omitted, every occurrence of <old_text> is replaced.
Return Value: The specified string of text
Further Remarks and Considerations – SUBSTITUTE()
- Use the SUBSTITUTE() function for replacing specific text in a text string. Use REPLACE() when the need is to replace text of variable length that occurs in a specific location within a targeted text string,
- SUBSTITUTE() is case-sensitive. SUBSTITUTE() will not replace <old_text> if the case does not match between <text> and <old_text>.
- The SUBSTITUTE() function is not supported for use in DirectQuery mode within row-level security (RLS) rules or within calculated columns.
The SUBSTITUTE() Function in Action
Let’s create a calculation that gives us an output to meet a sample business need that we can meet with SUBSTITUTE(), the last of the Extract & Modify Functions that comprise this Level.
SUBSTITUTE(): The Business Need
Use the SUBSTITUTE() function for replacing specific text in a text string.
To distinguish SUBSTITUTE() and REPLACE(), once again:
- REPLACE() is most useful for replacing text of variable length that can be isolated to a specific location within a targeted text string.
- The power of the SUBSTITUTE() function lies within its capability to replace specific text in a text string.
REPLACE() therefore replaces text based upon its position, whereas SUBSTITUTE() replaces specific text based upon the position of that text. Moreover, we have the option of specifying the characters of the old text targeted for replacement – if we omit the related instance number, every instance of old text is replaced.
Meeting the Business Need with SUBSTITUTE()
To perform the requested character set substitution, we will apply the SUBSTITUTE() function, which, as we have learned earlier, will replace a part of a text string with a different text string naming the text containing the characters we seek to substitute (or a column to which we refer that contains same text). We then specify the existing old text that is to be replaced, following that with a reference to the new text we want to replace the old text.
We’ll see the SUBSTITUTE() function in action, as we have done with the earlier functions, by performing the operation within the model itself.
- Right-click the Customer table in the training sample Data area, once again, and select New Column from the context menu that appears, as we did in our exercise with the LEFT(), RIGHT(), MID(), and REPLACE() functions earlier.
Once again, the calculation editor appears, along with a new column to house the output of the calculation we will input, which appears to the right of the existing Customer table columns, as we saw in our steps with the LEFT(), RIGHT(), MID and REPLACE() functions.
- Type (or cut and paste) the following DAX into the calculation editor, in place of the Column =
SUBSTITUTE = SUBSTITUTE('Customer'[Customer ID], "116","117",1)
into the formula bar, as usual ensuring that you click the green “check” sign to the immediate left of the formula bar, as shown, once completed.
With the above formula in the calculation editor, we are asking to create a calculated column that substitutes a value (named SUBSTITUTE() that, operating upon the Customer ID data column, replaces the digits “116” in the existing (“old”) CustomerID text with the digits “117” in the “new” (replacement) value.
The calculation appears in the editor as depicted:

Illustration 24: Creating a Calculation Using REPLACE() …
- Click the green “check” sign to the immediate left of the formula bar, once again.
- Place an “X” in the checkbox next to the new SUBSTITUTE() calculation that appears in the Data
Once the “X” is placed in the checkbox next to the new SUBSTITUTE() calculation, we see the intended DAX results appear in the new SUBSTITUTE() column, as shown:
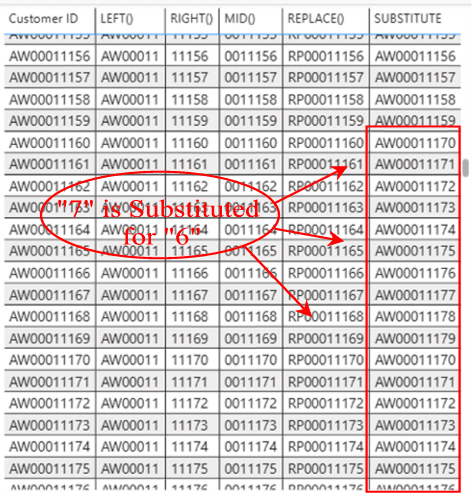
Illustration 25: The Business Requirement is Met via a Calculation Using SUBSTITUTE() …
The new calculation has accomplished its mission, and the new SUBSTITUTE() column is populated by a string that substitutes the substring of “117” for any substring in the Customer ID that was initially “116” in its original position of the CUSTOMER ID, regardless of the internally relative position within which the substring occurs. . (This might mean duplicating other IDs, in this simple customer data instance – not likely to be desirable in the real world - but my example here is only to demonstrate how the function works …)
Stairway Level Summary
This Level of the Stairway to DAX and Power BI is part of a subseries devoted to the DAX Text Functions subseries, within which I typically introduce multiple DAX functions – grouping functions, where practical, that are similar in operation in some ways, so as to condense explanations and to encourage comparison / contrast. In this case, we began the DAX Text Functions with the Extract & Modify Functions, where we introduced the LEFT(), RIGHT(). MID(), REPLACE(), and SUBSTITUTE() functions, where we followed our typical approach of discussing the general purpose and operation of each and then putting the respective functions to work within a Power BI model to meet needs similar to those we might encounter in the business environment.
As part of this introduction, we examined the syntax involved with each function, and then constructed an illustrative example of the use of the function in a simple practice exercise. Finally, with the examples we undertook, we generated a self-validating results dataset to obtain a little hands-on experience with each function, and to ensure accuracy and completeness of the results output by the calculation we constructed to contain each.