

Introduction
The world of IT infrastructure is fast changing with the introduction of cloud offerings. Although the Azure/AWS portals make life easier but imagine if you have to provision multiple resources. You will spend entire day clicking and that will lead to human errors. This is where provisioning resources using templates/code makes it error free and repeatable. Imagine having a set of code which can be changed and deployed multiple times. We will learn about Terraform in this article and use it to deploy Azure SQL Database.
Infrastructure as Code
Infrastructure as Code (IaC) is the management of infrastructure (networks, virtual machines, load balancers, and connection topology) in a descriptive model, using the same versioning as a DevOps team uses for source code. An IaC model generates the same environment every time it is applied.
In this article, we will use Terraform to deploy Azure SQL Database along with a Failover Group configuration.
What is Terraform?
Terraform is the infrastructure as code offering from HashiCorp. It is a tool for building, changing, and managing infrastructure in a safe, repeatable way. Operations and Infrastructure teams can use Terraform to manage environments with a configuration language called the HashiCorp Configuration Language (HCL) for human-readable, automated deployments.
In this article we will deploy Azure SQL Database with a Failover configuration using Terraform. The things we will cover are:
- Setup our development area in Azure cloud shell
- Understand how Terraform works
- Run our code and deploy Azure SQL Database with Auto-Failover group
- Connect and test both Primary and Secondary logical SQL Server
- Failover and test functionality
Pre-requisites
- An Azure Subscription.
- A basic understanding of Azure SQL Database.
- Basic Azure infrastructure understanding.
- Basic coding knowledge.
HashiCorp Terraform is installed by default in the Azure Cloud Shell. The Cloud shell can be run standalone, or as an integrated command-line terminal from the Azure portal. We will use the Azure Cloud shell for our development and deployment.
Let’s begin. First, login into Azure portal and launch the Azure cloud shell. The red box in Figure 1 shows how to launch the Cloud Shell.

Figure 1 - Launching the Cloud Shell
Next we will set up a new directory and check the default Terraform version. We will create a new directory, terraformdemo, and then make it our current directory to be used with this code:
ram@Azure:~$ pwd

/home/ram

ram@Azure:~$ mkdir terraformdemo

ram@Azure:~$ ls

clouddrive databrickscli main.tf terraformdemo terraform.tfstate terraform.tfstate.backup

ram@Azure:~$ cd ./terraformdemo

ram@Azure:~/terraformdemo$ ls

ram@Azure:~/terraformdemo$
Figure 2 shows the results of this code.
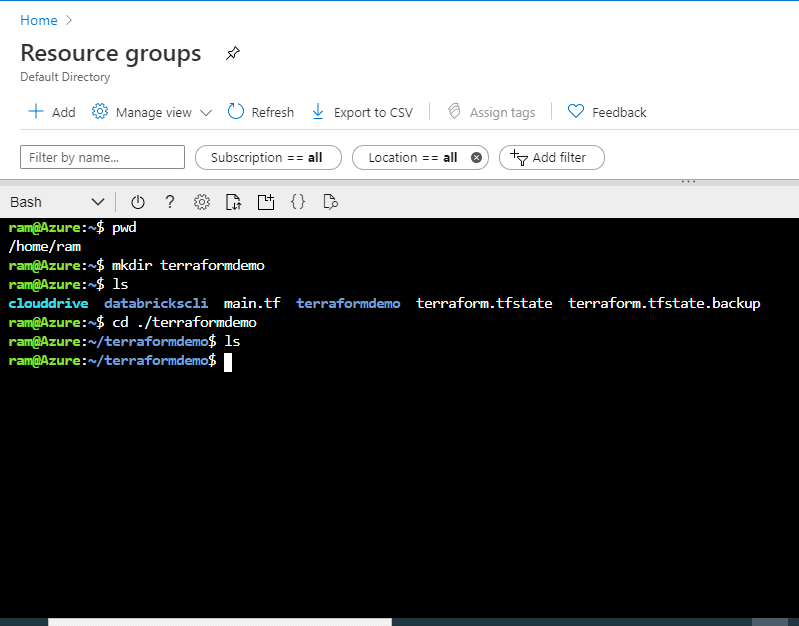
Figure 2 - Creating a new directory
Now we verify Terraform in the Cloud Shell by running ‘terraform version’. We see this in Figure 3.
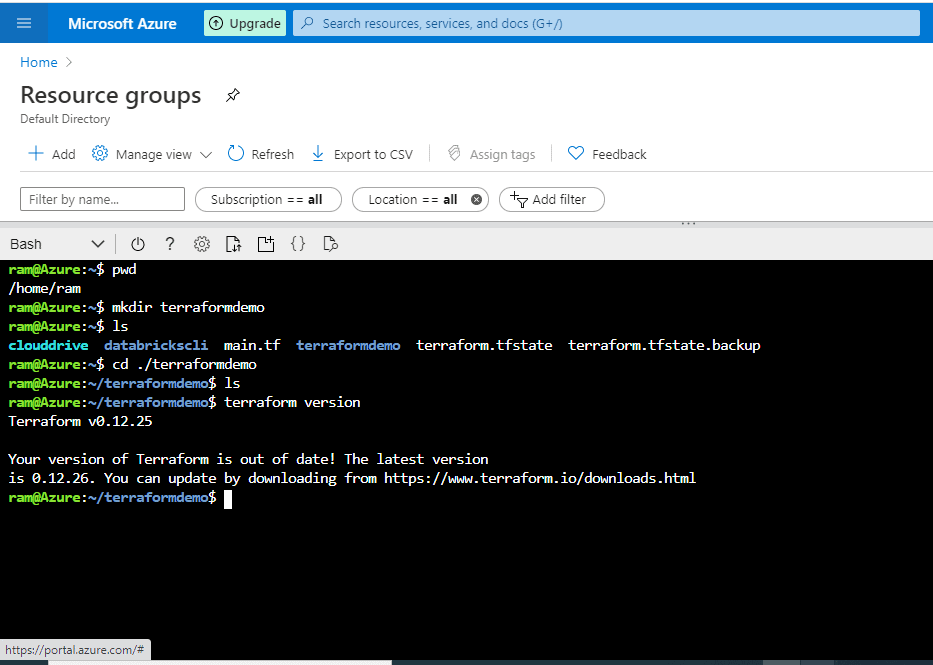
Figure 3 - Verifying the Terraform version
Note : Our Code is based on Terraform 0.12, which brought in a lot of improvements to the configuration language. Terraform 0.11 and earlier had a different syntax and style of coding. For more information, read these documents:
- https://www.terraform.io/docs/configuration/index.html
- https://www.terraform.io/upgrade-guides/0-12.html
Now that we have completed the basics, we can start with our code and deployment. Simply type ‘ code . ‘ and press enter. This will open a Visual Studio Code styled built in editor, as shown in Figure 4.
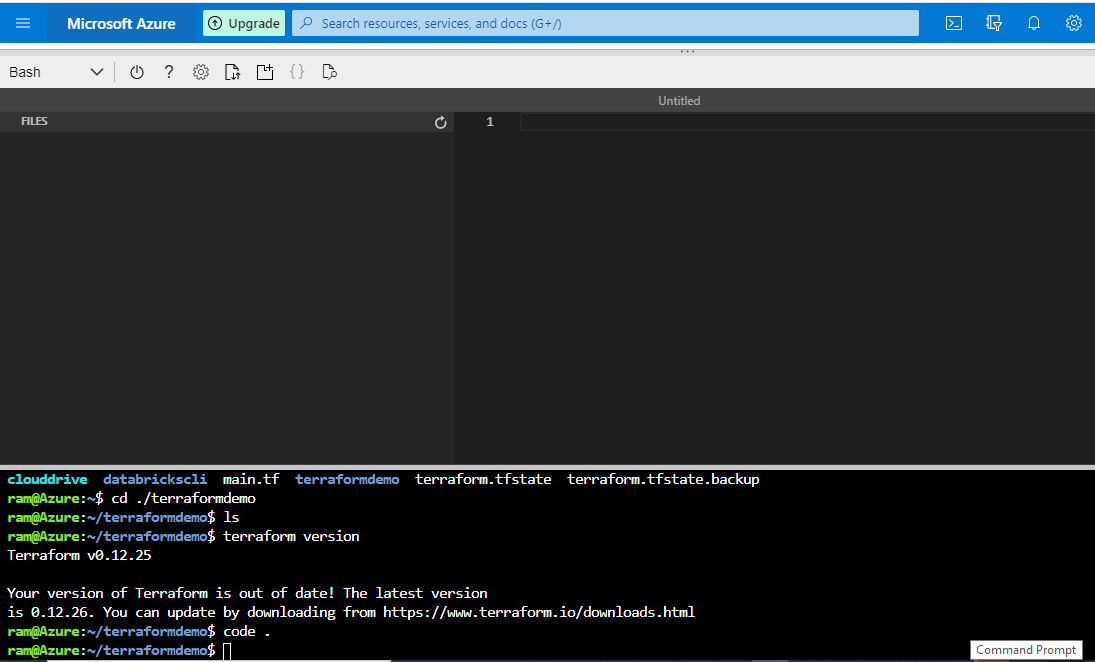
Figure 4 - Launching the built in editor
Right now, we do not have any files here, but we will start to add some.
The Basic Components of Terraform
The set of files used to describe infrastructure in Terraform is known as a Terraform configuration.
Configuration files can be in either of two formats: HashiCorp Configuration Language (HCL), or JSON. HCL format files have a .tf extension. JSON is sometimes preferable when configurations are generated by a machine. JSON files have a .tf.json extension.
Providers
Terraform can configure resources across multiple clouds. For example, a single configuration can span both Azure and AWS. In such cases, there needs to be a way for Terraform to know how to manage each cloud. This is where cloud providers come in. Each cloud provider can have a provider block present in the configuration.
Example :
provider "azurerm" {

version = "~>1.32.0"

}
Resources
A resource block defines the desired state for a given resource within the infrastructure. A resource block has two string parameters before opening the block: the resource type (first parameter) and the resource name (second parameter). The combination of the type and name must be unique in the configuration.
resource "azurerm_resource_group" "rg" {

name = "myTFResourceGroup"

location = "westus"

}
Terraform State
Terraform state is essential for managing changes to infrastructure over time. It is necessary to preserve the state file for the entire life cycle of the resources. For that reason (and others), it is recommended that you use a remote backend to save state in centralized, secure storage.
State file is extremely important, and Terraform cannot function without it. The state file keeps track of the all managed resources and their associated properties with current values. We will have a look at it during our planning stage.
Now that we know basics of all the requirements and their role, lets start with our deployment.
Getting ready with our code
Open your browser and check your current public IP address. Note this down as we will use it to whitelist our logical SQL Server. In this case, my public IP address is 90.195.58.138, as you can see in Figure 5.
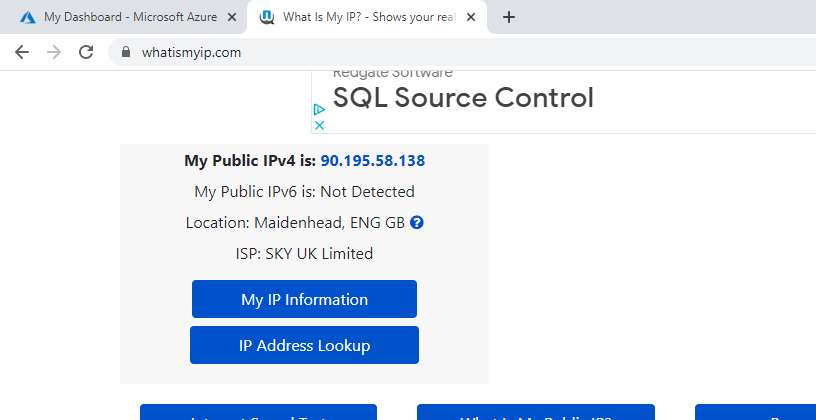
Figure 5 - getting my public IP address
Create a file and name it, main.tf, in our directory, /home/ram/terraformdemo. You can either use the GUI or just the terminal by executing this code, touch main.tf.
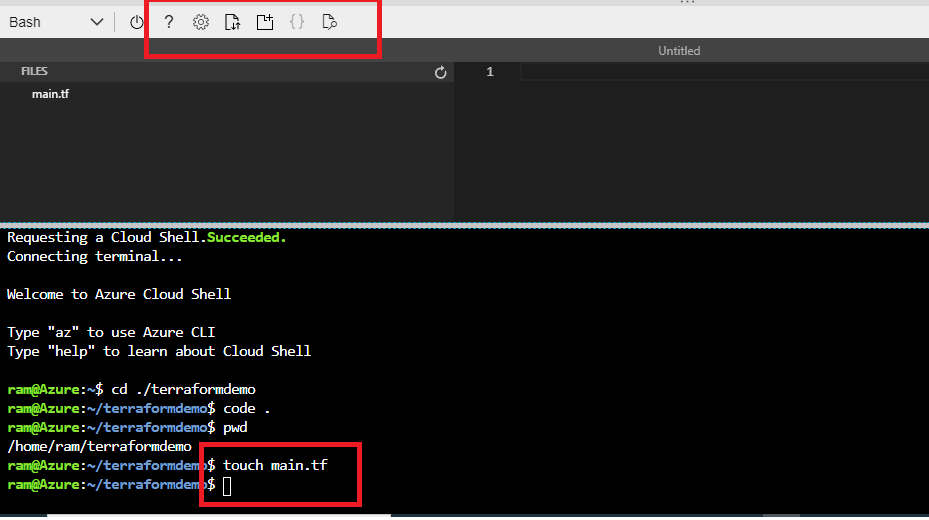
Figure 6 - creating a new file
Copy-paste the code below into this file and save it. Things you need to edit in your copy:
- Administrator_login_password : Enter a strong password for the admin login
- start_ip_address : Your own public IP
- end_ip_address : Your own public IP
- Logical sql server name : This must be unique.
- Location : The Azure region of your choice
The below code is a very basic setup and can be tweaked as per your requirement. HCL is declarative and can be understood as you go through this example. A few things to note while reading the code:
- Commenting in Terraform can be done in 3 ways (~,/* */, //)
- The provider block specifies which cloud provider will be used.
- Each resource has specific properties and keywords to define itself.
#Provider block

provider "azurerm" {

features {}

}

#This is the Resource group ,resource block

resource "azurerm_resource_group" "terraform_rg" {

name = "terraform_rg"

location = "northeurope"


}

#SQL Database ,resource block

# Primary logical sql server

resource "azurerm_sql_server" "primary" {

name = "sql-primary-07042020"

resource_group_name = azurerm_resource_group.terraform_rg.name

location = "northeurope"

version = "12.0"

administrator_login = "sqladmin"

administrator_login_password = "xxxxxxxx"

}

# Firewall setting for primary sql server

resource "azurerm_sql_firewall_rule" "firewall-primary" {

name = "FirewallRule1"

resource_group_name = azurerm_resource_group.terraform_rg.name

server_name = azurerm_sql_server.primary.name

start_ip_address = "90.195.58.138"

end_ip_address = "90.195.58.138"

}

# Secondary logical sql server

resource "azurerm_sql_server" "secondary" {

name = "sql-secondary"

resource_group_name = azurerm_resource_group.terraform_rg.name

location = "westeurope"

version = "12.0"

administrator_login = "sqladmin"

administrator_login_password = "xxxxxxxx"

}

# Firewall setting for secondary sql server

resource "azurerm_sql_firewall_rule" "firewall-secondary" {

name = "FirewallRule1"

resource_group_name = azurerm_resource_group.terraform_rg.name

server_name = azurerm_sql_server.secondary.name

start_ip_address = "90.195.58.138"

end_ip_address = "90.195.58.138"

}

#Azure SQL Database to be created on Primary

resource "azurerm_sql_database" "sql-database" {

name = "sql-prod-db"

resource_group_name = azurerm_sql_server.primary.resource_group_name

location = azurerm_sql_server.primary.location

server_name = azurerm_sql_server.primary.name

requested_service_objective_name = "Basic"

}

#The Failover group setup using the 2 logical sql server and adding the sql database into it.

resource "azurerm_sql_failover_group" "failovergroup" {

name = "ramifailovergroup"

resource_group_name = azurerm_sql_server.primary.resource_group_name

server_name = azurerm_sql_server.primary.name

databases = [azurerm_sql_database.sql-database.id]

partner_servers {

id = azurerm_sql_server.secondary.id

}

read_write_endpoint_failover_policy {

mode = "Automatic"

grace_minutes = 60

}

}
You can see this in my editor in Figure 7.
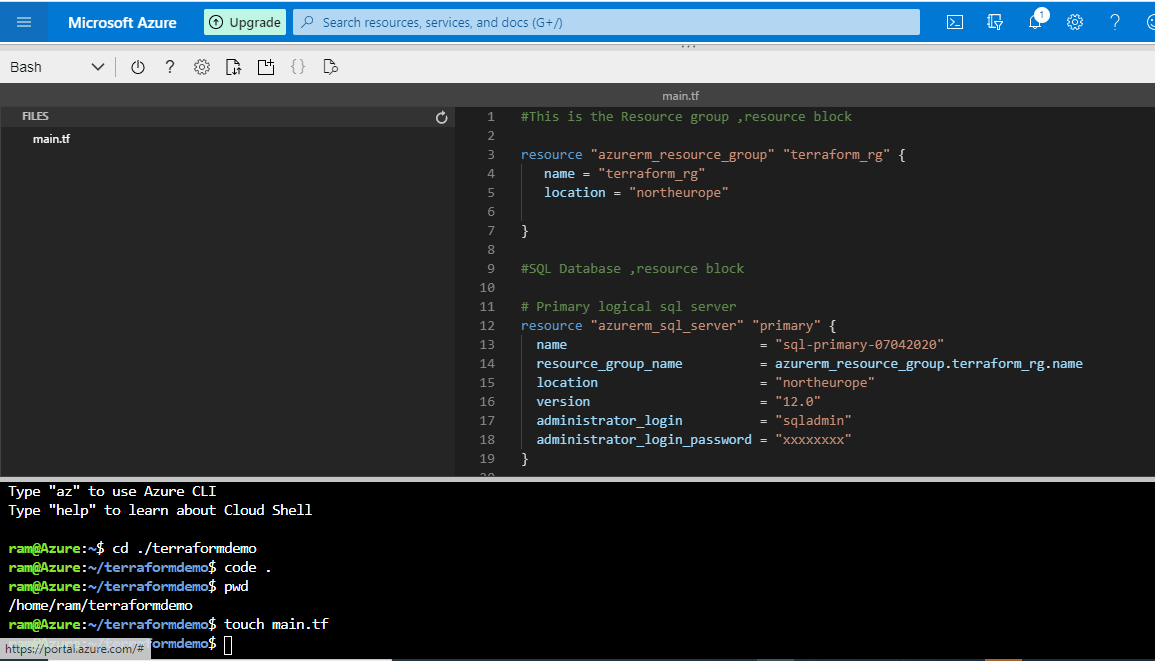
Figure 7 - entering the configuration in the file
Terraform Commands
Terraform is controlled via a very easy to use command-line interface (CLI) and is only a single command-line application, terraform. This application then takes a subcommand, such as “init”, "apply" or "plan".
All the various commands are well documented and can be found here: https://www.terraform.io/docs/commands/index.html
There are a lot of Terraform commands, however, we will use just 4 of them in this demo.
- init : The Terraform init command initializes a working directory containing Terraform configuration files
- plan: The Terraform plan command creates an execution plan.
- apply: The Terraform apply command applies the changes required to reach the desired state of the configuration, or the pre-determined set of actions generated by a Terraform plan execution plan
- destroy: The Terraform destroy command deletes the Terraform-managed infrastructure.
Running our code
A quick check to make sure the resource group that we are about to create doesn’t exist, with a search of Resource Groups in Azure.
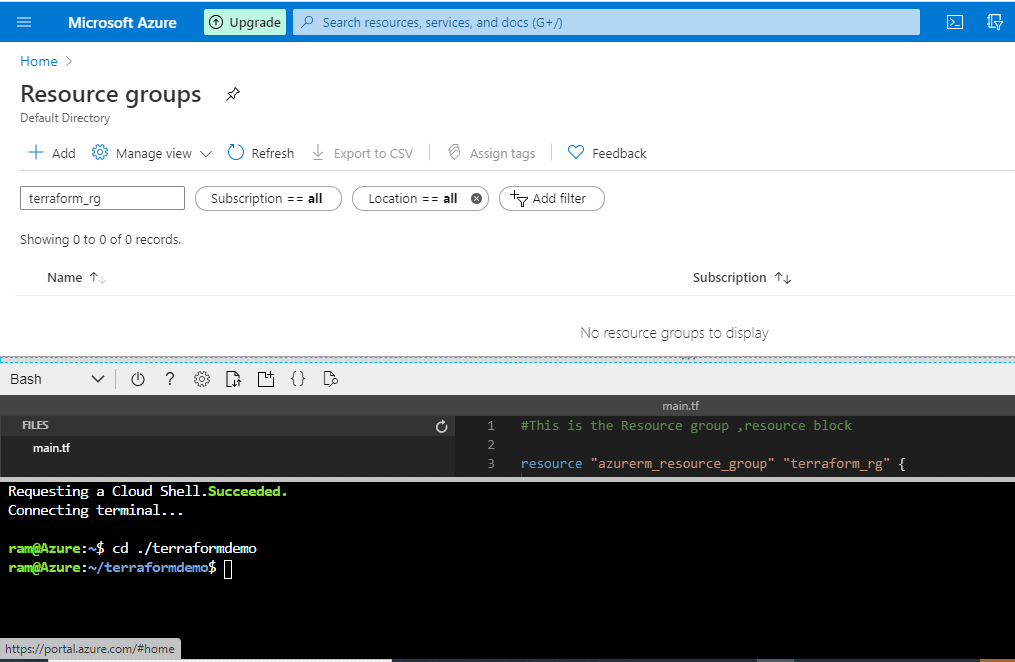
Figure 8 - Searching our Resource Groups
We run "terraform init" to download the provider plugins, which can be viewed in current directory.
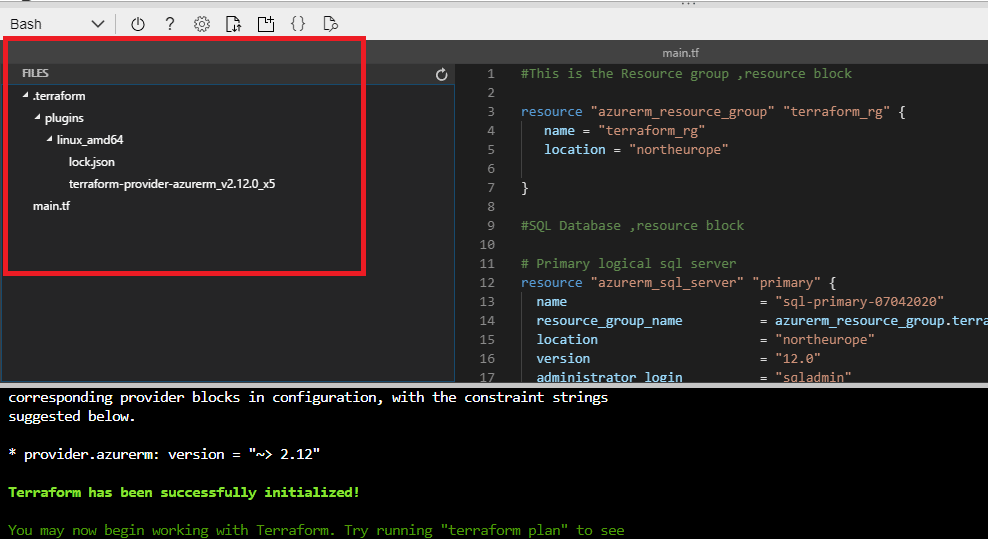
Figure 9 - List of files in our folder
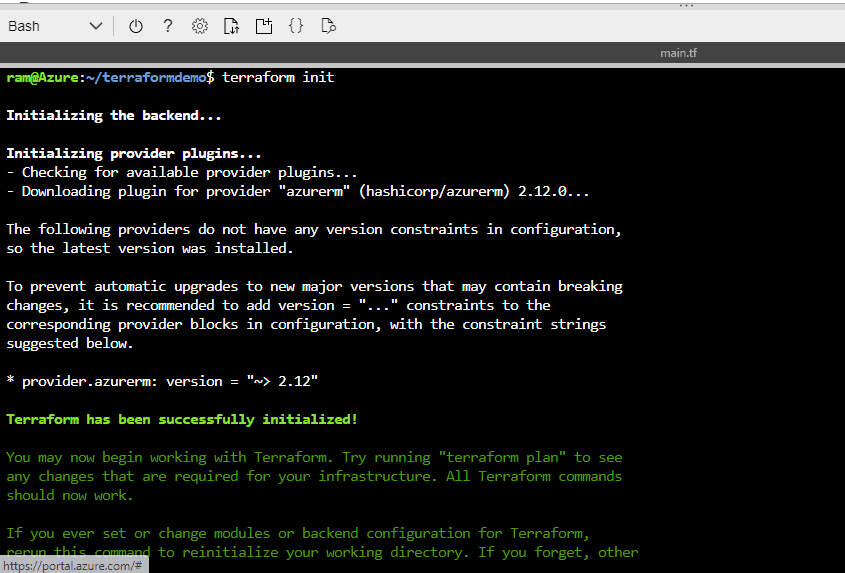
Figure 10 - Running terraform init
After init, we can verify the provider version by running "terraform version":
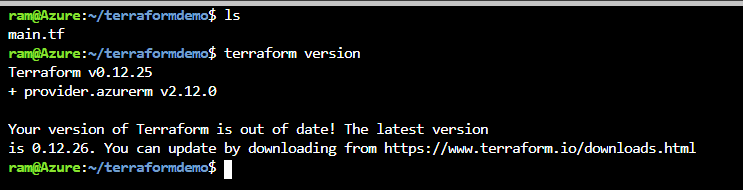
Figure 11 - verify the Terraform version
Next we run terraform plan. This will create our execution plan, we will be able to see which resources we will create, update, or destroy.
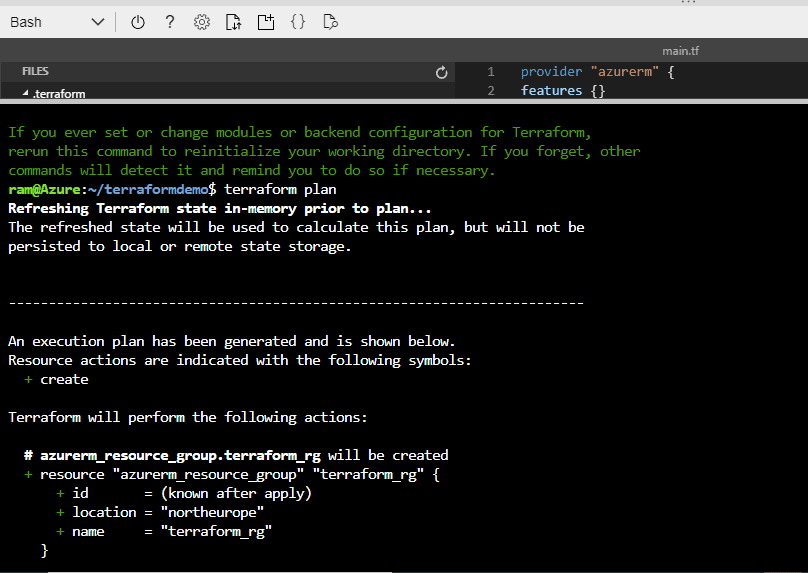
Figure 12 - output of terraform plan

Figure 13 - Summary of terraform plan
You will see a + sign for all resources that will be created, - for the resources to be destroyed and ~ for the resources to be updated. We can see the execution plan and confirm that our deployment will add 7 resources.
The State File
This state is stored by default in a local file named "terraform.tfstate", but it can also be stored remotely, which works better in a team environment.
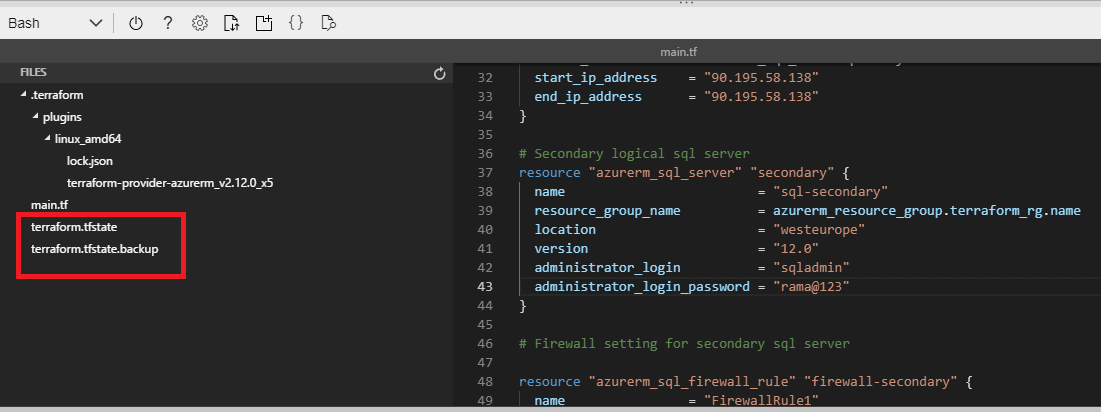
Figure 14 - The state file in our explorer
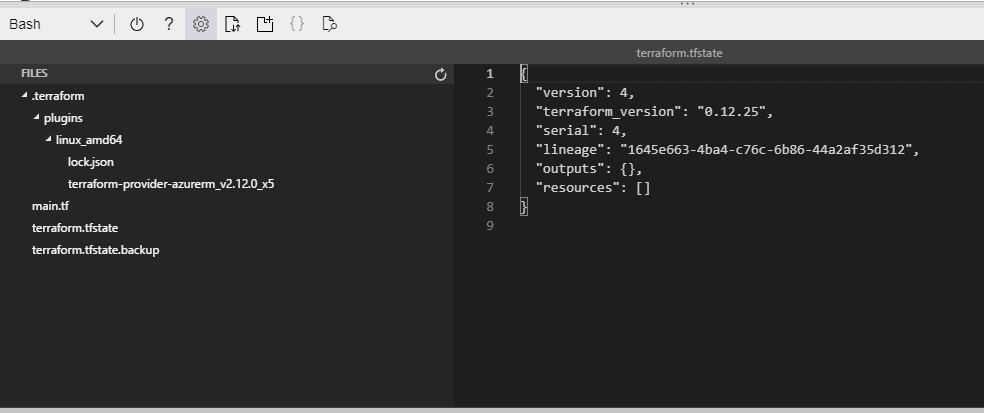
Figure 15 - Contents of the state file
Every time you apply Terrafrom it writes a copy of the current state of your infrastructure to a file called terraform.tfstate if this file is already present then it will move the old state file to a file called terraform.tfstate.backup and will create a new terraform.tfstate file.
The previous version of the state will be saved as terraform.tfstate.backup.
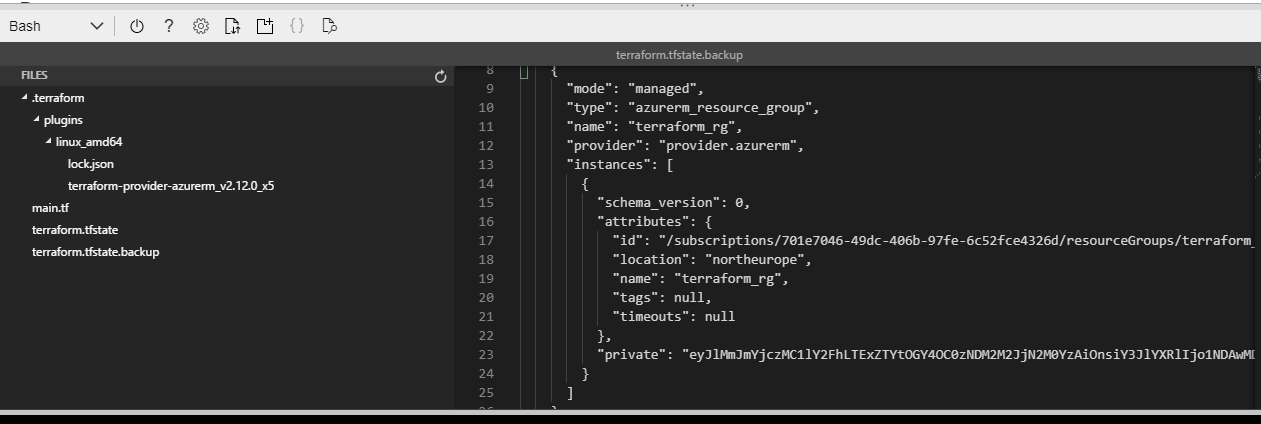
Figure 16 - Backup file
Now we move to terraform apply. This will provision all the changes that we found in the execution plan. It will prompt you for confirmation before making any changes. This can be by-passed using -auto-approve flag.
-auto-approve - Skip interactive approval of plan before applying.
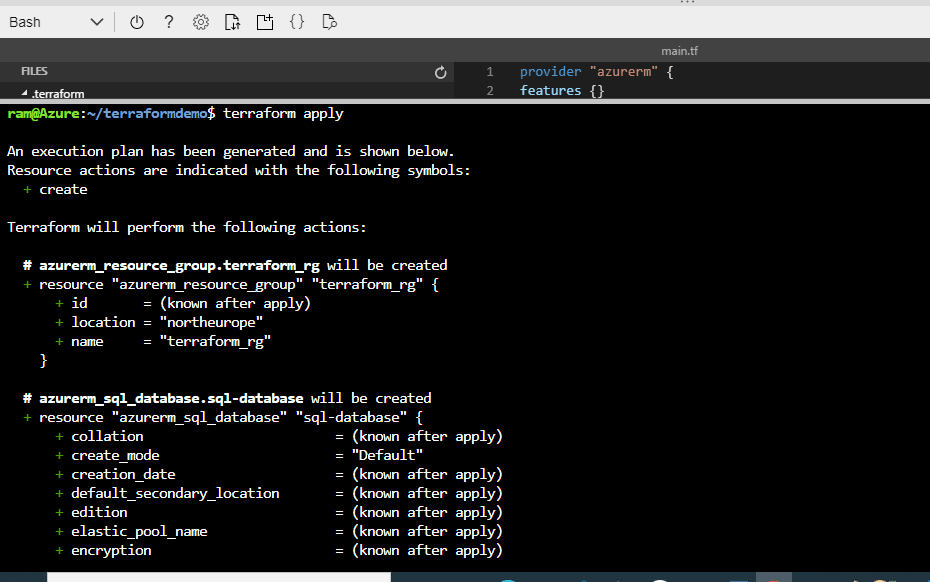
Figure 17 - Execution plan of terraform apply
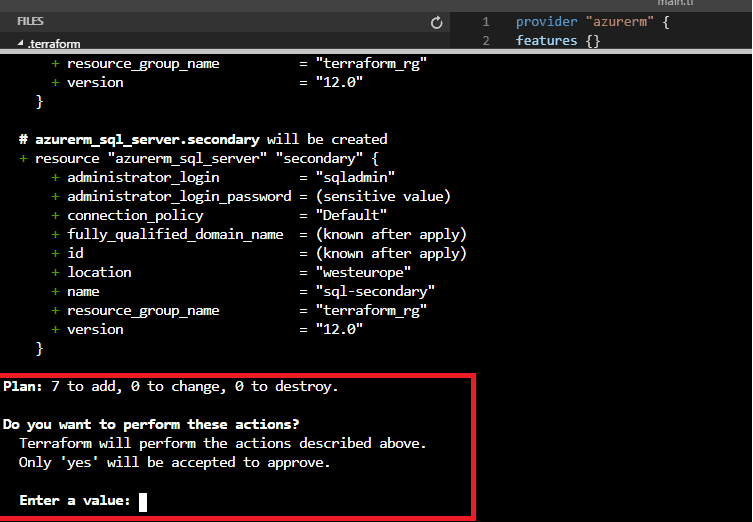
Figure 18 - Apply confirmation
We can type ‘yes’ to confirm the changes. If we do, the provisioning of resources will begin and in a few minutes our setup will be deployed.
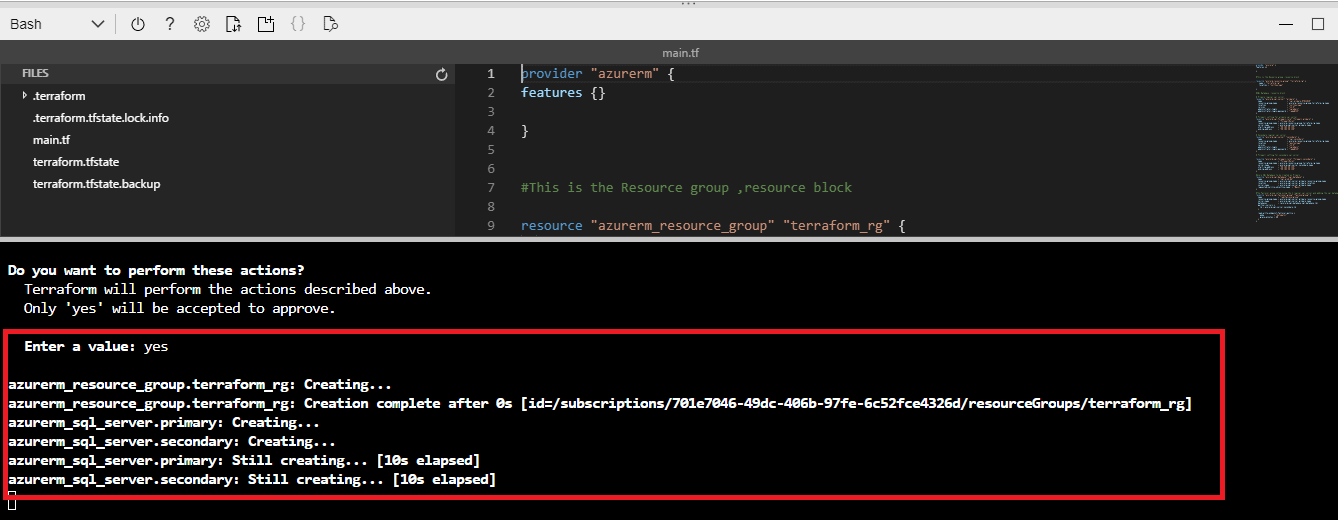
Figure 19 - Applying changes
After a few minutes, the apply is complete. We see the results at the bottom of Figure 20: Resources: 7 added, 0 changed, 0 destroyed.
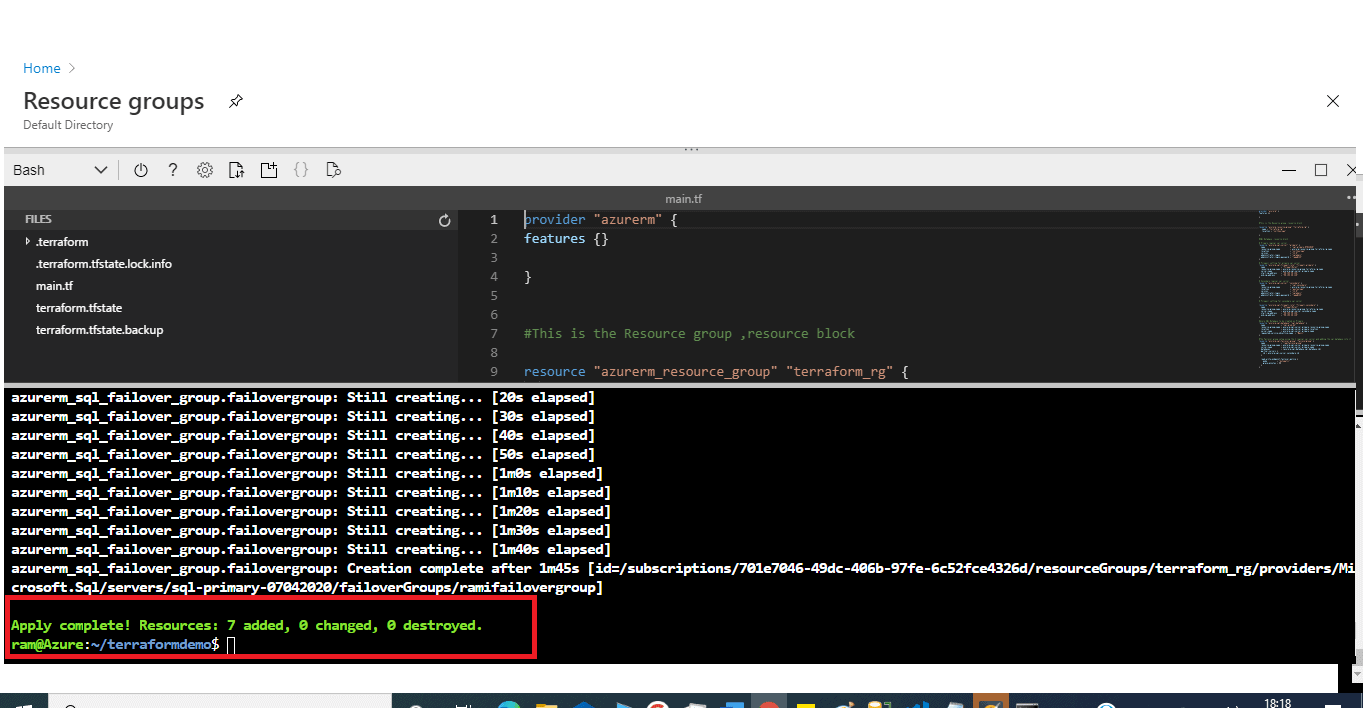
Figure 20 - Resources deployed
Congratulations! You have successfully deployed the Azure SQL Database with a Failover Group setup.
Note : We will test our setup and at the end we will destroy our environment.
Let’s verify our deployment
Let's check our Resource Group : terraform_rg. In Figure 21, we see it now appears in search.

Figure 21 - Our Resource Group
Inside this group, we can see our logical SQL Server and database in Figure 22.
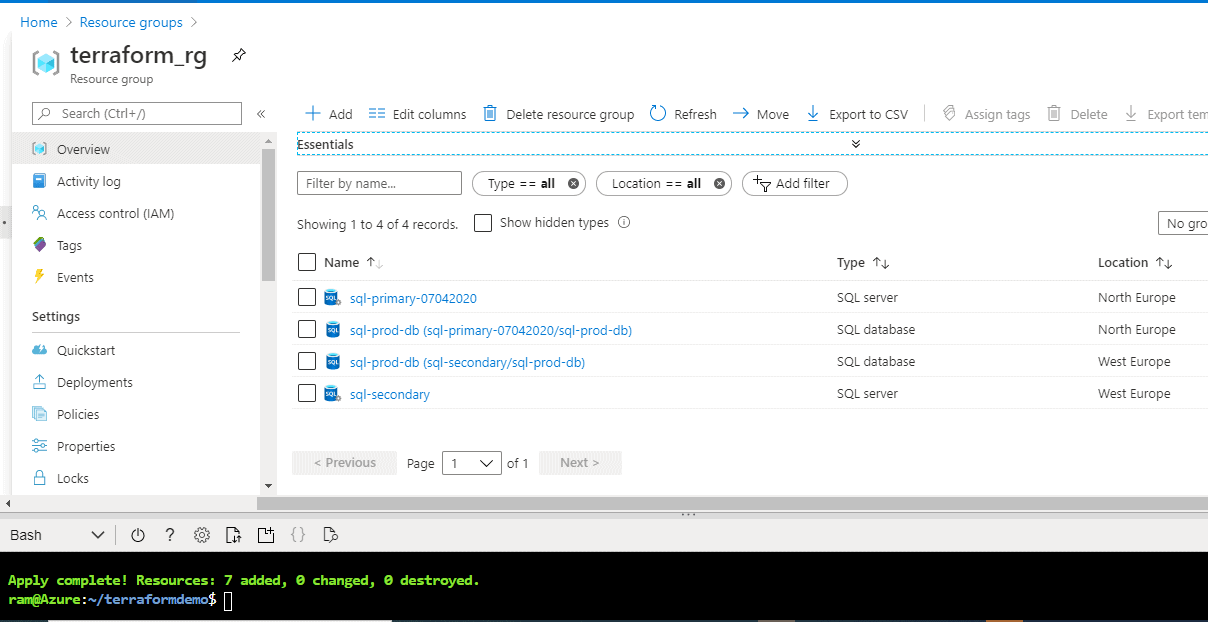
Figure 22 - Resource Group contents
We also can see the firewall rule in Figure 23.
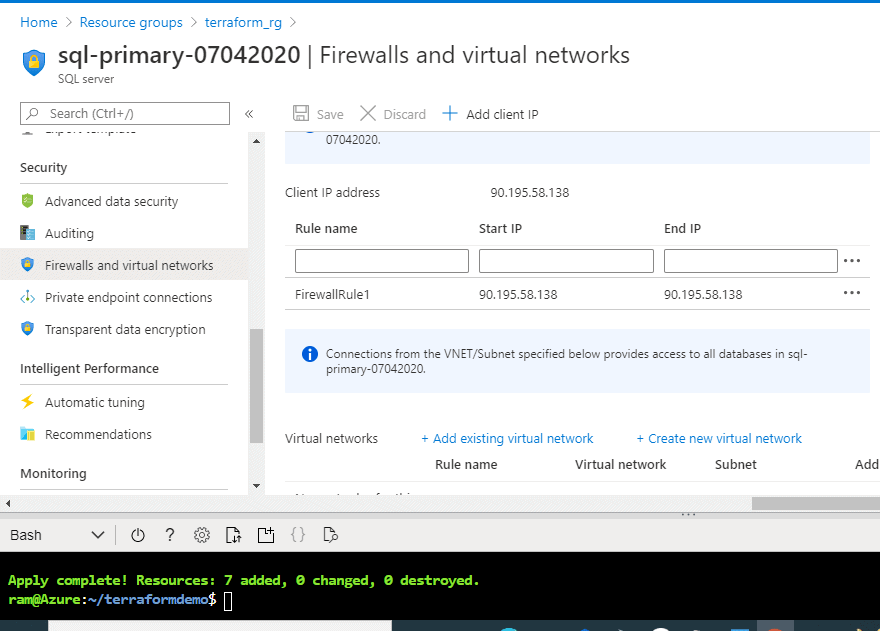
Figure 23 - Firewall rule
Failover Group
An Auto-Failover group uses the geo-replication technology. However, there are a few differences:
- Geo-replication replicates a single database to the secondary whereas auto-failover groups replicate a group of databases that are added to the failover group.
- Both manual and auto-failover are available in auto-failover groups whereas only manual failover is possible in Azure SQL active geo-replication
Auto-failover groups allow you to manage replication and failover of a group of databases on a server or all databases in a managed instance to another region. When you are using auto-failover groups with automatic failover policy, any outage that impacts one or several of the databases in the group results in automatic failover.
We have configured Automatic Failover in our file with this code:
read_write_endpoint_failover_policy {

mode = “Automatic”

grace_minutes = 60

}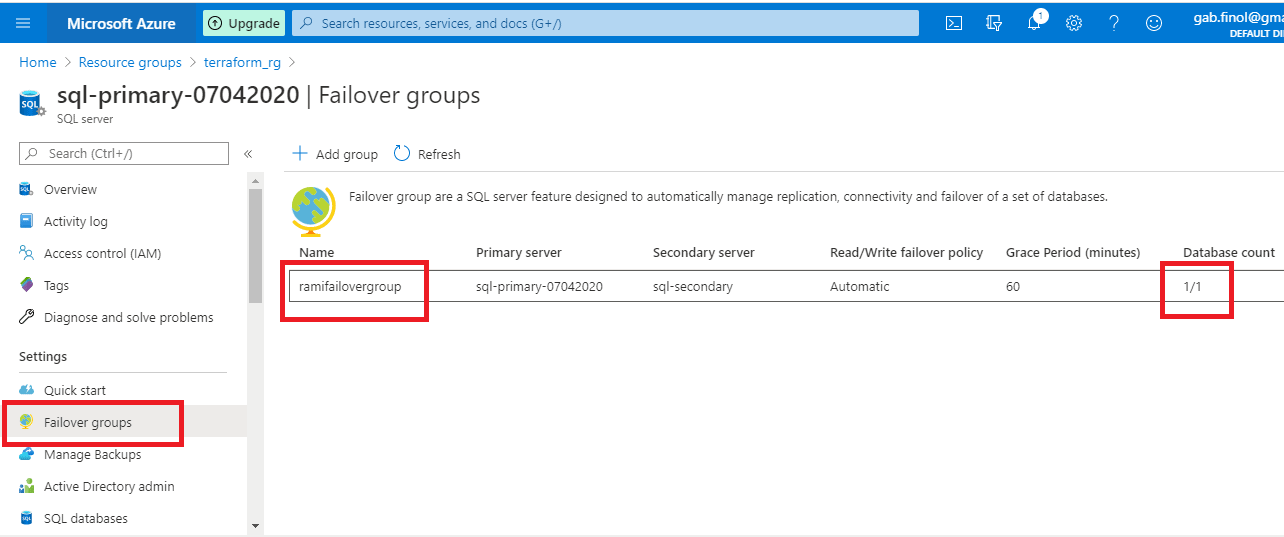
Figure 24 - We see the failover group
Adding and Removing databases from the Failover-Groups
We can always add a database of the same Azure SQL Server to an existing failover group. When a new database is added to the existing failover group, it automatically creates a new database in the secondary server with the same name, edition and compute resource. To add a new database to an existing failover group, Click on the failover group in the Azure SQL Server details page. Click on the failover group name and click on Add databases.
Similarly, we can Remove Databases from the Failover Groups.
Terraform can be used to make any such changes. If we want to manage our environment with Terraform, we need to make sure that our code is in sync with our setup. We will not go deep into it in this article.
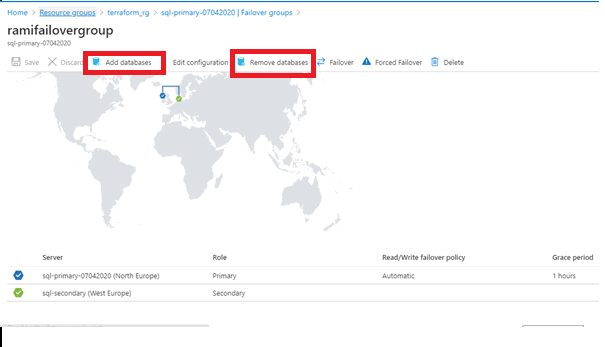
Figure 25 - Failover group in the portal
A DNS CNAME record that points to the current primary’s URL. It is created automatically when the failover group is created and allows the read-write workload to transparently reconnect to the primary database when the primary changes after failover. The read-write listener is what we will use to connect our applications. In case of a failover, there will a short blip and we would be back online when secondary takes over the primary role.
There is also a read only listener. A DNS CNAME record formed that points to the read-only listener that points to the secondary’s URL. It is created automatically when the failover group is created and allows the read-only SQL workload to transparently connect to the secondary using the specified load-balancing rules. We will use this endpoint for any reporting if required. Basically it helps us offload read-only connections from the primary database.
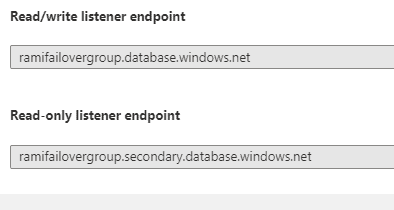
Figure 26 - listener connection endpoints
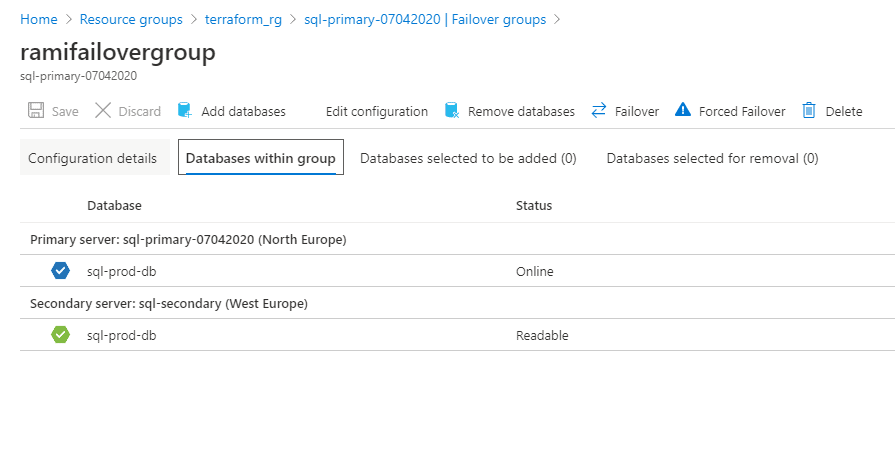
Figure 27 - Failover group config
Testing our setup
We will run a connection test. To do this, we will use SSMS locally to connect to the listener endpoint or the server names directly. We can see that using listener name works.
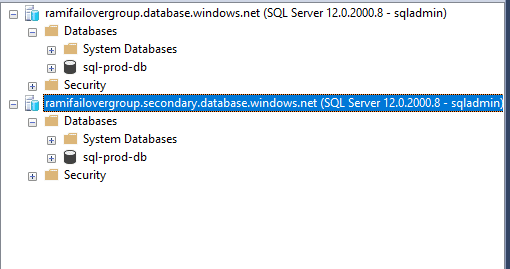
Figure 29 - Connection to the server with the endpoint
We can also use the server names:
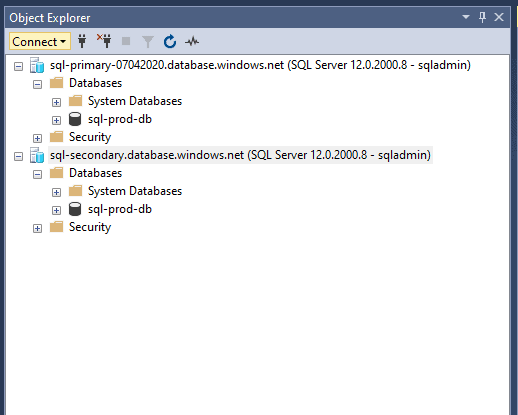
Figure 30 - Connection with server names
We are good so far, Successfully connected.
Query tests
Let’s create a table in the primary and verify.
/****** Object: Table [dbo].[Address] Script Date: 28/05/2020 00:40:57 ******/
SET ANSI_NULLS ON

GO

SET QUOTED_IDENTIFIER ON

GO

CREATE TABLE [dbo].[Address](

[AddressID] [int] IDENTITY(1,1) NOT NULL,

[AddressLine1] [nvarchar](60) NOT NULL,

[AddressLine2] [nvarchar](60) NULL,

[City] [nvarchar](30) NOT NULL,

[StateProvince] [nvarchar](50) NOT NULL,

[CountryRegion] [nvarchar](50) NOT NULL,

[PostalCode] [nvarchar](15) NOT NULL,

[rowguid] [uniqueidentifier] NOT NULL,

[ModifiedDate] [datetime] NOT NULL

)

GO
Ran the script in Primary.

Figure 31 - script execution
We have verified the table now exists in Secondary as well. So the replication is working as expected.
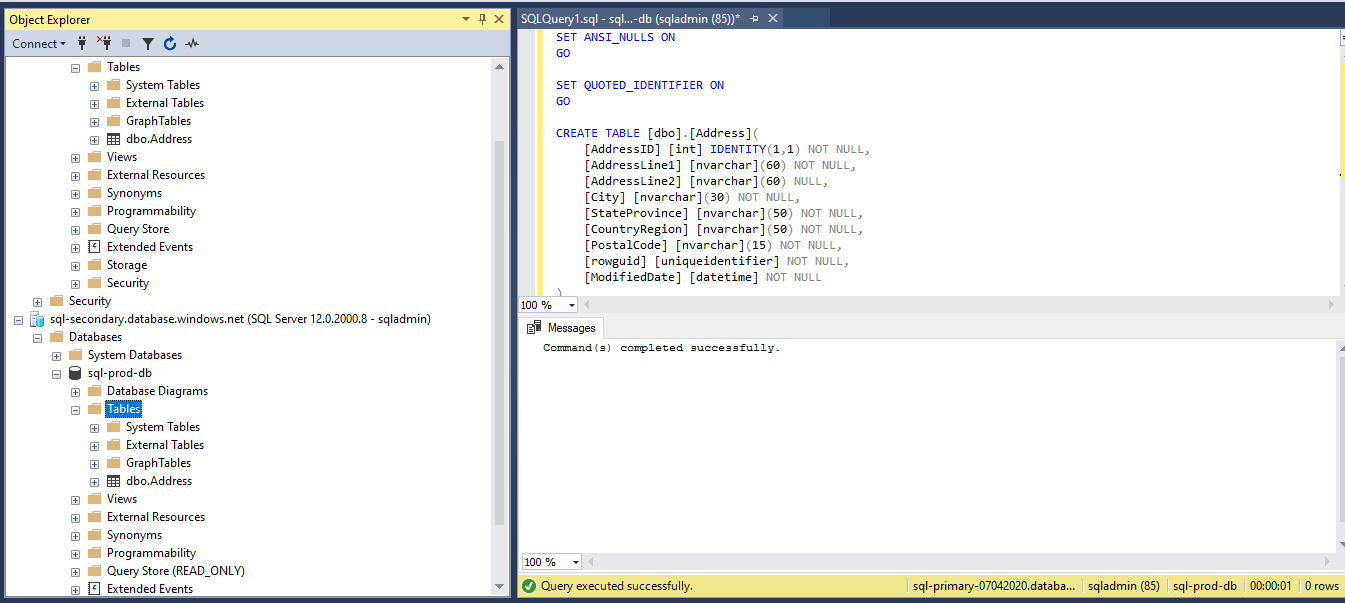
Figure 32 - Table in secondary
Let’s insert a record in Primary and verify the data replication.
USE [sql-prod-db]

GO

INSERT INTO [dbo].[Address]

([AddressLine1]

,[AddressLine2]

,[City]

,[StateProvince]

,[CountryRegion]

,[PostalCode]

,[rowguid]

,[ModifiedDate])


VALUES

(‘Flat 5’

,’30 Bolton Street’

,’Bolton’

,’Greater Manchester’

,’North’

,’ABC123’

,’6F9619FF-8B86-D011-B42D-00C04FC964FF’

,’05/05/2020’

)

GO
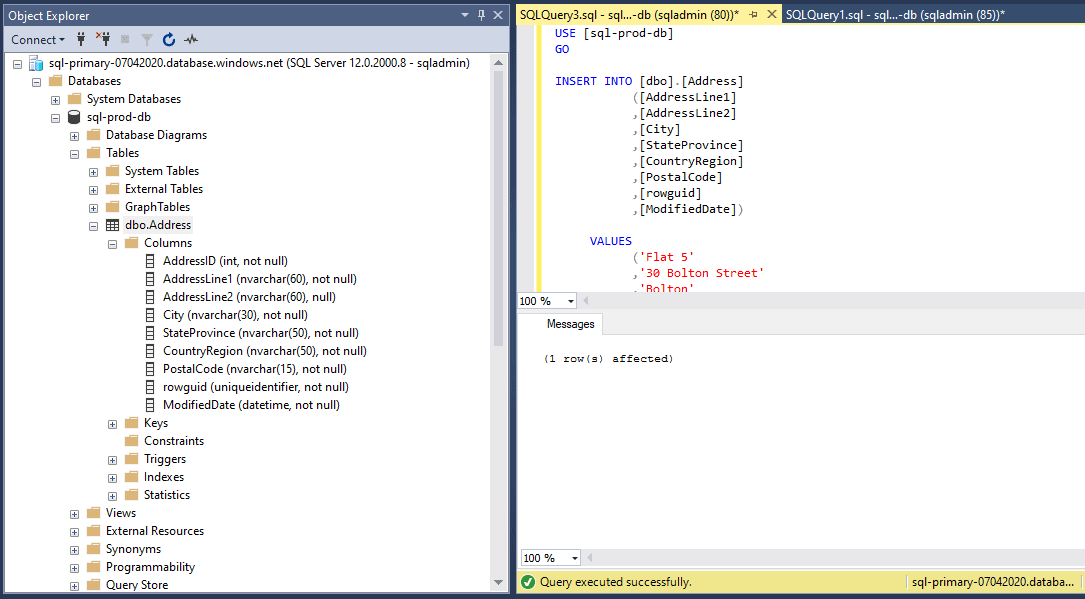
Figure 33 - Record inserted in primary
We can query and see the record in the primary.
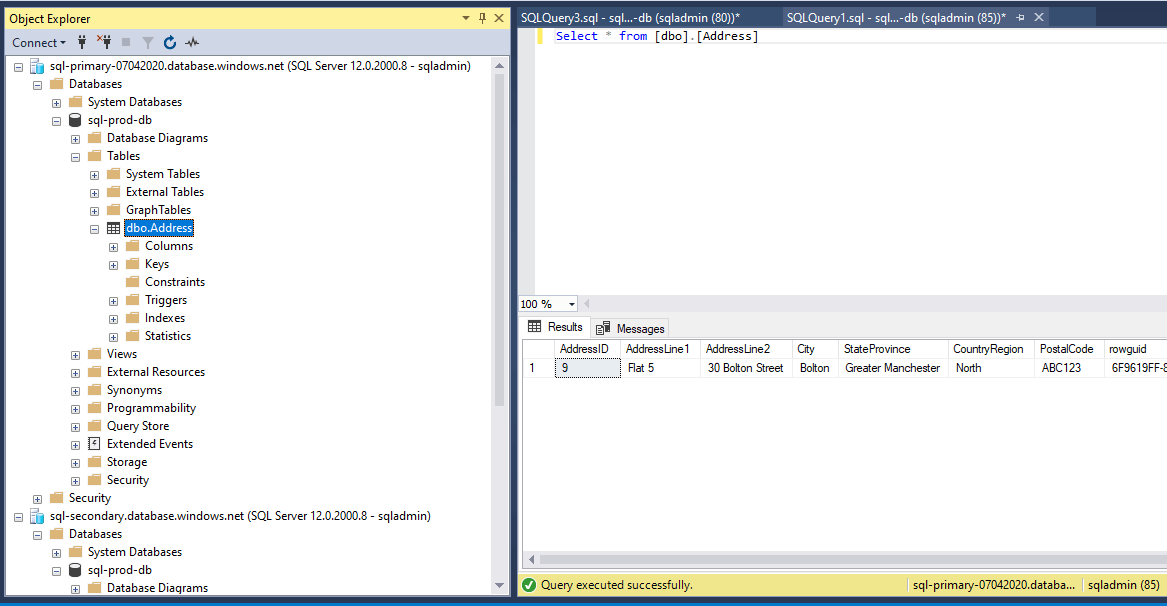
Figure 34 - Record verified in primary
The record has been successfully replicated to Secondary server.
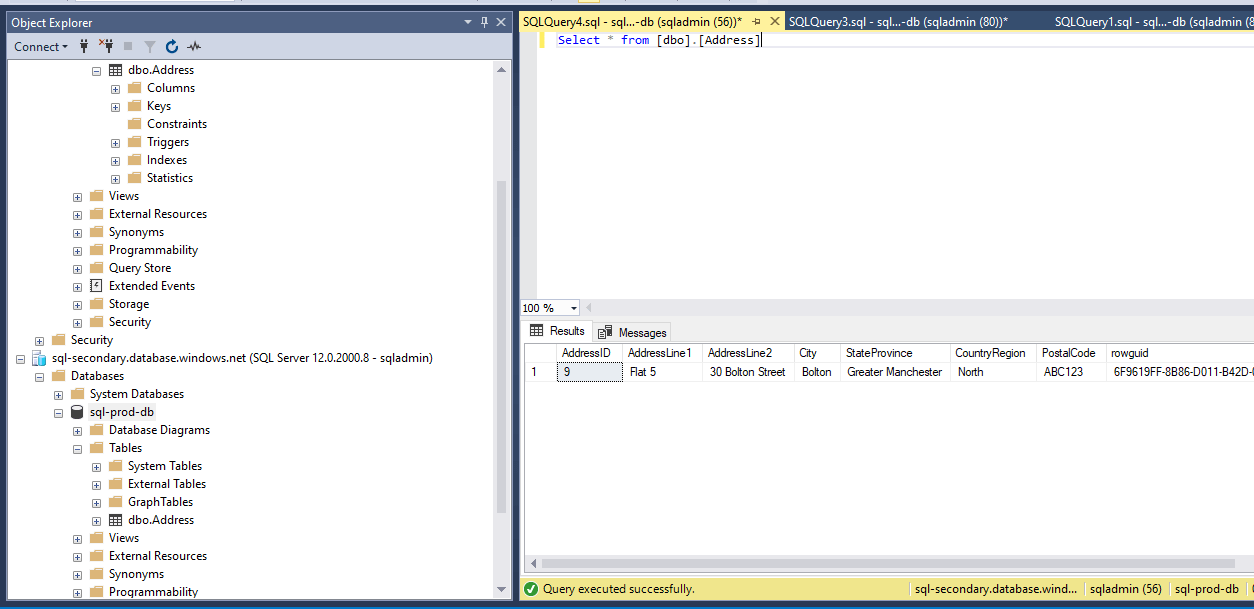
Figure 35 - Record verified in the secondary
Note : Secondary is read-only and running an Update/Delete will result in below error.
Msg 3906, Level 16, State 2, Line 4

Failed to update database “sql-prod-db” because the database is read-only.
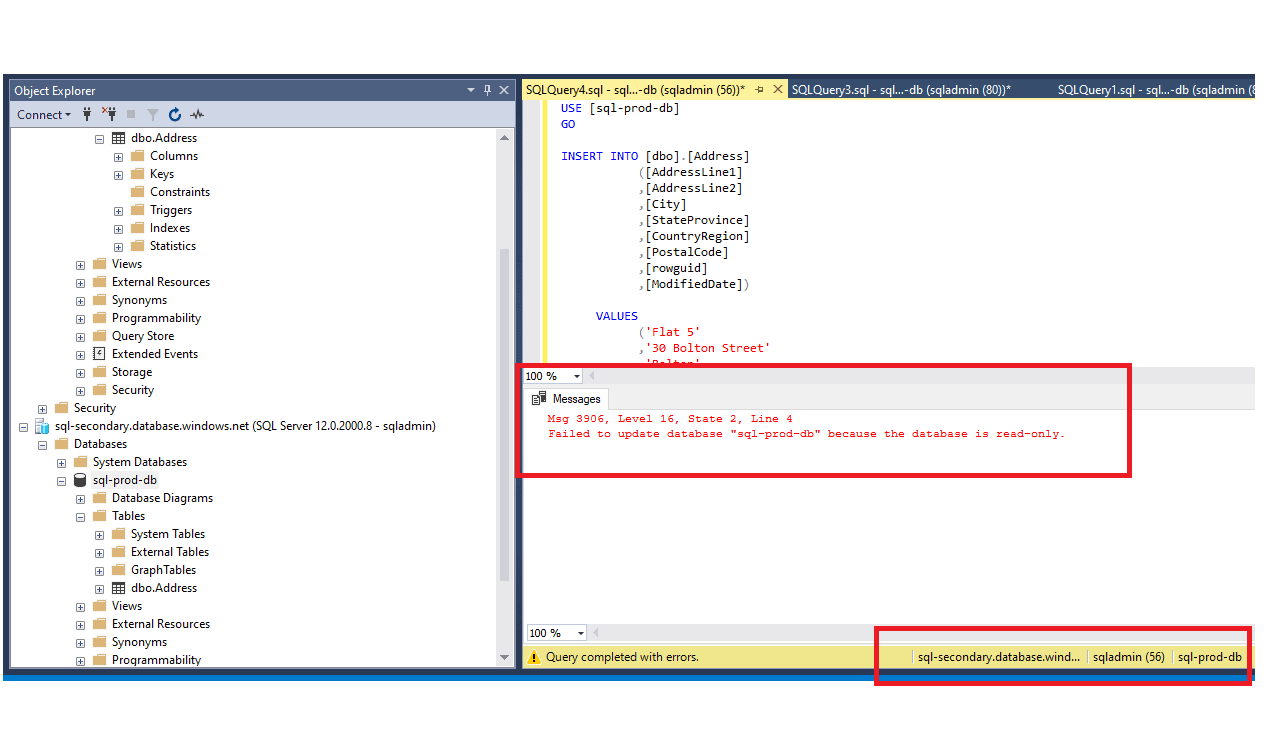
Figure 36 - Update error on the read only secondary
Failover test
Other than the available Automatic failover which we have already configured, we have 2 more options: forced failover and manual failover.
In the failover group details page, click on Forced failover (Figure 37) to do a manual forced failover which immediately switches the roles without synchronizing with primary. This may result in data loss. We will not do this, however we will do a Manual Failover.
In the below screenshot, the one marked with orange ‘ Failover’ is Manual Failover. To do a manual failover, navigate to failover groups and click on the name of the failover group. In failover group details page click on failover as shown in the below image.
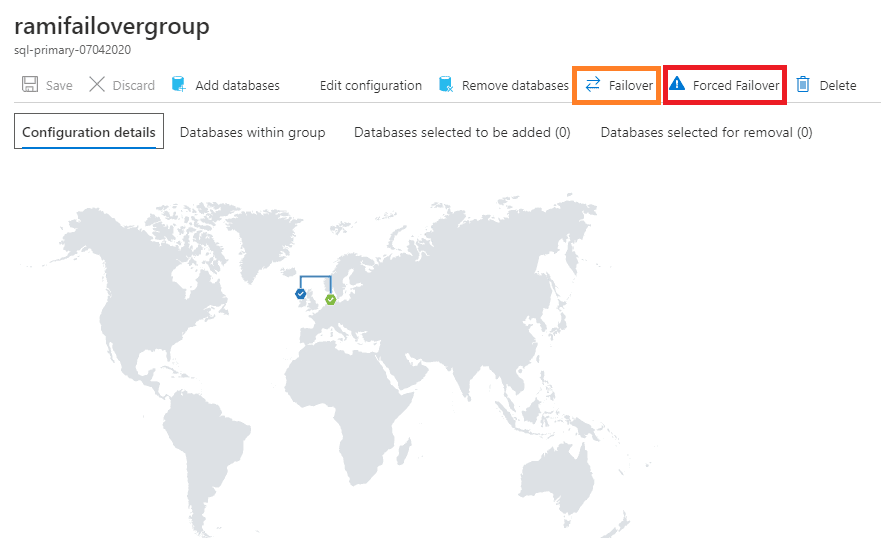
Figure 37 - Geogrpahical view of failover
Click on the Failover icon and confirm on the warning.
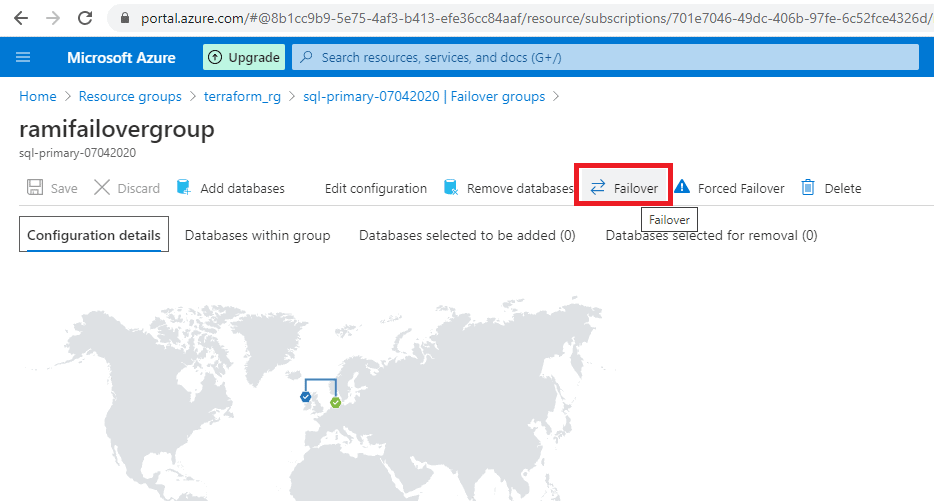
Figure 38 - Manual failover button
Click 'Yes'

Figure 39 - Confirmation of failover
The progress can be viewed from the Notifications..
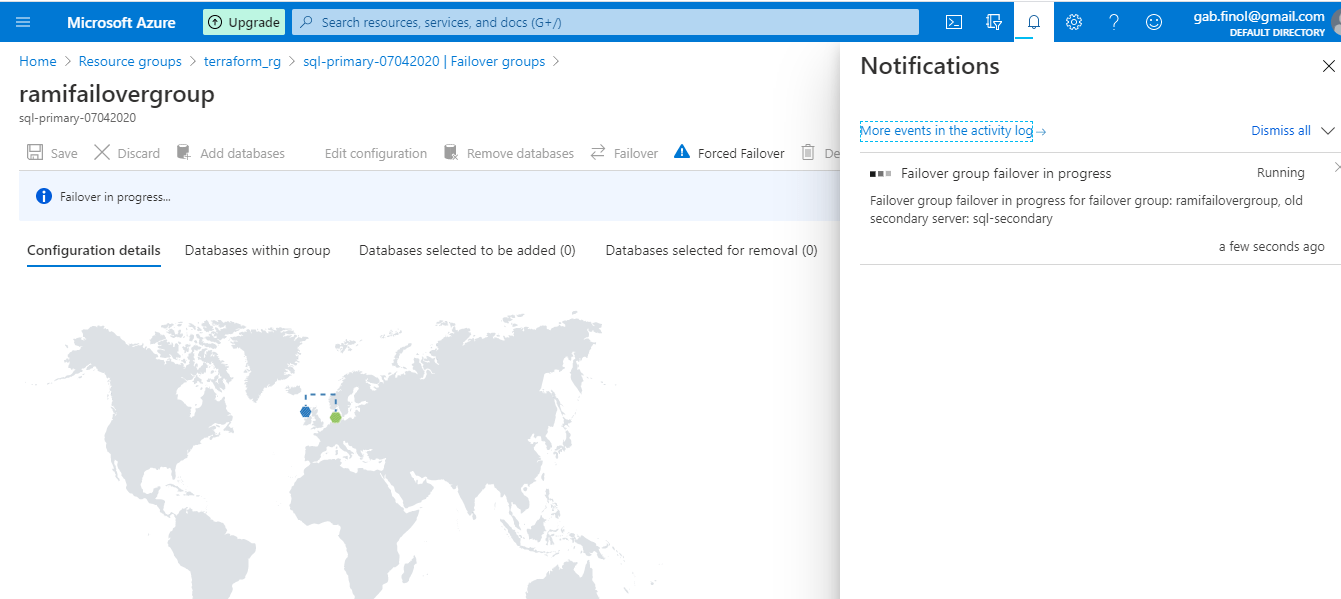
Figure 40 - Notification of failover
We can see the notification that the failover was successful.
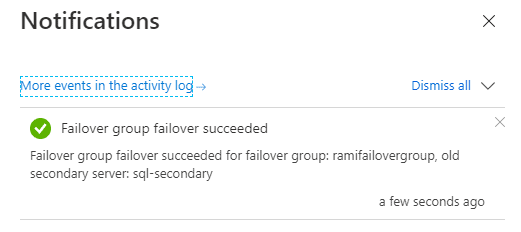
Figure 41 - Notification message of failover
The secondary server is now promoted to be the primary server. (Figure 42).

Figure 42 - Role change in servers
If we connect to the Read/Write Listener after the failover, we can see the listener is routing to the new Primary (sql-secondary).
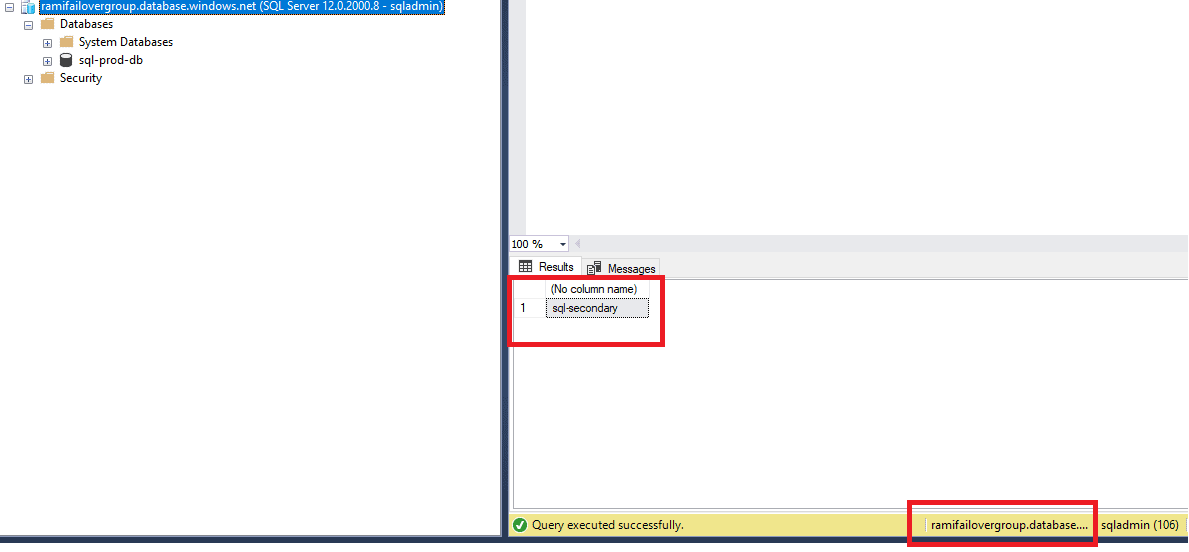
Figure 43 - Checking the read / write connection
Failback
We will need to Failback so that we are back to our original setup, which is what we have in our Terraform code.

Figure 44 - Failback
The Failback is successful. The server, sql-primary_07042020, is back with the primary role. If you do not failback, Terraform will not be able to destroy the environment as there will be mismatch in actual setup and state file.
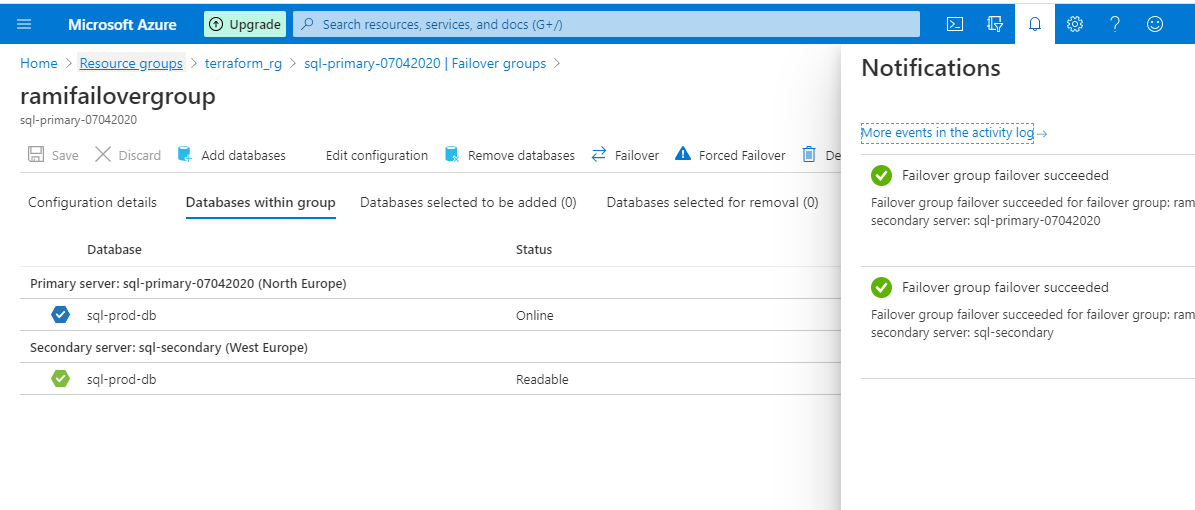
Figure 45 - Notification of failover
Destroying the whole setup
We will use terraform destroy here. The Terraform managed infrastructure will be destroyed by this command. It will ask for confirmation before destroying. It can be by-passed with -auto-approve flag.
-auto-approve - Skip interactive approval of plan before applying.
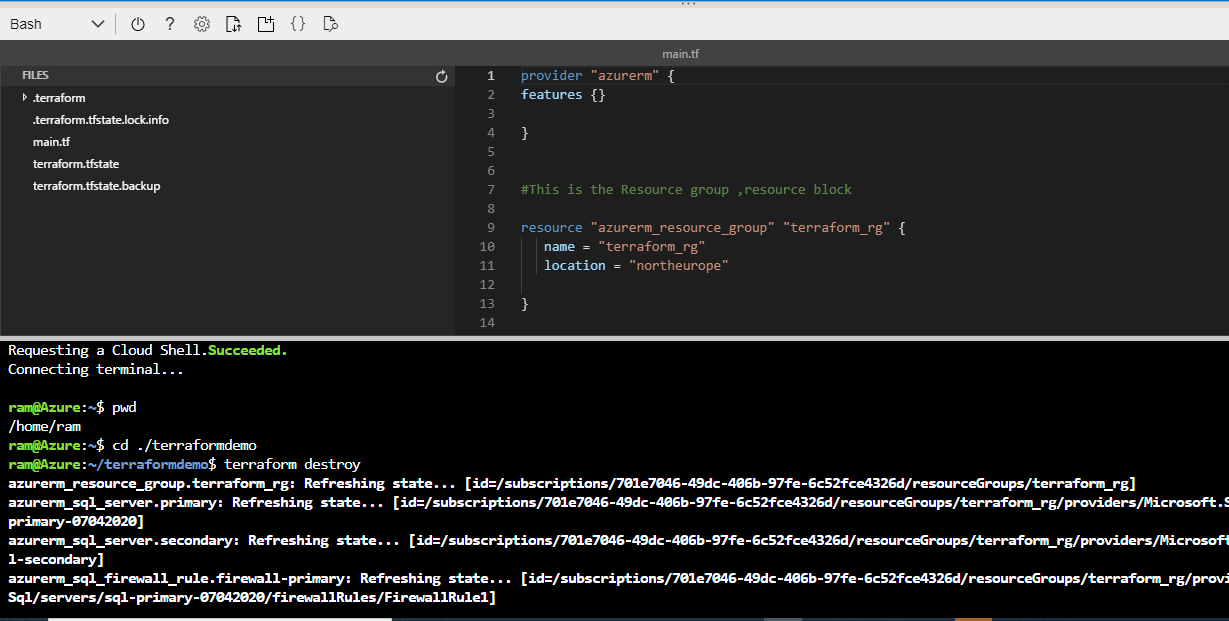
Figure 46 - Running terraform destroy
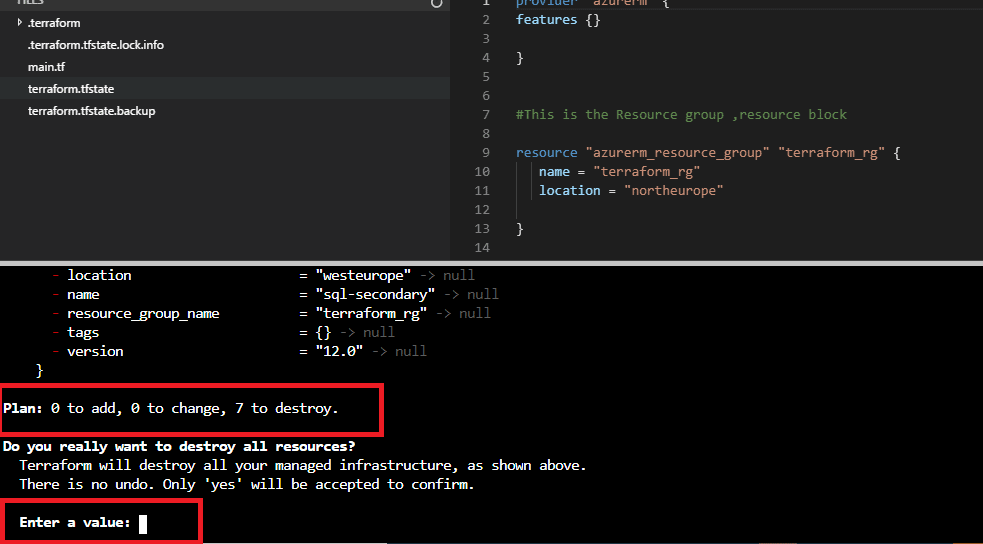
Figure 47 - Destroy confirmation
Confirm with ‘yes’ and press enter
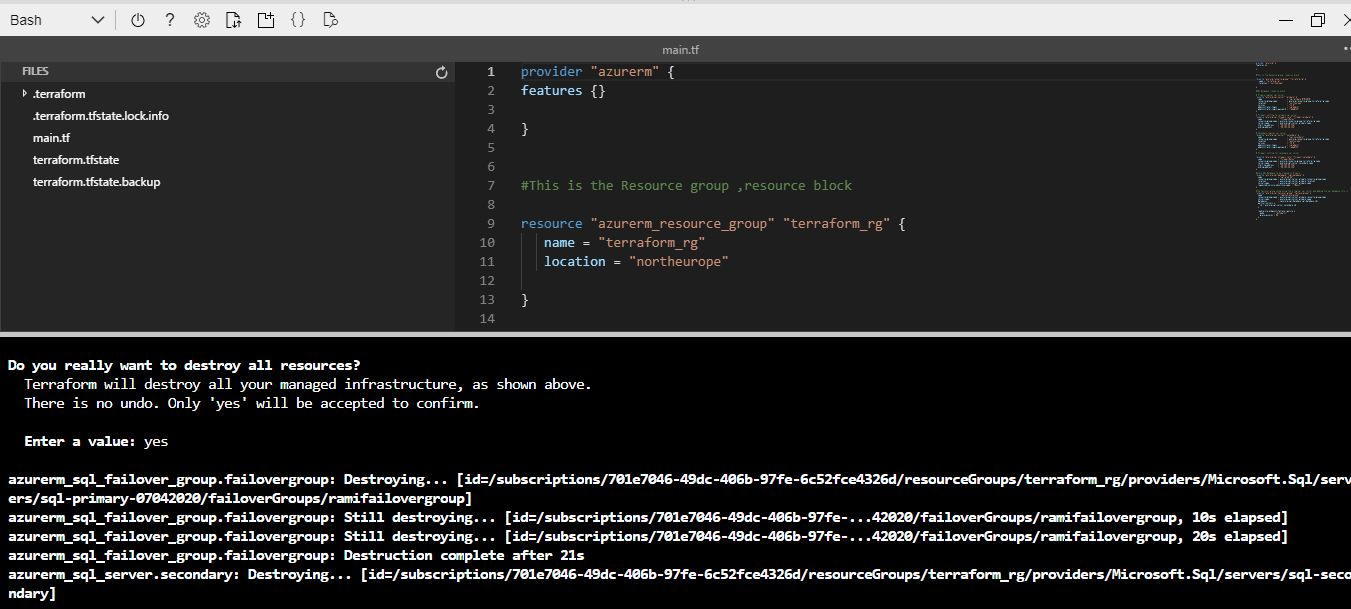
Figure 48 - We see resources removed
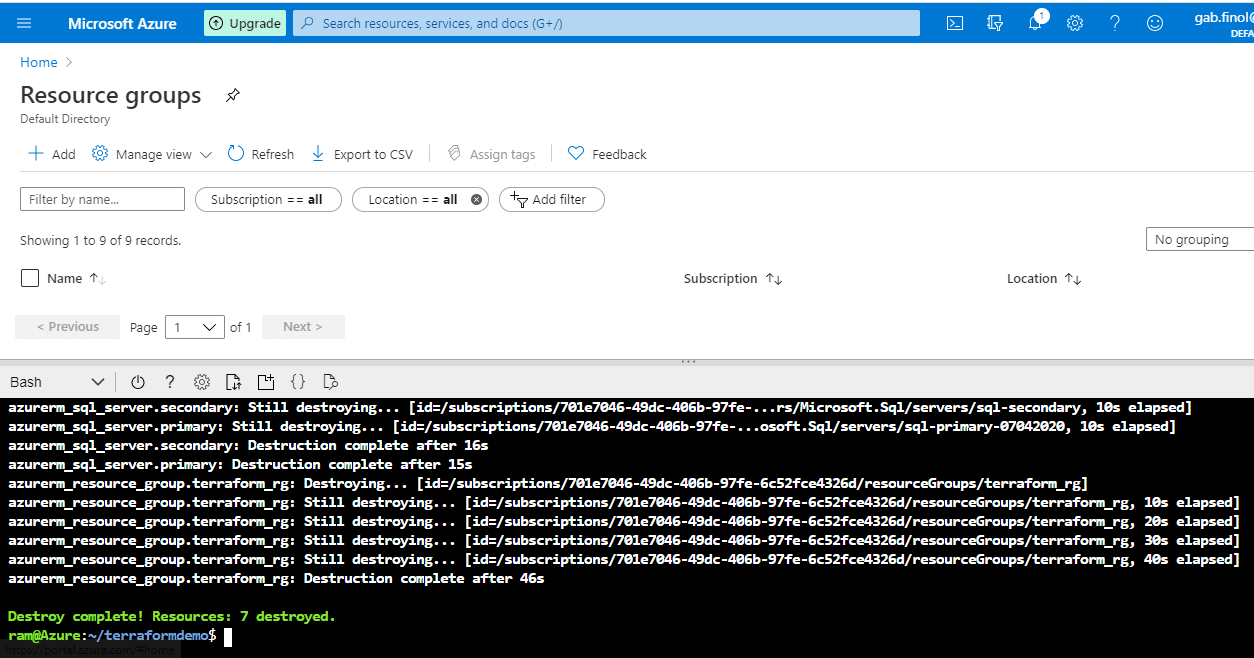
Figure 49 - Resource group gone and destroy complete
The destroy is complete. Resources: 7 destroyed.
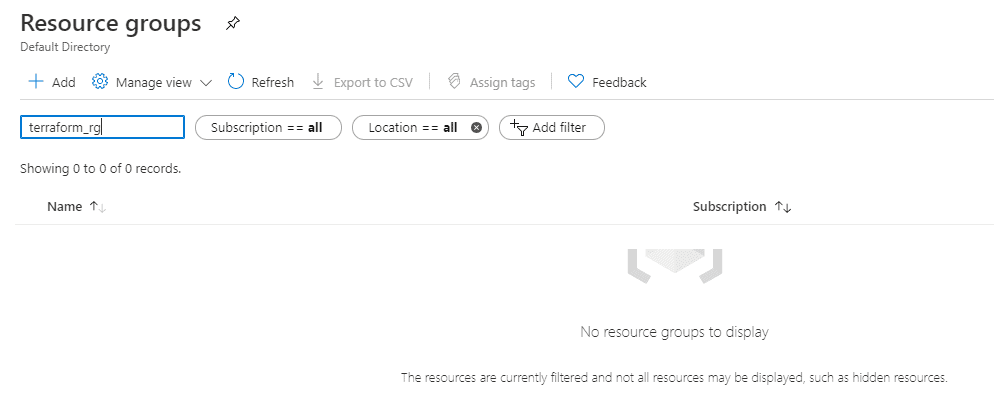
Figure 50 - Empty Resource Group
Conclusion
Terraform makes it easy to re-use configurations for similar infrastructure, helping you avoid mistakes and save time. Imagine we need to make similar set-up for multiple applications, it will really be very simple and the same code with a few changes can be re-used.
We have successfully:
- Provisioned Azure SQL Database setup with Terraform.
- Learnt how terraform works.
- Tested various aspects of our setup.
- Destroyed the environment we provisioned.
