

This article is an introduction to automated database deployments with Terraform.
Terraform is now one of the most interesting tools available to work with Infrastructure as Code (IaC), presenting a simple and readable structure. Thousands of companies adopted it, particularly because it supports the major cloud suppliers, such as Azure, AWS, GCP, and others.
A Few Words on IaC
Automated deployments are key to achieving continuous integration and continuous delivery (CI/CD). IaC tools are the means to automate the tasks, so we can consistently and predictably deploy infrastructure to different environments.
There are dozens of IaC tools available. Terraform gained a respectable share of this market because it is:
- Declarative: you don't need to bother with so much detail
- Idempotent: it identifies changes already applied to the environment and keeps the envinronment's consistency
- Vendor agnostic: it can be used with different cloud providers
- Open source: the basic version is free, although Hashicorp (the creator of this software) also offers an enterprise version.
Getting Started
The basic components to use are:
- the Terraform executable
- configuration files written in HCL (Hashicorp Configuration Language) or JSON
- provider(s) to specific environments (in the examples below, we will use the Azure provider, AzureRM)
- state data, which guarantees the consistency of any deployment.
If you intend to try the following examples by yourself, please remember to install the most recent versions of Terraform, AzureRM provider, and Azure CLI.
Generally your project will involve several HCL files, like:
- [main].tf : the "root" file for any project, that may contain providers and resources to be deployed.
- variables.tf: where you attribute values to your variables
- locals.tf: allows to create expressions based on variables (example: creating tags)
- output.tf: allows to collect values generated during deployment, such as IDs.
- custom files you use to better organize your project
As a first example, I present a Terraform version of the classic "Hello, World". It involves a single HCL file with fixed parameters (no variables) to create only one resource in Azure (a resource group). I refer to this code as "Example 1".
Creating an HCL File
Example 1 declares only 03 topics:
- provider, in this case we use AzureRM. This declaration is mandatory.
- required provider, where one specifies which provider version to use. Although it is an optional declaration, it is important to use it through the lifecycle of your environments, since provider syntax might vary depending on its version.
- resources: in this example, only one resource is deployed, a Azure resource group.
Image 01 shows the code within HCL file "main.tf".
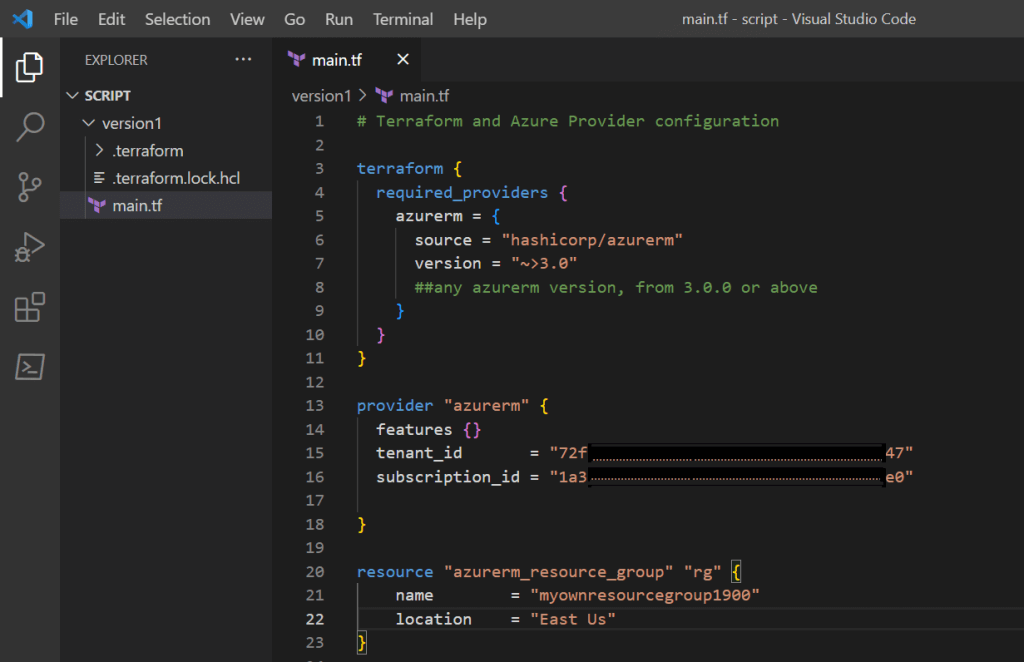 Image 01: contents of file main.tf (version 1)
You might have noticed I am using VS CODE to create the HCL files, but you can pick any IDE you like.
Terraform Workflow
Once the HCL file is created, I open a Command Prompt and login to my Azure subscription (az login).
Next step is to initialize Terraform session and then validate HCL files. If they are ok, I begin the planning phase to organize the deployment based on those files. Notice I am running those commands in the folder where the HCL file is placed, so I don't need to specify any extra information.
So far, we have to execute the following commands:
prompt> az login

prompt> terraform init

prompt> terraform validate

prompt> terraform plan
Image 02 shows the output of those commands.
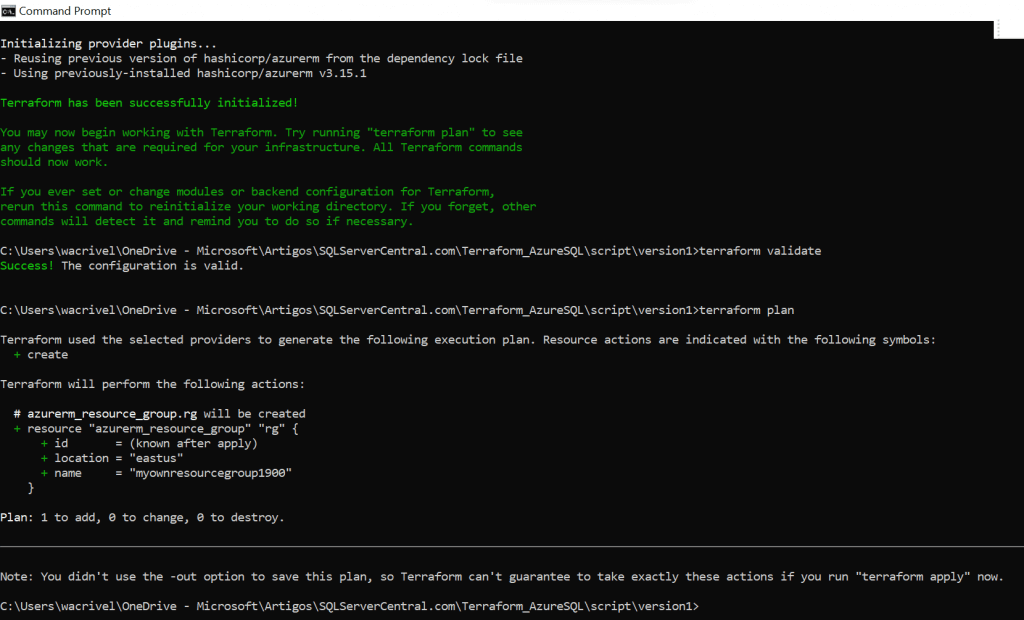 Image 02: initialize, validate and plan Example 01's deployment
Finally, I execute command "terraform apply" to create the resource. If you don't want to manually approve the execution, you can add the parameter "-auto-approve" to your command. Otherwise you will need to type "yes" when prompted.
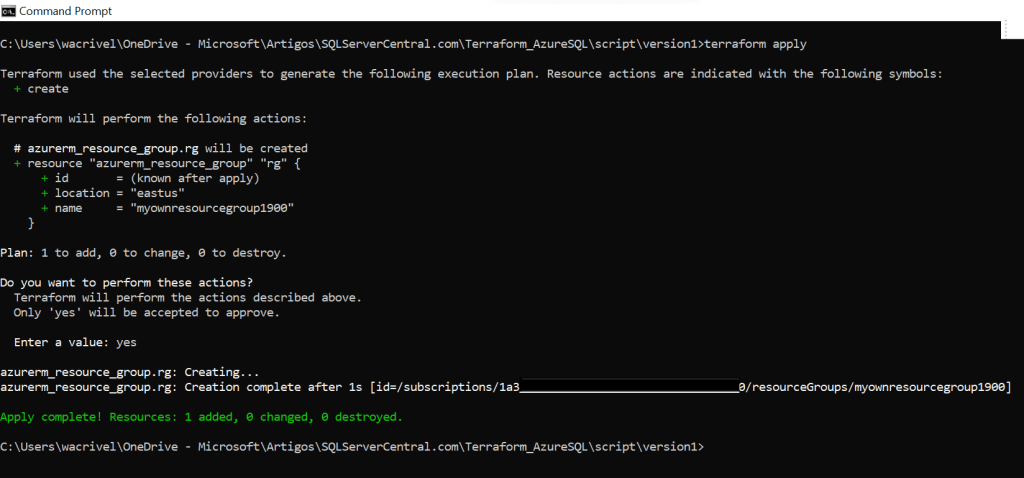 Image 03: apply Example 01's deployment
Now you can go to Azure Portal and verify that the new resource, resource group "myownresourcegroup1900", was properly created.
In case you need to remove that object, that is, to rollback the last deployment, you can run the command "terraform destroy", confirming the operation when prompted.
 Image 04: destroy Example 01's deployment
State Control
When this operation finishes, a control file will be created to store the status of the resources after deployment. This file is called "terraform.tfstate" and it is presented in JSON format.
Every time you execute a new deployment to add, change or remove resources, file "terraform.tfstate" will be updated and a copy of the previous deployment is moved to file "terraform.tfstate.backup".
IMPORTANT: for all practical purposes, these are internal files and you should never change or move these files manually. Terraform is idempotent thanks to the tfstate file.
Keep in mind you should never manually alter or drop resources that you deployed through code. You must keep on managing them that way, otherwise Terraform will lose control over their state.
Improving the Code
The first example of our code used only constant values, limiting its usability. When your script is a few lines long, it may not be a problem to edit those constants to deploy a new environment. But obviously this is not the case in real life scenarios.
In Example 2, we add extra HCL files to deal with variables, derived variables and outputs. This time we are going to deploy more resources, 04 in total: a resource group, a virtual SQL server, a storage account to keep database backups and a SQL database.
I created a new folder in VS CODE ("version2") and added the file "main_v2.tf" to it. This file declares all resources to be deployed and it uses variables instead of constants. I highlight below some snippets of the HCL code to explain how it works. But you can find the entire code related to Example 2 in Resource Section at the end of this article.
Creating HCL Files
To start creating the HCL files for multiple resources, we have to understand which parameters are used for those resources using AzureRM 3.0+. So we must check Terraform documentation to see the syntax used by each resource to be deployed:
- resource groups: check here.
- SQL server: check here.
- storage accounts: check here.
- SQL databases: check here.
Main File
The code to define provider requirements is kept as they were defined in Example 1 (see Image 01). The table below shows a block of code to define provider, resource group and SQL Server using variables.
provider "azurerm" {
}
#reference https://registry.terraform.io/providers/hashicorp/azurerm/latest/docs/resources/resource_group
resource "azurerm_resource_group" "rg" {
name = local.rgname
location = var.location
tags = local.common_tags
}
# reference https://registry.terraform.io/providers/hashicorp/azurerm/latest/docs/resources/mssql_server
resource "azurerm_mssql_server" "sqlserver" {
name = local.sqlservername
resource_group_name = local.rgname
location = var.location
version = "12.0"
administrator_login = var.sql_login
administrator_login_password = var.sql_password
minimum_tls_version = var.sql_tls
tags = local.common_tags
}You might have noticed I decided to simply suppress the information related to tenant and subscription IDs when defining provider this time. In fact, these parameters are optional in this scenario, since I intend to use my default subscription and tenant for this deployment. As I have to log in to Azure before running the HCL scripts, Terraform implicitly understands what to do.
Now let's check variables. Notice the code above shows two types of variables: we see one variable defined as "var" (var.location) and two others defined as "local" (local.rgname and local.common_tags). Time to talk about them.
Defining Variables
The "var" type means this is a simple variable defined in the "variables.tf" file as a plain text. Those variables are usually stored in HCL files called "variables.tf", although Terraform offers other means to do this. The code below is an excerpt from file "variables.tf" showing variables related to the resource group definition.
# variables related to RESOURCE GROUP

variable "rgName" {

    type  = string

    description = "preffix to resource group name"

    default = "SSC"

}


variable "rgPreffix" {

    type  = string

    description = "preffix to resource group name"

    default = "rg"

}


variable "location" {

    type  = string

    description = "code related to Azure Region"

    default = "eastus"

}
The variable "location" is a string and gets the value "eastus". This is the code associated to the reference "var.location" found in "main_v2.tf" file.
Defining the Locals
Locals are derived variables, i.e., variables based on one or more variables and constants. As you might suspect, file "locals.tf" has the definition of those variables.
This snippet comes from file "locals.tf" and we see the variable "rgname" uses a simple formula to concatenates variables "var.rgPreffix", "var.rgName" and random suffix (which we will covered later).
locals {

  .......

  rgname = "${var.rgPreffix}${var.rgName}-${local.randomSuffix}"

  .......

}
The "locals.tf" can hold another type of derived variables: the one that works as sequence of key-value pairs. This is specially useful for variables like "tags". We can define a list of key-value pairs and attribute it to a single derived variable, called "common_tags" in the example below.
locals {

  ........

  common_tags = {

    company      = var.company

    project      = "${var.company}-${var.project}"

    costcenter   = var.costcenter

    environment  = var.environment

  }

}
Collecting New Info
Finally, I add an output file ("outputs.tf") to collect information generated during deployment, like names, IDs, etc. Run command "terraform output" to present and/or save this information to a file. The code below shows the definitions I added to "outputs.tf".
output "newResourceGroupName" {

  value = azurerm_resource_group.rg.name

}


output "newSqlServerName" {

  value = azurerm_mssql_server.sqlserver.name

}


output "newStorageAccountName" {

  value = azurerm_storage_account.stoacct.name

}


output "newDatabaseName" {

  value = azurerm_mssql_database.sqldb.name

}
Creating Unique Names
Usually Azure resources should have unique names within their scope. That is: one can't create two resource groups with the same name within a given subscription, nor create two storage accounts with equal names in the same resource group. SQL Server' name is even more restrictive, as they must be unique in the entire Azure domain (remember they will be referenced as <myServerName>.database.windows.net in database connection strings).
To solve this issue, Terraform allows you to generate random values, like integers you concatenate to resource names.
To obtain random numbers, we use the following code, which is part of the file "locals.tf". The first block defines the range of integers to be considered. In this case, integers from 1 to 999,999. The first line in the block "locals{}" is formatting the random result to any string between "000001" and "999999" and the next line uses this string, referenced as "local.randomSuffix".
#Random ID for unique naming

resource "random_integer" "rand" {

  min = 000001

  max = 999999

}


locals {

  randomSuffix = "${format("%06s", random_integer.rand.result)}"

  rgname = "${var.rgPreffix}${var.rgName}-${local.randomSuffix}"

  ....................

}
Running HCL Scripts
We are going to use the same workflow as in Example 1. Only change, which is optional, is to execute "terraform output" to present in the screen and/or save to file the output parameters specified in file "outputs.tf"
After execution, this is the result I can see in Azure Portal.
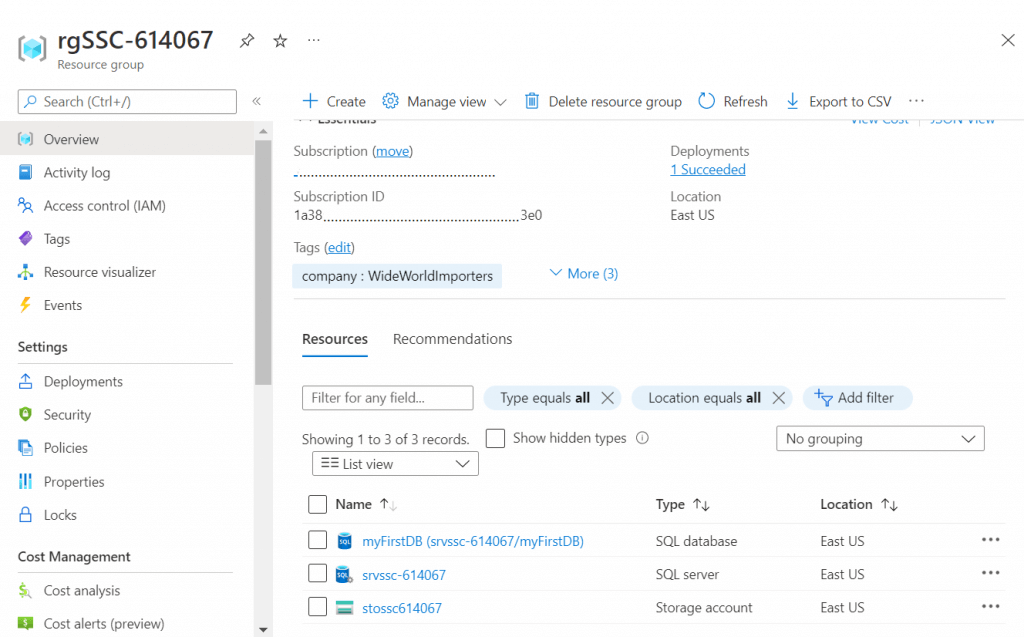 Image 05: showing results in Azure Portal after deploying Example 02
Next Steps
With this article, I just scratched the surface of automated database deployments with Terraform. But I hope you can get an idea of how powerful it is.
Obviously, real life scenarios are way more complex than those two examples. Security concerns, resource dependencies, deployments to different environments, infrastructures involving tens of resources and sometimes hundreds of parameters, automated execution and so on. Those topics will be the subject of the next parts of this article.

