

Introduction
Azure Cosmos DB is Microsoft's globally distributed, multi-model platform-as-a-service (PaaS) database. Any web, mobile, gaming, and IoT application that needs to handle massive amounts of structured, semi-structured and unstructured data may use Azure Cosmos DB. Guaranteed high availability, high throughput, low latency, and tunable consistency help in reading and writing data at a global scale with near-real response time.
Azure Cosmos DB is a NoSQL database and have many advantages over the relational database.
NoSQL database
NoSQL databases are also referred to as nonrelational databases. They can handle huge volumes of rapidly changing, unstructured data in different ways than a relational (SQL) database with rows and tables. Most nonrelational, high-performance databases are also called “not only SQL” as these databases can also handle highly structured data. They are not limited to any fixed data models.
The four most common types of NoSQL databases are:
- Key-value: Key-value stores pair keys and values using a hash table.
- Document: extends the concept of the key-value database by organizing entire documents into groups called collections. They support nested key-value pairs and allow queries on any attribute within a document.
- Columnar: efficiently stores data and query across rows of sparse data and are advantageous when querying specific columns in the database.
- Graph: uses a model based on nodes and edges to represent interconnected data and offer simplified storage and navigation through complex relationships.
Azure Cosmos DB Account
To start working with Azure Cosmos DB, I need to initially create an Azure Cosmos account in an Azure subscription. The Azure Cosmos account is the fundamental unit of global distribution and high availability. The account contains a unique DNS name to identify and manage it. For globally distributing the data and throughput across multiple Azure regions, new regions can be added or existing regions can be removed from the account at any time.
A single Azure Cosmos account can virtually manage unlimited amount of data and provisioned throughput. I need to create databases, containers and items under the Cosmos DB account for data population and management.
Creating a Database and Querying Data
I will discuss the step-by-step process for populating data and then querying in a Azure Cosmos DB account.
Step 1: create the account
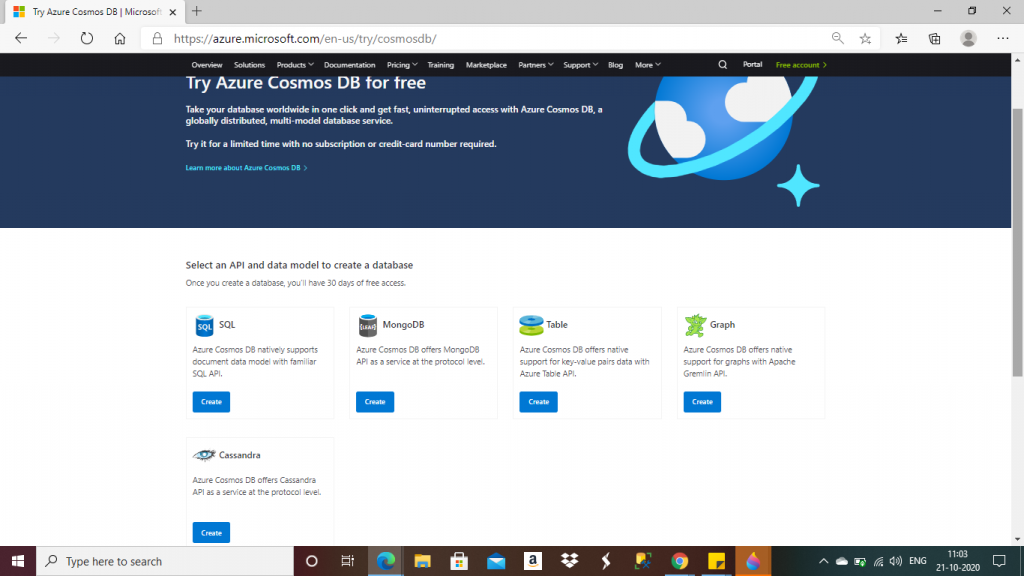
I click on the link, https://azure.microsoft.com/try/cosmosdb/, to create an Azure Cosmos DB account free for 30 days. No Azure subscription is required for this account. To create the account, first I need to select an API and data model from the five available options. I select the SQL API and press the 'Create' button.
API stands for Application Programming Interface. Programmers use the APIs to write programs to access the data. Cosmos DB supports 5 APIs:
- SQL API: enables to identify and retrieve documents using SELECT statements. This API should be used for any new application. Other APIs are there to support existing applications.
- Table API: Data in Table Storage can be migrated to Cosmos DB and the existing application can be used to access the data using Table API.
- MongoDB API: Data in a MongoDB database can be migrated to Azure Cosmos DB and the existing MongoDB application can be used to access the data using MongoDB API.
- Cassandra API: provides a Cassandra-like programmatic interface for Cosmos DB. The primary purpose of the Cassandra API is to enable quick migration of Cassandra databases and applications to Cosmos DB.
- Gremlin API: implements a graph database interface to Cosmos DB. A graph is a collection of data objects and directed relationships. Gremlin API enables to perform graph queries over data in Cosmos DB.
As you can see, each of these are available in a separate database that we can create.
Step 2: Create the SQL API Database
I click Create next to the SQL API. The Azure Cosmos DB account is created, and the free account should be valid for the next 30 days. I click on the link 'Open in the Azure Portal' to open the Cosmos DB in the Azure portal and start working with my database.

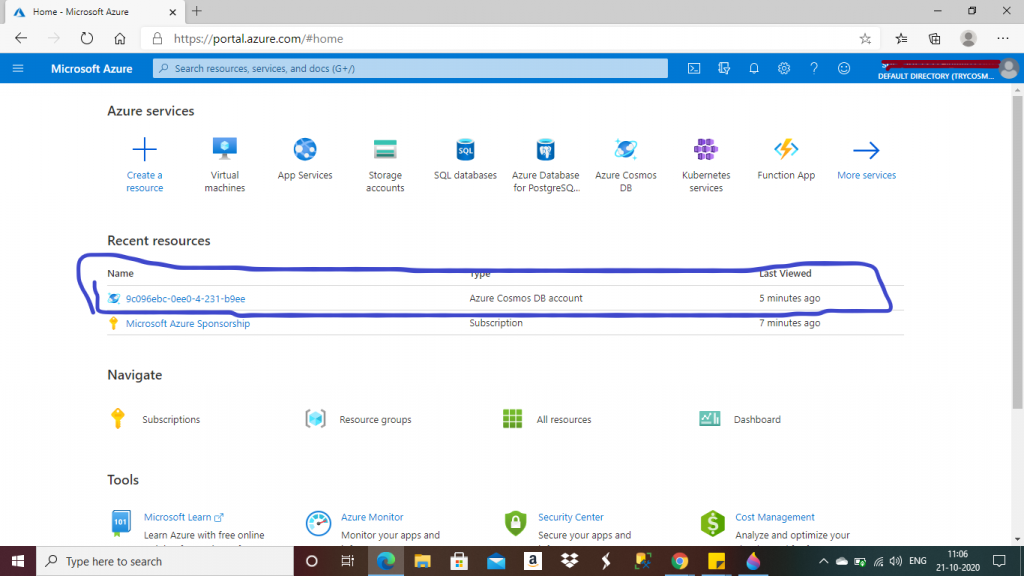
Step 3: Azure Cosmos DB account in the Home page
Now, I am in the Home page of the Azure Portal. The Cosmos DB account is available in the Resource list. A default name is given for the Cosmos DB account. I click on it.
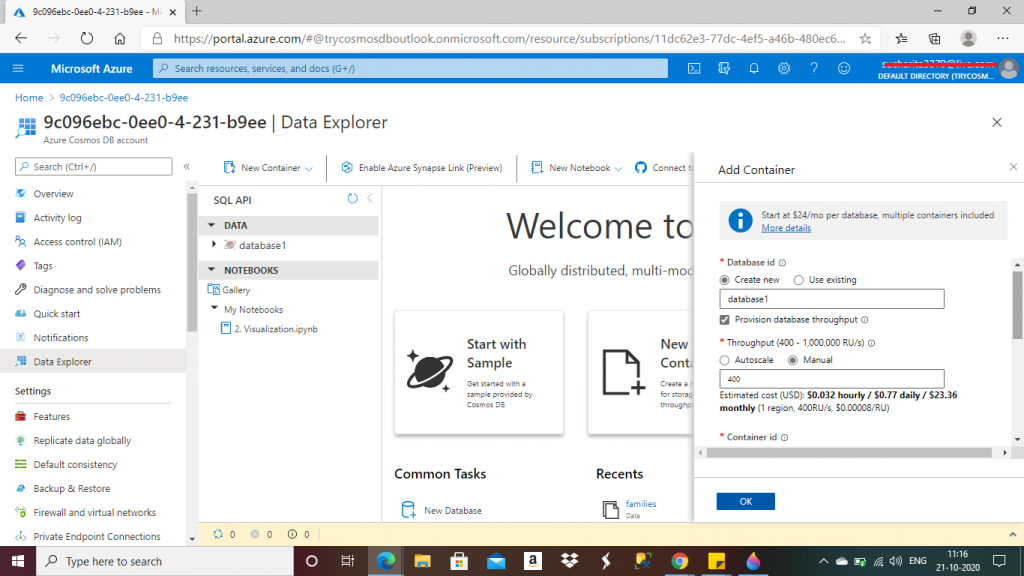
Step 4: Create the database and the container
I go to the Data Explorer tab for the Cosmos DB account. Here, I click on New Container link. A new window opens for adding a container. I have to provide a few details here about the database and the container.
Item: It can represent a document in a collection, a row in a table, or a node or edge in a graph depending on the API selected for creation of the Cosmos DB account.
Container: This is a schema-agnostic container of items. Different items in a container may have different schemas. A container is horizontally partitioned and then replicated across multiple regions. Items are automatically grouped into logical partitions and then are distributed across physical partitions, based on the partition key. The throughput on a container is evenly distributed across the physical partitions.
Partitioning: items in a container are divided into distinct subsets called logical partitions based on the value of a partition key associated with each item in a container. All the items in a logical partition have the same partition key value. Physical partitions are an internal implementation of the system. One or more logical partitions can be mapped to a single physical partition.
Partition Key: it has two components: partition key path and the partition key value. Selection of the partition key is an important design decision. Partition key should be a property whose value does not change and values have a wide possible range.
Database: This is similar to a namespace. I may create one or multiple databases under the Azure Cosmos DB account. There can be multiple containers inside a database.
Throughput: It is required for the containers to run writes, reads, updates and deletes on the items. Throughput of a database is shared across all the containers in the database. Unit for throughput is request units per second (RU/s). A single request unit, one RU, is equal to the approximate cost of performing a single GET request on a 1-KB document using a document's ID. Request units are estimated based on many factors like item size, item indexing, query patterns etc.
I create a new database here. I can provide the name of an existing database also in the Database Id field.
The next field is throughput. I set the option as manual and put the RU/s value as 400. Then, I have to give the name of the new container in the Container Id field.
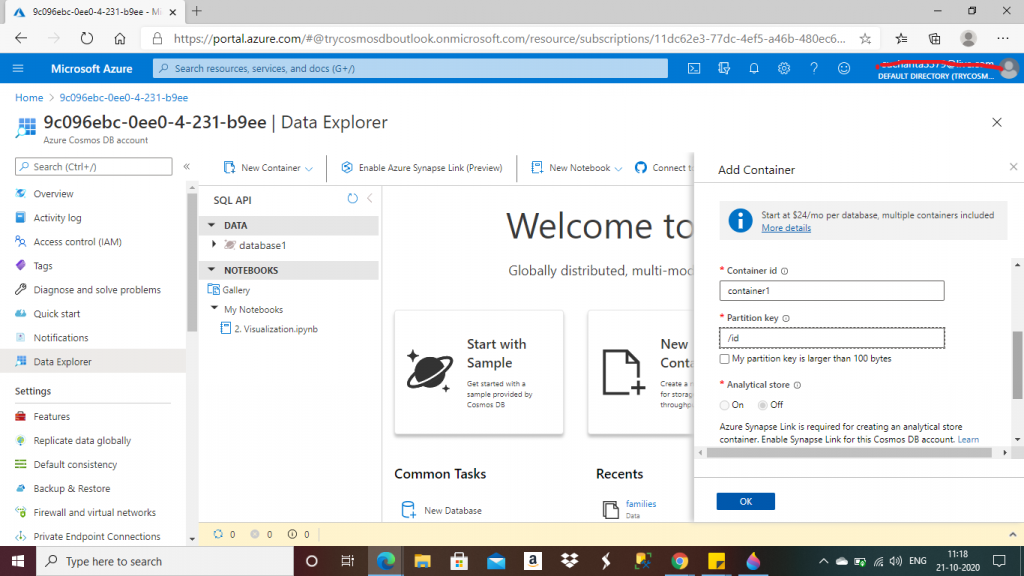
I give a name for the container in the Container Id field. Then I select the partition key as a field named id for the items to be added in the container. I keep the other fields with the default values for now and press the OK button.
Step 5: Adding Items to the Container
I created a database, named database1, and then a container, named families. Now, I have the option to create a new item or upload an existing item. This item needs to be a JSON file for the SQL API.
JSON stands for JavaScript Object Notation. JSON is a text format that is completely language independent but uses conventions that are familiar to programmers of the C-family of languages including C, C++, C#, Java, JavaScript, Perl, Python, and many others. JSON is a collection of name-value pairs. Names can be any string value and are case sensitive. Values can be arrays. JSON objects always begin with a { left brace and end with a } right brace and the properties (name-value pairs) can be nested within one another.
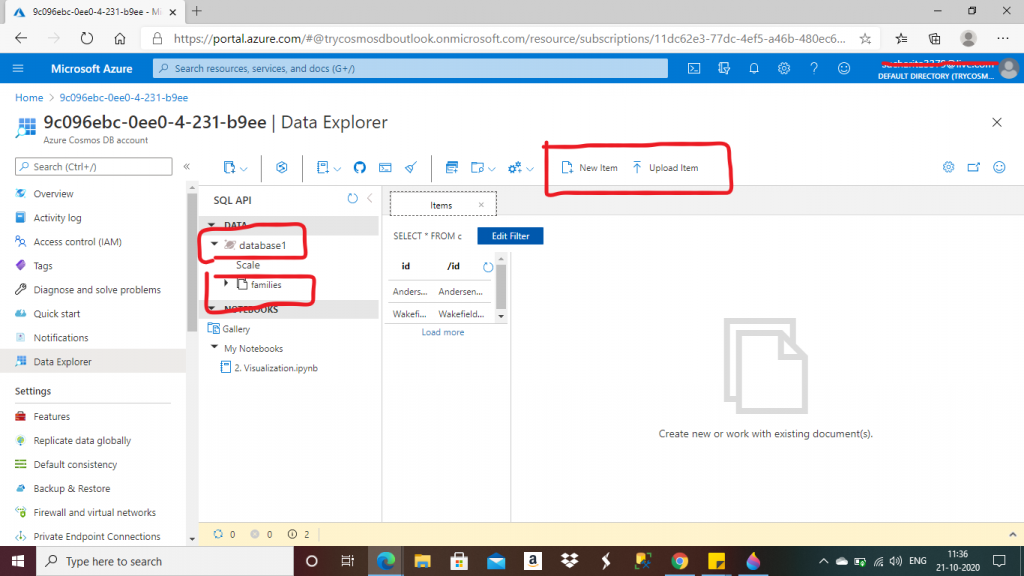
If I press the New Item link, a new empty JSON file is created. The elements can be added here.

If I press the Upload Item link, a popup window is open for the folder explorer. I may select an existing JSON file from the device folder.
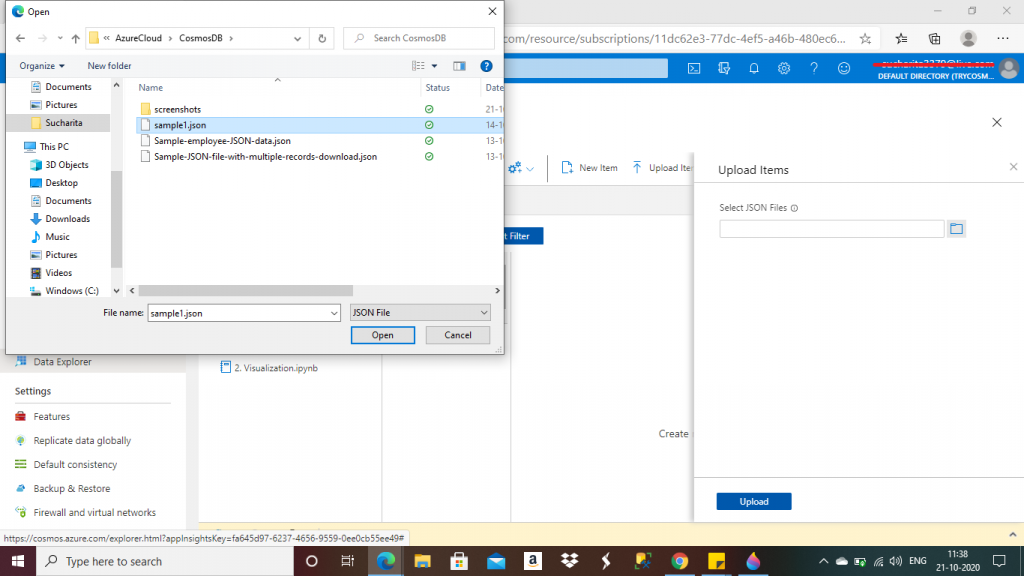
Step 6: upload the two JSON files
Here, I upload two JSON files from the folder location. These two files are about two families. These files are taken from Microsoft documentation.
Item 1:
{
    "id": "AndersenFamily",
    "lastName": "Andersen",
    "parents": [
        {
            "firstName": "Thomas"
        },
        {
            "firstName": "Mary Kay"
        }
    ],
    "children": [
        {
            "firstName": "Henriette Thaulow",
            "gender": "female",
            "grade": 5,
            "pets": [
                {
                    "givenName": "Fluffy"
                }
            ]
        }
    ],
    "address": {
        "state": "WA",
        "county": "King",
        "city": "Seattle"
    },
    "creationDate": 1431620472,
    "isRegistered": true,
    "_rid": "AzoFAMaUtpQBAAAAAAAAAA==",
    "_self": "dbs/AzoFAA==/colls/AzoFAMaUtpQ=/docs/AzoFAMaUtpQBAAAAAAAAAA==/",
    "_etag": "\"b50076de-0000-0200-0000-5f86d9ec0000\"",
    "_attachments": "attachments/",
    "_ts": 1602673132
}
Item 2:
{
    "id": "WakefieldFamily",
    "parents": [
        {
            "familyName": "Wakefield",
            "givenName": "Robin"
        },
        {
            "familyName": "Miller",
            "givenName": "Ben"
        }
    ],
    "children": [
        {
            "familyName": "Merriam",
            "givenName": "Jesse",
            "gender": "female",
            "grade": 1,
            "pets": [
                {
                    "givenName": "Goofy"
                },
                {
                    "givenName": "Shadow"
                }
            ]
        },
        {
            "familyName": "Miller",
            "givenName": "Lisa",
            "gender": "female",
            "grade": 8
        }
    ],
    "address": {
        "state": "NY",
        "county": "Manhattan",
        "city": "NY"
    },
    "creationDate": 1431620462,
    "isRegistered": false,
    "_rid": "AzoFAMaUtpQCAAAAAAAAAA==",
    "_self": "dbs/AzoFAA==/colls/AzoFAMaUtpQ=/docs/AzoFAMaUtpQCAAAAAAAAAA==/",
    "_etag": "\"b500b7df-0000-0200-0000-5f86da180000\"",
    "_attachments": "attachments/",
    "_ts": 1602673176
}
Step 7: Create the new query
I have two items now in the container named families. I press the New Query button. A new query window is open, in which I can write SQL-like queries on the items.
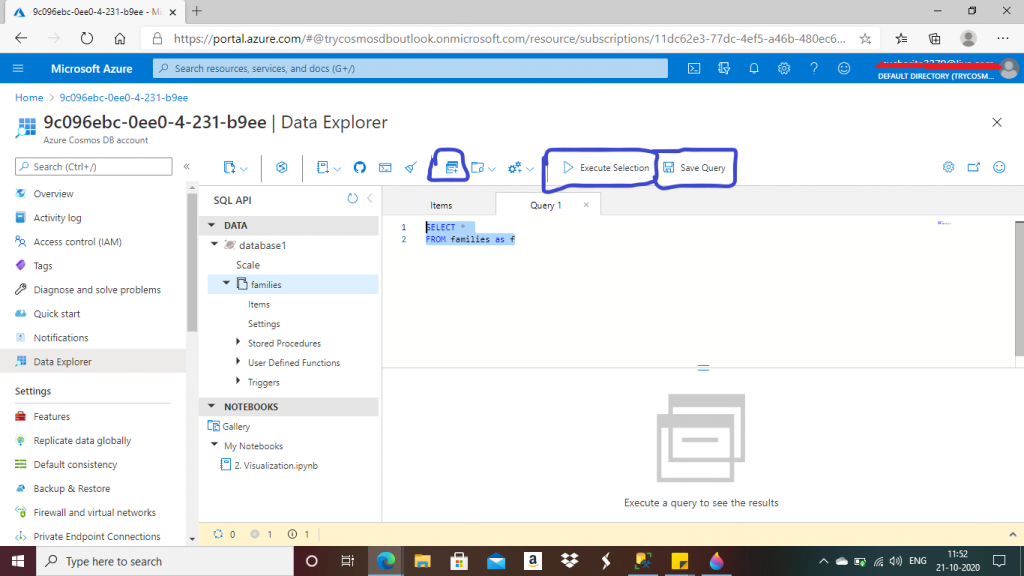
Step 8: Save the query
After writing a query, I press the Save Query link. A window is open to save the query. To save the queries, a new database named ___Cosmos is created.

Step 9: Write different queries on the items
Query 1 returns all the properties of both the items from the container named families. Query 2 returns all the properties of the item with id value matching with "AndersenFamily". Query 3 returns all the items matching the id values given in the list. Query 4 returns items matching the lastname value given.
In the select list, different property names can be mentioned instead of *. In the where clause, multiple search criteria can be mentioned based on the values of the property names.
--Query 1
SELECT *
FROM families as f


--Query 2
SELECT *
FROM families as f
where f.id = "AndersenFamily"


--Query 3
SELECT *
FROM families as f
where f.id IN ("AndersenFamily","WakefieldFamily")


--Query 4
SELECT *
FROM families as f
where f.lastName = "Andersen"
A few others. Query 5 returns the nested property address in the select list for the items with the given lastname value. Query 6 returns the first record of the array property children from the items with the given id value. Query 7 returns the name for the second pet of the first children from the items with the given id value. I retrieve property value from multiple levels of nesting here.
--Query 5
--nested properties
SELECT f.address.state, f.address.city
FROM families as f
where f.lastName = "Andersen"


--Query 6
--retrieve data for first child
SELECT f.children[0] AS c1
FROM families as f
where f.id = "WakefieldFamily"


--Query 7
--retrieve name for the second pet of the first child of WakefieldFamily and giving an alias
SELECT f.children[0].pets[1].givenName AS c1p2Name
FROM families as f
where f.id = "WakefieldFamily"
Joins
In SQL API, different levels of the JSON document can be joined. Inner joins result in a complete cross product of the sets participating in the join. The result of an N-way join is a set of N-element tuples, where each value in the tuple is associated with the aliased set participating in the join and can be accessed by referencing that alias in other clauses.
Query 8 returns parent details for each item in the families container. As both of the items have two parents each, total 8 JSON objects are returned. Each parent sublevel has its property names and values. Query 9 has join among multiple levels of the items. The first item has one children having one pet. The second item has two children each having one pet. So, this query returns three objects with property name and values from different levels of the items.
--Query 8
--self join
SELECT f.id, f.parents
FROM families as f
JOIN p IN f.parents


--Query 9
--join with multiple levels within the JSON document
SELECT
f.id AS familyName,
c.givenName AS childGivenName,
c.firstName AS childFirstName,
p.givenName AS petName
FROM families as f
JOIN c IN f.children
JOIN p IN c.pets
Conclusion
In this article, I gave introduction about the basics of Azure Cosmos DB. I used SQL API and processed two JSON documents. I have added these documents and then queried them using SQL-like code. There are many aspects of Azure Cosmos DB including global distribution, partitioning, data analytics etc. I will discuss about them in details in the next series of articles.
