

Introduction
Azure Synapse Analytics (formerly SQL DW) )is the next evolution of Azure SQL Data Warehouse. It is a combination of enterprise data warehousing and Big Data Analytics. A Synapse SQL Pool is the enterprise data warehousing feature that is generally available in Azure Synapse Analytics. This is a collection of analytic resources and the size and performance of the pool is determined by the selected Data Warehousing units (DWU). It has a massively parallel processing (MPP) architecture which makes the data computation very fast.
Usually an extract, load and transform (ELT) process is used for data loading in the Synapse SQL Pool to leverage MPP and to eliminate the resources required for data transformation before loading data. In ELT process, data is extracted from external storage and loaded in the SQL Pool. Then, data is transformed and finally inserted into the production tables.
Synapse SQL MPP architecture
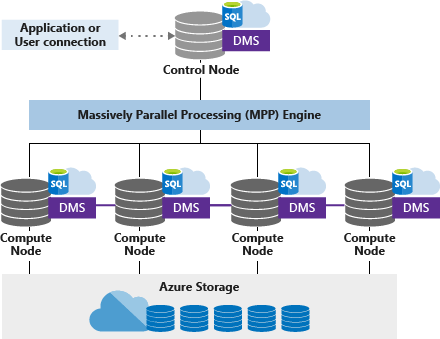
Synapse SQL uses a node based architecture. There are two types of nodes: a control node and a compute node. The control node accepts application queries and optimizes them on the MPP engine for parallel processing. The control node then shares the queries with the compute nodes to complete the execution in parallel. Compute nodes store user data in Azure storage and execute the queries in parallel.
The DMS (Data Movement service) helps with data movement between the compute nodes as per processing requirements.
The COPY Statement
There are many data loading methods for the SQL Pool. The COPY statement is the fastest, most scalable and flexible way to load data. Data can be loaded from Azure Blob Storage and Azure Data Lake through T-SQL language statements. With the COPY statement, data can be loaded from UTF-8 and UTF-16 encoded delimited text or CSV files. Data loading can also be completed from the Hadoop file formats such as ORC and Parquet as well. GZip and Snappy compressed file formats are also allowed.
Data can be copied from the external storage account to the SQL Pool through a single T-SQL statement. The user executing the statement should have the following permissions: INSERT and ADMINISTER DATABASE BULK OPERATIONS.
The target tables needs to be created before executing the COPY statement. It is possible to map the source data fields to specific target table columns and some default values can be included for the target columns in case no value is present in the source data field for a particular record.
Here, I explain the step-by-step process for data loading in the SQL Pool with Copy statement.
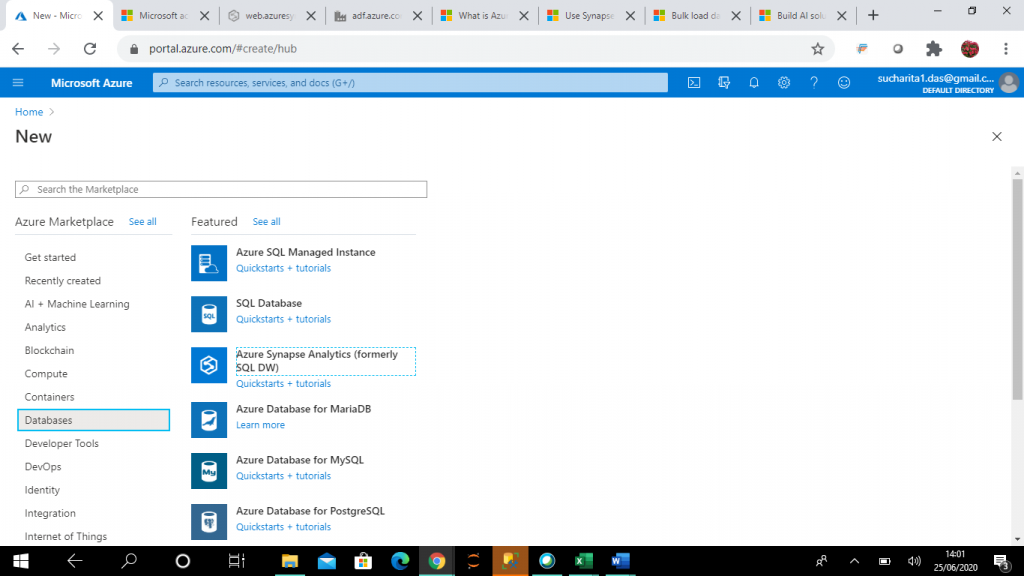
Step 1: Create a Resource
I need go to Azure Portal and create a new resource of the type, Azure Synapse Analytics (formerly SQL DW). This is a simple process described in this Microsoft Docs article, and we will cover the steps below.
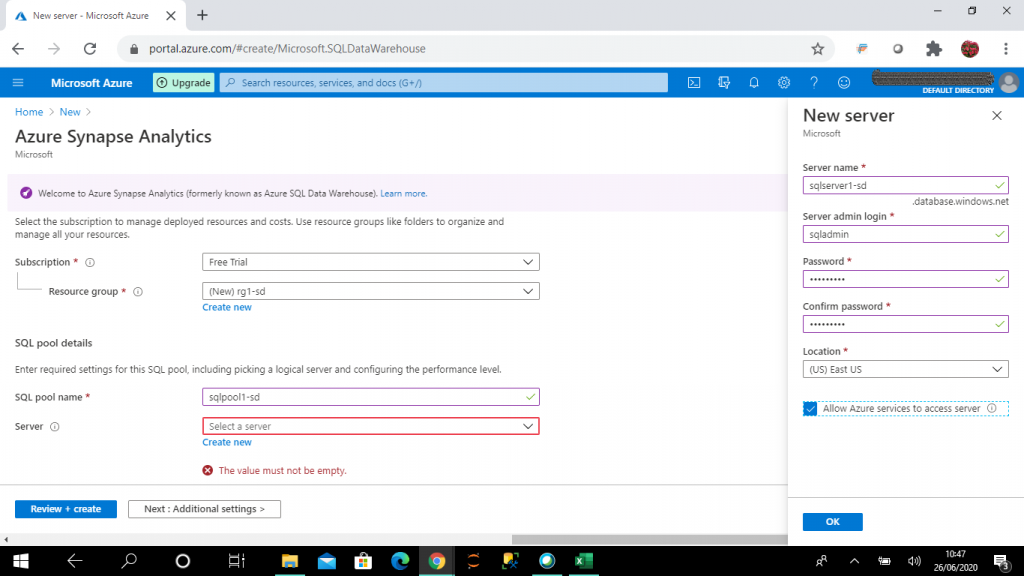
Step 2: Enter the Details
I have created a new logical SQL Server instance, as shown in the screenshot below. If any SQL Server instance is already available in my subscription, I may use that as well.
For this example, I choose the minimum DW Unit allowed. A DWU is a measure of compute resources and performance. If I increase the DWU, data loading and query performance increases, but the cost also increases. So, the value should be chosen as per your processing requirement and budget.
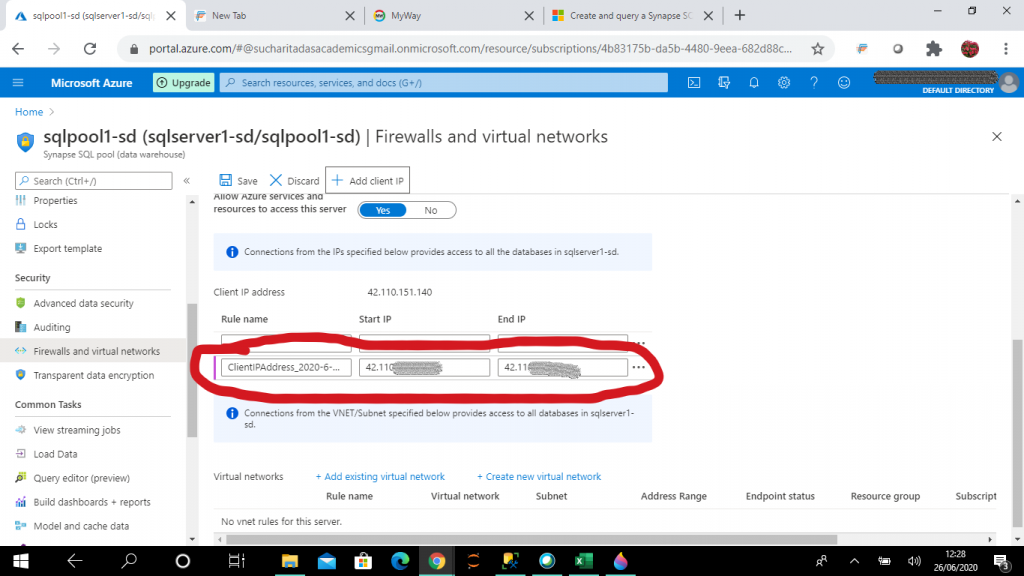
Step 3: Networking
Once the SQL pool is created, I select the SQL Pool and go into the Firewalls blade In the virtual networks section, I add the client IP of my system where from I will connect the SQL Server through Management Studio. When the logical SQL Server is created, the result is a public endpoint in the format:<servername>.database.windows.net
The SQL pool in the logical SQL Server can be accessed via the public endpoint. We now configure the following network access controls:
- Allow Azure Services - When set to Yes, other resources within the Azure boundary can access SQL Database.
- IP firewall rules - this feature is used to explicitly allow connections from a specific IP address, for example from on-premises machines.
IP firewall rules prevent all access to the SQL Server until the IP addesses of the client machines are added explicitly. You can see the dialog below where we add them.
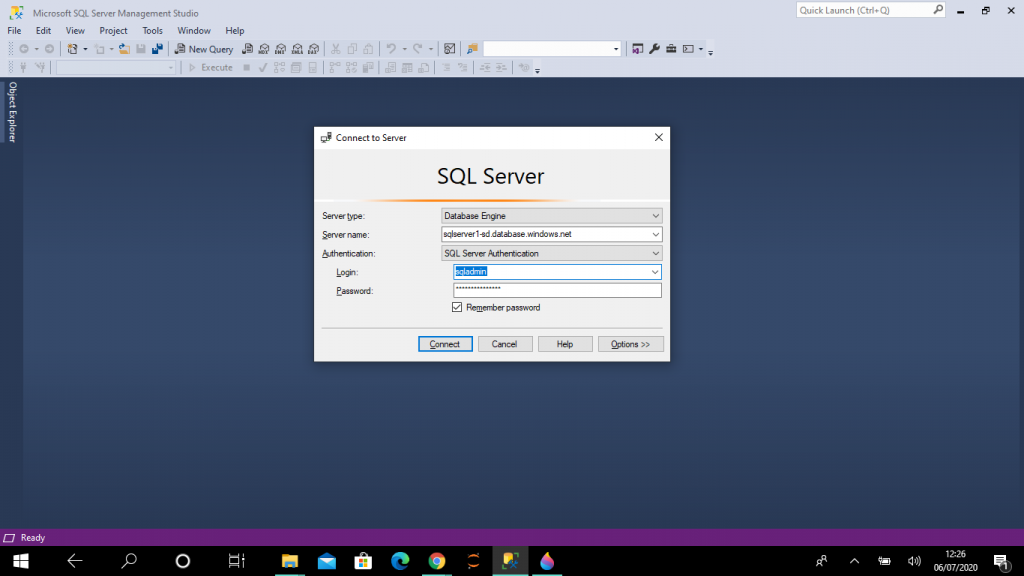
Step 4: Connect from SSMS
I get the connection string from the Overview page. I use this to connect to the SQL Pool through SSMS in my local machine. I use the sqladmin login I entered in the New Server dialog above.
Step 5: Creating a Table
I create a table, named dbo.titanic, in the SQL Pool. The code is below, but since the columns and data types must match with the data in the text file. Therefore, it is important to understand the input data and data types before starting the data loading process. I examined the data and came up with this schema.
create table dbo.titanic
(
PassengerId INT,
Survived INT,
Pclass INT,
Name VARCHAR(200),
Gender VARCHAR(10),
Age float,
SibSp INT,
Parch INT,
Ticket VARCHAR(30),
Fare MONEY,
Cabin VARCHAR(30),
Embarked CHAR(1)
)
WITH
(
    DISTRIBUTION = ROUND_ROBIN,
    CLUSTERED COLUMNSTORE INDEX
);
Clustered Columnstore Index
A clustered columnstore index uses column based data storage where all the data in a column is stored together. This is the default index for any SQL Pool table, and it offers the highest level of data compression and best overall query performance. This is usually the best choice for large tables.
Round Robin Distribution
Synapse SQL stores data into Azure storage to keep user data safe. Data is sharded into distributions to enhance the performance. Three possible sharding patterns are: hash, round robin and replicate. When Synapse SQL runs a query, the work is divided into 60 smaller queries that run in parallel on one of the distributions. Distributions map to compute nodes for processing.
I select round robin distribution for the titanic table. Here, data is distributed evenly across the table but without any further optimization. Round robin distributed tables give fast performance when used as a staging table for data loading. In hash distribution, a hash function is used to deterministically assign each row to one distribution based on the value in a particular column designated as the distribution column. Hash distributed tables get the highest query performance for joins and aggregations on large tables.
In replicated distribution, replicated table caches a full copy of the table on each compute node. It provides the fastest query performance for small tables .
Step 6: Logins, Users, and Workloads
I need to create a login. In the master database, I'll create one, named load_login.
I need a user as well, so I will create a user, named load_user, is created for the login, load_login, in both the master database and the SQL Pool database. The user, load_user, is given the required permissions to load data from external file storage to the SQL Pool. Insert and select permissions are given on the particular destination table dbo.titanic.
CREATE WORKLOAD GROUP
A workload refers to all operations that happen in a Synapse SQL Pool. Workload management consists of three high level concepts: workload classification, workload importance and workload isolation. Workload importance is used for deciding the order in which a request gets access to resources on a busy system. Workload isolation reserves resources for a workload group. Workload groups provides the ability to reserve resources, contain resources and define resources per request.
A classifier function is used for workload classification. The classifier assigns incoming requests to a workload group based on the parameters specified in the statement definition. I create the classifier for load_user and the workload group LoadData with maximum resources.
--create the login and user in master database
CREATE LOGIN load_login WITH PASSWORD = '<password>'; -- please replace <password> with the actual one
CREATE USER load_user FOR LOGIN load_login;
GO

--create the user in SQL Pool
CREATE USER load_user FOR LOGIN load_login;
GO

--grant required permissions for data loading
GRANT CREATE TABLE TO load_user;
GRANT ALTER ON SCHEMA::dbo TO load_user;
GRANT ADMINISTER DATABASE BULK OPERATIONS TO load_user
GRANT INSERT ON dbo.titanic TO load_user;
GRANT SELECT ON dbo.titanic TO load_user;

--workload group is created with maximum resources
CREATE WORKLOAD GROUP LoadData
WITH (
MIN_PERCENTAGE_RESOURCE = 100
    ,CAP_PERCENTAGE_RESOURCE = 100
    ,REQUEST_MIN_RESOURCE_GRANT_PERCENT = 100
);

--classifies load_user with the workload group LoadData
CREATE WORKLOAD CLASSIFIER [wclLoadData]
WITH (
WORKLOAD_GROUP = 'LoadData'
    ,MEMBERNAME = 'load_user'
);
Step 7: The storage account
I need to create a storage account and set access controls on it.
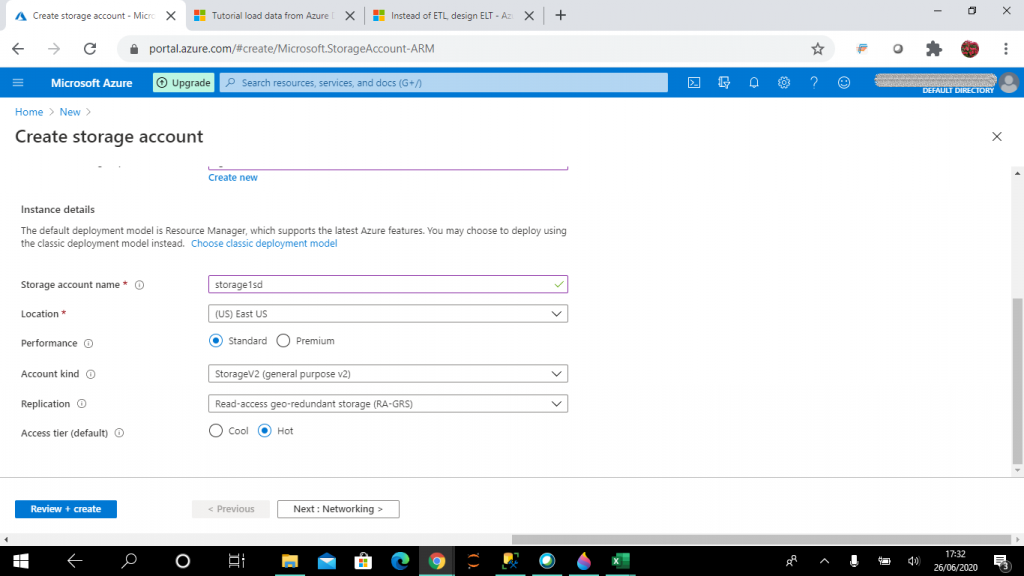
Azure storage account
The storage account provides a unique namespace for storing data. This is accessible from anywhere over HTTP or HTTPS. Data in Azure storage account is highly available, durable, secure and scalable. There are different types of storage accounts, but general purpose v2 accounts are used for storing blobs, files, queues and tables. This is the recommended type of storage account to use.
There are different options for replication. In RA-GRS replication, data is copied synchronously three times in the primary region and then copied asynchronously to the secondary region. Read access on data is enabled in the secondary region. The access tier can be hot or cool. Hot tier is optimized for frequent access of objects in the storage account. Cool tier is optimized for storing large amounts of data that is infrequently accessed.
For this account, I choose the hot access tier.
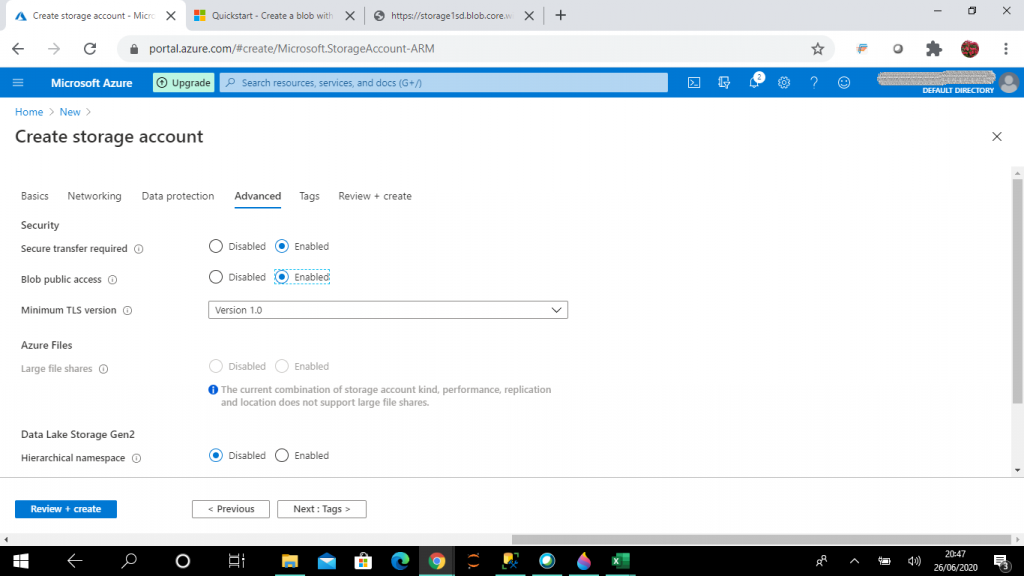
Blob public access
Blob public access in the Advanced tab is set as enabled. With this option set, blobs can be read without needing to share an account key or a shared access signature (SAS). When the storage account is created, two 512 bit account access keys are generated. These keys can be used to authorize access to the data through Shared Key authorization.
The shared access signature (SAS) is a signed URI (user delegation key) that points to one or more resources. It helps to provide secure access to the resources in the storage account. With SAS it can be controlled what resources the client may access, what are the permissions they have on the resources and for what duration the SAS will be valid.
Public read access can be given when certain blobs should always be available for anonymous read access. For this exercise, I choose this option, as you can see below.
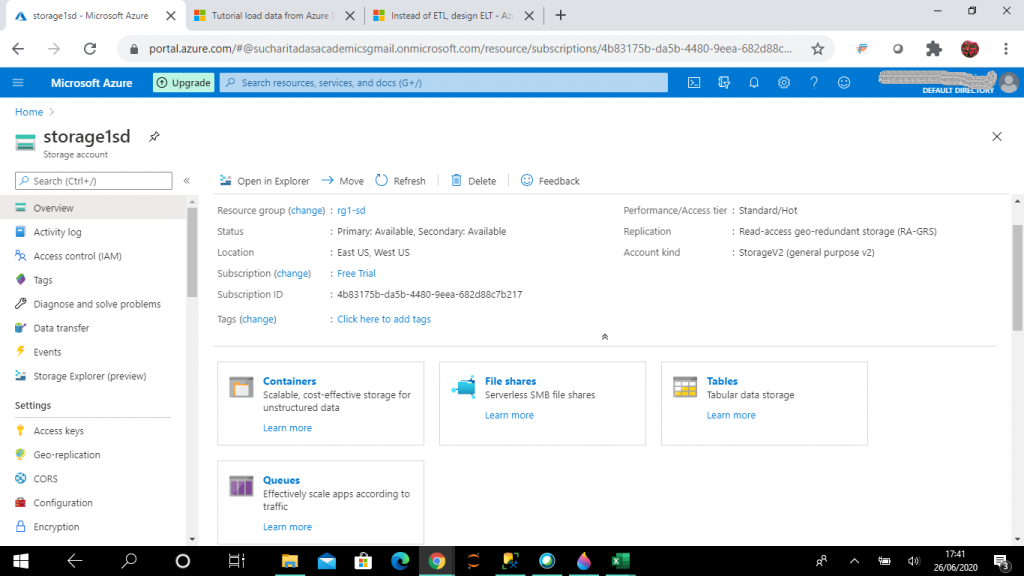
Step 8: Create a Container
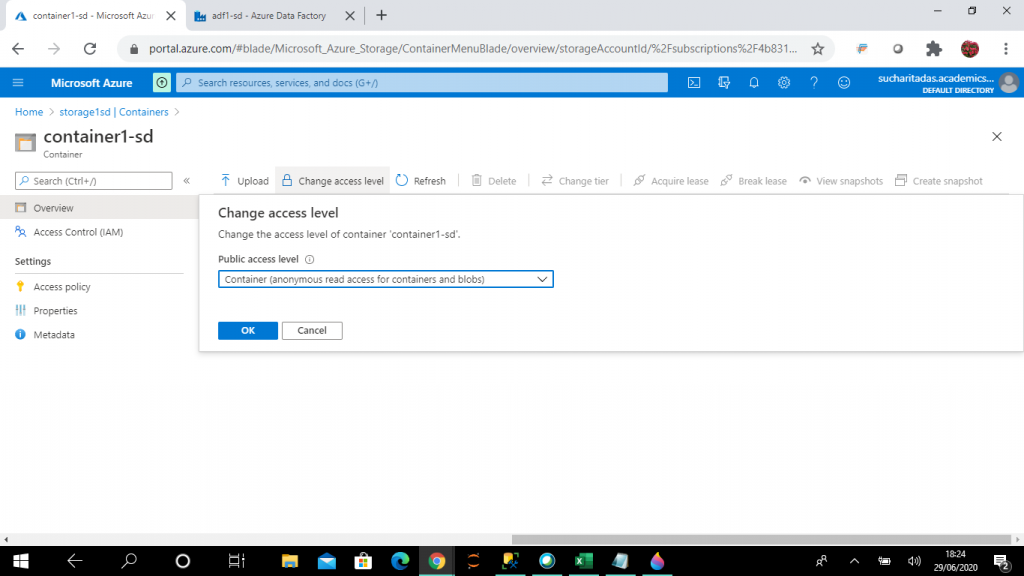
Once the storage account is created, we need a container that will be used to store our files. We start at the overview and click the Container link. In here, we want to create a new container, called container1-sd.
A container can be configured with one of three possible access levels:
- No public read access: The container and its blobs can be accessed only by the account owner. This is the default option.
- Public read access for blobs only: Blobs within the container can be read by anonymous request. Anonymous clients cannot enumerate the blobs within the container.
- Public read access for container and its blobs: Container and blob data can be read. Blobs within the container can be enumerated, but containers within the storage account can't be enumerated.
I set the Public Access Level as Container to access the blob files from SQL Pool script. I can change this option anytime as per our requirement.
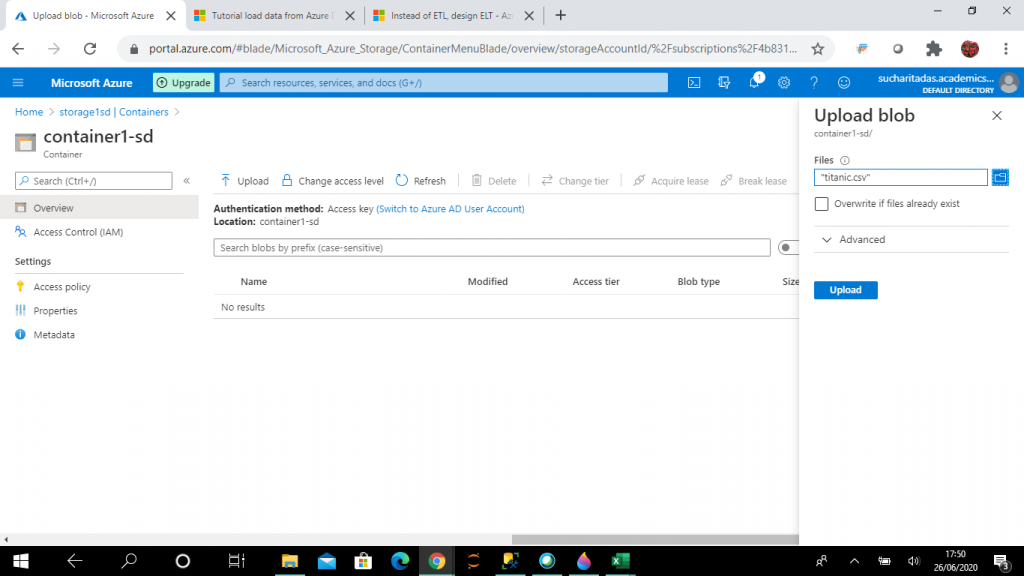
Step 9: Upload the Data
I select the upload button inside the container to upload the file, titanic.csv, from my local machine folder.
Step 10: Connect to the SQL Pool
I connect to the SQL Pool using the loading login created (load_login) through SSMS. This is a normal connection, like any other for a SQL Server instance. Enter the URL for the SQL Pool and your credentials.
Step 11: Run the COPY Command
I execute the following code in the SQL Pool.
COPY INTO [dbo].[titanic]
(
PassengerId 1,
Survived 2,
Pclass 3,
Name 4,
Gender 5,
Age default 0 6,
SibSp 7,
Parch 8,
Ticket 9,
Fare 10,
Cabin default 'None' 11,
Embarked 12
)

FROM 'https://storage1sd.blob.core.windows.net/container1-sd/titanic.csv'
WITH (
   FILE_TYPE = 'CSV',
   FIELDQUOTE = '"',
   FIELDTERMINATOR = ',',
   ROWTERMINATOR = '\n',
   FIRSTROW = 2
)
--(891 rows affected)
After the COPY INTO command, the table name is entered. After the table name, list of columns of the table can be added, but this is optional. Here, column details are provided in the following format:
[(Column_name [Default_value] [Field_number] [,...n])]
with these definitions:
- Column_name: name of the column from the target table
- Default_value: when no data is available in a record for the column, default value provided here will be loaded in the table.
- Field_number: This is the input file field number that will be mapped to the target column name. So, the source file and target table need not have the fields in the same order to copy data.
In the file titanic.csv, some of the values are missing for the columns Age and Cabin. So, I select 0 and None as default values for these two columns respectively.
FROM clause
In the FROM clause, there is a URL given that has the following format:
'https://<storage account name>.blob.core.windows.net/<blob container name>/<csv file name>'
This matches the URL path for our storage account, container, and file name.
WITH Clause
In the WITH clause, there are a list of arguments which can be set with different possible values optionally. Each of these is listed:
- FILE_TYPE: It can be CSV, PARQUET OR ORC.
- FILE_FORMAT: External file format object can be specified for Parquet and ORC files. This object stores the file type and compression method of the data.
- CREDENTIAL: It specifies the authentication mechanism for accessing the external data. It can be SAS, Key, Azure Active Directory etc.
- ERRORFILE: It is only for CSV input files. It contains the location where the error files are stored after execution of the COPY statement. A different storage account can be mentioned for storing the error files.
- ERRORFILE_CREDENTIAL: It is only for CSV input files. If ERRORFILE has the full path of the storage account defined, then this credential is used for authentication.
- MAXERRORS: This is the maximum number of rejected records allowed in the COPY statement after which the statement is cancelled. The default value is 0.
- COMPRESSION: It specifies the data compression method for the external data. Allowed values are: DefaultCodec, Snappy, GZIP, NONE.
- FIELDQUOTE: It specifies a single character that is used as the string delimiter in the CSV file.
- FIELDTERMINATOR: It specifies the character(s) that specifies the field terminator of the CSV file.
- ROWTERMINATOR: It specifies the character(s) that specifies the row terminator of the CSV file.
- FIRSTROW: This is for CSV files. It specifies the row number that is first read from the input file. In my input file titanic.csv, first row has the columns names. That is why the value is set as 2.
- DATEFORMAT: This is for CSV files. Here, date format for the SQL table data columns are specified.
- ENCODING: It specifies the data encoding standard for the input CSV file. The possble values are: UTF8 and UTF16.
- IDENTITY_INSERT: The possible options are ON and OFF. It specifies if the identity values in the input file are to be mapped to the identity column in the target table.
Step 12: Check the Load
After successful execution, all the records from titanic.csv are copied to dbo.titanic table in SQL Pool. We can check this with the following code:
select * from dbo.titanic
--(891 rows affected)
In the dbo.titanic table, Age and Cabin columns have the default values where data is missing in the input file.
Data load monitoring
Query on system views are run to monitor the data loading status periodically. Filters are used as applicable.
SELECT  r.[request_id]
,       r.[status]
,       r.resource_class
,       r.command
,       sum(bytes_processed) AS bytes_processed
,       sum(rows_processed) AS rows_processed
FROM    sys.dm_pdw_exec_requests r
              JOIN sys.dm_pdw_dms_workers w
                     ON r.[request_id] = w.request_id
WHERE session_id <> session_id() and type = 'WRITER'
GROUP BY r.[request_id]
,       r.[status]
,       r.resource_class
,       r.command;
Conclusion
The COPY statement is in public preview as of July 2020 and will be generally available by the end of 2020. It is the most flexible and easy data loading technique for Synapse SQL. It can be used from Azure Data Factory pipeline for data loading in Synapse SQL. Based on the DWU selected, the input data files needs to be split before using COPY statement for achieving the best performance. Be aware that LOB support, such as varchar(max) and nvarchar(max), is not yet available in the COPY statement.