Introduction
In the previous article, we decided where we would set up our Snowflake account relative to the data and services in the Cloud we would be working with. The next step is to get data into the Snowflake platform.
This article will walk you through the Cloud configuration options to set up your Snowflake account with your Cloud storage account. Cloud storage provides a best-and-fastest method to bring external data into your Snowflake account. This part bears repeating—if you want to bring data into Snowflake, it should come through Cloud storage.
Architecture
In this article, we will use an Azure Cloud account and a Snowflake account running in Azure. To connect your Cloud account with the Snowflake account, some type of security context must be used to allow the communication between the two accounts. Snowflake has multiple supported Cloud providers and regions, as discussed previously.
The Azure security context can be set up with Shared Access Signature (SAS) tokens or Service Principals. In Amazon Web Services (AWS), the security context uses AWS Secret/Key or Identity and Access Management (IAM) Roles.
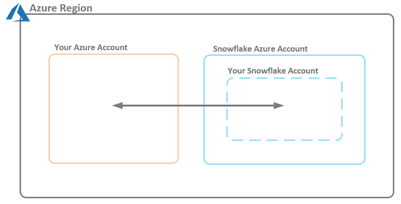
Figure 1 – Security Context Between Your Azure Account and Snowflake Azure Account
In this article, we will discuss how to set up the security context between the two accounts, as depicted by the arrow in Figure 1. Setting up the security context will allow you to bring data into your Snowflake account.
You can get data into Snowflake using one of three methods:
- Import from the Snowflake user interface (UI), using the current user’s UI security context
- Direct insert statements from outside the Snowflake account
- Copy Command
Import from the Snowflake UI
Importing data from the Snowflake UI is a great way to start getting data into Snowflake to allow working with the platform.
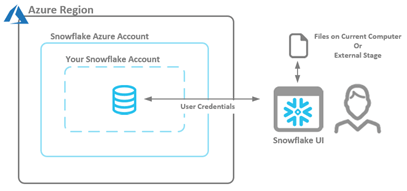
Figure 2 – Security Context Between Snowflake UI and Your Snowflake Azure Account Using the Load Data Wizard
Again, please note that the security context is provided by the current user’s credentials for local files. Using files in a stage will require the set up detailed later in this article.
Here is how to use the Snowflake Load Data Wizard. First, go to the Databases tab:
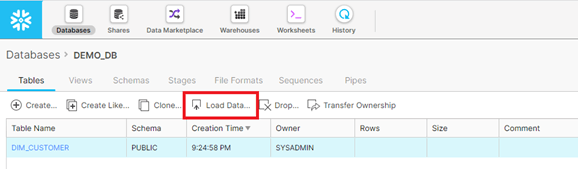
Select a table to load. The table row you select will be highlighted in blue and the Load Data icon will be enabled. Click the Load Data button.
Now follow the Wizard :
- Select a Warehouse (Compute Resource)
- Select the File to load
- Select a Format File (file configuration settings)
You cannot use the Load Data Wizard in automated extract-transform-load (ETL) processes, but it is a great option for loading small sets of data into a Snowflake database.
Direct Insert Statements from Outside the Snowflake Account
I want to address direct insert statements early on and explain why using them is not a viable option: Direct insert statements do allow an automatable solution not available through the Load Data Wizard. However, the resulting performance is very poor.
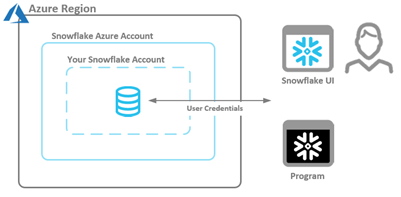
Figure 3 – Security Context Between Snowflake UI/Program and Your Azure Account Using Insert Statements
Copy Command
The last option, the Copy Command, is the best option to use. (It is currently used by replication providers such as FiveTran, Stitch and the Snowflake Connector for Spark.)
To use the Copy Command option with external storage, you must create a Snowflake Stage—a configuration that points to a storage location. If you use SAS tokens with the Snowflake Stage, the credentials will be stored within the stage’s metadata. A Snowflake Stage allows read and/or write access to the configured location.
In Azure, Snowflake currently supports the following storage types:
- Blob storage
- Data Lake Storage Gen2
- General-purpose v1
- General-purpose v2
Direct Loading with the INSERT Command
The INSERT code snippet below was used for testing. The INSERT statement had 10,000 rows per statement. The last run was done by increasing the maximum number of rows (16,384) for a single connection.
sql = "INSERT INTO DEMO_DB.PUBLIC.TEST_INSERT VALUES "
count = 0
for row in df.itertuples():
   count += 1
   sql += "('" + str(row.COL_1) + "', " + str(row.COL_2) +  . . .  + str(row.COL_N) + "')"
   if (count % 10000 == 0):
         cur.execute(sql)
         print("Flushing 10,000 records: ", count)
         sql = "INSERT INTO DB.PUBLIC.TEST_INSERT VALUES "
   else:
         if count < len(df):
               sql += ","
print("Total records: ", count)
cur.execute(sql)
Data Loading Results
The Warehouse size did not affect the execution time.
| Warehouse | Clusters | Credits | Execution Time | Rows/Second |
| X-Small | 1 | 1 | 1:35 | 316 |
| Small | 2 | 2 | 1:42 | 291 |
| Medium | 4 | 4 | 1:49 | 275 |
COPY INTO Command
During performance testing, we used additional data with 100 million+ rows in multiple files that were at least 4GB in size and located in various warehouses (x-small, small, and medium).
Data-Loading History
The following table puts a cost to the data load.
| Warehouse | Clusters | Credits | Execution Time | Rows/Second |
| X-Small | 1 | 1 | 1:36 | 1,289,261 |
| Small | 2 | 2 | 1:05 | 1,904,140 |
| Medium | 4 | 4 | 0:33 | 3,750,578 |
Note: When loading data, scale the warehouse up (instead of scaling it out).
Other methods of using an INSERT statement may exist and could result in better performance. However, the vast difference in performance between the INSERT statement and the COPY command should make this a non-viable option.
Stages
Snowflake supports two types of stages: Internal and External. Internal stages have multiple classifications (User, Table and Named), but in this article, we will only compare the Internal Named Stage to the External Stage (see Figure 4).
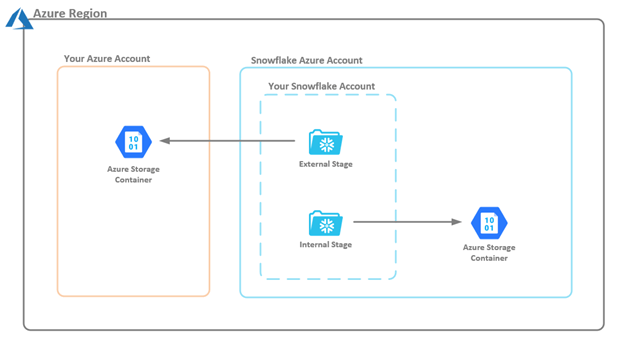
Figure 4 – Comparison of Internal and External Snowflake Stages
The difference between the two stages is the location at which storage is maintained. An external stage points to data in a storage container within your Azure account (that is, a storage container in which you control the types of processes and applications that can interact with it). An internal stage points to a storage container in the Snowflake Azure account. Access to this internal stage is only granted by using Snowflake Put and Get commands. Note: These commands cannot be used in the Snowflake UI; however, they can be used with SnowSQL or another programing language that can access files locally.
As discussed earlier, two different authentication methods can be used with external stages: SAS tokens and Service Principals. In this article, we will only walk through the use of SAS tokens.
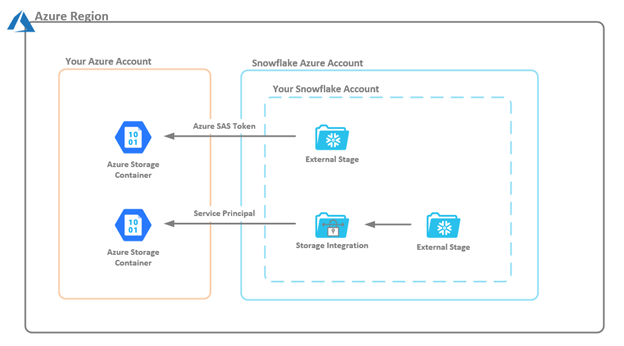
Figure 5 — Stage Authentication Methods
To create an external stage in Azure, you will need the storage container and an SAS key. For this article, we will use Azure Data Lake Storage Gen2.
How to set up an external stage:
- Log into your Azure account
- Go to the Storage Account you will use with Snowflake
- Click Shared access signature
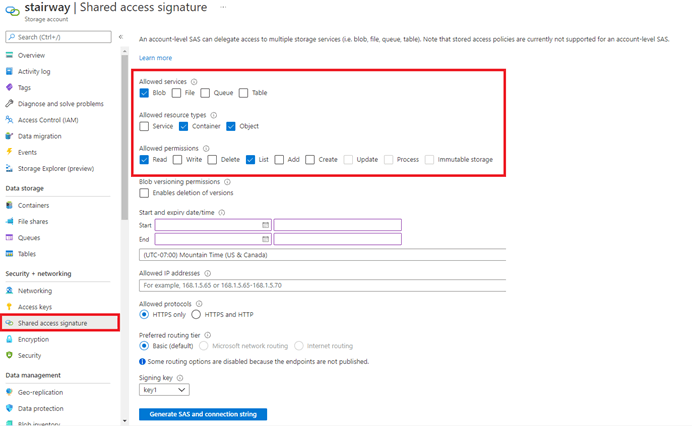
Figure 6 — Storage Container Settings
- From the Shared access signature screen in the storage account, select the following options.
- Allowed services
- Blob
- Allowed resource types
- Container
- Object
- Allowed permissions:
- Read Only Access
- Read
- List
- Allowed permissions: (this is not needed for this article but might be a configuration for Data Unloading)
- Write Access (not selected in the above image)
- Write
- Add
- Create
- Delete
- Specify start and expiry dates/times
- Leave the Allowed IP addresses field blank
- Click the Generate SAS and connection string
- Copy the SAS token that is generated from the above settings:
?sv=2020-08-04&ss=b&srt=co&sp=rl&se= . . . 2F5hI%2BCR9bXgBd3A%3D
Next, from the Snowflake UI, we will create an external stage that will point to our stairway storage container using the following code:
CREATE STAGE DEMO_DB.PUBLIC.STG_AZURE_STAIRWAY
URL = 'azure://stairway.blob.core.windows.net/snowflake'
CREDENTIALS = (AZURE_SAS_TOKEN = '******');
Note: Verify that the URL in your code points to your storage container location and the AZURE_SAS_TOKEN uses the token from the steps above.
You can use the LIST command to determine whether the SAS token was configured correctly and you are able to read data from your external storage container. The command will display all the files within the storage container.
LIST @DEMO_DB.PUBLIC.STG_AZURE_STAIRWAY;
You can see the results in this image:
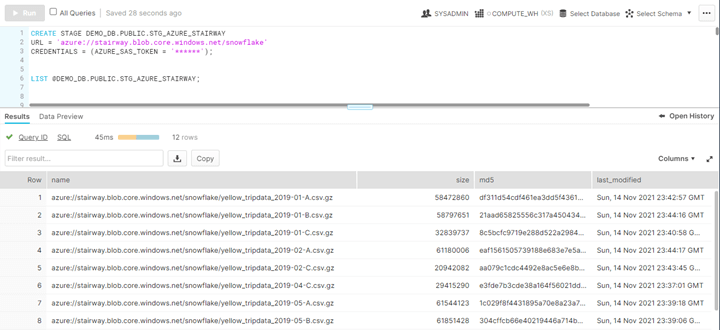
Figure 7 — Snowflake UI Creating External Stage and Listing Storage Container Contents
Note: If you get the following error message, your token could have expired.
Failure using stage area. Cause: [Server failed to authenticate the request. Make sure the value of Authorization header is formed correctly including the signature. (Status Code: 403; Error Code: AuthenticationFailed)]
In real-world scenarios, you can view the data in all the storage container files. In this article (for the sake of simplicity), we will only work with one file. The LIST command can be used with a regex pattern or the exact path to a file.
In the example below, the Snowflake stage was created with a pointer to: stairway.blob.core.windows.net/snowflake, so DEMO_DB.PUBLIC.STG_AZURE_STAIRWAY points to that location. To filter the selection down to the first file, we added /yellow_tripdata_2019-01-A.csv.gz to the stage path.
LIST @DEMO_DB.PUBLIC.STG_AZURE_STAIRWAY/yellow_tripdata_2019-01-A.csv.gz;
You can see the results in this image:
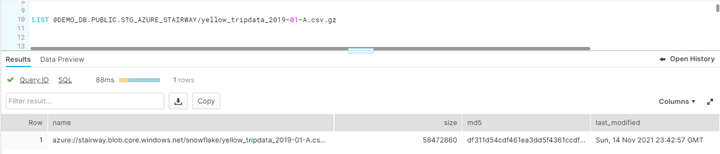
Figure 8 — Snowflake UI Listing Single File in the Storage Container
To view the data within the file, we can use a select with the $ syntax. (A nice trick is to use the first column to check that you can read the file.) You can then add more columns as you understand the data. The Yellow Taxi data that I use below is available at NYC OpenData.
SELECT $1
FROM @DEMO_DB.PUBLIC.STG_AZURE_STAIRWAY/yellow_tripdata_2019-01-A.csv.gz
LIMIT 100;
You can see the results in this image:
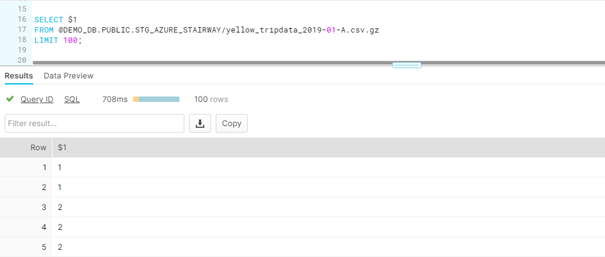
Figure 9 — Snowflake UI Selecting Data from File in Storage Container
On the NYC OpenData web site, a section titled “Columns in this Dataset” describes the columns within the file, and with that data, you can create a more defined select from the files.
SELECT $1::NUMBER AS VENDORID
     , $2::TIMESTAMP_NTZ AS TPEP_PICKUP_DATETIME
     , $3::TIMESTAMP_NTZ AS TPEP_DROPOFF_DATETIME
     , $4::NUMBER AS PASSENGER_COUNT
     , $5::NUMBER AS TRIP_DISTANCE
     , $6::NUMBER AS RATECODEID
     , $7::VARCHAR AS STORE_AND_FWD_FLAG
     , $8::NUMBER AS PULOCATIONID
     , $9::NUMBER AS DOLOCATIONID
     , $10::NUMBER AS PAYMENT_TYPE
     , $11::NUMBER AS FARE_AMOUNT
     , $12::NUMBER AS EXTRA
     , $13::NUMBER AS MTA_TAX
     , $14::NUMBER AS TIP_AMOUNT
     , $15::NUMBER AS TOLLS_AMOUNT
     , $16::NUMBER AS IMPROVEMENT_SURCHARGE
     , $17::NUMBER AS TOTAL_AMOUNT
     , $18::NUMBER AS CONGESTION_SURCHARGE
FROM @DEMO_DB.PUBLIC.STG_AZURE_STAIRWAY T1
LIMIT 100;
We see the results below:
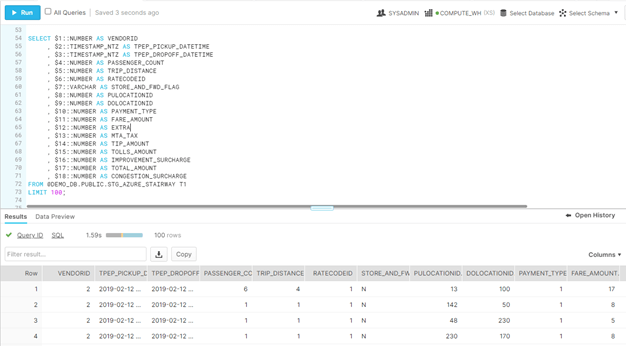
Figure 10 — Snowflake UI Selecting All Columns Data from File in Storage Container
One of the items not discussed in this article is the format file. A format file is comprised of the settings for the data export like the type of file CSV in our case. In the above example, we allowed Snowflake to use default settings and read the files without error. Format files will be covered in more detail in the next article on the COPY command.
Next Steps
Now that we have the configurations we need to bring data into your Snowflake account, we need to start using the COPY command. We will cover that in a future article.