Introduction
This article will walk you through the options that you should be aware of when starting an evaluation of Snowflake. From the various installs that we have done, we put together a list of items to understand and prepare to get the most out of a Snowflake trial. After discussing the various items we will then walk through the steps involved in setting up your Snowflake account.
Snowflake runs as Software as a Service (SaaS) in all of the major cloud vendors: Amazon Web Services (AWS), Microsoft Azure (Azure), and Google Cloud Platform (GCP). If you need an introduction to Snowflake, refer to the prior article: Introduction to Snowflake.
Snowflake can easily be set up within minutes from the link at https://signup.snowflake.com/. However, without some of decisions made in advance, your trial may not integrate as well as it could with your current cloud environment. This article will help you put some thought into your configuration options prior to setup.
As an example: How will Snowflake interact with external data outside of the Snowflake environment? How Snowflake interacts with data will become critical based on some of the decisions made. We will talk about this and provide suggestions in this article, so let’s get started.
Snowflake Initial Configuration Options
There are three main items to consider:
- Cloud Provider
- Cloud Location
- Snowflake Edition
We discuss these options because they can become difficult to work with after the trial has been setup.
To make this easier, we created a decision matrix for the first two items: Cloud Provider and Cloud Location.
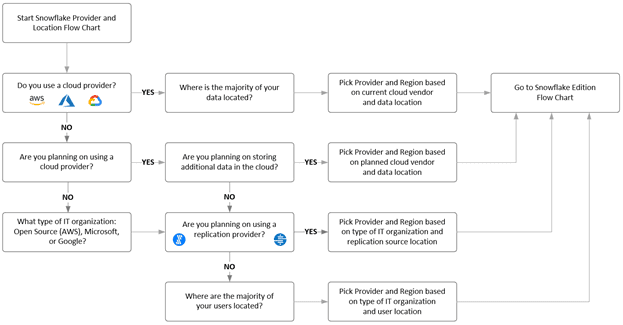
Figure 1 – Snowflake Provider and Location Decision Matrix
Cloud Provider
The first question to start with is: Do you currently use a cloud provider like AWS, Azure or GCP? If so, then setting up Snowflake on your current provider is likely the best choice. If you have this already decided, move on to the Cloud Location.
If your company has not moved to the cloud or your department does not have the authority to make a decision regarding provider, you should reach out to see which cloud provider your organization is planning on using. If these choices are already being made, you should pick the provider that will best align with your company’s planned infrastructure. You do not want to pick AWS to host Snowflake when your company’s cloud storage is based in Azure.
If none of the above options are applicable, then I would suggest making a provider decision based on the type of development shop you work in. If you are a Microsoft shop, I would recommend Microsoft Azure. If you are an open-source shop, I would recommend Amazon Web Services. If you are Google development shop, I would recommend GCP, with the one understanding: that Snowflake was built for the Google platform last and has some of the most limited options at the time of this writing. For example, Snowflake on GCP is only available in one location in the United States (US Central1 - Iowa) and two locations in Europe (Europe West2 - London Europe West4 - Netherlands). Snowflake on GPC is not currently available in Asia/Pacific.
You can read more about the supported regions at this link.
Cloud Location
The next option to consider when setting up Snowflake is which region will host your data. The decision regarding region should be based on the data locality:
- Does your company use Azure Blob, S3, or Google Cloud Storage?
- Does your company have a data lake or data shares currently in the cloud?
- Does your company plan to use replication providers?
When you activate a Snowflake account, you can choose the geographic region where your account is located and where your data is stored. This location also determines where your compute resources are provisioned.
If you already have data stored in a cloud provider, you should choose to provision your Snowflake account with the same provider. You should also choose to provision the account in the same region where your data is hosted, to minimize data latency and to provide additional support for disaster recovery.
If you are currently using a cloud storage provider and have data that will be used within Snowflake, then setting Snowflake up in the same region will help with transfer performance. Hosting Snowflake in the same region as your data (Storage?) you will prevent egress / transfer costs across regions.
Note: Snowflake interacts with external data through Snowflake Stages. Not something to understand at this point but something to call out on the diagram shown in Figure 2.
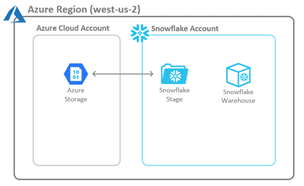
Figure 2 – Ideal Snowflake and Data Location (Same Provider and Region)
In a non-ideal configuration, Snowflake will not be in the same region as the data, as seen in Figure 3. Data will have to travel across the wire and will have higher latency than cloud storage within the same region.
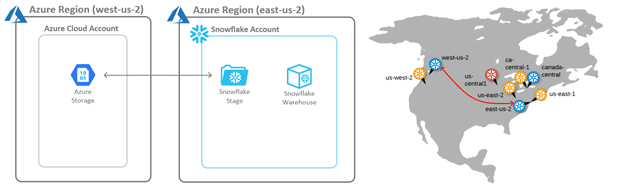
Figure 3 – Non-Ideal Snowflake and Data Location (Same Provider but Different Region)
In another non-ideal configuration, Snowflake is not in the same cloud vendor and region as the data, as in Figure 4. Data will have to travel across the wire to another cloud vendor entirely, and thus will have higher latency. There can be data egress charges to move data into and out of a provider.

Figure 4 – Non-Ideal Snowflake and Data Location (Different Provider)
If you currently plan to use data from a data lake architecture with Snowflake external tables, the performance will be best if the data is in the same region.
If you will be using external replication providers, like Fivetran or Stitch, then having the replication provider and replication sources as close (Locale – wise) to Snowflake as possible would be best.
Note: The replication providers will often have their services in different locations, and this can be less of a performance issue. I have used Stitch in the United States and its services are in AWS Virginia (us-east-1) region. We used it to process RDS data in AWS Oregon to a Snowflake account also in AWS Oregon and we did not see latency issues. Fivetran has its services in more cloud regions, and I have not seen latency issues with them as well from multiple different data sources replicated to Snowflake accounts. These services manage the data replication with periodic batches and not in real time replication. If the batches become smaller in duration, like every 5 minutes, the service location could become more of a factor.
Snowflake Edition
After deciding on the Cloud Provider and Location, the last choice is the Snowflake Edition.
To make this easier we created a decision matrix to assist in deciding Snowflake Edition. If your organization grows and needs additional features from a different edition, this can be changed with the help of Snowflake Support.
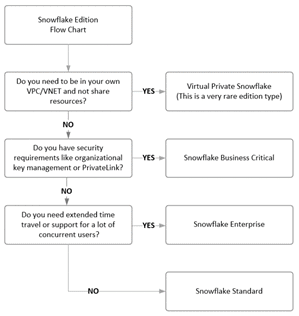
Figure 5 – Snowflake Edition Decision Matrix
There are currently four Snowflake Editions: Standard Edition, Enterprise Edition, Business Critical Edition, and Virtual Private Snowflake (VPS)
The above matrix starts with the edition with the most features and continues down through editions, each with a reduction in features. I will discuss some of the key features within each edition that will highlight some decisions to consider. If you want more details on the specific features per edition, see the Snowflake editions.
Note: If your requirements change and new features are needed you can contact Snowflake support and move to a different edition.
Virtual Private Snowflake (VPS)
This is the most secure edition in Snowflake and runs within its own VPC/VNet within the cloud provider. VPS does not share any resources with other Snowflake clients. This option is not widely used and has the highest Snowflake cost. You will have to contact Snowflake support to setup this edition.
Some of the features in Virtual Private Snowflake (VPS) have limits because the account is running in a separate VPC/VNet and is not able to use pooled resources. The data sharing feature (data sharing enables the sharing of objects in your account with other Snowflake accounts, for more details see secure data sharing) is not currently supported in VPS.
Business Critical Edition
Business Critical Edition is an edition that enables the highest level of security and data protection features. These include direct proxy to your other virtual networks using AWS PrivateLink or Azure Private Link and customer-managed encryption keys through AWS Key Management Service, Azure Key Vault, and Cloud Key Management Service. These data protection features include database failover and failback between Snowflake accounts for business continuity and disaster recovery.
Enterprise Edition
This edition includes enterprise business features like multi-cluster virtual warehouses to meet scale and performance needs, extended time travel for additional data retention durations, and enhanced performance options, like search optimization and materialized views.
Standard Edition
This edition is the vanilla version of Snowflake, which even as the basic version, is still a feature rich edition that can meet the business requirements of most organizations. These include time travel, database replication, secure data sharing, federated authentication, enterprise grade encryption and access to the same level of warehouses/compute as the other editions.
Edition Costs
The cost difference between the editions is simple with an increase of one dollar per credit between the editions. The following diagram shows costs for Snowflake hosted in the United States and on Azure at the time of publishing this article:
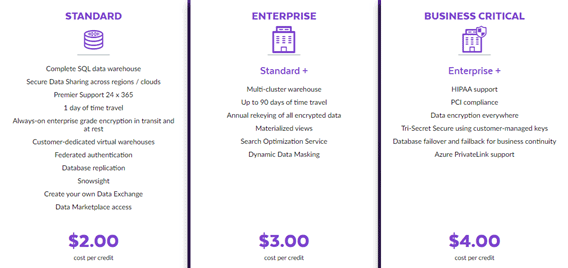
Figure 6 – Snowflake Edition Compute Cost
The cost for data storage does not change across editions and is represented below. Notice that there is a discount for up front storage capacity:

Figure 7 – Snowflake Storage Cost
For the full details on pricing see the pricing page.
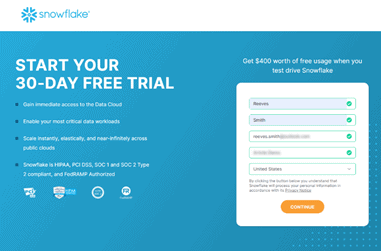
Setup
Now that we have discussed the options, we will walk through a typical Snowflake install. First go to https://signup.snowflake.com/. Enter: First Name, Last Name, Email, Business and Country and Click the CONTINUE button.
Next is where the decisions made above will help you decide on the best configurations for your environment. You need to make these decisions:
- Choose your Snowflake edition: Standard, Enterprise, Business Critical
- Choose you cloud provider: Amazon Web Services, Google Cloud Platform, Microsoft Azure
- Select the region for the above selected provider
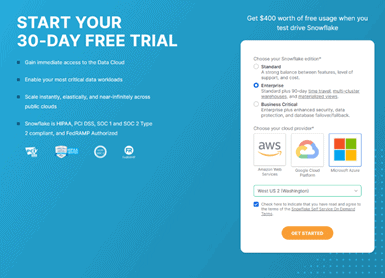
You then Agree to the Terms and click the GET STARTED button.
Note: To create a Snowflake account with the Virtual Private Cloud edition will take a call the Snowflake support and they will setup your account.
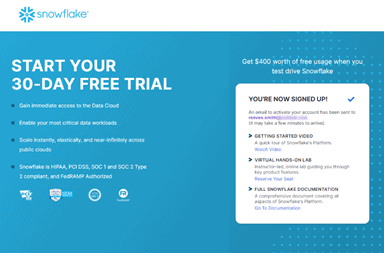
Activate the account by going to your email from the initial step and click the CLICK TO ACTIVATE option.

The CLICK TO ACTIVATE button will take you to the initial Snowflake sign on where you will create the first user who will have access to the ACCOUNTADMIN the role.
Note: ACCOUNTADMIN is the top role that has all access to the Snowflake account.
Welcome to the Snowflake UI
The Snowflake user interface is similar to SQL Server Management Studio (SSMS) and is used for SQL queries, as well as performing administration operations within the Snowflake account. Below we see the UI when you log in to your account. Each section is described below.
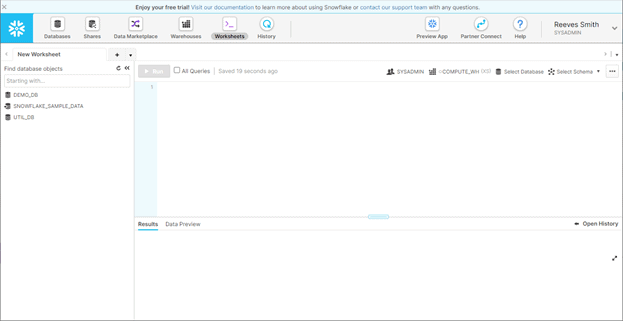
Figure 8 – Snowflake User Interface
At account creation there will be four databases available within your account:
- DEMO_DB (blank database)
- UTIL_DB (blank database with example file formats)
- SNOWFLAKE_SAMPLE_DATA (like the AdventureWorks database but with TPC benchmark data)
- SNOWFLAKE (administrative database that is only available to the ACCOUNTADMIN role and not currently visible from the SYSADMIN role).
The worksheets that you create in this UI are automatically saved to your account. Worksheets can be renamed for ease of use.
The Warehouses button, next to the Worksheets button, will open a view to the currently configured warehouses. At account creation there is one warehouse created, COMPUTE_WH. It is configured as X-Small and is runnable by everyone in the Snowflake account because it was granted Usage to Public. There is no cost to creating Warehouses because they are just a set of configurations. Running a warehouse however, will cost Snowflake credits.
Another item to note is the History button, next to the Worksheets button, that will open a view that is very similar to SQL Profiler. This page shows a listing of all queries executed in the last 14 days, and allows you to view details of these queries.
For more detail on the above user interface see Using Worksheets.
Next Article
In the follow up article we will discuss setting up the cloud specific settings like external cloud storage and working with the UI to loading data into Snowflake.