The first three levels of this series have been the lead-up to this level, automating the database deployment with Azure Pipelines. First, we started with an introduction to Azure DevOps and the Git client. Next, SQL Source Control was introduced to manage a database’s schema and manually deploy changes from the database to source control (and vice versa to support developers working with their copy of a database). The previous level involved code branching and merging, which is needed for two primary purposes: isolating the development of a feature from other code changes and saving (merging) changes into the main branch as a package to aid in automated deployments.
In this level, Azure Pipelines will be explored, as the orchestration (pipeline) will be defined to build and deploy database schema changes made in SQL Source Control. The destination database in this level is an Azure SQL database, as the deployment is a little more straightforward than deploying to SQL Server, which is generally on a private network. In the next level, we'll cover how to bridge the gap to a SQL Server instance.
Getting Started with Azure Pipelines
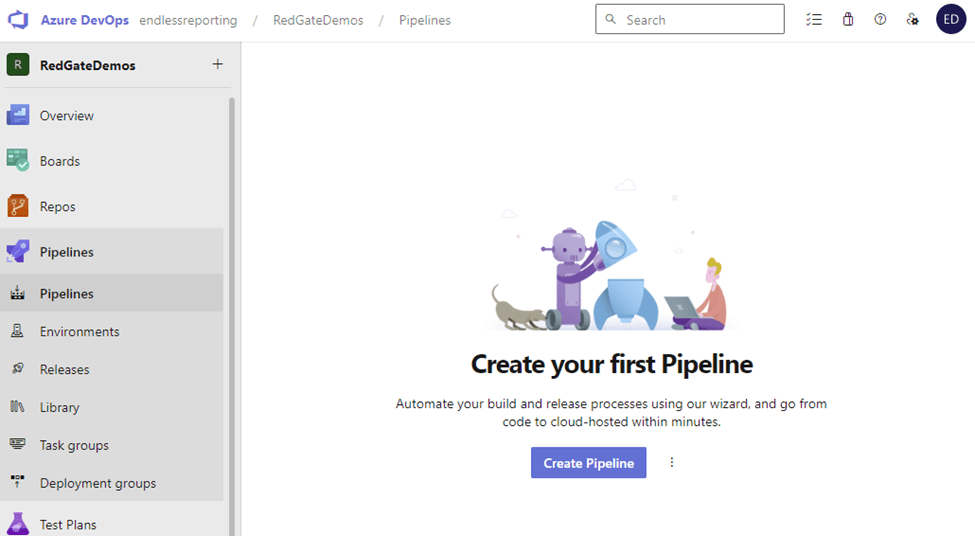
To orient ourselves in Azure DevOps, below Boards and Repos is Pipelines on the left navigation bar. Since we haven’t yet defined a pipeline in our demo project, Create Pipeline is the first step when we click this item. There is a menu to the right with options. For now, we’ll ignore those and continue.
Azure DevOps presents several choices for accessing our code to start a new pipeline. There are two things to notice on this screen. First, popular source control tools are available, not just Azure DevOps. Bitbucket Cloud, GitHub, and Subversion can be used to store source code the pipeline will use. The second thing to note is the first four options all have a bubble with YAML next to them. We will be writing code to define our pipeline. Let’s choose Azure Repos Git to get started.
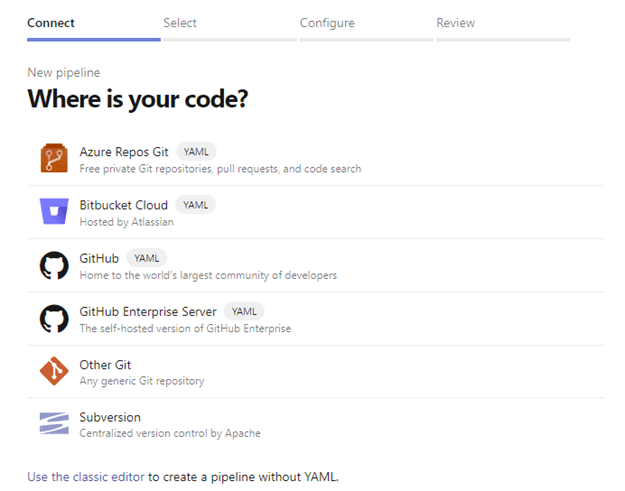
I said there were two things to note, but as of when this was written, there is a third thing to note. At the bottom of the screen, there is an option to Use the classic editor. Since it is named ‘classic editor,’ it is safe to assume Microsoft has plans to deprecate that functionality. If you find the link is there when you work with Azure Pipelines, it could generate YAML snippets copied and pasted into a YAML pipeline. Do not use the classic editor for production-level pipelines. It should only be used for research and development purposes. I will not cover this editor for this level and stick with the “pure YAML” pipeline.
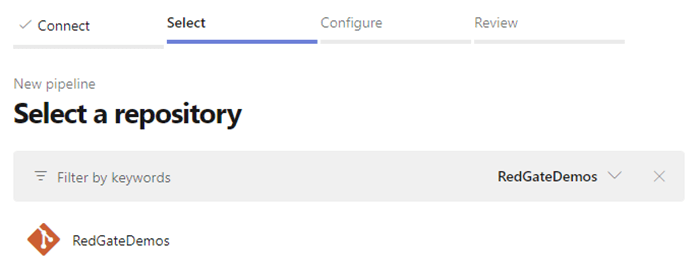
After choosing Azure Repos Git, Azure Pipelines will return the list of Git repositories within the current Azure DevOps project. This is where Azure Pipelines will save the YAML file that defines the pipeline, not where the code is coming from. There are options to integrate code from other projects within the pipeline. For my RedGateDemos project, I only have the default repository. My only choice to move forward from this screen is to choose the repository, RedGateDemos.
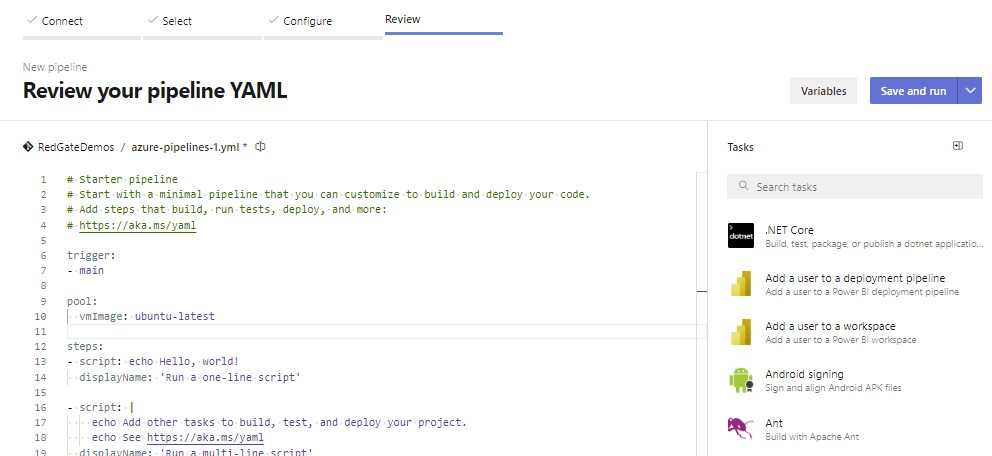
After choosing the repository, Azure Pipelines provides many templates to help start defining a pipeline, with several options shown in the screenshot above. Unfortunately, no database template exists, not even for projects using Microsoft tools. As a result, we need to use the Starter pipeline, the first option listed.

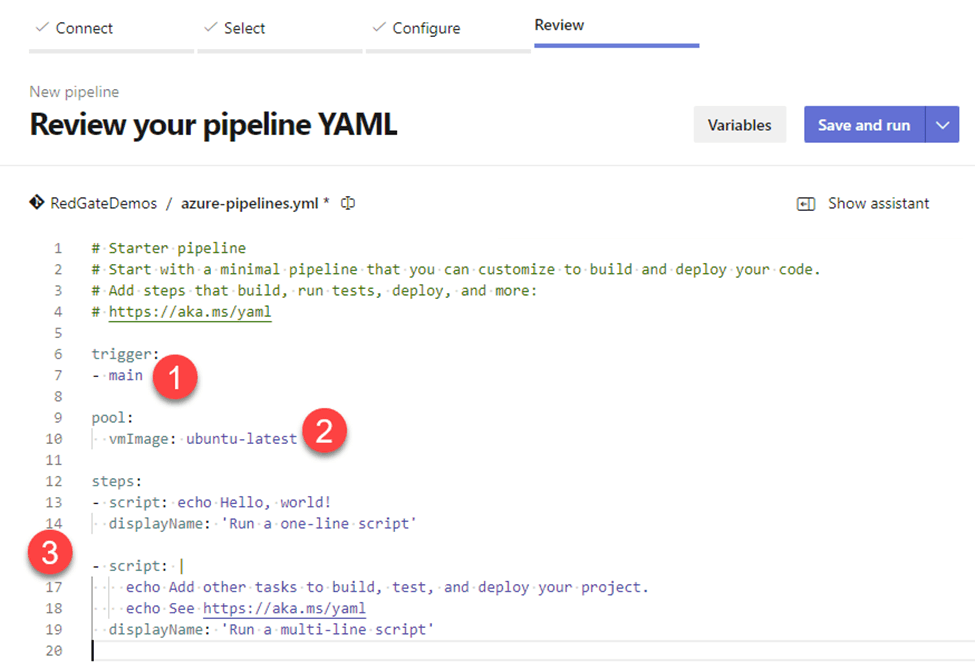
Azure DevOps gives us a plain-looking template that has three areas of interest.
- Trigger – When code is committed to the ‘main’ branch, the pipeline is triggered to run.
- Pool (vmImage) – Upon the pipeline being triggered, Azure Pipelines is going to create an agent (virtual machine) running the latest version of Ubuntu Linux. This agent needs to have access to your SQL instance. This requires the SQL instance to have a public IP address the agent access (yikes!!). Azure Pipelines allows self-hosted agents to be installed on on-premises servers to deploy changes to SQL Server. Communication is handled between Azure DevOps and the agent, with the agent performing the work. For this level, we're going to use Azure SQL DB, which is built to be a publicly accessible environment. In the next level, we'll discuss self-hosted agents.
- Steps – These are the actions the pipeline will perform. In this case, two scripts will be executed to display text on the logging screen.
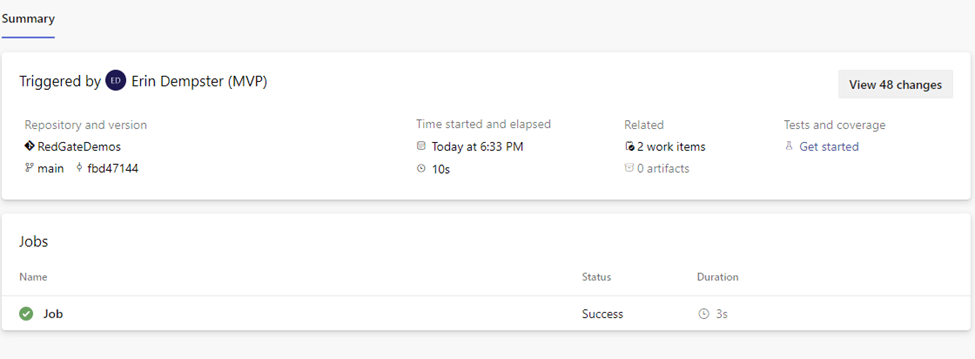
Microsoft didn’t give us an invalid script, so let’s click Save and run to see what it does. ADO took me to an execution summary page, as partially shown below. It tells me which code branch was used (main), when it started (6:33 PM), and how long it took (10 seconds), among other things. We’ll talk about some of those later.
Additionally, the job, “Job,” can be clicked on, which takes us to the job details page. On the left side of the screenshot, we can see several items were executed. The grayed-out checkboxes show tasks related to the pipeline run's maintenance. The first step in a job is to check out code from the repository, and then our custom tasks will be executed, as we can see with ‘Run a one-line script’ and ‘Run a multi-line script.’

This is all fine and great, but we need the pipeline to do our work, deploying database changes. Let’s make that happen.
Working with YAML in Azure Pipelines
YAML, short for “YAML Ain’t Markup Language,” along with Microsoft’s schema definition, is not easy to work with. It’s defined with a hierarchical structure, like JSON. Scripts are whitespace-sensitive, meaning column 3 is interpreted differently than column 1 on a given line. Once spacing is managed, Microsoft (and other providers, like Red Gate) provide pre-packaged tasks that perform the heavy lifting in the pipeline. As a result, there are some excellent documents available on Microsoft Learn to get you started.
Azure Pipelines uses the following hierarchy to define a pipeline.
- Stages – Use stages to track deployments to multiple environments, defining sets of jobs for each environment. Each group of jobs can use environment checks and approvals (covered in the next level).
- Stage – Each stage is executed sequentially; agent pools can be defined for each stage.
- Jobs – Commonly used as the highest level to define a pipeline of small or medium size.
- Job – Discrete tasks running in a particular agent pool, either that of the script or defined explicitly in the job. Microsoft also defines a specific deployment job with the name, "deployment," which has its own documentation, separate from "normal" jobs.
- Steps – A set of operations that run sequentially.
- <Operation> - smallest unit of work performed by a pipeline, such as building the project with .Net Core (DotNetCoreCLI@2) or executing a PowerShell script (PowerShell@2) to copy files.
- Steps – A set of operations that run sequentially.
- Job – Discrete tasks running in a particular agent pool, either that of the script or defined explicitly in the job. Microsoft also defines a specific deployment job with the name, "deployment," which has its own documentation, separate from "normal" jobs.
- Jobs – Commonly used as the highest level to define a pipeline of small or medium size.
- Stage – Each stage is executed sequentially; agent pools can be defined for each stage.
Just from this hierarchy of "executable steps," there is ambiguity on how to define a pipeline. For our needs, we will only use the levels that are bolded. Stages and Stage we won't worry about.
Create the Pipeline
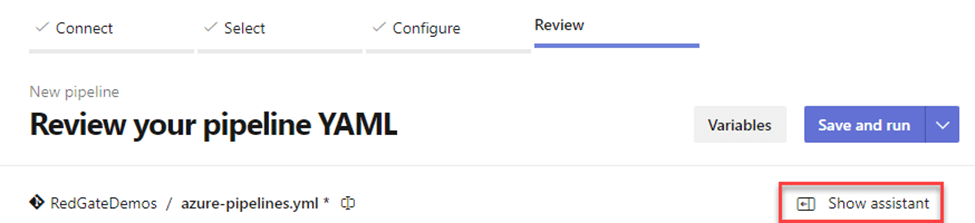
The editor has a Show assistant button at the top of the page. A task list expands out, providing a lot of tasks to choose from. Each task has defined properties to help make the process a little bit easier.
With the template provided, let’s make the following changes to start our pipeline.
- Delete the first four lines, as these are Microsoft’s comments about the starter pipeline.
- Change ubuntu-latest on line 10 to windows-latest. The default setting in the template is to use the most recent version of Ubuntu Linux as the operating system for the agent. Our pipeline needs to use Windows for the Red Gate build and deployment tools to run.
- Lines 13 – 19 can be deleted, as we’ll define our steps.
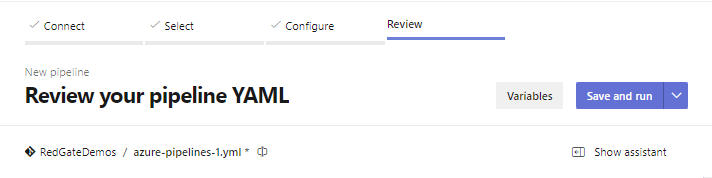
It’s time to build up the script to deploy the database. To see how this is going to go, I've captured the script in its entirety. As we progress through the pipeline, feel free to save changes by clicking the drop down Save and run in the upper right corner and choose Save (see the screenshot above).
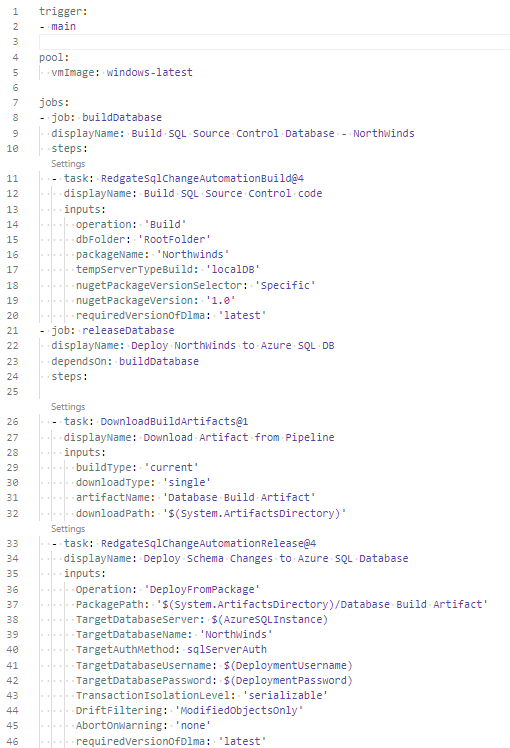
The first task to add is Red Gate SQL Change Automation: Build. This task will create a zip file that becomes our artifact in the pipeline. Artifacts are the compiled components we plan to deploy to another environment. Sometimes the task will automatically save the artifact to the pipeline, like this task does, while other tasks will not. For the latter, it is up to the DevOps developers (that's you) to save the artifact to the pipeline. SQL Change Automation will name the artifact Database Build Artifact.
| Task Assistant | YAML Output |
|
|
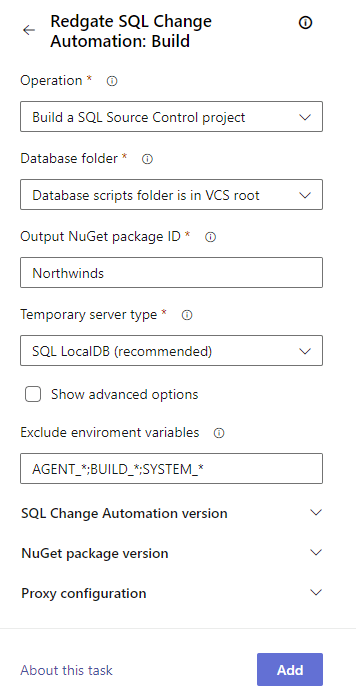
The first task has been built out, using the task assistant interface on the left below to generate the YAML on the right. The first four items, all required, need a bit of explanation.
- Operation - SQL Change Automation supports projects from Red Gate SQL Change Automation, as well as SQL Source Control. This task also supports running tSQLt unit tests against a database. Our goal is to prepare the schema changes for deployment, so we'll choose Build a SQL Source Control project.
- Database folder - While the task provides a lot of operations, the options within a task are simplified. Database folder gives us two choices, either scripts are saved at the root of the source control repository, or the "solution" is saved within a subfolder. In our example, the code starts in the root folder of the repository.
- Output NuGet package ID - When the build operation is complete a .nupkg file is generated. This field defines what the name of the file will be.
- Temporary Server type - Our options are SQL LocalDB or SQL Server. The build process will deploy the schema to a temporary database to ensure the code is syntactically correct. As views, stored procedures and functions are created, SQL Server will check some dependencies, such as the existence of other databases, if there are cross database queries. For our simple Northwinds database, we don't need to worry about dependencies on other databases, so SQL LocalDB will work. If you have a database that does have cross-database queries, SQL Server will need to be used. At that time, additional information, including the server name and connection credentials will be required.
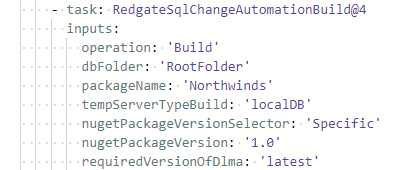
Upon clicking Add, the YAML is inserted into the script, at the location of our cursor. Additional fields used by the SQL Change Automation: Build task were added. Leave them, so the pipeline has the correct instructions.
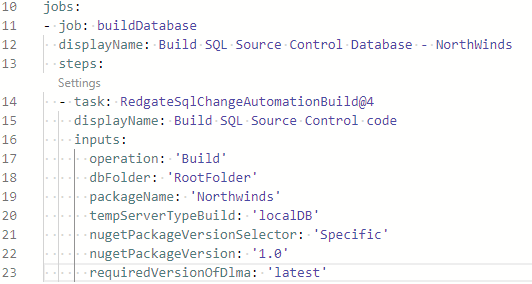
Notice in the screenshot above the task has been added to a set of steps within a job named buildDatabase. This is the first (and only) step in this job, and it provides separation from the deployment tasks. In the next level, we'll get into approvals, and they can run in their own job or defined for a series of jobs. An additional note about the section of configuration in the screenshot, the Task Assistant is just that, an assistant. It's there to get the task started, but other attributes can be added. For example, displayName can be added, which is used in the execution log to separate the details of each pipeline operation. We saw this earlier when we ran the sample YAML and reviewed the execution.
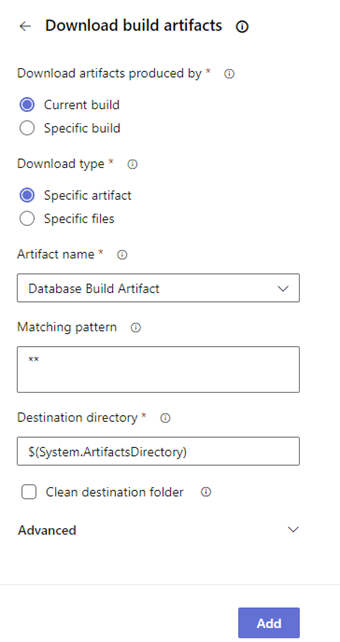
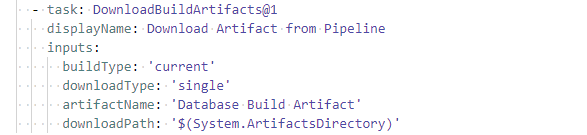
With the database schema "compiled" into a nupkg file as an artifact, the next job is to deploy the changes to a server. Two tasks are needed for the deployment. Download build artifacts will copy our artifact, Database Build Artifact, from the pipeline's storage to the Azure DevOps agent that's executing the pipeline job. There is only one file we need, Northwinds.nupkg, but in Matching pattern, we'll leave the wildcards in place and download "everything." Azure DevOps defines a folder on the agent to save artifacts for use in the job. It is referenced by a system-defined variable, ArtifactsDirectory. Since it's there, let's use it and reference it as $(System.ArtifactsDirectory). When we click Add, the YAML on the right is generated.
| Task Assistant | YAML Output |
|
|
|
|
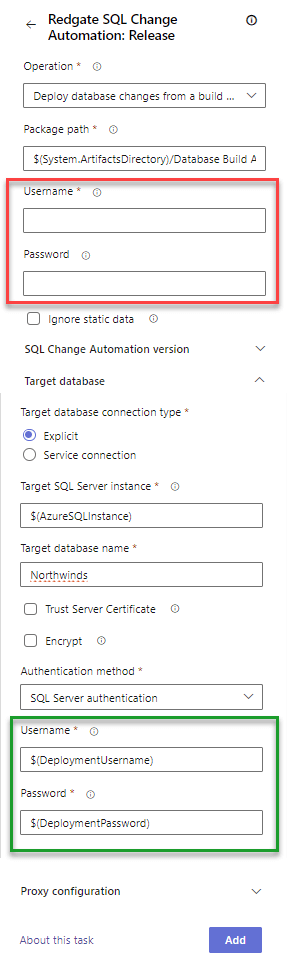
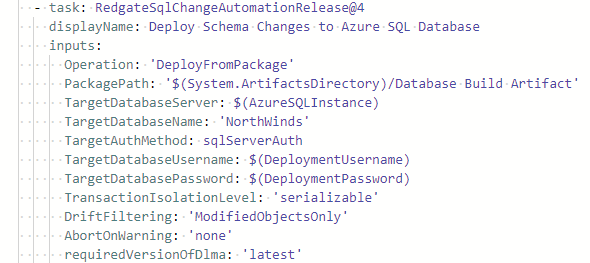
The second step in this job is to deploy the schema changes to a database. This task can be found searching for Red Gate Change Automation:Release in the Task Assistant. This task has a lot of options to choose from. The screenshot above is portions of two screens of options that have been narrowed down for what we need. Let's cover the properties needed to deploy the Northwinds database.
- Operation - We're going to choose Deploy changes from a database artifact, so we can use the artifact created in the previous job. This is the simplest option for us. If we needed to keep the change script for audit purposes, we could choose Create a database release artifact and then define a copy of this task but choose Deploy changes from a release artifact.
- Package path - This is concatenation of the Destination directory and Artifact name properties from the download task. In our pipeline, this is $(System.ArtifactsDirectory)/Database Build Artifact.
- Target database connection type - Explicit or Service connection are available to use. For this level, we'll use an Explicit connection and define the connection. In the next level, we'll investigate the Service connection option, as it is more secure to use than an Explicit connection.
- Target SQL Server instance - Enter the instance name of the Azure SQL DB server being used. I'm going to use a 3rd variable and define it in a moment.
- Target database name - Our destination database is named Northwinds.
- Username and Password - Here's a fake out from the Task Assistant. We do not want to use the pair of properties at the top of the screen. These are credentials for a live source database. After choosing the Authentication method towards the bottom of the screen, this is where we'll set the username and password. Except, we don't want to put the actual values here, because YAML is stored in clear text. We need to define and use two user-defined variables. Let's call them $(DeploymentUsername) and $(DeploymentPassword). We will define these next.
With all of those options populated, click Add to generate the YAML similar to the copy on the right side.
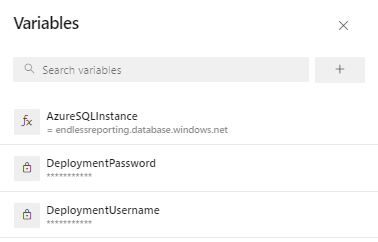
The pipeline is almost ready. The last thing to do is to define the 3 variables used in the release task. Towards the top right corner of the screen, click the Variables button to add the variables.
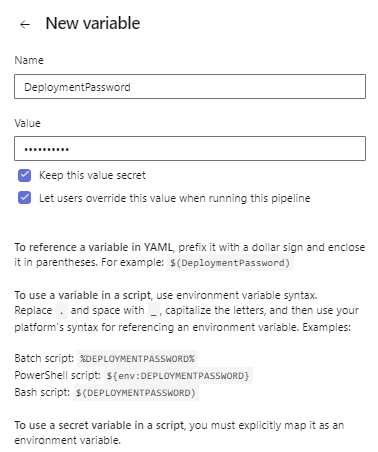
Initially, the list of variables will be empty. Click the '+' sign to create one. Provide a name and a value. If users can be allowed to override the value at runtime, check the second box. For sensitive variables, like usernames and passwords, definitely choose Keep this value secret, as has been done for the DeploymentPassword variable below. Variables need to be created for DeploymentUsername, DeploymentPassword and AzureSQLInstance to satisfy the release task we created.
 |  |
For our deployment to a single environment, such as Test, the pipeline is complete. We can save the pipeline changes, committing the YAML to the repository. Because we defined a trigger on line 1 that's looking at the main branch, when we saved the YAML to the main branch, an execution was triggered. After the save, if the editor remains on the screen, click the Pipelines link at the top of the screen or from the left navigation panel and work your way into the pipeline and then the current execution. A summary of the pipelines actions will be displayed, like the screenshot below. If we've been perfect with the configuration, and the Azure SQL Database is accessible, the Northwinds database schema changes will be deployed.
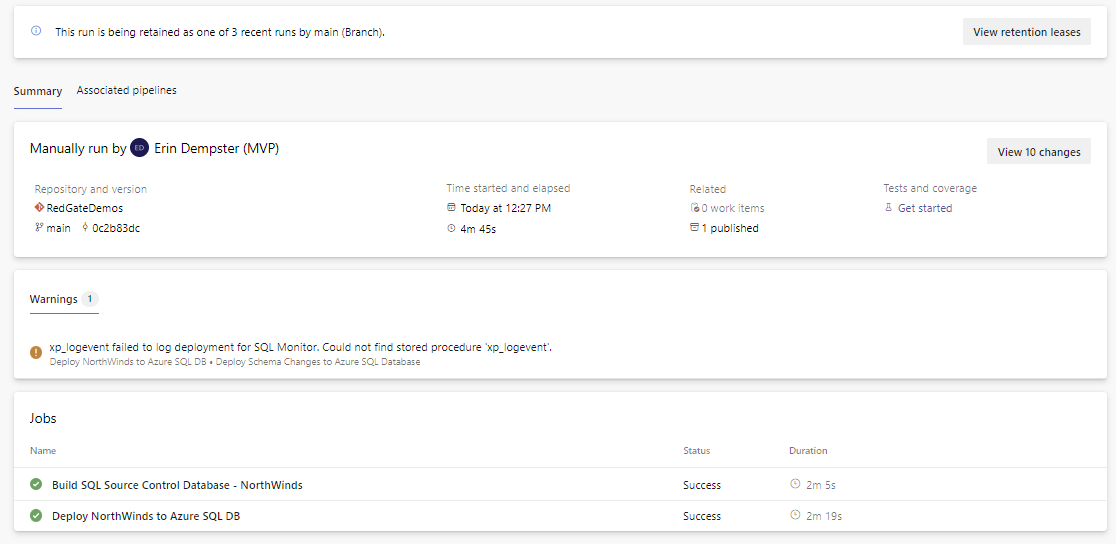
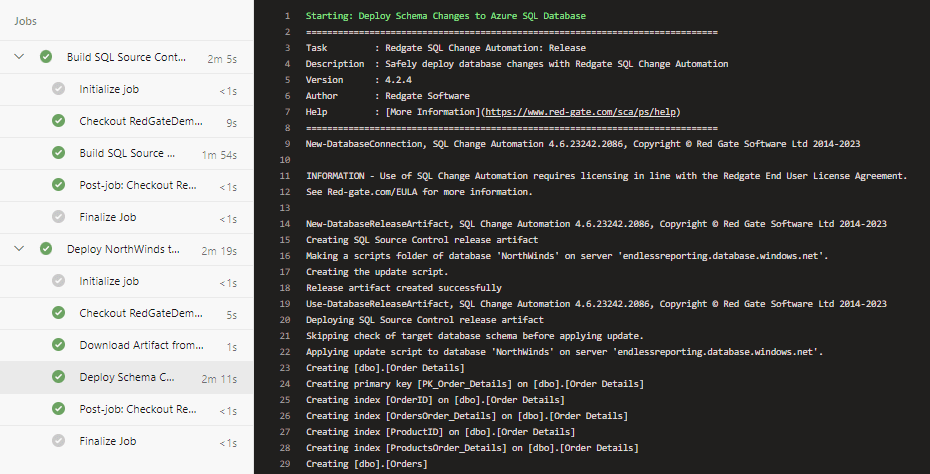
The jobs listed above have green checkboxes, as do the individual steps in the screenshot below (click on one of the jobs to see the details), showing the deployment was successful. The log on the right side has the first several changes deployed to the empty database.
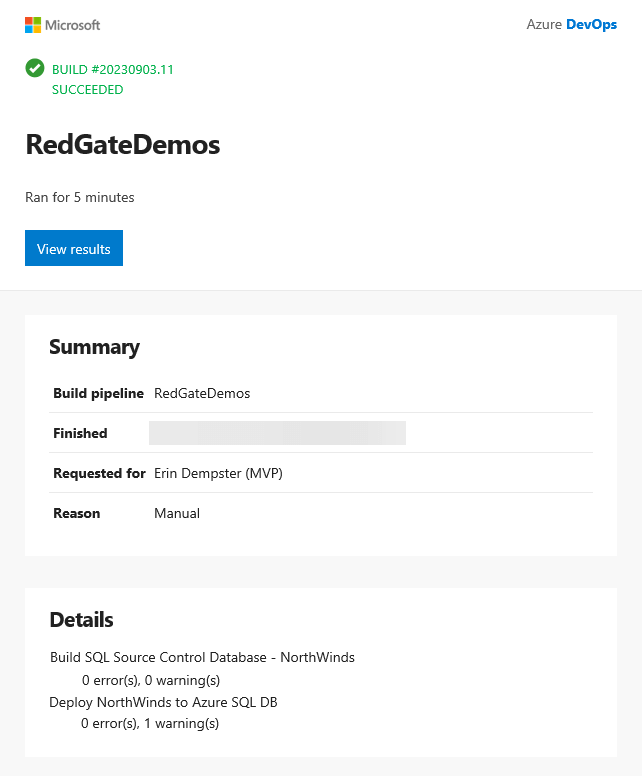
To inform the person who initiated the pipeline execution of its completion, and email is sent with information from the pipeline. The pipeline was initiated by the completion of a pull request, so that is the person who will receive the confirmation email. The View results button in the email will take the user to the execution summary page.
As the development team makes changes to the database schema in the future, when pull requests are completed and code is merged into the main branch, the pipeline will be triggered to run automatically. Only the new, updated or deleted schema changes will be deployed, so those logs will be much shorter than this initial deployment.
A lot has been covered in this level.
- Introduction to Azure Pipelines user interface
- Configuration hierarchy of the pipeline defined in YAML
- Red Gate SQL Change Automation task for Azure Pipelines
- Defined a functioning pipeline to build and deploy a database to Azure SQL
However, there are several useful features in Azure Pipelines we did not cover at all.
- DevOps project-wide variable groups
- Approvals and manual validation steps
- Service connections to the destination database
- Deploying changes to multiple environments
- Deploying changes to on-premises SQL Server instances
These topics will be covered in the next level.
