

Recently a customer asked me for help with setting up a test of an Azure SQL Database in the single database tier with Geo-Replication to work with Transparent Data Encryption (TDE) with a customer-managed key, also known as Bring Your Own Key (BYOK). It is very simple to do it when you use service-managed keys, the default with regular TDE, but there are some catches when it comes to TDE BYOK.
Keep in mind it is strongly recommended to allow the Azure service to manage this key unless you and your company are fully aware of what is involved with key management. This is because if you lose your key, you will not be able to access your database anymore. It is as simple as that. Microsoft has no back door for this, which is why they recommend that you let them manage the key.
Anyways, I believe there are people willing to try to BYOK, but unfortunately it seems hard to find one document that puts together all necessary information for TDE BYOK plus Geo-Replication. My intention here is to present a functional, introductory reference, more like a to-do list.
Considering that Azure customer base is expanding fast, there are so many newcomers. I hope this document might be useful for them. That being said, here we go.
The Basics
Geo-Replication is used to improve availability. Therefore, the idea is to reproduce your entire virtual infrastructure in different regions. The image below represents this architecture :
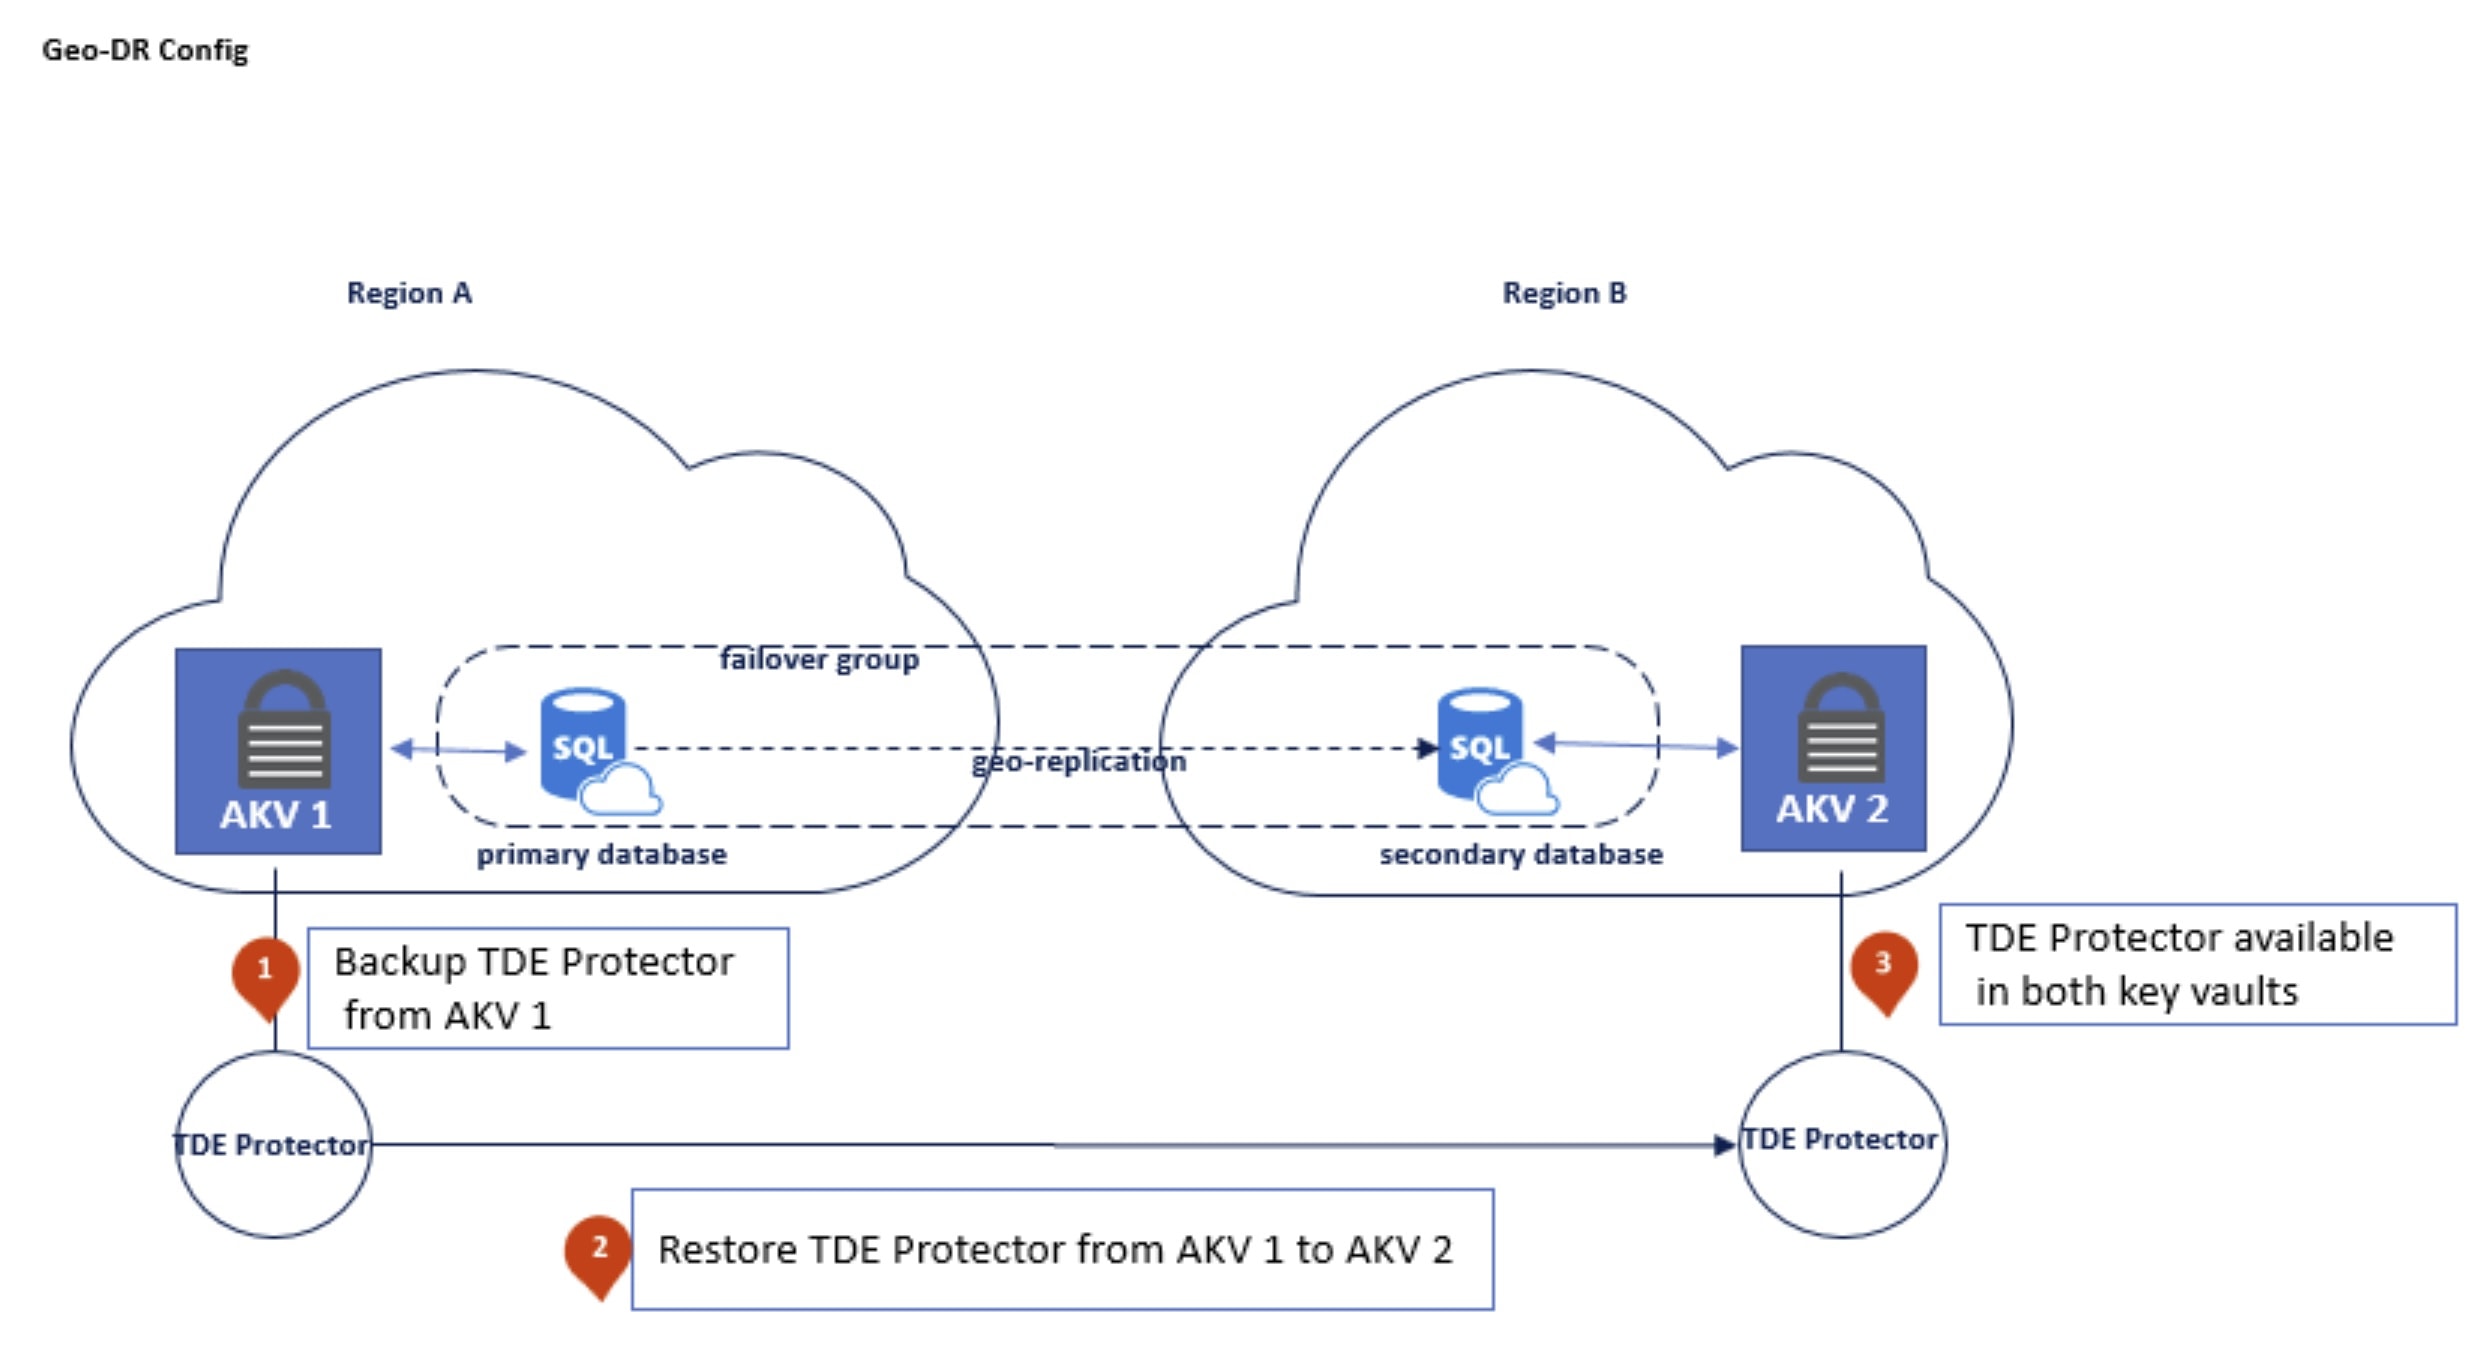 Azure SQL DB architecture with TDE BYOK and Geo-Replication
During normal operation, your primary region will hold a read-write database and the secondary database will be read-only. This might help you to better distribute the workload within primary and secondary databases. As of today, you can have up to four geo-replicas.
In case of disaster with the primary database, you can turn one of the replicas to read-write mode, and it will assume the role of primary database. There are ways to do this failover automatically, but this is out the scope of this document.
Planning Geo-Replication and TDE BYOK
The first concern is to select two or more regions that provide the services you need with a reasonable latency. By definition, network latency should be as low as possible and it will be probably lower for the regions that are closer to you. But you have to assure that all services you need are available in the selected regions. You can check latency values for all Azure regions in this link: http://azurespeedtest.azurewebsites.net/.
The most common services are available in all Azure Regions. But you can verify that in the link https://azure.microsoft.com/en-us/global-infrastructure/services/.
The next issue is to identify the resources that will be needed to implement the virtual infrastructure described above. In each region, you will need:
- A Resource Group
- A SQL Server
- A SQL database
- A Key Vault
You can use the Azure Portal to implement all those resources. In this document, I show you how to do it with Azure Powershell.
The Steps
It is time to begin creating resources and configuring the proper setup. I use distinct resource groups for each region to better manage resources for each geo-replica.
Azure Powershell provides a large number of cmdlets and most of them works with several parameters. As you will guess, some parameters are mandatory and others are optional. In most the examples below, I provide the very minimum number of parameters to do the job required. For details about the existing cmdlets and possible parameters, please check the documentation.
Implementing Resources in Primary Region
As advised before, this is supposed to be a simple and functional to-do list. If you intend to reuse it, dont't forget to replace the strings I use in each cmdlet with your own.
Step 1 - Connect to Azure and create a resource group in the Primary Region you want to use. You need to provide a name for the resource group and the location where it will be hosted. Optionally, you can tag the resource group to add a meaningful description, for instance.
Connect-AzAccount


New-AzResourceGroup -Name 'rsSSC1' `

   -Location 'East US' `

   -Tag @{article = 'SSC TDE BYOK'}
Step 2 - Create a SQL Server to host your databases. By the way, as of today, each virtual server can host as many as 5,000 databases.
For the sake of this document, two important concepts to keep in mind are:
- TDE and TDE BYOK are defined on the server level, affecting all hosted databases
- Geo-Replication is set up at the database level (for details on assuring business continuity for a group of databases in the same server, please refer to Failover Groups).
To create the new server, you must provide the resource group name, a unique server name, the region or location where it will be placed and at least provide credentials for an administrator with SQL authentication.
New-AzSqlServer -ResourceGroupName 'rsSSC1' `

   -ServerName 'sqlDemoTDEBYOK1' `

   -Location 'East US' `

   -SqlAdministratorCredentials `

       $(New-Object -TypeName System.Management.Automation.PSCredential  `

   -ArgumentList 'myadminusr', `

       $(ConvertTo-SecureString -String 'Pr3ttyStr0ngP@ss' -AsPlainText -Force))
For security reasons, it is highly recommended to provide an Azure Active Directory (AAD) account to be a SQL Server administrator too. Besides, only an administrator with ADD account is able to grant access to other AAD accounts.
In the example below, I provide the resource group name, the server name and my own AAD account as administrator. You can find here more details about other parameters to use.
Set-AzSqlServerActiveDirectoryAdministrator `

   -ResourceGroupName 'rsSSC1'  `

   -ServerName 'sqlDemoTDEBYOK1' `

   -DisplayName 'Wagner Crivelini'
Step 3 - Create a database in the primary server. You must also inform the resource group name and the pricing tier to use; in this case, it is "S0".
New-AzSqlDatabase  -ResourceGroupName 'rsSSC1'  `

   -ServerName 'sqlDemoTDEBYOK1' `

   -DatabaseName 'myPreciousDB' `

   -RequestedServiceObjectiveName 'S0'
Step 4 - Create a Key Vault in the primary region. You must provide at least a unique vault name, its resource group and location.
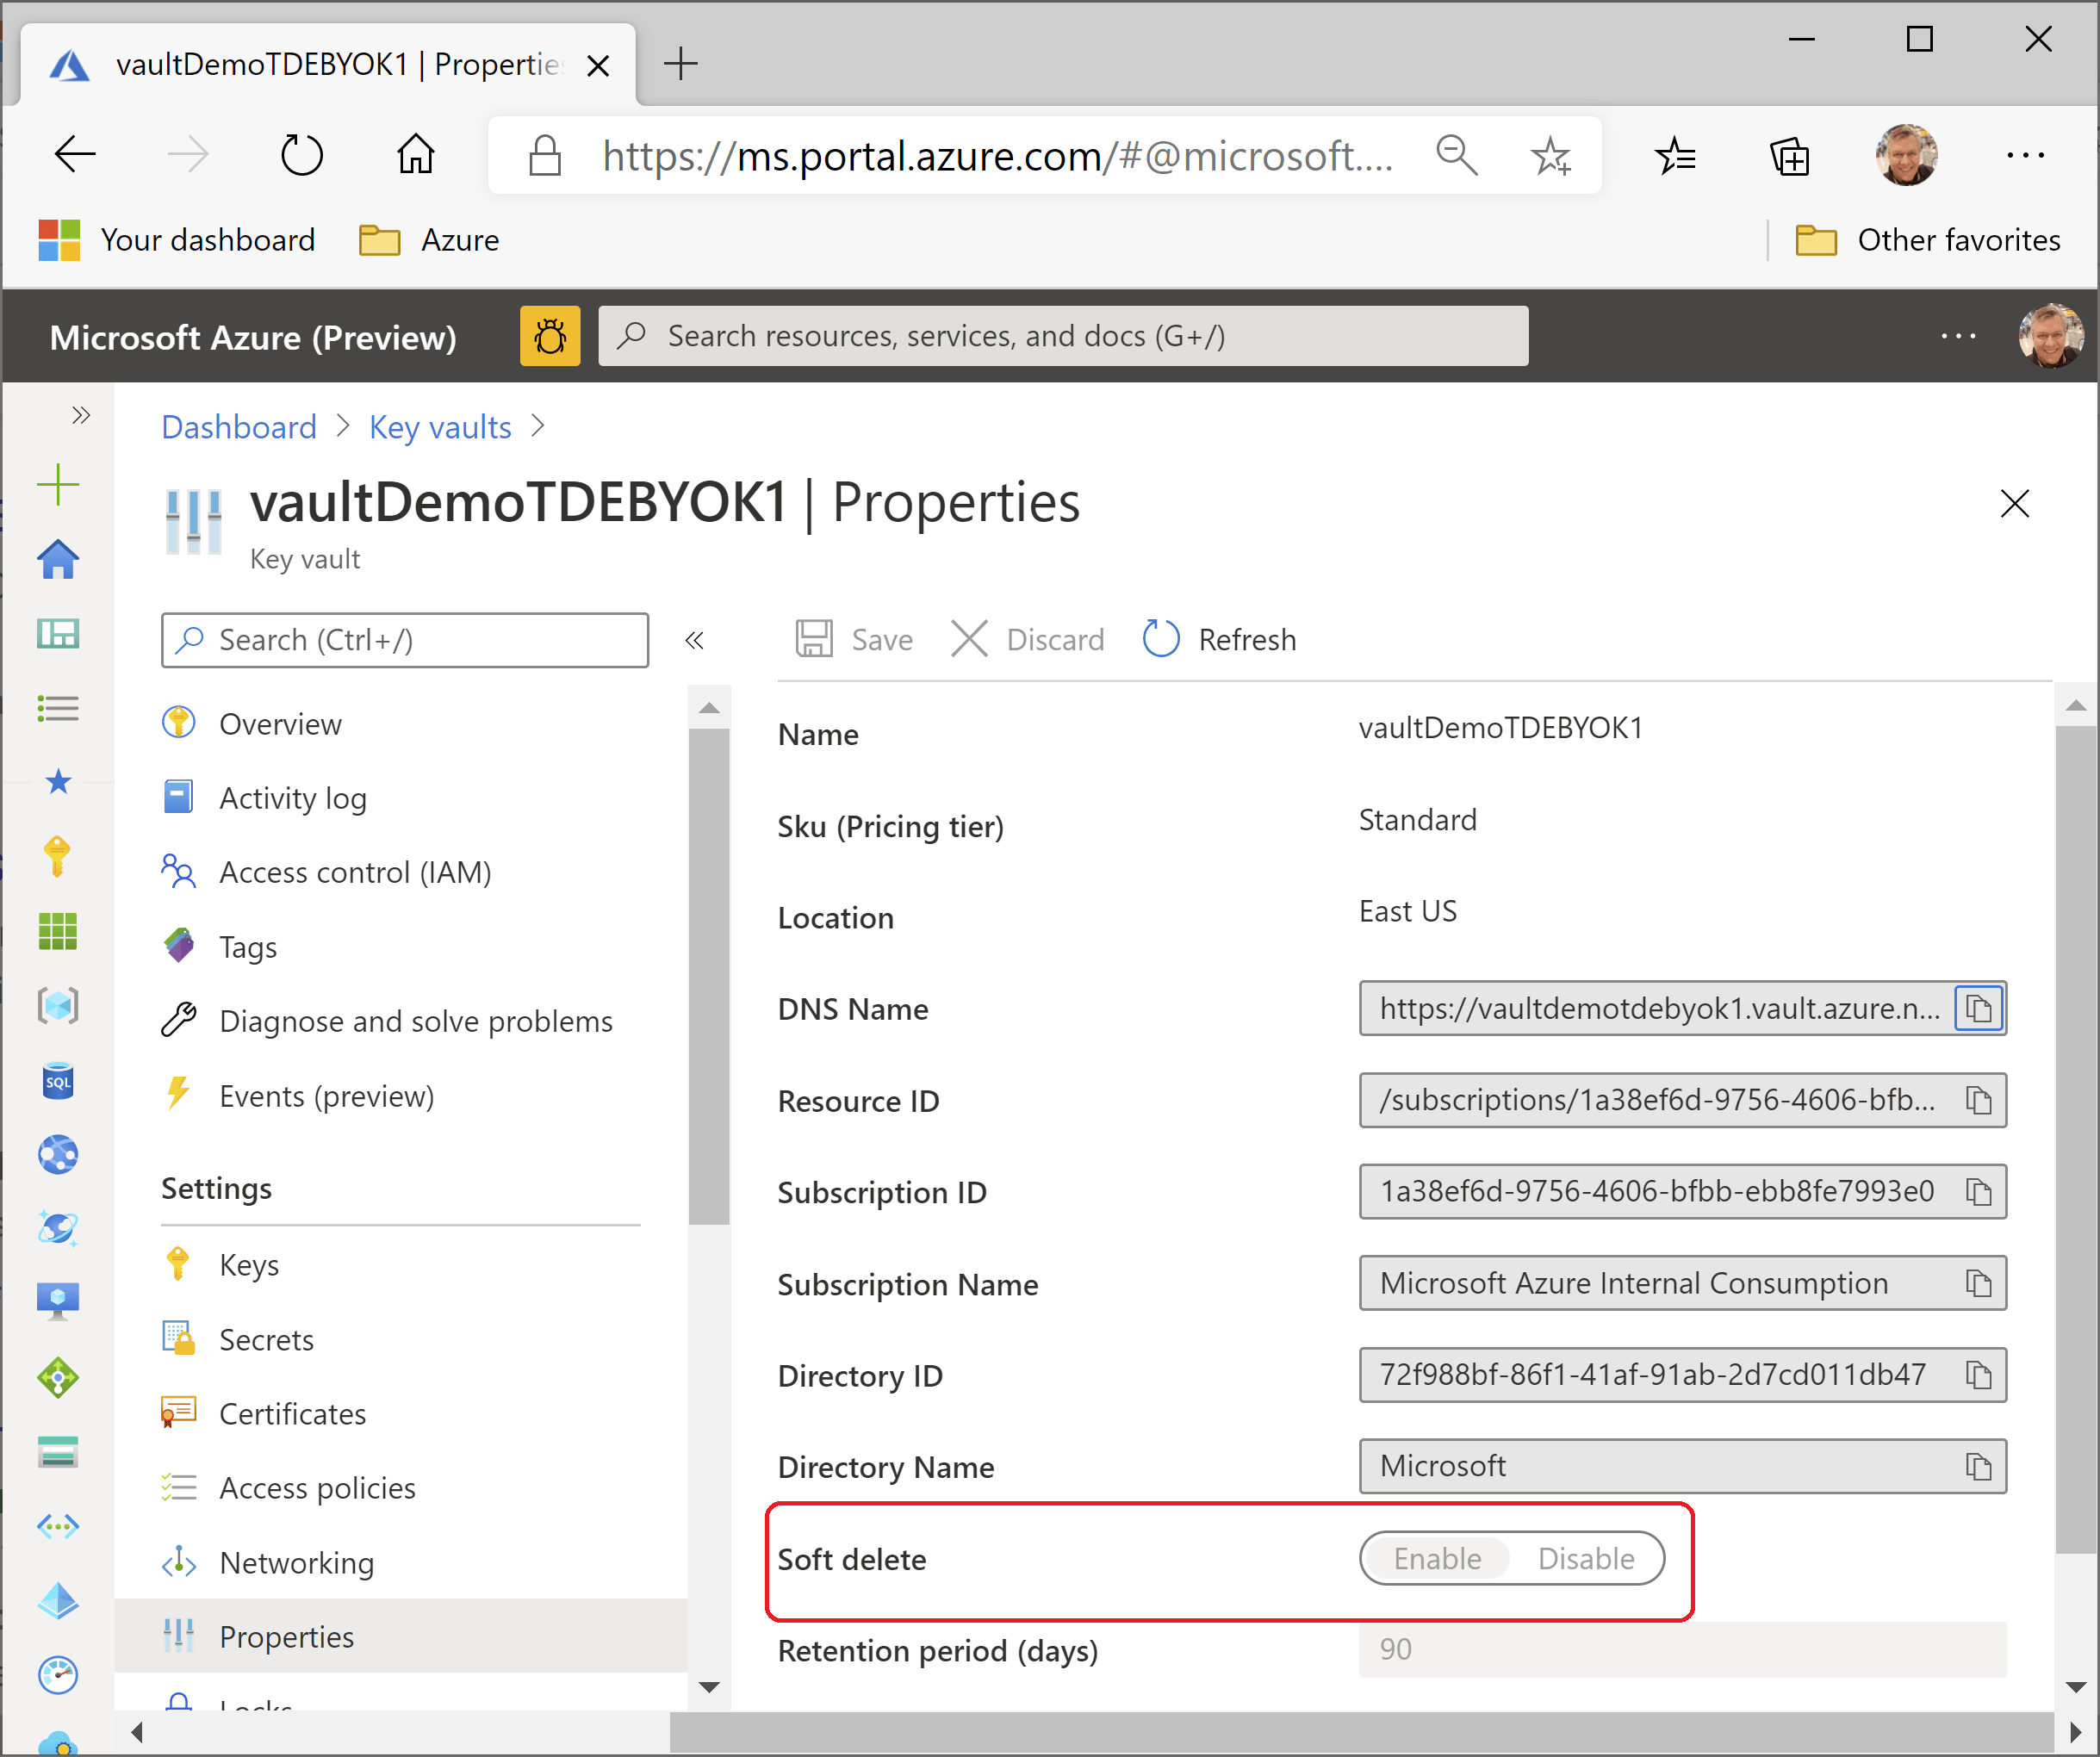
New-AzKeyVault -VaultName 'vaultDemoTDEBYOK1' `

   -ResourceGroupName 'rsSSC1' `

   -Location 'East US'
An important issue here is that the new key vault is created with default options, that is, SOFT-DELETE is on, as shown in the portal. You can verify that in Azure Portal, as shown in the image below.
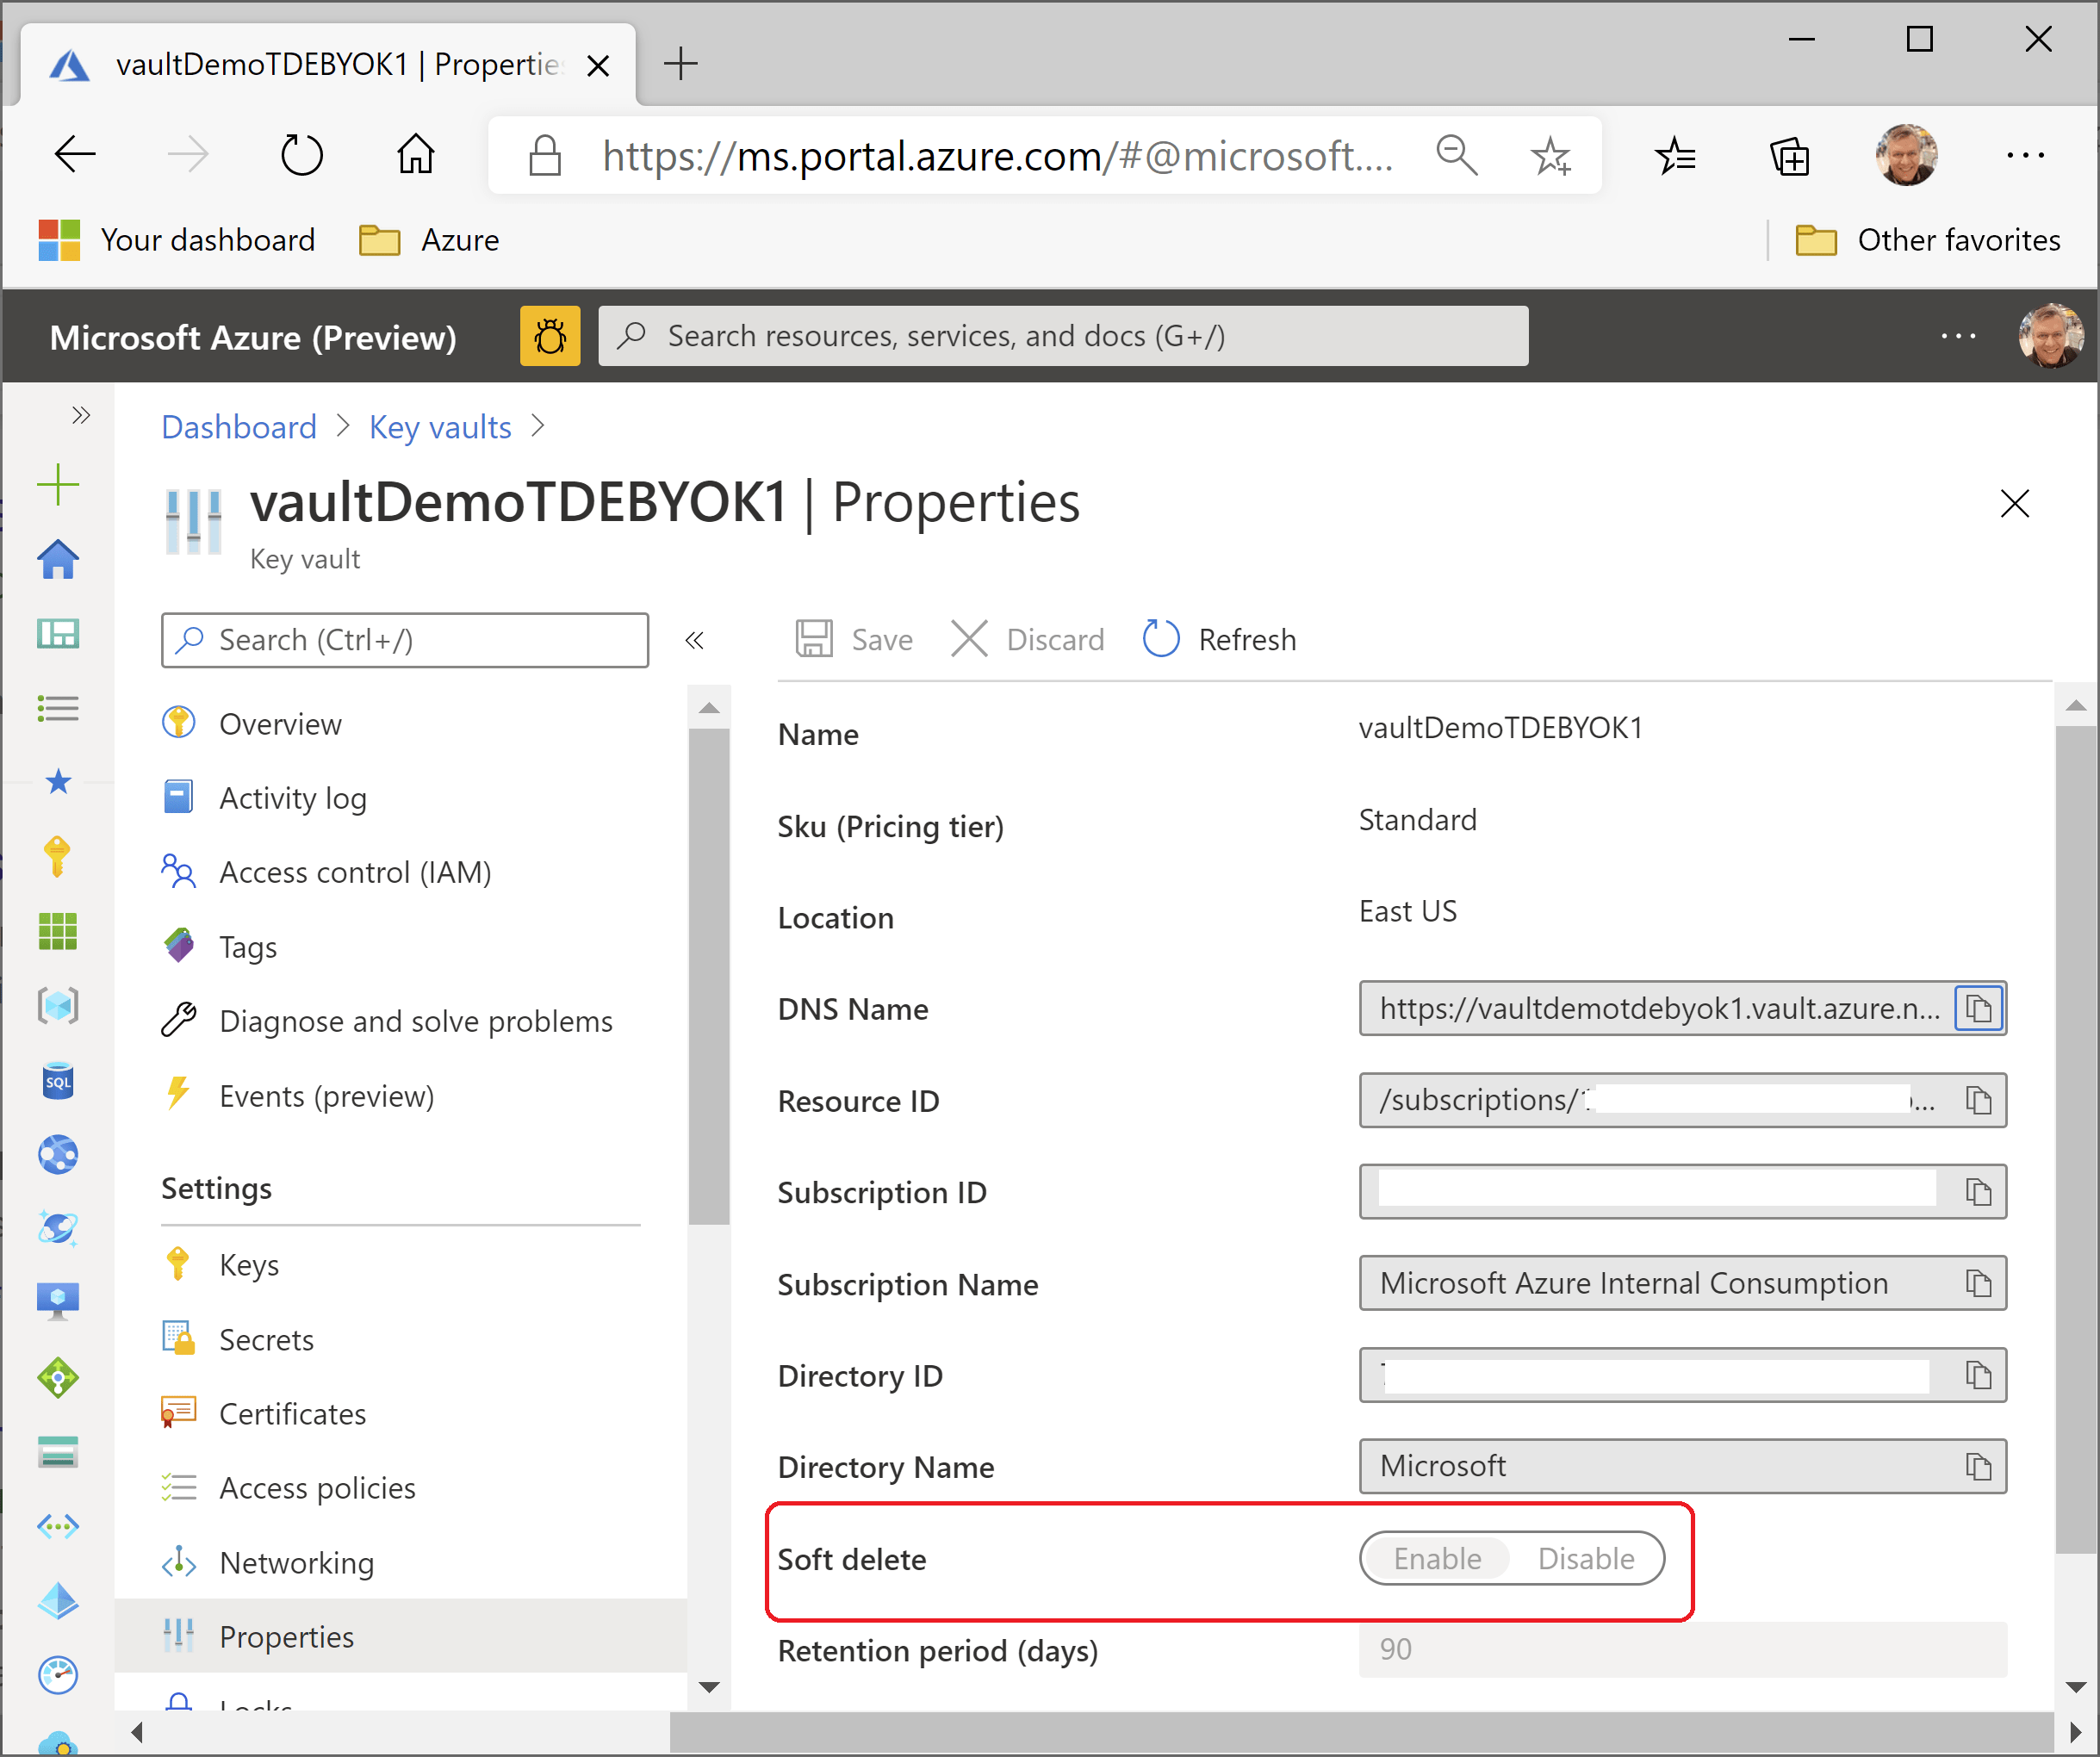 Checking Key Vault configuration
This is a mandatory condition to enable TDE BYOK. In case you want to reuse an existing vault that does not use SOFT-DELETE, you will not be able to use Azure Portal. You need to do it through Azure Powershell but be aware this operation is irreversible. The code is shown below.
($resource = Get-AzResource -ResourceId '

   (Get-AzKeyVault -VaultName 'vaultDemoTDEBYOK1').ResourceId).Properties | '

   Add-Member -MemberType "NoteProperty" -Name "enableSoftDelete" -Value "true"


Set-AzResource -resourceid $resource.ResourceId -Properties $resource.Properties
Step 5 - Create a new key in the primary vault as a software-protected key.
Add-AzKeyVaultKey -VaultName 'vaultDemoTDEBYOK1' `

   -Name 'keyTDEBYOK' `

   -Destination 'Software'
Step 6 - Backup the key you just created and save it to a local drive. You have to provide the key and vault names and the full path for the backup file.
Backup-AzKeyVaultKey -VaultName 'vaultDemoTDEBYOK1' `

   -Name 'keyTDEBYOK' `

   -OutputFile 'c:tempkeyTDEBYOK.blob'
Step 7 - Create a policy in the primary key vault to allow primary SQL Server to execute the necessary operations: get, unwrap the key and wrap the key.
$server = Set-AzSqlServer -ResourceGroupName 'rsSSC1' `
-ServerName 'sqlDemoTDEBYOK1' -AssignIdentity
Set-AzKeyVaultAccessPolicy -VaultName 'vaultDemoTDEBYOK1' `
-ObjectId $server.Identity.PrincipalId `
-PermissionsToKeys get, wrapKey, unwrapKey
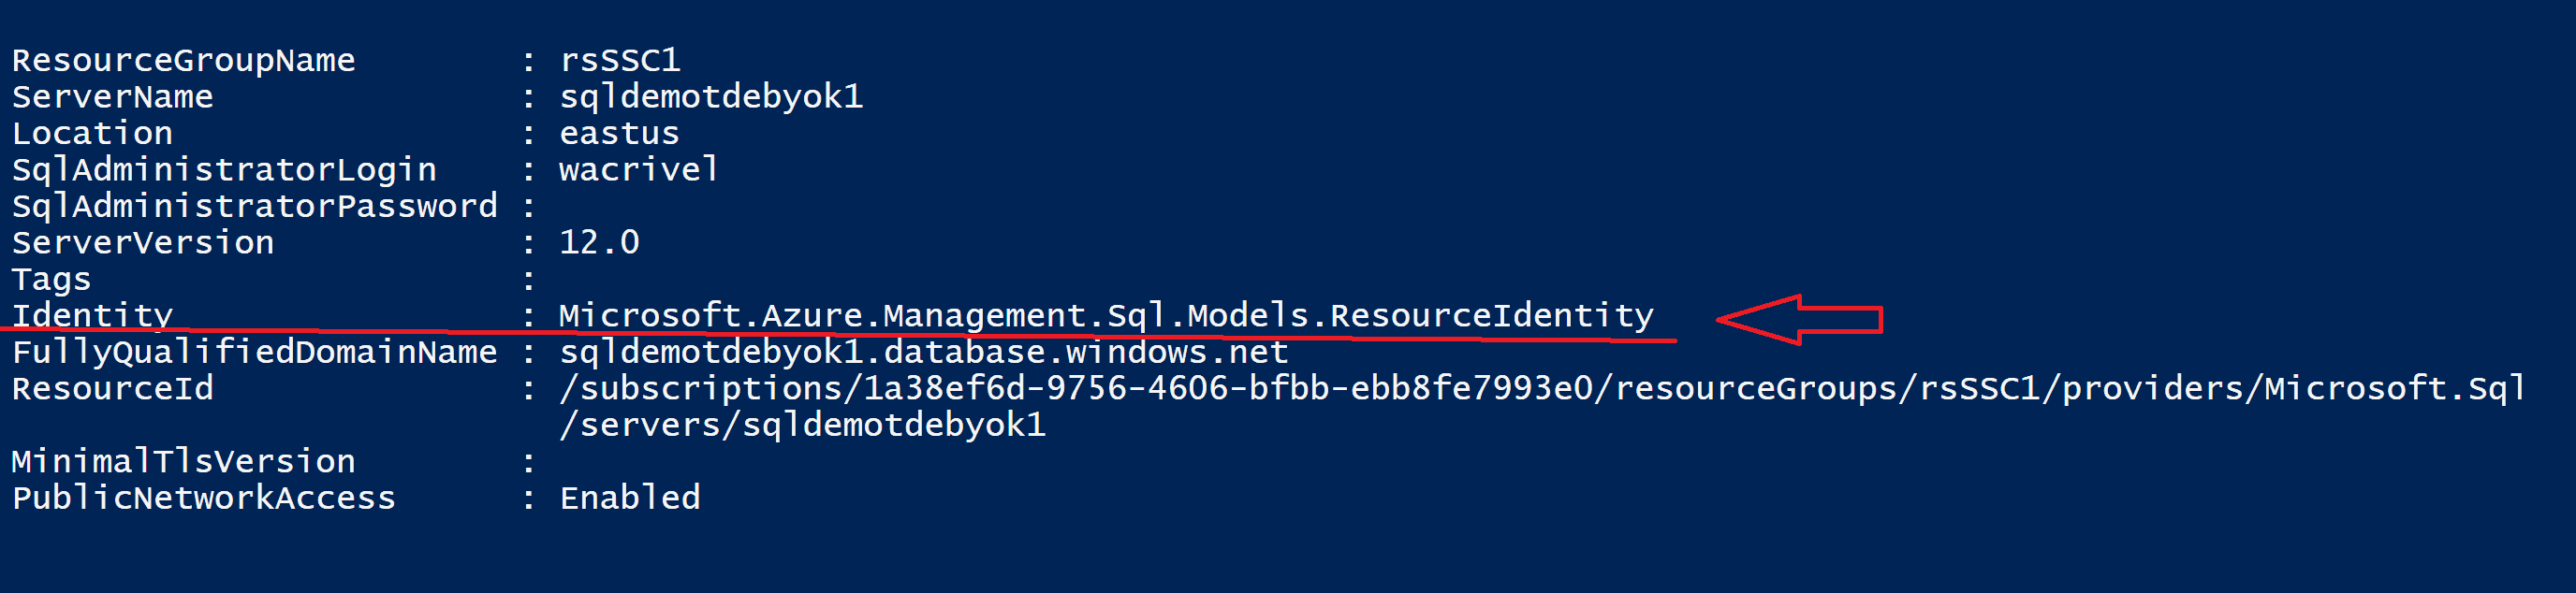
Get-AzSqlServer -ResourceGroupName 'rsSSC1' `
-ServerName 'sqlDemoTDEBYOK1'As you can see in the output of cmdlet Get-AzSqlServer, the server now has an identity, which will be necessary when setting up the TDE BYOK feature.
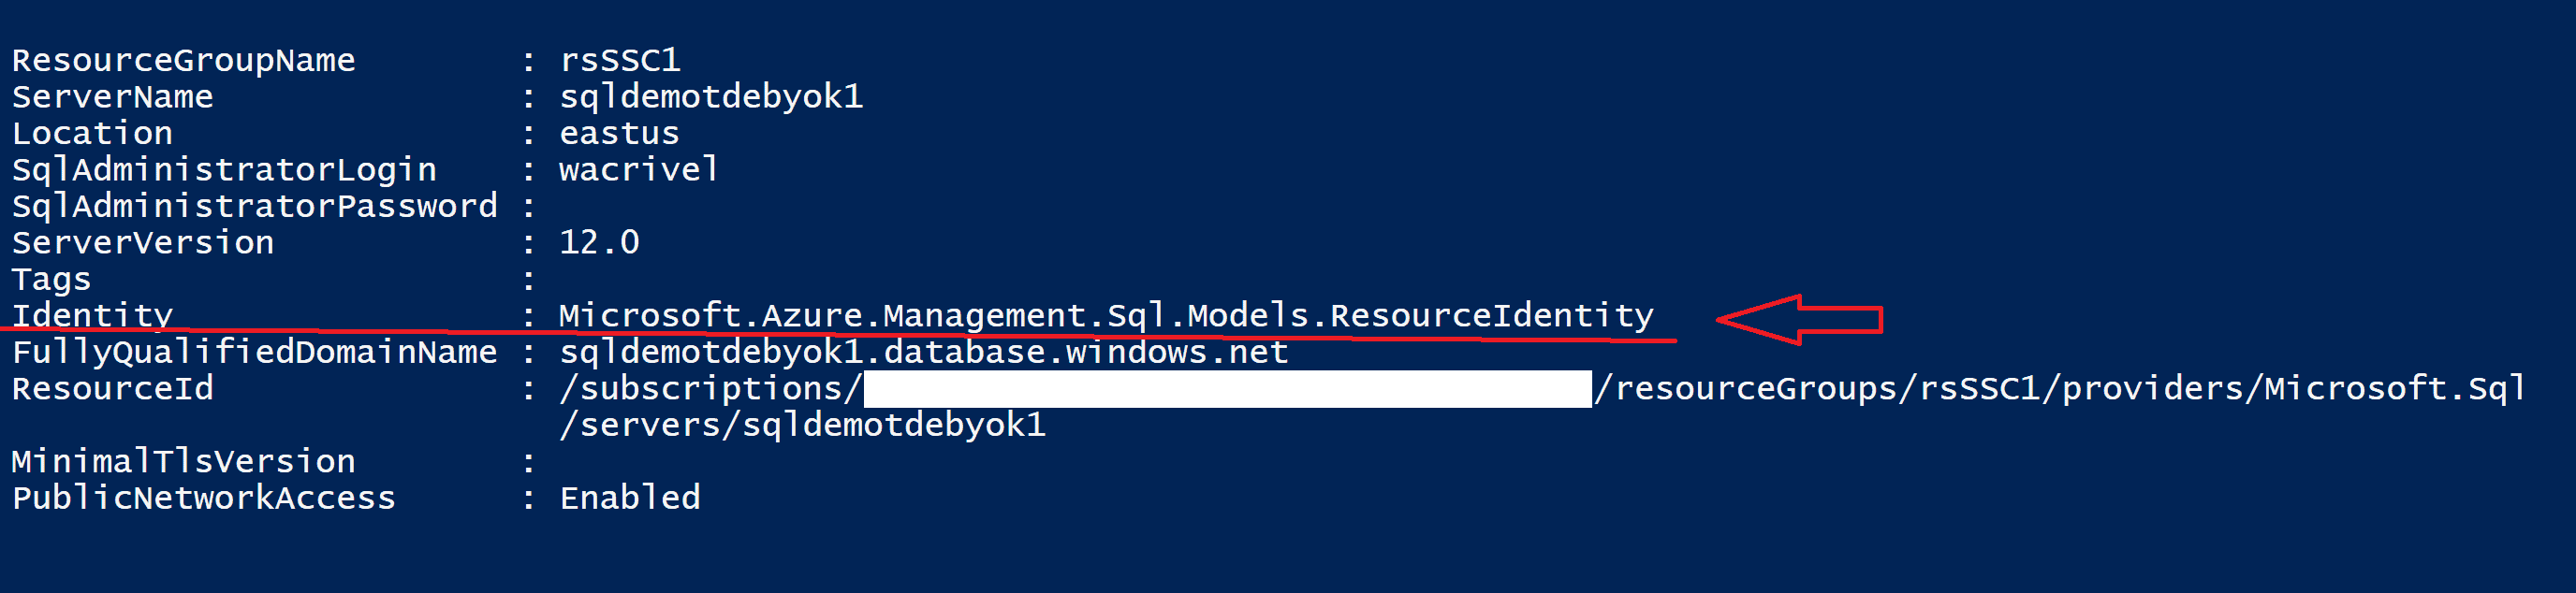 Use Azure Powershell to check SQL Server identity
Step 8 - Enable TDE BYOK on the primary server. It is necessary to include the resource group, server name, type of repository (in this case, "AzureKeyVault"), and the key id that you can also find in Azure Portal. For more information on this step, please, check this link and read the note below(*).
Set-AzSqlServerTransparentDataEncryptionProtector  `

   -ResourceGroupName 'rsSSC1' `

   -ServerName 'sqldemotdebyok1' `

   -Type AzureKeyVault `

   -KeyId 'https://vaultdemotdebyok1.vault.azure.net/keys/keyTDEBYOK/b945a1b7bd4b43f18bf907b48c88b384'
For the Resources in Secondary Region
At this point, the basic configuration is done in the primary region. You need now to execute on the secondary region steps 1, 2, 4, 7 and 8 listed in the previous section. You must not run steps 3, 5 and 6 on the secondary. In this region, I use the following resource names:
- Region: the secondary region you selected.
- Resource Group: rsSSC2
- SQL Server: sqlDemoTDEBYOK2
- Key Vault: vaultDemoTDEBYOK2
Naturally, you need to replace resource names with the ones you define for your secondary.
Once you have completed those steps, the next step is to restore the key to the secondary vault (*). Please inform the secondary vault name and the full path for the key backup file.
Restore-AzKeyVaultKey `

   -VaultName 'vaultDemoTDEBYOK2' `

   -InputFile 'c:tempkeyTDEBYOK.blob'
IMPORTANT (*): In case you are implementing TDE BYOK in servers that already have geo-replication, you must first convert the secondary server to use a customer-managed key. After that, you will be able to set up the primary server.
Set Up Geo-Replication
Now it is time to finally set up replication process. To activate Geo-Replication, you will have to inform database name, resource group and server names for the primary region and then pass resource group and server names for the secondary region (which are referred as "Partner*" resources).
$dbgeorep = Get-AzSqlDatabase -DatabaseName 'myPreciousDB' `

   -ResourceGroupName 'rsSSC1' `

   -ServerName 'sqlDemoTDEBYOK1'


$dbgeorep | New-AzSqlDatabaseSecondary -PartnerResourceGroupName 'rsSSC2' `

   -PartnerServerName 'sqldemo-TDEBYOK-2' `

   -AllowConnections "All"
You will find more information about this feature in here.
Now you finally have your servers, databases, key vaults deployed to two regions using TDE BYOK and Geo-Replication.
Checking Your TDE BYOK Implementation
To make sure the implementation is working, you can check Azure Portal as shown below.
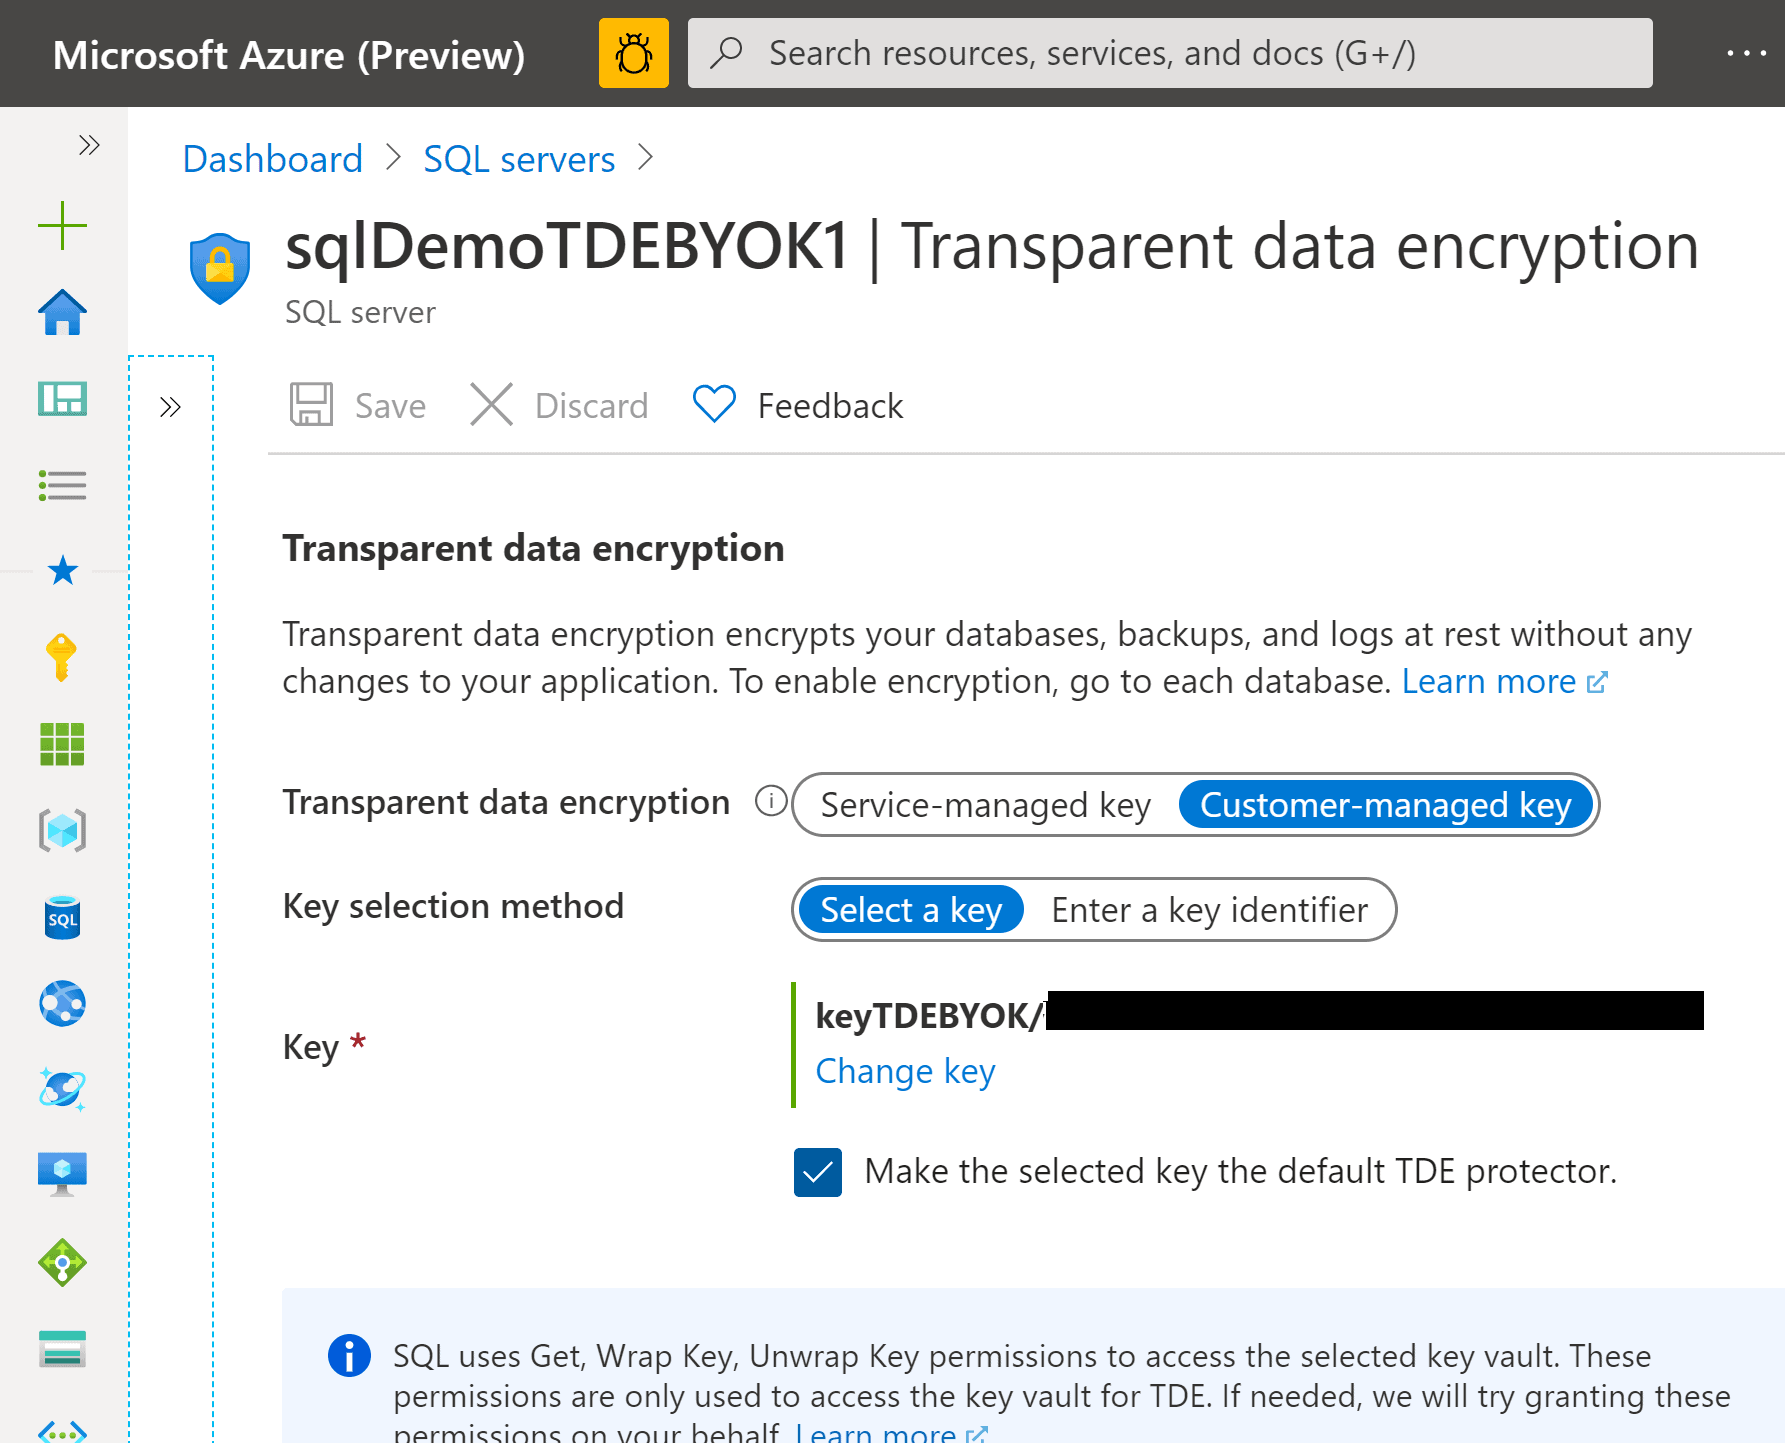 Checking TDE BYOK setup in Azure Portal
You can also use T-SQL, using DMV sys.dm_database_encryption_keys. You should look for column encryption_state, that is expected to have value 2, which means "Encrypted". For more information, check this link.
Checking Replication Status
T-SQL offers several tools to monitor geo-replication operations (check this document). For instance, to check if geo-replicated databases are in sync, try DMV Sys.dm_geo_replication_link_status. You should pay special attention to column replication_state_desc, that is expected to present status “CATCH_UP” (details available here).
Recommendations
This to-do list is intended to help you create a proof of concept to better understand the pros and cons of using TDE BYOK. But keep in mind it is suitable for very specific business requirements. Most of the companies will do better using TDE with service-managed key.
TDE BYOK is a feature for skilled security administrators. Never try it in production unless you are sure about what you are doing. Remember you might lose all databases hosted on your virtual server if you are not able to recover the encryption key.
