

Overview
Amazon RDS allows users to create multiple databases within a single database instance. And connections to each of these databases are shared across the DB instance. This setup can become a bottleneck when the number of connections per DB instance is limited. This article explains how you can achieve scalability in this environment. It presents the method I used for scaling, explores alternative approaches, and discusses their pros and cons.
The Problem with Shared DB Connections Across Databases
Amazon RDS hosts multiple databases within a single instance, and there are a limited number of connections shared amongst all these databases. Additionally, connections established for one database cannot be reused by another. Each database requires a separate connection. For example in the multi-tenant environment shown in Fig 1.1, each tenant has a dedicated database within the same Amazon RDS instance.
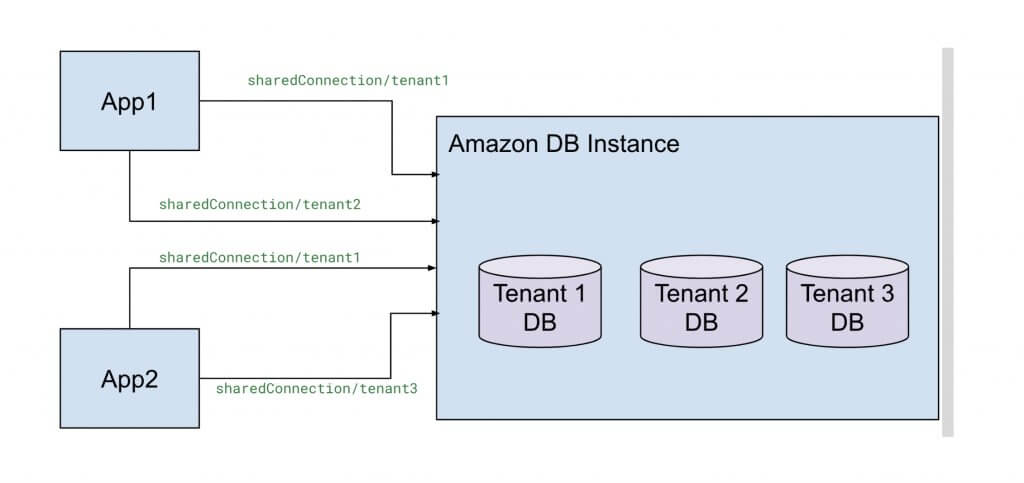
Fig 1.1
This Amazon RDS instance enforces a maximum limit of 5000 connections. As a result, tenant1, tenant2, and tenant3 databases must share the 5000 connections amongst themselves. Also, to connect to tenant1’s database, you must use sharedConnection/tenant1; similarly, for tenant2’s database, you need sharedConnection/tenant2, and so on. Therefore a connection established for one database cannot be reused to connect to another.
Now, imagine thousands of tenants using the same instance. This setup would allocate only a few connections per tenant, quickly exhausting the total connection limit during peak traffic. Thus increasing the load on the DB and slowing down the system. Additionally, this would also limit the number of tenants you can have per DB instance.
Our Initial Design
In the early stages, our micro-service followed a similar data model design. We had a multi-tenant environment where we needed to isolate the data between multiple tenants. To ensure maximum isolation, we chose to create a separate database for each tenant. This approach worked fine when there weren't a lot of tenants and the traffic was low. Each time a tenant made a request, the system created a new connection, gradually consuming a few database connections. However, during load testing, we discovered that this design was not scalable. Creating a new connection for every request introduced unnecessary overhead and increased latency. We had to create a new connection every time because we did not have a connection pool. And as the number of application pods scaled the number of connections also increased thus exhausting all the DB connections during peak traffic and straining the DB.
Our Solution
To resolve this problem, I implemented a cache of connection pools as shown in Fig 1.2.
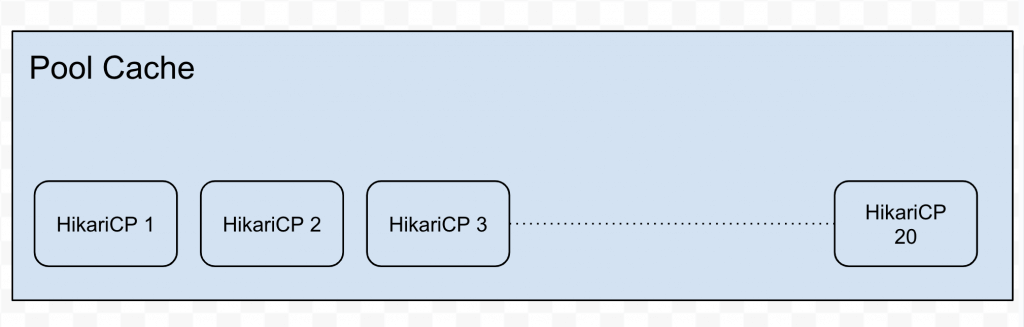
Fig 1.2
We initially avoided using a connection pool due to the complexity of implementing one in this environment. However, after hitting the above bottleneck we ended up deciding to build one. I created two caches of connections pools; one for read and one for write. A cache of connection pool would have the ability to hold connections for multiple tenants at the same time. It was ideal to distribute the traffic across DB instances for better scalabiltiy. Therefore it was decided to send traffic not just to the master DB but to the read replicas as well. Our application was read heavy and had minimal writes, so this proved to be an ideal setup.
The config setup for these caches is shown in the code snippet below. I used a Caffeine Cache; which is an in-memory cache using a Google Guava inspired API. The default cache size was 200; therefore it could hold connection pools for 200 tenants at any given point in time.
@Configuration
@EnableCaching
public class CachingConfig {

     private static final String DEFAULT_CACHE_SIZE = "200";

     /**
      * Return the alternate cache manager.
      * It manages the Write Cache
      * @return CacheManager
      */
     @Bean
     public CacheManager writeCacheManager() {
           CaffeineCacheManager cacheManager = new CaffeineCacheManager("writeCache");
           cacheManager.setCaffeine(caffeineCacheBuilder());
           return cacheManager;
     }

     /**
      * Return the alternate cache manager.
      * It manages the Read Cache
      * @return CacheManager
      */
     @Bean
     public CacheManager readCacheManager() {
           CaffeineCacheManager cacheManager = new CaffeineCacheManager("readCache");
           cacheManager.setCaffeine(caffeineCacheBuilder());
           return cacheManager;
     }

     // Cache Builder
     Caffeine<Object, Object> caffeineCacheBuilder() {
            return Caffeine.newBuilder()
            .maximumSize(Integer.parseInt(DEFAULT_CACHE_SIZE))
            .recordStats();
     }
}
Hikari Connection Pool Framework
The second requirement for building a connection pool cache was to select a lightweight connection pooling framework. A lightweight connection pool because the cache needed to hold up to 200 connection pools simultaneously. HikariCP, a lightweight and high-performance JDBC connection pooling framework seemed to be an ideal choice. HikariCP was finalized due to its small footprint of approximately 130 KB. Each pool in the cache was initially configured with a maximum of 20 connections and a minimum idle connection of 1 which was later adjusted to 0—a change we will discuss shortly. The connection pooling configuration is shown in the code snippet below.
@Component
public class DBConnectionPoolCache {

    private static final String DEFAULT_MAX_POOL_SIZE = "20";

      /**.
       * Returns a pool for a specific tenant
       * @param tenantName Tenant pool being accessed
       * @return {@link HikariDataSource} pool
       */      @Cacheable(value = "writeCache")
      public HikariDataSource getWriteConnectionPool(String tenantName) {

              HikariConfig hikariConfig = new HikariConfig();
              hikariConfig.setJdbcUrl("URL");
              hikariConfig.setPoolName(tenantName);
              hikariConfig.setConnectionTimeout(Duration.ofSeconds(30).toMillis());
              hikariConfig.setIdleTimeout(Duration.ofSeconds(30).toMillis());
              hikariConfig.setMaxLifetime(Duration.ofMinutes(15).toMillis());
              hikariConfig.setLeakDetectionThreshold(60 * 1000);

              // Max connection per pool
              hikariConfig.setMaximumPoolSize(Integer.parseInt(DEFAULT_MAX_POOL_SIZE));

              //Min idle connections
              hikariConfig.setMinimumIdle(0);

              HikariDataSource dataSource = new HikariDataSource(hikariConfig);

              return dataSource;
          }

      }

}
The maximum pool size was set to 20 and the minimum was set to 1. So at any point in time you can expect 200(cache size) connections to be open if the cache is full and up to 200(cache size) * 20(max pool size) = 4000 DB connections per pod. Our application initially ran on three pods, with an auto-scaling capability of up to 10 pods. At full scale, 10 pods could theoretically be 4000*10=40000 connections. However, we had 2 read replicas and one write and we never expected the write pool to reach it's maximum limit as we were read heavy. And even if the read replicas reached it's maximum capacity, we had the option to further auto-scale the read replicas to 15 pods. Therefore I wasn't worried about reaching the limit initially.
Tweaking a few parameters
During load testing, it was observed that the three pods quickly exhausted the available connections. The issue stemmed from minimumIdle = 1. This allocated one connection per tenant until the idle timeout of 30 seconds elapsed. Since there were 200 or more tenants firing requests at any point in time, maintaining one connection per tenant during peak traffic became costly. Hence we decided to reduced the minimum idle connections to 0. This change ensured that no tenant held connections during peak traffic, and connections were immediately released back to the database when idle.
Setting minimumIdle = 0 introduced slight latency when establishing the first database connection, but this impact was negligible and an acceptable trade-off given our application's traffic pattern.
Some other options
A few market alternatives, such as RDS Proxy and PgBouncer for Amazon RDS PostgreSQL, can replace the need to build a custom connection pool. We chose not to explore external options primarily due to cost and time constraints. We wanted something the would address the issue immediately and was cost-free. Therefore, we built our own connection pool. However, RDS Proxy and PgBouncer are excellent choices if you can invest time and money.
RDS proxy
RDS Proxy is a fully managed database proxy designed specifically for Amazon RDS. RDS proxy provides connection pooling, failover capabilities, security through IAM authentication and connection multiplexing. It dynamically adjusts the pool size based on workload demands. It is priced per vCPU per hour for each database instance. You can find more details here
PGBouncer
PgBouncer is an open-source connection pooler designed for PostgreSQL which sits between the application and the DB. It is a more generic open source pooling framework that is mostly used with Postgres. PgBouncer provides connection pooling and multiplexing features. Availability and failover capabilities entirely depend on the deployment topography and the user. The users are responsible for the management and deployment of PgBouncer.
Conclusion
When scaling database connections in a multi-tenant setup, having an optimzed connection pooling is crucial. Implementing a cache of connection pools with HikariCP significantly reduced overhead and improved performance for us. If cost and control are priorities, building a custom solution like shown above is a viable approach. However, managed services like RDS Proxy and PgBouncer offer easier alternatives for teams with the budget and time to implement them.
