

Did you ever wonder what the heck all those property settings meant in SQL Server 2000’s client tool, Enterprise Manager, and whether or not you really needed to tweak them? What are the key points? It never hurts to review.
The first question to answer is, “What is the fastest way to get to the Configuration Properties?”
That’s easy! Just open Enterprise Manager, and from the main menu, click on Tools => “SQL Server Configuration Properties…”. You can also right click the Server Group (i.e., (local) (Windows NT)) and click on Properties. For more advanced configuration properties, you can use stored procedures in Query Analyzer.
The General Tab
So let’s talk about the first tab in Enterprise Manager’s SQL Server Configuration Properties, the General tab, in the Configuration Properties window (see Figures 1, 2, 3, and 4 below).
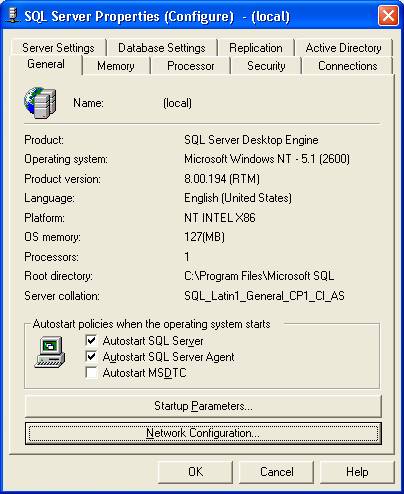
Figure 1
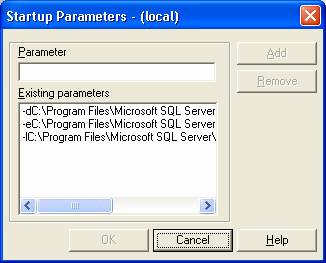
Figure 2
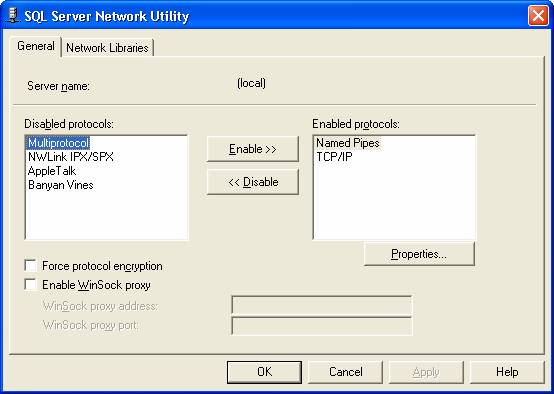
Figure 3
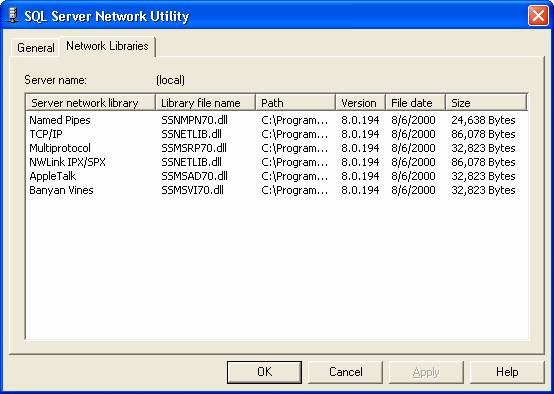
Figure 4
What are the key points of the General tab?
- Displays system and server information (Figure 1).
- Configures start up options (Figure 1). It's highly recommended that you automatically start SQL server and SQL Server Agent (used for scheduling replication, monitoring SQLServerAgent service, maintaining error logs, running jobs, and starting other processes). SQL Server Agent is not enabled by default but really should be. Enable Autostart MSDTC (used with Microsoft’s Web Server and SQL Server) if you want the MSDTC (Microsoft Distributed Transaction Coordinator) service to be loaded automatically in order to manage transactions across multiple servers.
- Allows you to set up additional start up parameters (Figure 2). The path for master database, the path for the error log, and the path for the master database transaction log are already set up for you and you can change them if you want. Other startup parameters include:
- –B (breakpoint on error)
- -c (don’t run SQL Server as a service but rather run it from the commandline)
- -f (start with minimal configuration)
- -g number (amount of memory in MB to reserve)
- -m (single-user mode)
- -p<level> (set precision for numeric and decimal data types)
- -s<altreg> (alternate registry)
- -T<tnum> (trace flag)
- -t<tnum> (internal trace flag)
- -x (disable statistics for CPU and cache-hit ratio)
- -y number (error number for dump stack)
- Allows you to set up network options (Figures 3 and 4). This is pretty straightforward (i.e., enabling/disabling protocols, forcing encryption, enabling WinSock proxy, and viewing details of installed network libraries).
The Memory Tab
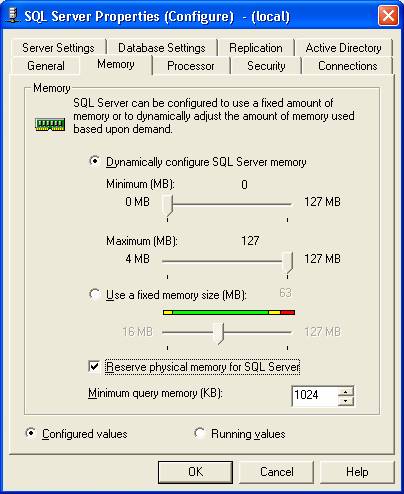
Figure 5
Key points (Figure 5):
- By default, SQL Server is set to use dynamic memory (recommended). You can tweak the minimum and maximum values for memory allocation but it’s not a highly recommended practice.
- If you want, you can assign a fixed memory size (you must ensure that the memory allocated will be available for SQL Server).
- Reserving physical memory is great option on a dedicated system ‘cause you can reduce paging and cache hits. You can adjust the minimum query memory, but proceed with caution, and use this formula: FreeMemory/(AvgQuerySize * AvgNumSimulQueries).
- “Configured values” shows you what has been configured vs. what are actually running (just click on “Running values” to view). Note: This applies to all tabs with these two options.
Processor tab
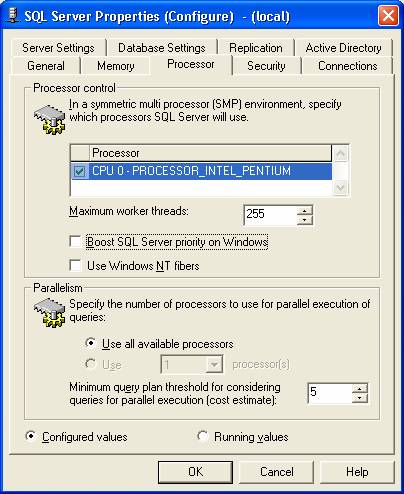
Figure 6
Key points (Figure 6):
- SQL Server Standard Edition supports up to 4 processors. Advanced Server supports 8 processors. Data Center Server supports 32 processors.
- Multiple processors are designated as CPU 0, CPU 1, CPU 2, etc. Put check marks next to the processors you want SQL Server to use. Don’t allocate more processors than your SQL Server edition supports.
- Threads can be from 10 to 32,767 (except desktop version). You want the threads to match the number of user connections. Otherwise, SQL Server will use pooled threads (multiple user connections per each individual thread) which reduce performance.
- On dedicated Windows NT and Windows 2000 servers, it is recommended to click the “Boost SQL Server priority on Windows” option. This will allow your instance of SQL Server to run at a higher priority (priority base 13) than other processes.
- You can configure SQL Server to use NT fibers. Use this only when you have multiple CPU’s and a low numbers of users. This option would negate switching between the “thread handled” kernel and “non-thread handled” user-modes (like applications and user-related tasks) because the user-modes would then be threaded directly.
- Specify the number of processors to use for parallel processing when: (1.) Number of CPUs > Number of active connections. (2.) Elapsed time in seconds for serial execution of a query > Query plan threshold.
Security Tab
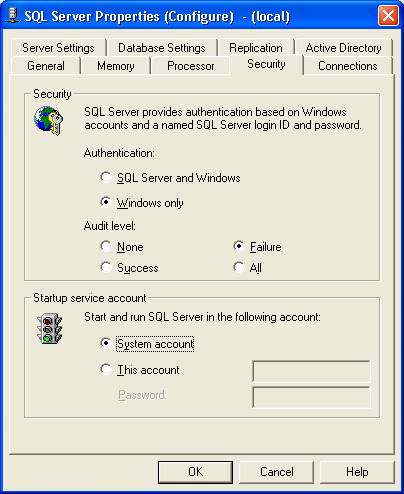
Figure 7
Key points (Figure 7):
- Specify whether to use combined authentication (SQL Server and Windows) or Windows only. This depends on whether you want users to login in with their NT user accounts and other users with their SQL Server logon ID. With
combined authentication, SQL Server logons are checked first. For ease of administration, you probably want to consider Windows only.
- Specify the level of auditing. I would recommend “Failure” auditing at the least.
- Specify which account to use to start the SQL Server service. Use the local “System account” for local operations only. Otherwise, specify a Windows domain account.
Connections Tab
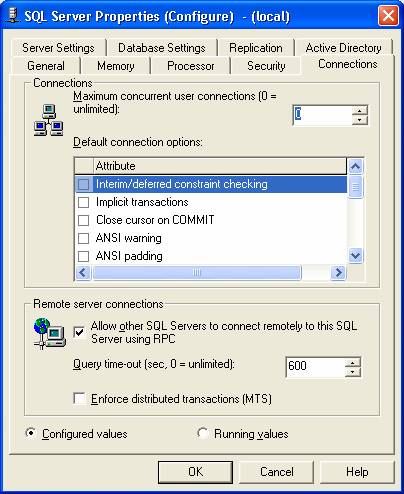
Figure 8
Key points (Figure 8):
- You can set the maximum number of user connections (0 to 32,767) depending on server limitations and/or the application. 0 = unlimited. To determine the number of connections your server can handle, go to Query Analyzer and execute this command:
SELECT @@max_connections
However, you are probably better off adding memory and/or clustering and let SQL Server determine the maximum number of user connections.
- You can set default query-processing options for user connections (applies to new logons only) by clicking the check box to the ON state:
- Interim/deferred constraint checking (disable deferred checking of foreign key constraints)
- Implicit transactions (use transactions implicitly)
- Close cursor on COMMIT (automatically close cursor at transaction end)
- ANSI warning (displays null, overflow, and divide-by-zero warnings)
- ANSI padding (fixed-length fields pad with trailing spaces)
- ANSI nulls (comparing with a NULL gives unknown result)
- Arithmetic abort (terminate queries with overflow or divide-by-zero error)
- Quoted identifier (double quotation marks are interpreted as an identifier and
not as a delimited string). THIS IS IMPORTANT
TO ANYONE WHO HAS EVER ENCOUNTERED THIS PROBLEM!
- No count (turn off the row count returned)
- ANSI null defined ON (new columns allow nulls unless they are explicitly allowed
or disallowed)
- ANSI null defined OFF (new columns do not allow nulls unless they are explicitly
allowed or disallowed)
Server Settings Tab
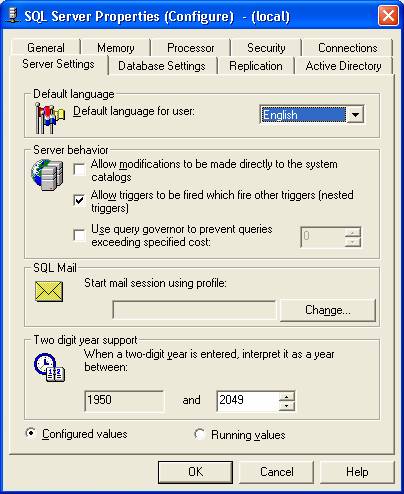
Figure 9
Key points (Figure 9):
- You can choose a default language for date displays including month and day.
- For server behavior, you can allow direct updates to system tables (very risky) rather than the default which is where users can only update systems tables with system-stored procedures; you can disable nested triggers (can have up to 32 levels) but, beware, this would negate a rollback for a transaction; and/or you can enable the query governor to prevent queries running which exceed an estimated amount of time (0 to 2,147,483,647).
- Once you establish a client connection (i.e., Outlook 2000) with a mail server, you can then set up SQL Mail to use that profile to configure stored procedures that are triggered by e-mail and/or send notifications (via SQLAgentMail) to designated operators.
- You change the default Y2K compliant values for two-digit year dates by using the Two year digit support option.
Database Settings Tab

Figure 10
Key Points (Figure 10):
- The fill factor (ranges from the default of 0 percent to 100 percent) only applies to new/re-created indexes. As it applies to the index tree, 0 percent (the default) leaves room for growth in the upper level; whereas, 100 percent leaves no growth (good for read-only tables only). Basically, the fill factor applies to the empty space in the data pages that can fill up when making additions or modifications to the data. If you change the fill factor and see a significant decrease in page splits (see performance monitor output for SQLServer:Access Methods:page splits/sec), then you have a optimum fill factor. If the page splits increase significantly over time, then you will like have to recreate the index with a new fill factor. If you change the fill factor, make sure you balance read performance while making large updates execute faster.
- For backup and restore, you can choose to have a read/write timeout for tape reads and also whether you want specify the number of days to keep old files (retention period).
- You can change the checkpoint interval for flushing all cached data pages to disk by changing the recovery interval (default is 0 which means it will occur about once a minute).
- You can change the default data and log directory paths.
Replication Tab

Figure 11
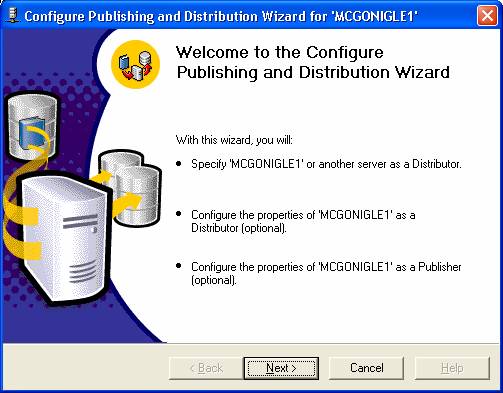
Figure 12
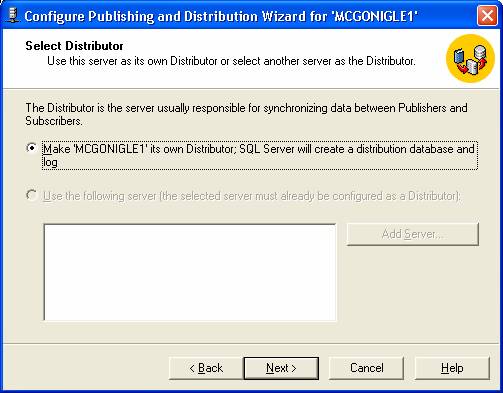
Figure 13

Figure 14
Key Points (Figure 11):
- Allows you to set up replication among SQL Servers through the wizard (Figure 12). You can set up the local server or another server as a Distributor (Figures 13 and 14), configure the local SQL Server instance as a Distributor, or configure the local SQL Server instance as a Publisher. When assigning a Distributor, make sure that you do not have the SQL Server Agent using the System account or else replication will fail. However, if the System account is being used, the wizard will pop up for SQL Server Agent and allow you to change the account.
- Allows you to disable replication (either as a Publisher or Distributor).
Active Directory Tab
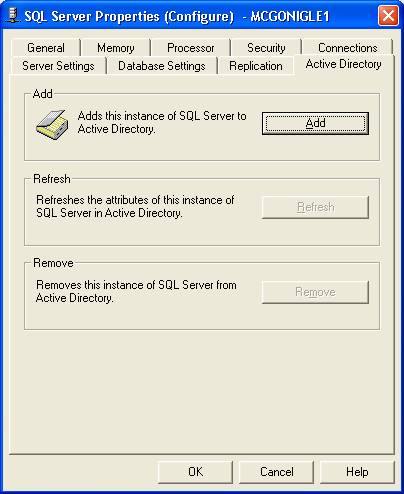
Figure 15
Key Points (Figure 15):
- You can Add, Refresh, or Remove SQL Server information published in the Active
Directory.
Conclusion
It is nice to have options like the Configuration Properties wrapped up into a nutshell. Sometimes the options can seem “under described” and some of us tend to click before really know whether it’s a good option or not. Hopefully, these Key Points will help you along. Please be aware that there is a stored procedure (sp_configure) in Query Analyzer that will give you access to more advanced options for configuration purposes. Try it out when you get a chance:
exec sp_configure ‘show advanced options’, 1
go
References Used:
SQL Server 2000 Administrator's Pocket Consultant: Configuring and Tuning Microsoft SQL Server. (2001, July 19). Retrieved August 25, 2004 from http://www.microsoft.com/technet/prodtechnol/sql/2000/books/c02ppcsq.mspx
