

In this article, we will review how to configure Always On Availability Groups in Ubuntu Server using the Pacemaker cluster. The following are the high-level steps to configure Always On Availability Groups (AOAG) with an Ubuntu server.
- Install SQL Server on Ubuntu 16.04
- Install Pacemaker agents and configure the cluster
- Create Always On Availability Groups
- Create Pacemaker cluster resources
Let's go over these steps one by one. For the demo, I create a three-node cluster using Pacemaker. Below are the node and virtual IP details for your reference.
- UBSQL01 – 172.31.6.224
- UBSQL02 – 172.31.14.121
- UBSQL03 – 172.31.3.50
- Virtual IP - 172.31.6.225
Installing SQL Server on Ubuntu 16.04
Log in to the UBSQL01 server using SSH and make sure you can connect to the other two nodes, UBSQL02 and UBSQL03. Repeat the same step on UBSQL02 and UBSQL03 as well. Once we know there is network connectivity, we can proceed. Let us start installing SQL Server. Please note that you must execute all the steps below on the other two nodes that will host the Always On Availability Groups.
First, We need to import the registry keys. Execute the following command to import registry keys.
sudo wget -qO- https://packages.microsoft.com/keys/microsoft.asc | sudo apt-key add -
After importing repository keys, we need to add the repository. Please execute the following command to register the Microsoft SQL Server Ubuntu repository.
sudo add-apt-repository "$(wget -qO- https://packages.microsoft.com/config/ubuntu/18.04/mssql-server-2019.list)"
Now install SQL Server on the Ubuntu server by executing the following commands.
sudo apt-get update

sudo apt-get install -y mssql-server
After installing the SQL Server package, set up SQL Server by executing the following script.
sudo /opt/mssql/bin/mssql-conf setup
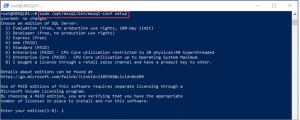
Choose the SQL Server edition, accept the terms and conditions, and enter your sysadmin (SA) password. For demo purposes, I choose the evaluation edition.
After the successful installation of SQL Server, we need to install SQL Server command-line tools and setup the environment variables. Execute the following script to install SQL Server command-line tools. Accept the terms and conditions when prompted.
curl https://packages.microsoft.com/keys/microsoft.asc | sudo apt-key add –
curl https://packages.microsoft.com/config/ubuntu/16.04/prod.list | sudo tee /etc/apt/sources.list.d/msprod.list
sudo apt-get update
sudo apt-get install mssql-tools unixodbc-dev
echo 'export PATH="$PATH:/opt/mssql-tools/bin"' >> ~/.bash_profile
echo 'export PATH="$PATH:/opt/mssql-tools/bin"' >> ~/.bashrc
source ~/.bashrc
Now we need to install SQL Server HA to setup Always On Availability Groups. Install SQL Server HA on all three nodes. Execute the following command to install SQL Server HA.
sudo apt-get install mssql-server-ha
Enable SQL Server HA by executing the following command and restart your SQL server.
sudo /opt/mssql/bin/mssql-conf set hadr.hadrenabled  1
sudo systemctl restart mssql-server
Repeat this procedure to install SQL Server, command line tools, and SQL Server HA on all three nodes. Once SQL Server is installed on all the three nodes, we need to install the Pacemaker components.
Installing Pacemaker Agents and Configuring the Cluster
Pacemaker is an open-source high availability cluster resource manager. It detects node and resource level failures and moves resources to the active and healthy node in the Always On Availability Groups.
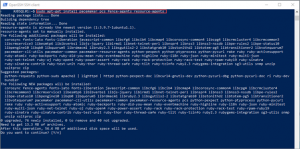
Log in to UBSQL01 using SSH and install Pacemaker. Execute the following command to install the Pacemaker agent. Repeat this step on the other two nodes.
sudo apt-get install pacemaker pcs fence-agents resource-agents
Enable the required ports by executing the following commands. The last one will reload the firewall. Repeat this step on the other two nodes as well.
sudo ufw allow 2224/tcp
sudo ufw allow 3121/tcp
sudo ufw allow 21064/tcp
sudo ufw allow 5405/udp
sudo ufw allow 1433/tcp
sudo ufw allow 5022/tcp
sudo ufw reload
Set the password for the user, hacluster, which is used to authenticate other nodes in the Pacemaker cluster. Repeat this step on the other two nodes.
sudo passwd hacluster
Enable and start Pacemaker on all three nodes by executing the following commands.
sudo systemctl enable pcsd
sudo systemctl start pcsd
sudo systemctl enable pacemaker
Destroy the previous clusters, if any. Execute the following command on all the three nodes.
sudo pcs cluster destroy
sudo systemctl enable pacemaker
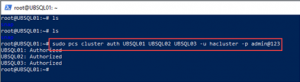
Authenticate the cluster nodes of Always On Availability Groups by executing the following command only on the primary node. i.e., UBSQL01 in this case. Replace hostnames with the hostnames of your Ubuntu servers. Please refer to the below image.
sudo pcs cluster auth UBSQL01 UBSQL02 UBSQL03 -u hacluster -p admin@123
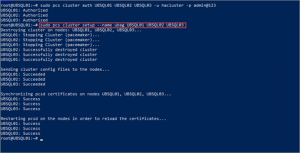
Now we need to create the Pacemaker cluster. Execute the below commands to create a cluster. Replace hostnames with the hostnames of your Ubuntu servers.
sudo pcs cluster setup --name ubag UBSQL01 UBSQL02 UBSQL03
sudo pcs cluster start --all
sudo pcs cluster enable --all
For the demo purpose, I am disabling SONITH. In case if you plan to set up a cluster on the production environments, please configure SONITH. Please refer to the following link for more information on SONITH: https://clusterlabs.org/pacemaker/doc/crm_fencing.html
sudo pcs property set stonith-enabled=false
Create a SQL Server login for the pacemaker. The Pacemaker cluster uses this login to connect to SQL Server and make changes to the Always On Availability Groups. Execute the following T-SQL on all the three nodes.
CREATE LOGIN [pacemakerLogin] with PASSWORD= N'admin@123'
ALTER SERVER ROLE [sysadmin] ADD MEMBER [pacemakerLogin]
GO
Save the login and password in the file called pacemaker-passwd and save it in this location: /var/opt/mssql/secrets/passwd. Please execute the following script on all the three nodes to save the login and password.
echo 'pacemakerLogin' >> ~/pacemaker-passwd
echo 'admin@123' >> ~/pacemaker-passwd
sudo mv ~/pacemaker-passwd /var/opt/mssql/secrets/passwd
sudo chown root:root /var/opt/mssql/secrets/passwd
sudo chmod 400 /var/opt/mssql/secrets/passwd
Creating Always On Availability Groups
Login to SQL Server on the primary node, UBSQL01, and create a Master Key and certificate by executing the following script.
CREATE MASTER KEY ENCRYPTION BY PASSWORD = 'Cert@123A'
GO
CREATE CERTIFICATE AGcert with subject ='dbm'
GO
Backup the certificate to file by executing the following T-SQL script.
Backup certificate AGcert

to file ='/var/opt/mssql/data/AGcert.cer'
With private key (
File = '/var/opt/mssql/data/AGcert.pvk',
Encryption by password = 'Cert@123A'
)
GO
Copy the certificate backup files (.cer and .pvk) to other nodes and place them under this location: /var/opt/mssql/data/Create the certificate on the other two nodes using the certificate backup files. Execute the following query to create a certificate using certificate backup files. Make sure the user mssql has appropriate permissions on the backup files to generate the certificate.
CREATE MASTER KEY ENCRYPTION BY PASSWORD = 'Cert@123A';
GO
CREATE CERTIFICATE AGcert
from file ='/var/opt/mssql/data/AGcert.cer'
With private key (
File = '/var/opt/mssql/data/AGcert.pvk',
decryption by password = 'Cert@123A'
)
GO
Now create an endpoint on all the three nodes using the certificate AGcert. Execute the following T-SQL script on all the three nodes to create the endpoint for mirroring.
create endpoint [AG_ENDPOINT]
as TCP (LISTENER_PORT = 5022)
FOR DATABASE_MIRRORING (
ROLE =ALL,
AUTHENTICATION = CERTIFICATE AGcert,
encryption = required algorithm aes
)
GO

ALTER ENDPOINT [AG_ENDPOINT] STATE =STARTED
GO
Create Always On Availability Groups by using the following T-SQL script. Replace the hostnames with the hostnames of your Ubuntu servers.
CREATE AVAILABILITY GROUP [ubag]
with (DB_FAILOVER =ON ,CLUSTER_TYPE=EXTERNAL)
FOR REPLICA ON
N'UBSQL01'
WITH
(ENDPOINT_URL = N'tcp://UBSQL01:5022',
AVAILABILITY_MODE =SYNCHRONOUS_COMMIT,
FAILOVER_MODE =EXTERNAL,
SEEDING_MODE =AUTOMATIC
),
N'UBSQL02'
WITH
(ENDPOINT_URL = N'tcp://UBSQL02:5022',
AVAILABILITY_MODE =SYNCHRONOUS_COMMIT,
FAILOVER_MODE =EXTERNAL,
SEEDING_MODE =AUTOMATIC
),
N'UBSQL03'
WITH
(ENDPOINT_URL = N'tcp://UBSQL03:5022',
AVAILABILITY_MODE =SYNCHRONOUS_COMMIT,
FAILOVER_MODE =EXTERNAL,
SEEDING_MODE =AUTOMATIC
)
After creating the Availability Group, join the replicas, and execute the following script to grant access to AG for creating a database.
ALTER AVAILABILITY GROUP [ubag] GRANT CREATE ANY DATABASE
GO
Add the database to the Availability Group you created above. Replace the Availability Group name and the database name with yours. Execute the following script to add the database to the availability group.
ALTER AVAILABILITY GROUP [ubag] ADD DATABASE [UBAG_Sample];
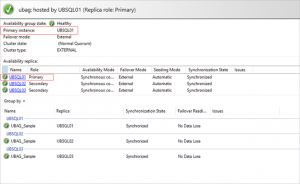
Log in to the primary node and navigate to Always On High Availability and then Availability Groups. Right-click on the Availability Group you created. Click on Show dashboard to see the health of Always On Availability Groups. Please refer to the below image that shows UBSQL01 as a primary replica in Always On Availability Groups.
Now we need to create Pacemaker resources for the Availability Group to failover automatically.
Creating Pacemaker Cluster Resources
Execute the following command on the active node, UBSQL01, to create a resource for the AOAG.
sudo pcs resource create ag_cluster ocf:mssql:ag ag_name=ubag meta failure-timeout=30s --master meta notify=true
Get an unused private IP address from your network and create a virtual IP resource in the pacemaker. This virtual IP will be used for connecting the active node.
sudo pcs resource create virtualip ocf:heartbeat:IPaddr2 ip=172.31.6.225 cidr_netmask=20
Now we need to add colocation and ordering constraints for virtual IP resource. This constraint ensures that the virtual IP is brought online on the active node where ag_cluster resource is online.
sudo pcs constraint colocation add virtualip ag_cluster-master INFINITY with-rsc-role=Master
sudo pcs constraint order promote ag_cluster-master then start virtualip
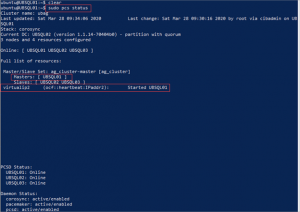
Check the status of ag_cluster resource using the below command. Please refer to the below image that shows UBSQL01 is the master, and the virtual IP is started on USQL01.
sudo pcs status
Execute the following script to failover Always On Availability Groups to another node manually.
sudo pcs resource move ag_cluster-master UBSQL02 --master
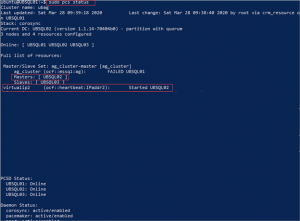
Check the status of cluster resources after failover by executing the following command.
sudo pcs status
Please refer to the below image, which shows UBSQL02 is the master, and virtual IP address is started on UBSQL02.
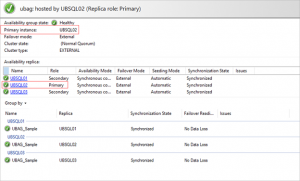
Log in to the SQL Server using SQL Server Management Studio (SSMS) and navigate to Always On High Availability and then Availability Groups. Right-click on the Availability Group you created. Click on Show dashboard to see the health of Always On Availability Groups. Please refer to the below image for the dashboard after manual failover. The replica UBSQL02 became the primary, and UBSQL01 became a secondary after manual failover using a pacemaker cluster.
In this article, we explored how to configure Always On Availability groups in Ubuntu using Pacemaker cluster software for automatic failover. In case you have any questions, please feel free to ask in the comment section below.
