

This is the seventh article in a series on the basics of using Git. The other articles in the series are:
- Basic Git for DBAs: Getting Started with Git
- Basic Git for DBAs: Sharing Files Through GitHub
- Basic Git for DBAs: the Basics of Branches
- Basic Git for DBAs: Making Changes in GitHub
- Basic Git for DBAs: Merging Code Between Branches
- Basic Git for DBAs: What's a Pull Request?
- Basic Git for DBAs: Managing PowerShell Scripts
- Basic Git for DBAs: Ignoring Files and Customizing Your Environment
In the previous articles, we set up a repository, shared files, branched code, and merged it back together. In this article, we will change direction to a more practical endeavor. How will I manage scripts with a team of people and ensure we can all get the code and contribute back?
The Goal
The goal in this article will be to set up a system for managing PowerShell scripts, though you could easily do this with other scripts that your team uses. Random SQL scripts, WMI or batch files that help you check data in your environment, or really any files. We aim to do the following:
- Have a common storage location for organizing code
- Ensure team members can get the most current copies of code
- Ensure team members can fix code and submit new scripts or enhancements for review
Those are fairly simple goals for our team, and this article will walk through how this can work. Note that there are other ways to do this, but I am aiming to keep things simple and easy to implement.
Tools
In this series, we've used GitHub and SourceTree to do some of the work, but we'll diverge a bit here. We will still use GitHub for storing code, but we'll edit and manage our repo in the command line and with VS Code. VS Code is a nice editor for PowerShell, and includes VCS features. There is documentation available for a VCS and VS Code, but we'll keep things simple in this article.
We also need git installed. The list of things needed are:
- Git
- VS Code
- A GitHub account
We covered some of this in the first article, so check there if you need help getting started.
Creating an Environment
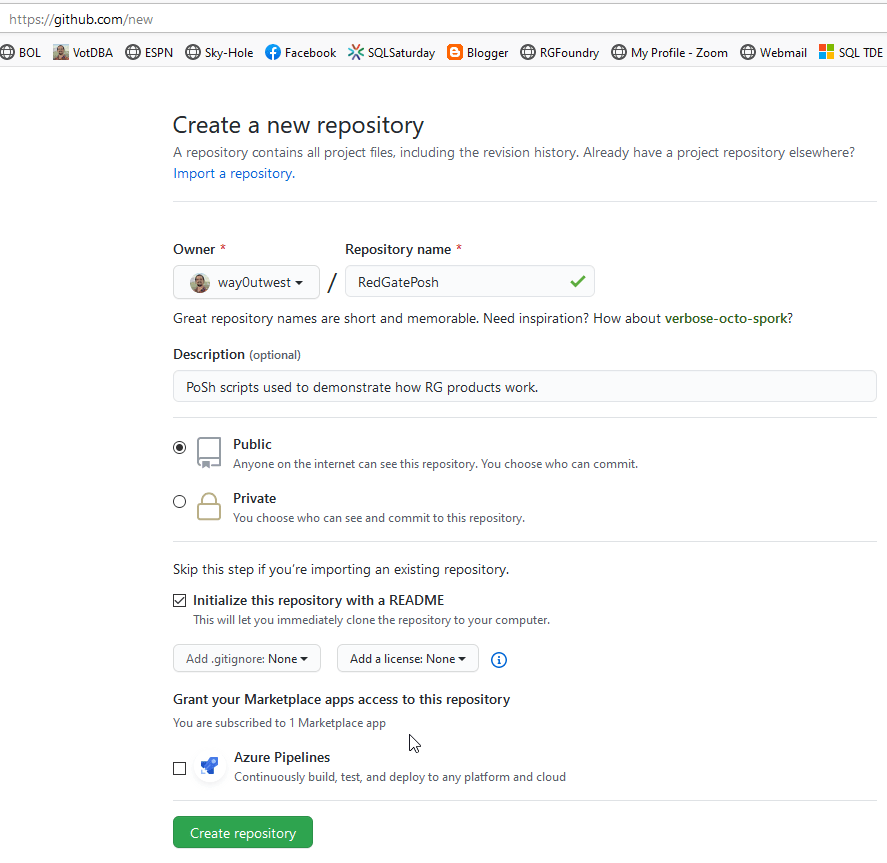
The first thing we need to do is create a place to store our code. Someone on the team will create a repo on on GitHub and add all your team members as contributors. For the demonstration, I'm going to create a "RedgatePoSh" repo, since I need to manage some demo scripts that use PoSh for various. I'll use the /new link to build the new repo. I'll add a description and initialize with a README. All good practices.
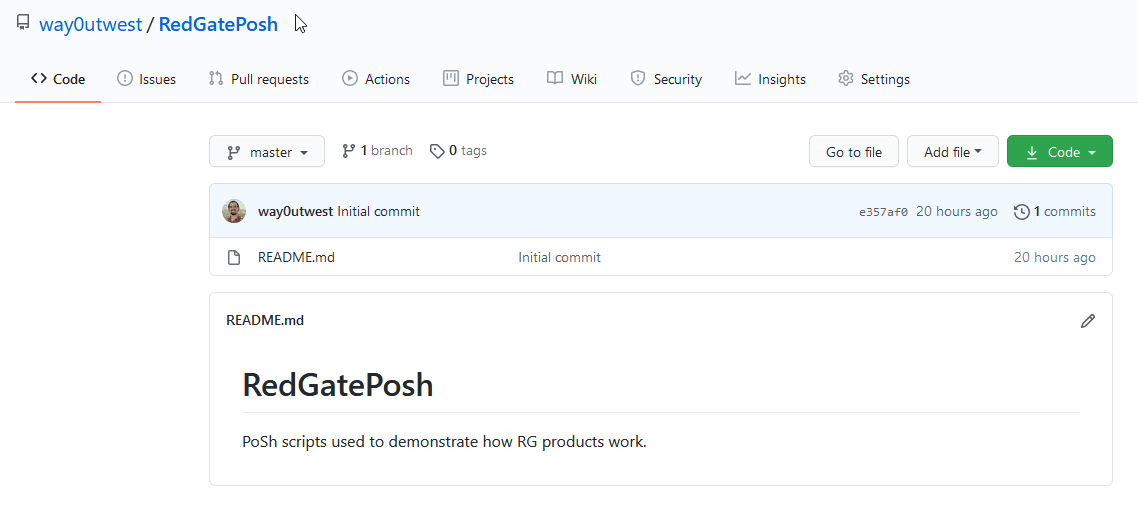
This gives me a repo with one commit, for my README. I see this:
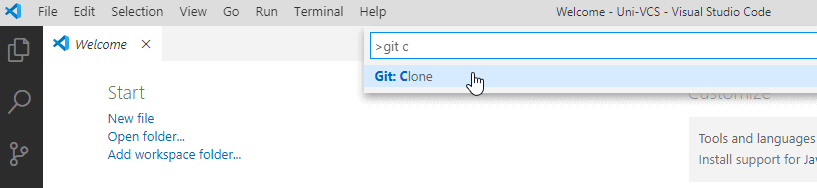
From here, I want to get a copy of this on my local system. To do that, let's switch to VS Code. In a new VS Code instance, I can invoke the command palette with CTRL+Shift+P. This let's me enter git c and see this:

If I select this, I can then enter a GH repo URL.

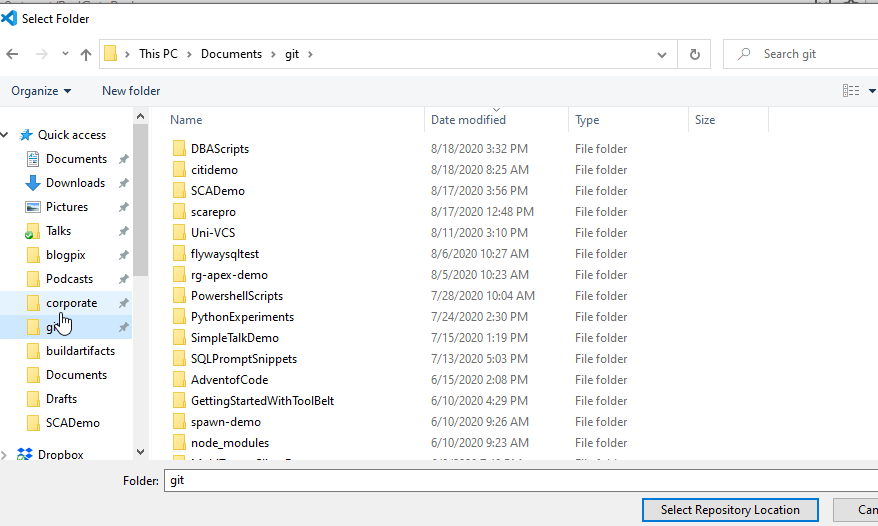
Once I hit Enter, I get a folder browser. This is where I can pick the folder in which the repo will clone.
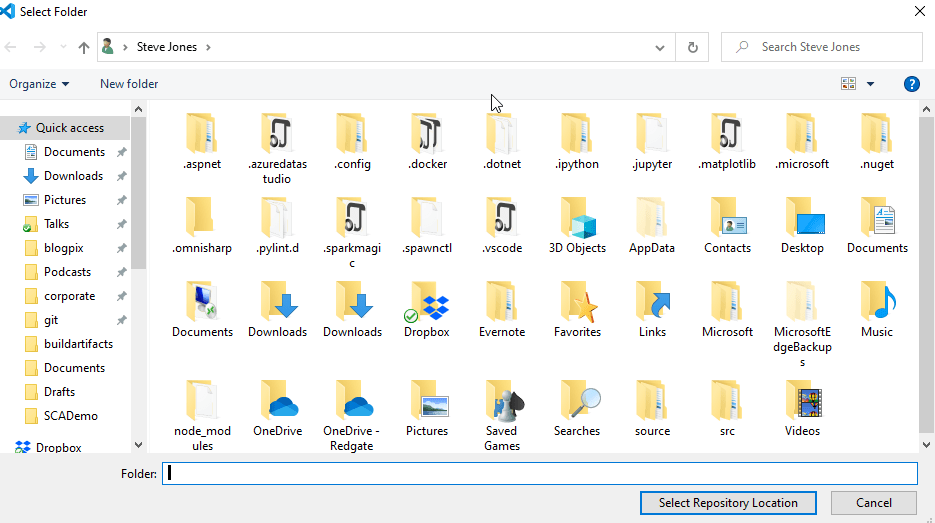
In terms of organization, I used to use c:\Users\serNameSource\Repos for organization, but I found this to a pain. Specifically, so much stuff starts in Documents, especially editors, that I decided to stop doing this. On my latest machine, I've just created a git folder under Documents. Then I clone things here. If I browse there, I see repos. I'll hit "Select Repository Location" here.
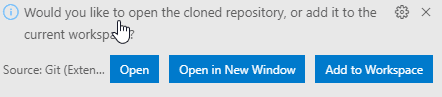
Once I do this, I get a note asking if I add this folder to my workspace or a new one. I like keeping things separate, so I'll open a new one.
Now, I'm set up in VS Code. My repo is open as a folder.
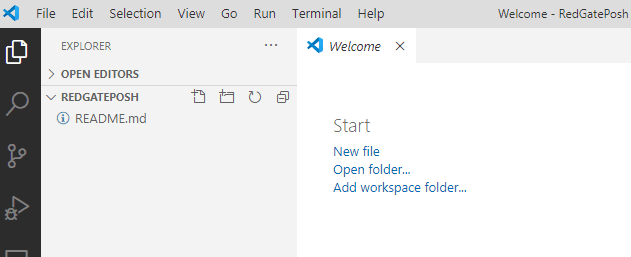
In my repo, I see the same view as I have on the left side of VS Code.
Making Changes
Now that we have a place to work, let's start making changes. I'll update some files and commit changes. I'll describe the first one, and then you can start to follow along with how commits and pushes work. I'll also describe a flow of work that uses some of the skills from previous articles, so be sure you understand how to work with Git in those articles. The only changes are using VS Code to manage the code.
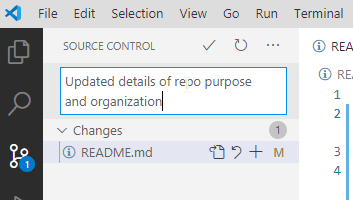
First things first, double click the readme.md to open it. Then I'll add some text to the file and save it. Note that in the image below, I have a "1" on the third icon from the top on the left. This is the VCS icon, and I have one change, which is this file.

In the text, I've noted I'm going to organize with a sub folder, so let's create that. In the left pane (Explorer), if put my cursor near the folder name (REDGATEPOSH), I see a few icons. I can select the one for a new folder.
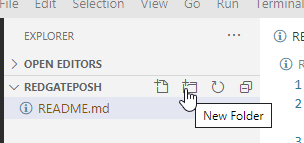
I can enter the name I put in the Readme.

This creates the folder, and now I want to save this change. I'll click the VCS icon on the left and get a list of my changes in the repo. In this case, only the file change is noted. I need a file in the folder to get that added. We'll fix that in a minute. For now, I'll add a commit message.
Staging Changes
The change here isn't staged, which means it's something I want to commit. This is because I might want to commit some changes and not all if I've made many changes. Ideally I change one set of related things and commit them, but we're all human and we make mistakes. Git is built to allow me to stage changes that will be committed and have other changes unstaged, which means they won't get committed and still be listed as changes.
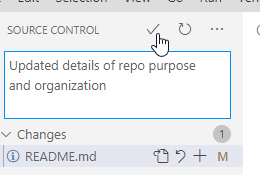
You can use the plus (+) sign to stage a particular file. If you don't, and hit enter, VS Code will ask you to stage and commit. The checkmark at the top is for committing changes.
If I click this, I see a message.
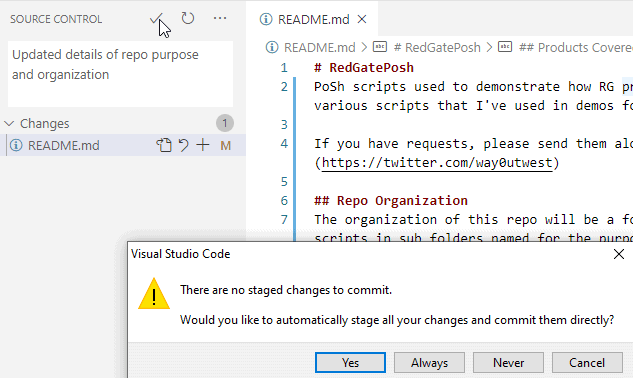
I can always do this, never do this, or do it this time. If you forget to stage, look at the list of changes and decide if this is an appropriate list of changes for this commit message. If it is, click "Yes". Avoid the Always button. We want to deliberately write messages that make sense if we look at them in a year.
In this case, I'll click Yes and commit my one change. This completes the commit, clears the "changes" section on the left, and removes the "1" next to the icon. I can tell I've committed something and not pushed at the lower left of VS Code, where I see the branch name (master), as well as a 0 and 1. The 0 is how many commits the remote (Github) is ahead of me. The 1 tells me I have 1 local commit not pushed.
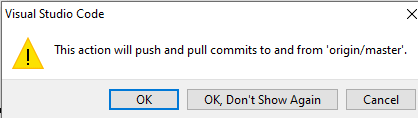
![]()
If I click the section with the 0 and 1, I'll get a dialog asking me to push and pull. I'll click the don't ask again button because in general I want this to keep moving forward without interrupting me.
A Few Mistakes
A few things I should do differently. First, clean up master to be main. An easy change, which I noted on my blog. I'll run these in a command line and then fix up the branches in GitHub as the defaults. I'll also delete the master branch on GitHub.
The second thing is that I don't want to just make changes in the main branch in a team. This leads to merge conflicts and issues as people try to update code that others might also change. This is especially true for young repos when lots of code changes are being made.
Our goal for the branches are to treat main like production. This is the branch for code people want to use in managing our environment. In my case, demo code for customers. If I need to update things or add something new, I'll do it in a branch, and then use a PR to merge the changes over. Even for my own code, this ensures I can trace back when I broke something, and also gives me a chance to breath and double check my code or have someone else do this.
Let's move to making a branch and adding other code.
Adding PowerShell Code Files
First, let's branch. I'll click the "main" in the lower left and I get a few branch options.

I'll pick the "Create a new branch" and enter "feature/sca" as the name. Once I click Enter, I see this in the lower left as the new branch name.
![]()
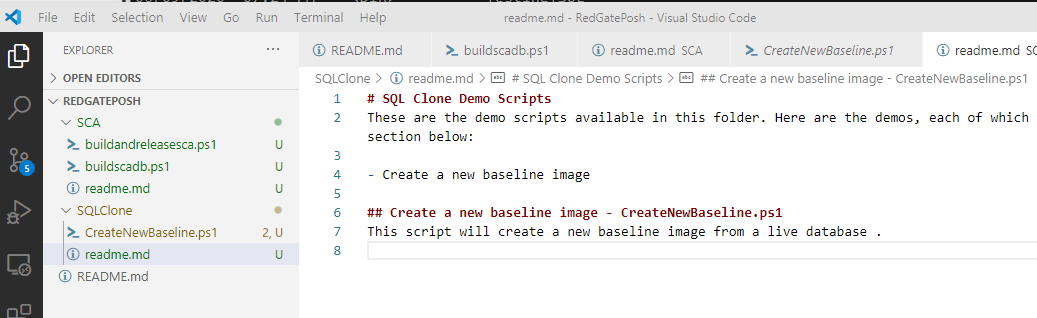
I've created a folder, so let's add some files. In this case, I'll create a new file and paste in some code from a demo script I have for builds. I'll also add a readme.md in that SCA folder. This is what I see when I have a few files added. I've added a readme and a couple files to the SCA folder, and created a new SQL Clone folder and added a couple files there. I'll show the Explorer view first.
In this view, note I have multiple files open.
The "U" to the right of each item notes that these are unstaged files. Let's switch to the VCS view. We see 5 total changes.
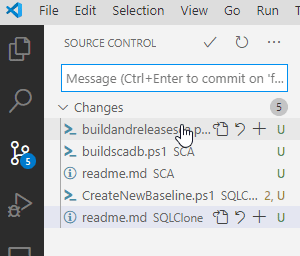
I don't want to commit all these items. This is an SCA branch, so I'll click the "+" next to the changes in the SCA folder. That gives me this view. To be clear, I don't like this view, because the titles (Staged Changes and Changes) don't stand out well. There might be a theme that makes this better, but the default one I picked isn't great.

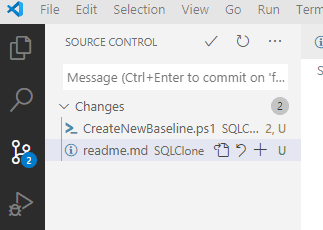
I can enter a commit message and click the checkmark. This time those changes get committed, and I still see the other changes for SQL Clone.
Now, I want these changes in another branch. Even though I might be adding lots of scripts, I both want the commits to include related files and the branches to reflect that. Here I want to push these to the remote. I click the circular arrows or cloud icon (depending on state) next to the branch name in the lower left, and VS Code will push my changes to the remote. GitHub notes this, and when I go to the online repo, I can create a pull request and submit that to my team. How this works is covered in the sixth article.
I can update my main branch when things are merged. Typically now I'd switch back to main and delete this feature branch. I'd then follow the process above, create a new branch for feature/sqlclone, and then commit the changes to that branch. In this way I ensure each set of related changes gets reviewed by the team.
To switch branches, I can click the branch name in the lower left. This gives me a list of branches, along with my "create" options.
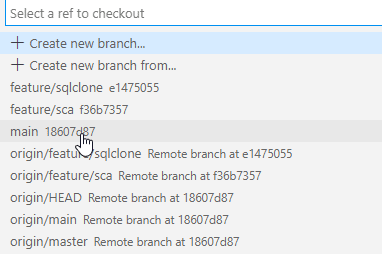
I can click a branch, such as "main" in the image above, and I'll switch to that branch.
Deleting Branches
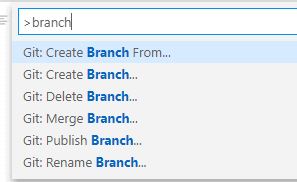
Once I've gotten changes merged on GitHub, I can have those branches automatically delete. However, I'll still have local branches. If I CTRL+Shift+P to get the command palette, I can enter "branch" and see options. One of these is delete.
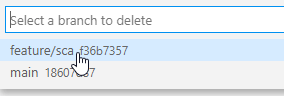
If I pick this, I see a list of branches. I'll delete the feature branch here. Note, I cannot delete the active branch, so I need to select a different branch first.
As I get code merged from my branches, and see the notifications, I'll clean up my local branches. If someone isn't cleaning branches on the remote, I'll want to do it there.
The View for Team Members
I will want to add other team members as contributors to my repo. We talked about how to do this in the second article, Basic Git for DBAs: Sharing Files Through GitHub. As I add the team members, they will want to accept the invitation and then get the main stable branch as the code they use in their work. Let's do that here. I have added me sjonesdkranch user as a contributor to this repo, and that user accepted the invite. Let's look at how that user can get code.
This user will open VS Code, and then clone the repo in the same way that I did above. This gives me a working environment where I can see a the scripts in the Explorer view, and I can open the Readme files to see what scripts I have available.

Running Scripts
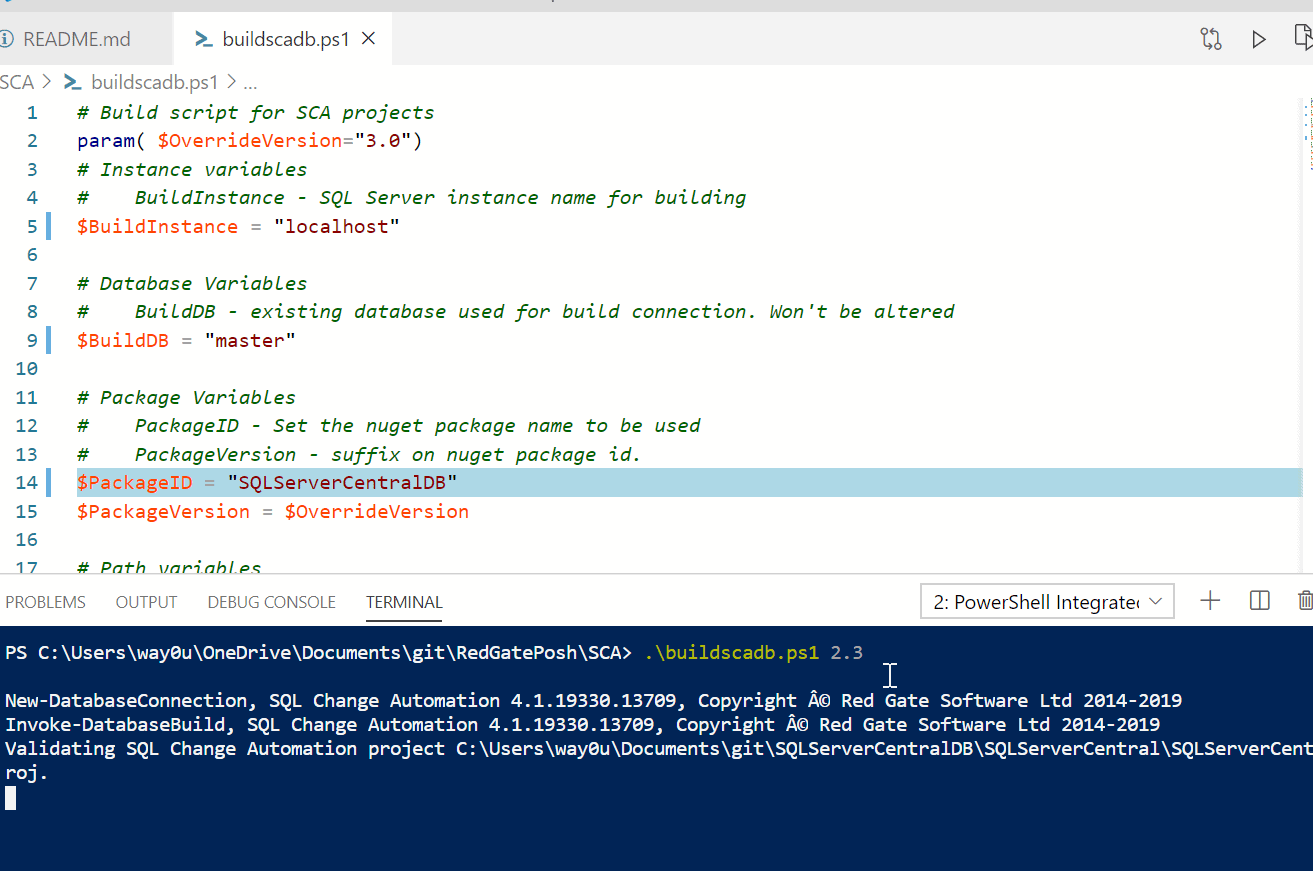
I can run a script in the built in Terminal in VS Code. This is at the bottom of the screen when I open a script. In this case, I'll open the buildsca.ps1 file and I can see I'm in the local folder. I can alter a few variables, and then save the script. This does appear as a change in the repo, but I can then run this.
When I'm done, I can reset this, abandoning my changes. Alternatively, I could refactor this script and fix some of the issues other users would also have by refactoring the code. I can change the variables that need to be set to parameters with defaults. If the team uses consistent setups, and they should, we can use defaults, but then allow a user to run this script without having to edit it at all. That's the ideal way to make this work.
Alternatively, I could create my own local branch where I save the changes to the scripts for my own environment.
Submitting My Changes
As a team member, I can add my own scripts and contribute to the repo. As we've down above, I want to do the following:
- create a branch
- write code
- commit changes and push
- create a pull request
- change back to main
This allows me to send in my changes, but if I need to work with the approved scripts, I am back on main. Let's work through this.
First, I'll create a feature branch calls feature/adminscripts and then add a folder. I'll add a couple scripts in here that allow me to attach and detach all databases from an instance. I like these scripts for development because I can focus on one set of databases without seeing lots of other ones. Once I've done this, I'll commit the changes.
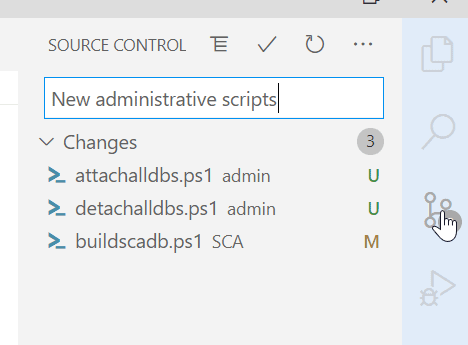
Now I create a PR on GitHub.
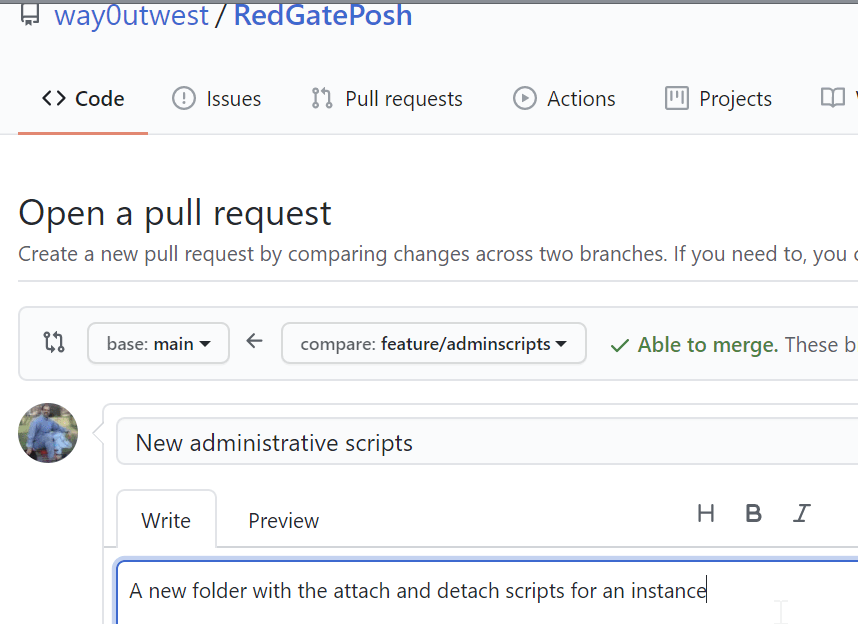
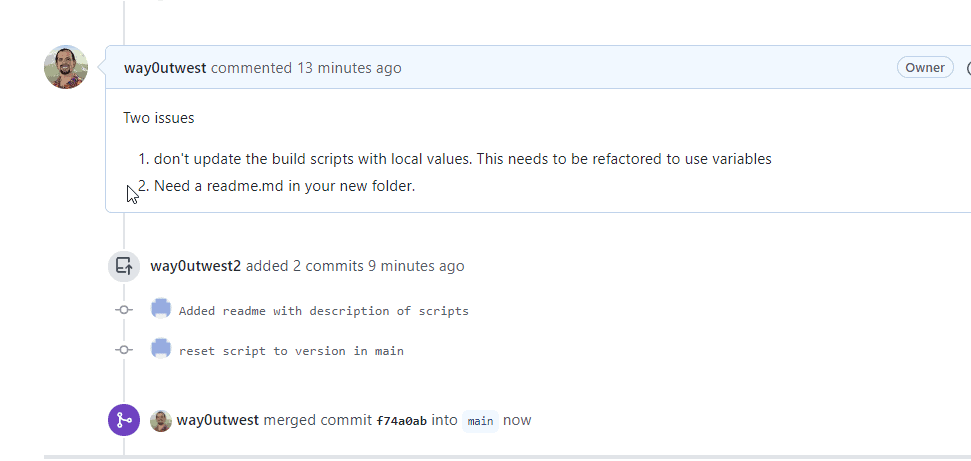
A short while later, I see a comment from way0utwest. Apparently I forgot to include a readme.
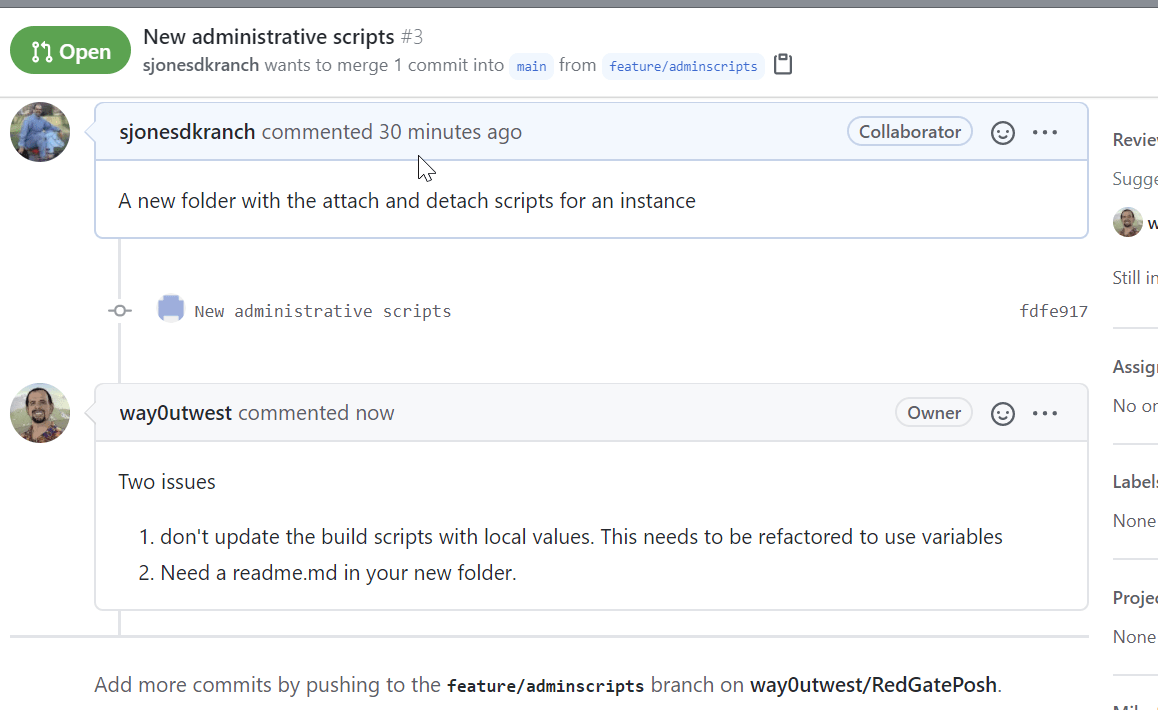
I can go back to my branch and add the readme. Then I can commit this change and push. Once I do this, on GitHub, I see the new change in the PR. Once way0utwest approves this, it will be merged into main. I can now reset my branch back to main and await notification of the merge. Once that happens, I'll pull down the changes.
Note: The "way0utwest2" user is apparently a conflict with my configuration on the second machine. I have a different profile there for cmdline pushes, so I need to watch out for that. Most users don't have two git profiles, so this isn't an issue.
The Workflow
Now that we have shown how this works in a team environment, with each team member making changes in branches and submitting them to the group for review. Once changes are made, users can then pull them down. As noted above, users should communicate with each other, and as changes are merged into the main branch, they can pull the changes.
As noted above, the main workflow for a user making changes to code is:
- create a branch
- write code
- commit changes and push
- create a pull request
- change back to main
Note that the user can spend a lot of time in the "write code" phase, testing and verifying the scripts. They can also push these branches to GitHub and have other users pull down their branch and test the code themselves.
The flow shown above also highlights the coding practices of building scripts that don't need to be modified to run. If there are environment differences, these ought to be handled through parameters.
Summary
In this article, I've shown the basic flow for managing PowerShell code with GitHub and VS Code. I can add branches, add files, commit the changes, and make pull requests to merge the code into a production branch that others use.
This is a basic flow for managing code, and there are more complex topics that you might utilize, such as rebasing, but if you follow this flow in a team, you should be able to manage your code and ensure that everyone has a stable codebase in their main branch. Team members can also propose and submit changes in other branches as they find bugs in scripts or create new ones to address different problems.
A final few items to keep in mind when working with PoSh.
- Always use parameters for parts of the script that the person executing the script might need to change.
- Include documentation in your folders that help other users understand what is in the repository. I'd recommend a readme or equivalent in each folder.
- Ensure that pull requests include updates to the readme files
- Include help documentation in the PoSh scripts. This isn't hard to include in scripts, and users will learn how to do this over time. However, with versioning, we can slowly migrate our scripts to include better documentation and help
- Clean up local branches after merges.
Using a VCS to help manage code and documentation is a great way to ensure you have stable scripts and code for your team, as well as allowing changes to be made and peer reviewed over time.