Virtualisation technology has granted us some fantastic opportunities to enhance our skills. For those of us who like to experiment at home we can now do so free of the constraints of work place policies and bureaucracy. As virtualisation technology has matured, so too, has the support tooling surrounding it.
Hashicorp Vagrant is a tool that allows the setup and configuration of a virtual machine to be scripted and also to trigger subsequent software configuration scripts. In this article I should like to take you through the steps I used to build a working SQL Server on Linux box on my home Windows PC.
Pre-requisites
- Vagrant - I am using version 2.0.0
- Oracle VirtualBox - I am using version 5.1.28
- Powershell - Must be version 4 or abouve
- .Net Framework - Must be 4.5 or above
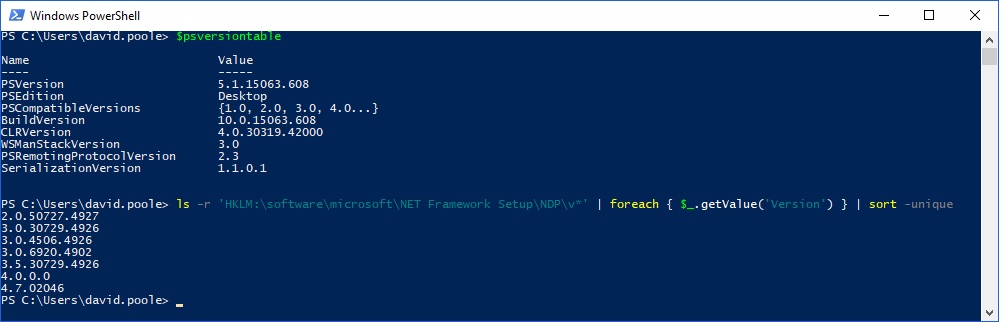
If you have Powershell installed already you can check its version number and that of the installed .Net Frameworks by running the following commands.
$psversiontable
ls -r 'HKLM:\software\microsoft\NET Framework Setup\NDP\v*' | foreach { $_.getValue('Version') } | sort -unique
On my PC these provide the results shown below.
Getting a Vagrant Virtual Box up and running
Vagrant provide an excellent "Getting started" guide based on "Vagrant: Up and Running" from O'Reilly. . If you are not familiar with Vagrant then I recommend working through the tutorial at your leisure as it covers a wider range of capabilities than are needed here.
On my home machine I have a folder called "VirtualBoxes" in which I create a SQL2017 sub-folder.
- Open up a command window (Windows key + R, type cmd and press enter)
- Navigate to the relevant folder (cd \VirtualBoxes\SQL2017
- Type the comamnds below as they appear in the Vagrant tutorial
vagrant init hashicorp/precise64
vagrant up
This will download the online template for one of the many online Virtual Box definitions and fire it up on your Windows box. If you start Oracle VirtualBox you will see that your new box will appear in the list of boxes on the left of the screen.
In the \VirtualBoxes\SQL2017 folder we will see some new entries one of which is called Vagrantfile. The Vagrantfile tells Vagrant how to build your virtual box and is heavily commented to help guide you through the configuration.
Having got the box up and running we must check to see if it meets the minimum requirements needed to install SQL Server 2017. From your windows operating system prompt type
vagrant ssh
This will start an ssh session from your PC to your new virtual box. The command to check the OS version of our virtual box is run lbs_release -irc and the results are shown below.

As Ubuntu 16.04 is a minimum requirement for running SQL Server 2017 on Linux we must start to edit our VagrantFile.
To leave the ssh session type exit
VagrantFile
Choosing a suitable box template
The default box from the Vagrant tutorial is not sufficient for our needs so we must select a different one. The publicly available boxes are listed at https://app.vagrantup.com/boxes/search. From this list we can see that ubuntu/xenial64 best meets our needs.
- Open up the Vagrantfile using Notepad or any suitable text file editor.
- Change the following line
config.vm.box = "hashicorp/precise64"
to
config.vm.box = "ubuntu/xenial64"
- Save your changes to Vagrantfile
- From the OS prompt type
vagrant destroy - Type
vagrant upto rebuild your virtual box using the new template. This will take about 2 minutes as the ubuntu/xenial box represents the daily build of the Ubuntu system.
This time when we run from within an ssh session we get the results shown below.lbs_release -irc

At this point the working portion of our Vagrantfile is as follows: -
Vagrant.configure("2") do |config|
  config.vm.box = "ubuntu/xenial64"
end
Configuring our box for SQL Server
There are a few settings we need to consider before we start installing SQL Server 2017.
- Minimum memory should be 4GB or greater
- Our Virtual box needs to respond to the standard SQL Server TCP port 1433
- We need to assign a private network IP address to our Virtual box.
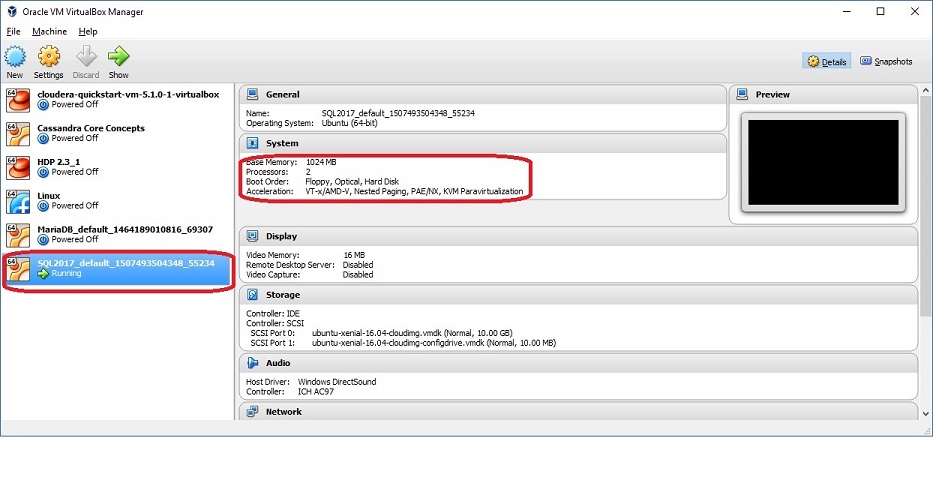
If we look at our Virtual Box application we can see that our new box only has 1GB of RAM
Choose the box, click on settings and then choose the Network option from the resulting left hand pane as shown below.

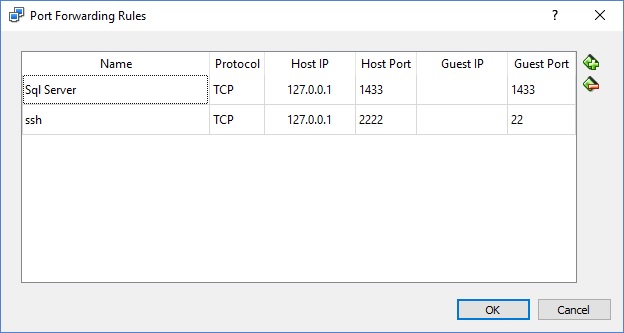
Click on the "Port Fowarding" button to receive the dialogue revealing which ports on our PC (the host) are mapped to which ports on our VirtualBox (the guest).

Of course we could alter these manually but we want a fully scripted box so will add some lines to the Vagrantfile.
For port forwarding, change the Vagrantfile line
# config.vm.network "forwarded_port", guest: 80, host: 8080, host_ip: "127.0.0.1"
to
config.vm.network "forwarded_port", guest: 1433, host: 1433, host_ip: "127,0,0,1", id: "Sql Server"
By specifying the host_ip we are insisting that our VirtualBox is only accessible from our workstation. Without the host_ip specification our new VirtualBox would be open to everyone on our network. The id: "Sql Server" is optional but I find it useful to have a meaningful description to appear in the "Name" column of the previous example dialogue box.
We need three lines adding to our Vagrantfile to alter memory.
  config.vm.provider "virtualbox" do |vb|
    vb.memory = "4096"
  end
By default the Virtual Box name will be the folder name plus the timestamp when it was created. I prefer to give my box a specific name so abovethe vb.memory = 4096 line in the block above I enter the following
vb.name = "SQL2017"
It is possible to configure a Vagrant box to be multiple boxes (web server & DB server). In this example we simply want a single SQL Server 2017 instance so we can simply uncomment the line by removing the # character.
# config.vm.network "private_network", ip: "192.168.33.10"
When we have finished the working portion of our Vagrantfile is as follows:
Vagrant.configure("2") do |config|
  config.vm.box = "ubuntu/xenial64"
  config.vm.network "forwarded_port", guest: 1433, host: 1433, host_ip: "127,0,0,1", id: "Sql Server"
  config.vm.network "private_network", ip: "192.168.33.10"
  config.vm.provider "virtualbox" do |vb|
    vb.name = "SQL2017"
    vb.memory = "4096"
  end
end
If we are not sure if we have edited the file correctly we can run vagrant validate from the command line. To reconfigure our VirtualBox we simply run the following command
vagrant reload
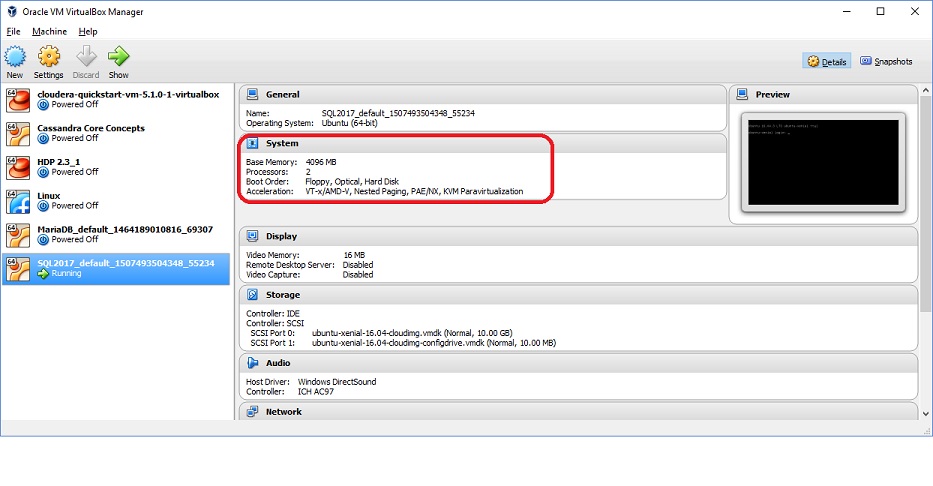
On completion we can see in our VirtualBox app that the memory settings have changed
When we look at our network port forwarding diaogue we now have the TCP port 1433 mapped and named
We now have our hardware provisioned from a script. There is one more edit we need to make to our Vagrantfile and that is to tell it the script that we wish to run after the hardware has booted up successfully.
Above our final end statement we enter the following line
config.vm.provision "shell", path: "install_mssql2017.sh"
This tells Vagrant to run a shell script called install_mssql2017.sh on our Virtual box instance. It is this script that will perform the actual install of SQL Server 2017.
Linux Bash script to Install SQL Server 2017
For the purposes of this article our script is going to perform a simple unattended install of SQL Server 2017 including the command line tools on Ubuntu16.04. Once successful we will have a SQL Server 2017 instance on which we can do the following:
- Connect through SQL Server Management Studio or any other tools on our workstation
- Connect via SSH and run sqlcmd commands
My first attempt was to copy the script from the Microsoft unattended install on Ubuntu documentation. This needed some amendments as the script assumes that it would be run as the root user where as the default login for the Vagrant ubuntu/xenial box is "ubuntu".
The amendments were as follows. Replace the #!/bin/bash with sudo su. When the script runs this switches the Linux login to the super user which, by default is root. Change the line beginning MSSQL_SA_PASSWORD from
MSSQL_SA_PASSWORD='<YourStrong!Passw0rd>'
to
MSSQL_SA_PASSWORD='Equ1f@x!'
I decided to set up an install user so I uncommented the following lines
# SQL_INSTALL_USER='<Username>'
# SQL_INSTALL_USER_PASSWORD='<YourStrong!Passw0rd>'
And changed them to
SQL_INSTALL_USER='DavePoole'
SQL_INSTALL_USER_PASSWORD='5@d0ldG1t!'
The final amendment was to add a line above the final echo Done! line so that the end of the file appears as follows:
echo "PATH=$PATH:/opt/mssql-tools/bin" >/etc/profile.d/mssql-tools.sh
echo Done!
This final amendment is important as it ensures that we connect using vagrant ssh we can run sqlcmd and bcp from any folder on our virtual box without having to specify the path to those binary files.
To get rid of our original Vagrant SQL2017 box we simply type vagrant destroy and answer the prompt to confirm that we do wish to get rid of the box. Running vagrant up will bring up our new box and run our SQL Server 2017 install.
Connecting to Our New SQL2017 box
This is just as we would connect to any other SQL Server box. Earlier on we gave our box an IP address of 192.168.33.10 so we use that to connect using SSMS.

If you wanted to connect to the box by using a name then you could amend your hosts file as held on C:\Windows\System32\drivers\etc\hosts
# Copyright (c) 1993-2009 Microsoft Corp.
#
# This is a sample HOSTS file used by Microsoft TCP/IP for Windows.
#
# This file contains the mappings of IP addresses to host names. Each
# entry should be kept on an individual line. The IP address should
# be placed in the first column followed by the corresponding host name.
# The IP address and the host name should be separated by at least one
# space.
#
# Additionally, comments (such as these) may be inserted on individual
# lines or following the machine name denoted by a '#' symbol.
#
# For example:
#
#      102.54.94.97     rhino.acme.com          # source server
#       38.25.63.10     x.acme.com              # x client host

# localhost name resolution is handled within DNS itself.
# 127.0.0.1       localhost
# ::1             localhost
192.168.33.10 Ubuntu-xenial
What to do if the install does not appear to work
When I started to put together these instructions I had to work through a number of issues. Earlier on I mentioned using the vagrant validate command to parse your Vagrantfile
As Vagrant tends to suppress error messages that have not originated from Vagrant itself I found the best way to debug the install_mssql2017.sh file was to comment out the line in the Vagrantfile to call it and then run the individual commands one at a time. The parts that caught me out were as follows:
- Typos - we all make them but they can be hard to spot
- Only the root user can run "sudo apt-key add -". Notice the - at the end of the command, it is important.
- Passwords. There is a default password policy in place. This only became apparent when I ran the
/opt/mssql/bin/mssql-conf -n setupcommand - Exiting superuser mode. Vagrant does not like this at all and simply fails to run any commands after the exit statement. This caused considerable head scratching.
To begin with I was overambitious and tried to use SQLCMD and BCP as part of install_mssql2017.sh script. This ran into issues because the install_mssql2017.sh script is not aware of the two commands and needs the full path to comands included in any use of them. This is because subsequent session will make use of /etc/profile.d/mssql-tools.sh but not the current one.
With the benefit of hindsight I would keep the server setup separate from the deployment of a database and database artefacts.
Closing thoughts
The beauty of using Vagrant and VirtualBox is that we can build a ring fenced environment containing the software we wish to use on demand without compromising our work stations. When we have finished we can simply stop or destroy our virtual instance knowing that a rebuild is simply a vagrant up command that will run in the time it takes to make a cup of coffee.
What we have achieved in this article is the equivalent of running setup.exe for SQL Server and accepting the default settings for all options. The whole point was to produce a simple "kick the tyres" install. It is a good starting point before moving on articles such as performance tuning and configuration on the Microsoft website.
Should we wish to learn other technologies there are a number of predefined VirtualBox templates to allow you to do so. It is not just the open-source world that has grasped the benefit of easy-to-install software and basic but high quality online tutorials. A number of proprietary software vendors produce VirtualBox or VMWare player images with their software pre-configured. These can be downloaded and used legitimately for training purposes.
There has never been a better time to train for the job you want.