

Here in Malta, there are many I-Gaming companies. The I-Gaming business creates an important movement for the Maltese economy. In the I-Gaming business, one good example of the need for data security is the customer wallet.
The customer wallet involves transactions, credits, and debits on the wallet. The complete security of this data is essential. If someone, such as an IT Administrator or a DBA, is capable to make an update in a wallet, this is a complete failure for the business. The transactions registered in the wallet need to be completely tamper-proof. In this context, when we are talking about data security, we are not talking only about hackers or security breaches. We are talking about protecting information in such a way that if the CEO of a company asks for a change on the information, this can’t be done without leaving an auditable trail.
If you are thinking about blockchain for this purpose, you are not wrong. However, the complexity of the decentralized blockchain environment may be an overkill for this scenario. Decentralization is not needed; an easier centralized environment can solve the problem. As a solution, Microsoft brings to us the SQL Ledger. A tamper-proof solution for Azure SQL and SQL Server. While blockchain is a decentralized solution, with all the complexity of this kind of solution, SQL Ledger is a centralized solution, making it easier to implement.
What is SQL Ledger
Azure SQL Ledger keeps a history of all transactions executed on the table and a hash of the transactions. At any moment, the data of the database can be compared with the hash history kept by Ledger to verify that no tampering has happened with the database.
Initially, the hashes are kept in the database. However, this is not a totally safe solution. The security can be increased by asynchronously saving the hashes in the Azure Storage or in the Azure Confidential Ledger service. The solution using Azure Storage is very safe, but it’s not totally tamper-proof. The Azure Confidential Ledger can increase the security of this solution even more.
Provisioning Azure SQL Ledger
Azure SQL Ledger can be enabled on the database level when we provision a new database. After the database is already provisioned, we can't change this configuration anymore. During the provisioning, we can enable SQL Ledger and configure the storage for it. The storage configuration can be changed at any moment in the future.
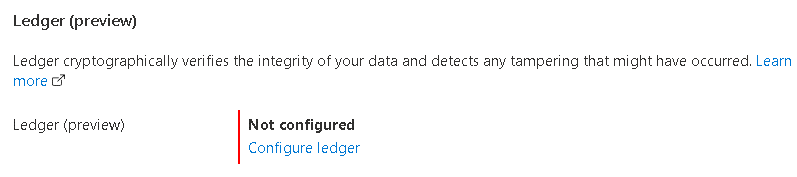
When enabling SQL Ledger, we can specify where we would like to store the transaction hashes to prevent tampering: In an Azure Storage Account or in Azure Confidential Ledger. We also have the option to not choose a secondary storage for the hashes, but this would make the solution less safe.

If we choose to store the data in an Azure Storage Account, we should apply an immutability policy to the storage account. Only using the immutability policy, the storage account can provide a trustworthy external storage for Azure SQL Ledger.
The immutability property is only available in Azure Storage Accounts with hierarchical namespaces property disabled. That’s why the storage account created during the provisioning steps of an Azure SQL Database will already have this property disabled by default.
On the storage account, you can find the access policies on the context menu of the blob container, as you may notice on the image below.


There are two kinds of immutability policies: Legal Retention and Time-Based Retention. Azure SQL Ledger has one very specific requirement: it needs to add information to the files, to add new hashes to the file. The existing content can’t be changed, but new content needs to be added.
Azure SQL Ledger will use Append-only blobs to save the hashes the only immutable policy which supports them is the Time-Based Retention.

The Time-Based retention has a retention period. Once the retention period is expired, the files will not be updatable. It would be possible to delete the files, but not to update them. Besides that, there are some automation possibilities to renew an immutable storage policy, but this is beyond this article.
Ledger Tables
There are two kinds of Ledger tables we can create: Updatable tables and Append Only tables. Their name already explains the meaning and what kind of scenarios they are intended for.
Let's create a first example using an Updatable Ledger table:
CREATE SCHEMA [PartTracking]
go

CREATE TABLE [PartTracking].[Parts]
(
     [ID] INT NOT NULL PRIMARY KEY CLUSTERED,
     [SerialNum] VARCHAR (100) NOT NULL,
     [ManufDate] DATETIME2 NOT NULL,
     [BatchID] INT NOT NULL,
     [CarID] INT NULL
)
WITH (
     SYSTEM_VERSIONING = ON,
     LEDGER = ON (LEDGER_VIEW = [PartTracking].[PartsLedgerView])
)
For every ledger table we create, three objects are created:
- The table
- A history table - The history table holds the history of all changes on the table. SQL Ledger uses the temporal tables technology for the history table
- A View
We can use the view to identify each operation executed in the table. On the Create Table syntax above, we are specifying the name we would like to use for the view

The name of the history table is defined by the pattern ‘MSSQL_LedgerHistoryFor_” and the object id. The image below shows the object id from the sys.objects table

After creating the table, the View and the history table are completely empty. There are some system tables which will show the activity we executed.
sys.database_ledger_transactions: Holds information about each ledger transaction executed over ledger tables

sys.database_ledger_blocks: Holds information about each block registered on the verification storage

sys.ledger_table_history: Holds information about table creation and drop activities
Note that the transaction_id value is the same as the one from sys.database_ledger_transactions.

sys.ledger_column_history: Holds information about changes on the table schema

Note that the transaction_id value, the same one on the other tables, but now we have a different sequence number for each column in the table, illustrating the sequence of tasks executed during the transaction 1155.
Checking the Created Digest
After the creating of the table, the first digest is already created and saved in the storage. We can use Azure Storage Explorer to check the folders created by Ledger. The image below shows the folders and the file created by Ledger

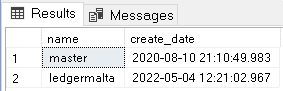
In this structure, centraldata is the name of the Azure SQL Server and ledgermalta is the name of the Ledger SQL Databases. The timestamp on the last folder is a few seconds after the creation of the database. It means the folder was created during the same process of the database creation, but after the database was already created.
One simple query executed in the database can illustrate this relation with the date:
select name,create_date from sys.databases
Ledger Hidden Fields
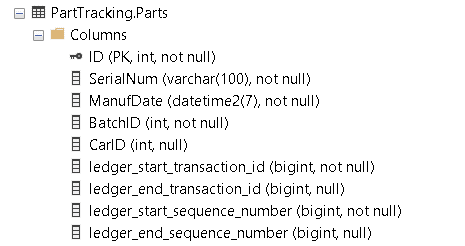
The Ledger table holds 4 special hidden fields. We can check these fields on SSMS or in the sys.columns table:
- [ledger_start_transaction_id]: The Id of the last transaction which changed this record, turning it into the values it has
- [ledger_end_transaction_id]: This field is the id of the transaction which changed this record into another.
- [ledger_start_sequence_number]: Sequence number of the statement in the start transaction
- [ledger_end_sequence_number]: Sequence number of the statement in the end transaction
The "end" fields will never be filled in the main table. The end field will only be filled in the history table. The history tables keep the past records, after changes of deletions have been made. These past records will have the "end" fields filled with the information about the transaction which updated these records into new ones.
As a logical result, the "end" fields for a record will be the same as the "start" fields for the next version of the same record. This is the result of the UPDATE operations, which appear as a DELETE of the old version of the record and an INSERT of the new version of the record.
The DML activities on a Ledger table create different results for each kind of activity:
INSERT: The record is inserted in the main table with the "start" values and no "end" values.
UPDATE: An UPDATE operation involves a DELETE of the old version of the record and an INSERT of the new version of the record. The old version of the record will be inserted in the history, with the existing "start" values and the current transaction information as the "end" value. The new version will be Note that the transaction_id value is the same as the one from sys.database_ledger_transactions.in the main table using the current transaction information as the "start" value. This creates a scenario where the "end" values of one of the history records will be the "start" value of another history record or the current version.
DELETE: The deleted record is inserted in the history table. The "end" fields will contain the values of the current transaction, responsible for the deletion.
Let’s make some experiences with DML statements and analyse how the Ledger reacts to each change.
Checking the History of the Records
Let’s insert a record in the table and check the result. The insert statement is the one below:
INSERT INTO [PartTracking].[Parts]
     VALUES (1, '123-333-444', '01-02-2019', 1, NULL)
A simple query over the ledger view created for this table is what we need to check the history of our records. Like this query below:
SELECT * FROM [PartTracking].[PartsLedgerView]
      ORDER BY ledger_transaction_id
The query on the view will show the inserted record as a result, like the image below:

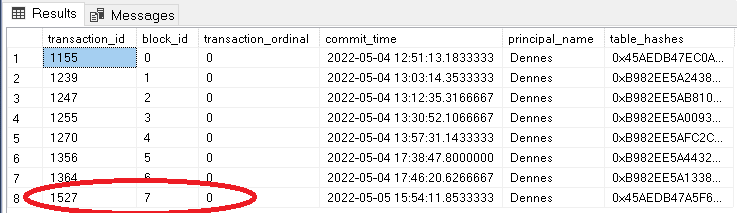
Querying the sys.database_ledger_transactions DMV, we will see two transactions, one for the creation of the table and the 2nd one for the INSERT:

The query on sys.database_ledger_blocks will show two blocks saved on the storage, one for each transaction:

Let’s insert one more record to improve the example:
INSERT INTO [PartTracking].[Parts]
     VALUES (2, '123-444-333', '01-03-2019', 1, NULL)
go
The table sys.database_ledger_transactions will not bring any news, just one more transaction. Let’s analyse the table sys.database_ledger_blocks and discover some more details.
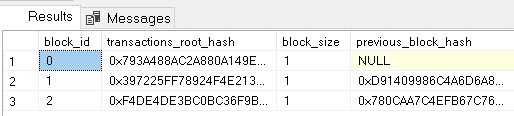
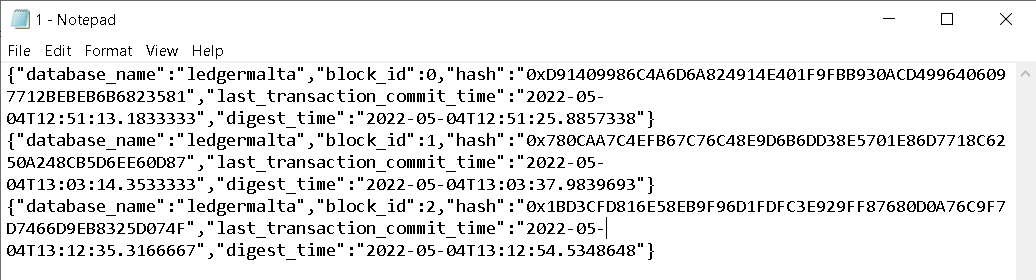
The previous_block_hash field is not easy to link between the records, because we have the hash of the previous block but not of the current block. To visualize better the link between blocks, we can open the digest file.
You will find three blocks, like the image below, and you may notice the hash of the first block is the hash which appears on the previous_block_hash field for the second block in the query.
Updating and Deleting Records
Let’s start with a single UPDATE and test what happens with the table:
UPDATE [PartTracking].[Parts] SET [CarID] = 2 where id=2
go
We can execute a query in our main table, [PartTtracking].[Parts], to check what happens with the special fields. The fields are hidden, so they need to be explicitly included in the query.
select [ID], [SerialNum], [ManufDate], [BatchID], [CarID],
      [ledger_start_transaction_id], [ledger_end_transaction_id],
      [ledger_start_sequence_number], [ledger_end_sequence_number]
from [PartTracking].[Parts]
go
As explained before, the “end” fields will always be empty, even after an update. The “start” values changed for the updated record.
If we check the history table using the query below, we will find the old version of the record.
select * from parttracking.MSSQL_LedgerHistoryFor_1525580473
go

It’s interesting to notice the history table only has the old values of the updated record. The CarID field is NULL in the history table and 2 in the main table. The current value of every record is only kept in the main table. The history table only contain old values of the records. This means the history table only contains records which were updated or deleted.
The field, ledger_end_transaction_id, in the history table contains the value 1255, identifying this was the transaction responsible to make this record an old version. In the main table, you may notice the same value in the field, ledger_start_transaction_id. This pattern, the same transaction as the end of one record and start of another is how an UPDATE appears in the history.
We can use the ledger view created for the table to see the history of operations over the table. We can order the query by ledger_transaction_id and ledger_sequence_number to have a better view of the result.
select * from [PartTracking].[PartsLedgerView]
     order by ledger_transaction_id,ledger_sequence_number
go
Every UPDATE statement appears in the history as a sequence of INSERT and DELETE. Both activities appear in the same transaction, in sequence. You may notice the ledger_sequence_number used on these operations.
We just completed the update of a single row. Let’s update multiple rows and see how the history will be. First, the update statement:
UPDATE [PartTracking].[Parts] SET [CarID] = 3
go
The blocks and transactions system tables will not show any difference for us, only additional blocks and transactions. The history table, on the other hand, has some additional details for us, let’s check it.
select * from parttracking.MSSQL_LedgerHistoryFor_1525580473
go

On the image above we see the history with two UPDATE statements: the first one, affecting only a single record, while the second one affecting 2 records. This can be noticed by the values of ledger_end_transaction_id. The field ledger_end_transaction_id points to the transaction which updated the record, turning this one in the history into an old value. You may notice the value 1255 with a single row and the value 1270 with two rows.
There are multiple sequence numbers for the transaction 1270, as expected. But it’s interesting to notice the values in ledger_end_sequence_number are not really in sequence. They are 1 and 3. This happens because each UPDATE is in fact an INSERT and a DELETE. The sequence numbers 0 and 4 are the INSERT, while the 1 and 3 are the DELETE.
As always, the SQL Ledger view for this table will show the history in a better way, as you may notice in the image below.
select * from [PartTracking].[PartsLedgerView]
       order by ledger_transaction_id,ledger_sequence_number
go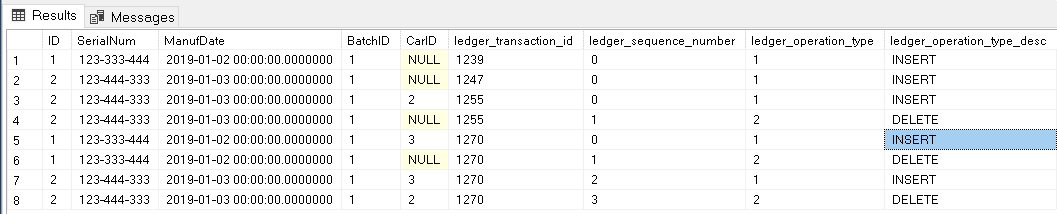
On the history above, you may notice:
- 2 initial inserts
- 1 single update – INSERT/DELETE with the same transaction id
- 2 updates – two INSERT/DELETE with the same transaction id
You may also notice the same ID field value repeats in different transactions. First, because each update has two operations. Finally, because one of the records was updated twice.
Finally, let’s execute one DELETE operation and one more INSERT operation and check the result of these operations with SQL Ledger.
Delete [PartTracking].[Parts] where ID=2
go

INSERT INTO [PartTracking].[Parts]
          VALUES (3, '333-444-123', '01-03-2019', 1, NULL)
go
Let’s check the SQL Ledger view, the main table, and the history table to analyse the result. We will use the following queries:
select * from [PartTracking].[PartsLedgerView]
    order by ledger_transaction_id,ledger_sequence_number
go

select [ID], [SerialNum], [ManufDate], [BatchID], [CarID],
     [ledger_start_transaction_id], [ledger_end_transaction_id],
     [ledger_start_sequence_number], [ledger_end_sequence_number]
from [PartTracking].[Parts]
go

select * from parttracking.MSSQL_LedgerHistoryFor_1525580473
go

The SQL Ledger view doesn’t have much surprise for us. We have an additional DELETE and INSERT in the end of the history, both with different transaction ids.

The main table has the expected records. What’s interesting to notice is the record ID=2. This record is present in the SQL Ledger view, but it’s not in the main table anymore.

On the image above, you may notice the history table with another interesting detail: The record ID=3 is not present in the history table. This happens because the record was inserted, but never updated or deleted. Only old versions of the records will be inside the history table, in other words, updated or deleted records.
Append Only Ledger Table
The Append Only Ledger tables are a great solution for wallet systems, for example, which is common in the I-Gaming industry. A Ledger table creation is slightly different than an updatable table. Let’s compare the statement below:
Create Schema Transactions
go

CREATE TABLE [Transactions].[Wallets]
(
    UserId INT NOT NULL,
    Operation tinyint NOT NULL /* 0: Credit 1: Debit */,
    [Timestamp] Datetime2 NOT NULL default GetDate(),
    Amount Numeric(15,2) NOT NULL
)
WITH (
   LEDGER = ON (
       APPEND_ONLY = ON
        )
)
GO
The main difference in this type of table is that we don’t need the SYTEM_VERSIONING enabled. We don’t need the history table, because we will not have updates or deletes in the table.
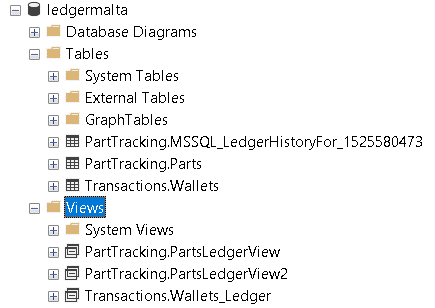
After creating the table, we will notice the lack of the history table in SSMS. The table and the view are created, as illustrated by the image below, but not the history table.
Another important difference are the special fields in the table. Since there will be no changes in the table and we also don’t have the history table, we don’t need the “end” fields. There will be no “end” for a record, only the “start”.

The image above shows the list of fields. Only the “start” fields were created.
We can check the sys.database_ledger_transactions to analyse how the table creation affected the Ledger.
SELECT * FROM sys.database_ledger_transactions
GO

As you may notice, the creation of our 2nd Ledger table is one more transaction registered in the database. SQL Ledger doesn’t work only by table. It works on the database level. We will be able to verify the entire database or a single table, as we will see later in this article.
We can also check the sys.database_ledger_blocks to confirm the same, the create table transaction became one more transaction among other table transactions.
SELECT * FROM sys.database_ledger_blocks
GO
Let’s insert some records and test the result:
INSERT INTO [Transactions].[Wallets] (UserId,Operation,[Timestamp],Amount)
values (1,0,'2022/05/01',100)
INSERT INTO [Transactions].[Wallets] (UserId,Operation,[Timestamp],Amount)
values (2,0,'2022/05/01',200)
INSERT INTO [Transactions].[Wallets] (UserId,Operation,[Timestamp],Amount)
values (3,0,'2022/05/01',300)
INSERT INTO [Transactions].[Wallets] (UserId,Operation,[Timestamp],Amount)
values (2,0,'2022/05/02',50)
INSERT INTO [Transactions].[Wallets] (UserId,Operation,[Timestamp],Amount)
values (3,1,'2022/05/02',80)
INSERT INTO [Transactions].[Wallets] (UserId,Operation,[Timestamp],Amount)
values (1,1,'2022/05/02',30)
INSERT INTO [Transactions].[Wallets] (UserId,Operation,[Timestamp],Amount)
values (3,0,'2022/05/03',20)
INSERT INTO [Transactions].[Wallets] (UserId,Operation,[Timestamp],Amount)
values (2,1,'2022/05/03',40)
INSERT INTO [Transactions].[Wallets] (UserId,Operation,[Timestamp],Amount)
values (1,1,'2022/05/03',20)
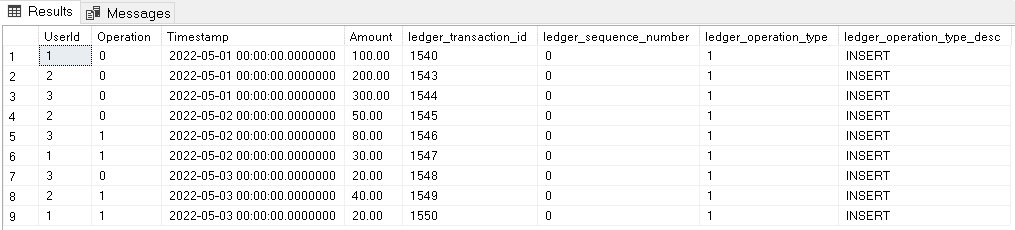
GOThe Ledger view was created, but all the operations on the records will be only inserts. That’s why the view is simpler than the one created for an updatable ledger table.
CREATE VIEW [Transactions].[Wallets_Ledger] AS
   SELECT [UserId], [Operation], [Timestamp], [Amount],
       [ledger_start_transaction_id] AS [ledger_transaction_id],
       [ledger_start_sequence_number] AS [ledger_sequence_number],
       1 AS [ledger_operation_type], N'INSERT' AS [ledger_operation_type_desc]
   FROM [Transactions].[Wallets]
GO
As you may notice on the code above, the view does nothing more than list all the records in the main table as INSERT operations. This is illustrated on the image below:
The result expected from a wallet table is the balance for each user or even the running total for each user wallet. This can be retrieved using a query with window function. The query below does the job for us:
select UserId, [Timestamp],
case operation
when 0 then 'Credit'
when 1 then 'Debit'
end OperationType,
Amount as OperationAmount,
sum(case operation
when 0 then Amount
when 1 then Amount * -1
end)
over (partition by UserId order by TimeStamp
rows between unbounded preceding
and current row) CurrentBalance
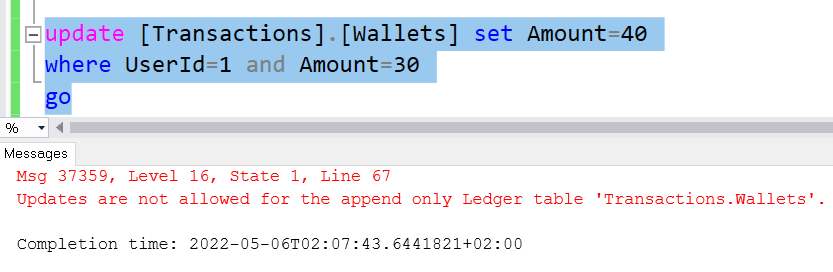
from [Transactions].[Wallets]Of course, the query above has no relation with SQL Ledger. What’s important is the security SQL Ledger brings to this scenario to insure there is no way the data can be tampered. Any attempt to change the existing data in the table will face an error like the one illustrated in the image below.
Verifying the Environment Integrity
All the SQL Ledger transactions are registered and have a hash block to ensure their integrity. The Azure portal provides a button to verify the integrity of the database. On the database left menu, we can choose Ledger menu and we will find the Verify Database button.

Once we click on the Verify Database button, we will see a window containing the script we need to execute for the database verification.
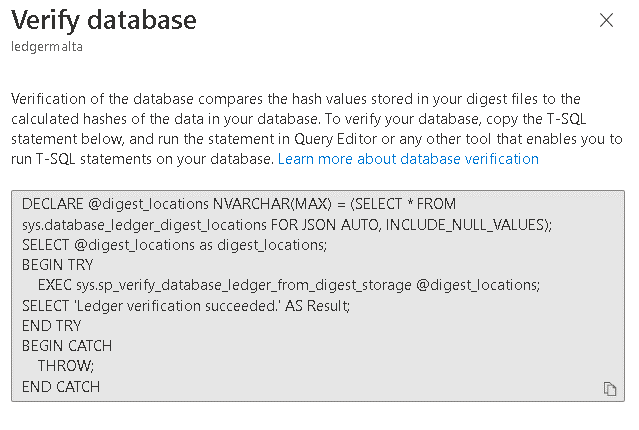
It’s the same code you can see below. Basically, it’s a call to the sys.sp_verify_database_ledger_from_digest_storage stored procedure. The first parameter is the list of locations where the digest is stored. This value needs to be retrieved from the sys.database_ledger_digest_locations system table.
DECLARE @digest_locations NVARCHAR(MAX) = (SELECT * FROM sys.database_ledger_digest_locations
              FOR JSON AUTO, INCLUDE_NULL_VALUES);
SELECT @digest_locations as digest_locations;

BEGIN TRY
      EXEC sys.sp_verify_database_ledger_from_digest_storage @digest_locations;
      SELECT 'Ledger verification succeeded.' AS Result;
END TRY

BEGIN CATCH
      THROW;
END CATCH
This example executes the integrity check on the database level and not on the table level. In the event of a failure, the result of the execution will tell us which table is failing the check.
Simulating a failure
We can simulate a failure to analyse the results. In an Azure SQL Database, we can’t create the failure from the database point of view, but we can mess with the digest storage. It’s important to notice that in production scenarios it’s very recommended to use immutability policies in the azure storage to ensure this kind of tampering is not possible. During a small test, however, we can skip the immutability policy and mess with the files.
Messing with the file to create a failure is not that simple. The file has the content type application/octet-stream. If you download the file and open it in notepad, VS Code or a regular editor, the content type of the file will be changed when you uploaded it again.
You need a very low-level editor capable to edit this file blob and keep the same content type. I decided to use the Azure cloudshell editor. I wrote about this on two blogs:
- https://www.red-gate.com/simple-talk/blogs/evaluation-policies-in-a-tenant-wide-level-and-more-azure-tricks/
- https://www.red-gate.com/simple-talk/blogs/azure-storage-mapping-file-shares-and-powershell-drives/
As long as you manage to edit the file and keep the same content type, any solution you use will be ok. For this article, I will use the following steps:
- Using Azure Storage Explorer, download the file to the cloudshell mapping in my local machine
- Make a copy of the file, for safety
- Use cloudshell on the Azure Portal to edit the file
- While editing the file, change the hash of one or more blocks
- Save the file
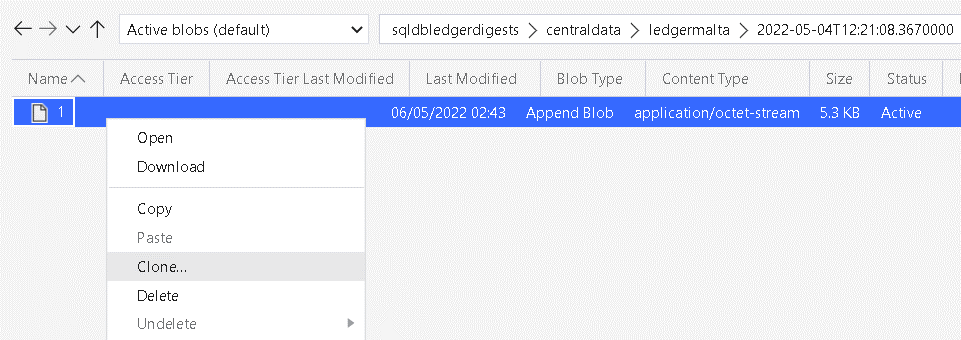
- Using Azure Storage Explorer, clone the file in the digest folder
- Delete the original file in the digest folder, leave the cloned one.
- Upload the file from the local cloudshell mapping to the digest folder
- Delete the cloned file in the digest folder
Clever File Movement
The steps above consider the cloudshell file share is mapped to the local machine. In this way, we can make some clever file movements.
- Once we download the file from the digest folder to the local mapped share, the file will be available on Azure Portal through cloudshell
- Once we edit the file in the cloudshell, the file is edited on the mapped drive, because they are the same
- After editing the file on the portal, we can upload the file from the local mapped share to the digest folder. The file visible on the portal is the same visible on the mapped share.
Editing a File in the cloudshell
We can use the cloudshell native file editor. We can edit the file using CODE <filename> . In order to access the files in the clouddrive, we need to change the current folder to clouddrive and then start editing the file.
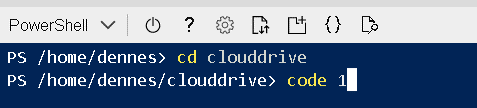
The file created by the digest has the name “1”, making the statement simple as you may notice on the image above.
Edit the file, on the other hand, can be an annoying task. The special characters on the file will make the editing task a challenge, but since it’s something we only need to do when simulating a failure, it ends up being acceptable.

Uploading the File Back to the Digest Folder
The Azure Storage Explorer can make the process easier. We will also need to use one interesting workaround.
The Azure Storage Account created by Azure SQL Ledger has the Hierarchycal Namespace configuration disabled. This means the storage account doesn’t support folders. The folders we can see are in fact a simulation of folders. For example, if your file is in centraldata\ledgermalta\2022-05-04T12:21:08.3670000, this folder doesn’t really exist. Instead, what you have is a file, whose name is centraldata\ledgermalta\2022-05-04T12:21:08.3670000\1. The folder path is part of the file name.
This has some small and annoying consequences. If you delete this file to upload a new one, the folders will disappear. That’s why the sequence of steps above include a work around for this:
- Clone the file in the digest folder using another name
- Delete the original file in the digest folder, leaving the cloned one
- Upload the modified file from your local mapped folder to the digest folder
- Delete the cloned file
Verifying the Integrity with the Simulated Errors
We can change two different hashes and execute the verification again to check the result. The verification will point to each block which is not valid.
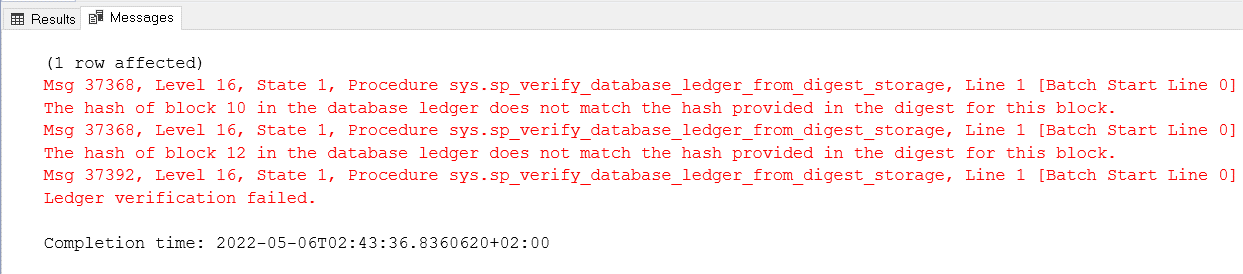
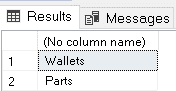
Once we identify the blocks with failures, we need to build a query to retrieve the tables affected by these blocks.
The query to check the blocks will need to look into each Ledger view for the transaction ids contained in these blocks. The query will be like this one below:
Select 'Wallets'
     where exists(
        select 1 from [PartTracking].[PartsLedgerView]
           where ledger_transaction_id in (
                select transaction_id FROM sys.database_ledger_transactions
                  where block_id in (10,12)))
union all
     Select 'Parts'
        where exists(
          select 1 from [PartTracking].[PartsLedgerView]
             where ledger_transaction_id in (
               select transaction_id FROM sys.database_ledger_transactions
                   where block_id in (10,12)))
In this example, both of our tables are affected.
Summary
Azure SQL Ledger is a powerful new feature to bring a level of security to our data in SQL that was only available in more complex third-party tools, such as blockchain. The example in this article is only the top of the iceberg, let’s dive deeper on Azure SQL Ledger in future articles.
References
SQL Ledger Documentation
SQL Ledger Articles
- https://sqlservergeeks.com/azure-sql-database-ledger-part-1-by-jason-m-anderson/
- https://sqlservergeeks.com/azure-sql-database-ledger-part-2-by-jason-m-anderson/
SQL Ledger White Paper
Azure Confidential Ledger