Azure Data Factory (ADF) is a scalable, trusted cloud-based solution for building automated data integration solutions with a visual, drag-and-drop UI. Moving on-premises SSIS workloads to Azure can reduce the operational costs of managing infrastructure, increase availability with the ability to specify multiple nodes per cluster and deliver rapid scalability. With the release of Azure Data Factory V2 Integration Runtimes (ADFv2 IR), deployment to the Azure cloud is now possible for SSIS projects that use 3rd party components.
In this article, we walk through the steps for creating an SSIS Project to replicate NetSuite data to an Azure SQL database and deploying the project to Azure Data Factory, providing an entirely cloud-based replication service.
Deployment Prerequisites
The deployment of SSIS Projects requires the following:
- Azure Subscription - This can be managed in the Azure Portal. More information on Azure Subscriptions is available from Microsoft.
- AzureRM PowerShell 6.2.0 or higher - You can find instructions on obtaining the supported Azure PowerShell from the Microsoft Documentation, or you can use the .msi installer (direct download). After installing the new version, you may need to run the cmdlet:
Set-ExecutionPolicy Unrestricted - SSMS 2012 or higher - We recommend using the latest version available from Microsoft.
- (Optional) CData SSIS Component Server License - To deploy CData SSIS Components to the cloud, you need a Server license and a Runtime Key (RTK) for the CData products being deployed.
Deployment Guide
The overview of the process is as follows:
- Create an Azure SQL Server and Azure Resource Group
- Create an Azure Data Factory
- Create and Start an Azure Integration Runtime
- (Optional) Create an Azure SQL Database
- Create an SSIS Project to Replicate Enterprise Data to Azure SQL
- Deploy the SSIS Project to Azure
- Manage/Configure the Project in SSMS
- Use Azure Data Factory to manage and execute a deployed project
Each of these steps is described below.
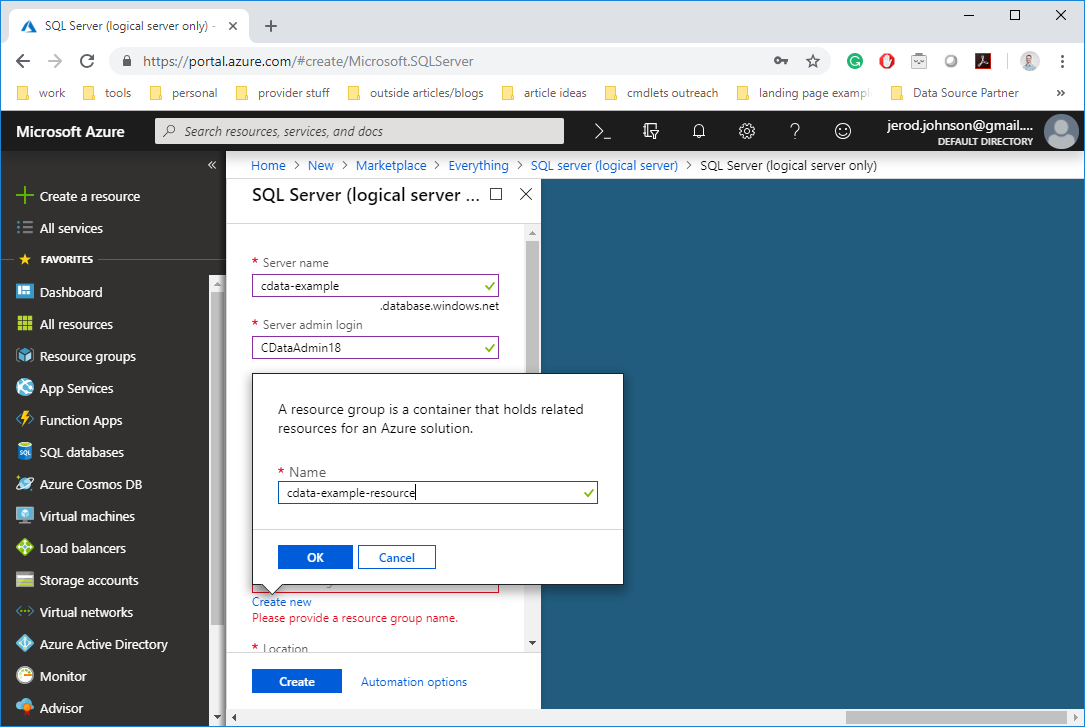
Create an Azure SQL Server and Resource Group
To deploy an SSIS project to Azure Data Factory, we need to first create an Azure SQL Server and resource group. Log in to the Azure portal and click "Create a resource." Search for and choose "SQL Server (logical server)" and click Create. In the creation wizard:
- Name the server and create a new admin login and password. I have an example below:

- Assign or create a new resource group.
- Choose a location.
- Click create.

Create an Azure Data Factory
With the Azure SQL Server and resource created, we can now create our Azure Data Factory. In the Azure Portal, click "Create a resource". Search for and select "Data Factory" and click "Create". In the creation wizard:
- Name the data factory.
- Use the existing resource group (or create a new one).
- Assign a Version (V2) and Location.
- Click Create. You should have filled out the fields similar to what is shown here:

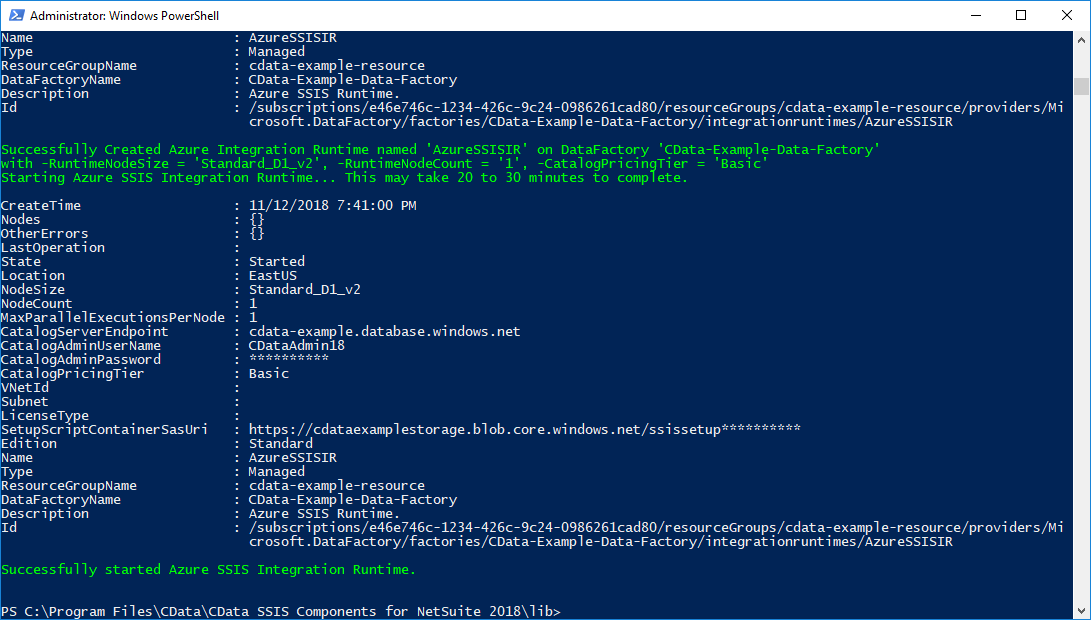
Create and Start the Integration Runtime
CData Software SSIS Components include a PowerShell script to create the resources necessary for deployment and start the Azure Integration Runtime. The script file (AzureDeploy.ps1) is attached to this article and found in the lib folder at the installation location (C:\Program Files\CData\CData SSIS Components for ...\ on Windows). Follow the prompts when running the script to create and start the Integration Runtime.
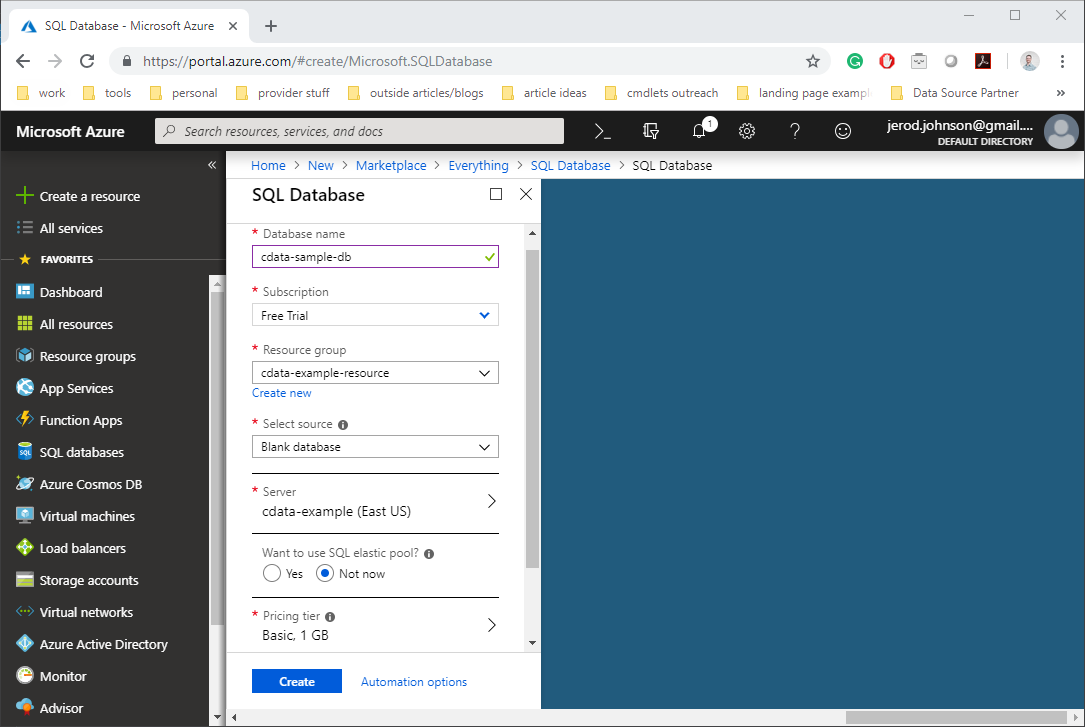
(Optional) Create an Azure SQL Database
The SSIS project we'll deploy will replicate NetSuite data to an Azure SQL Database. If you have another database to replicate to (or wish to deploy another project entirely) then you can skip this section. To create a new Azure SQL Database click "Create a resource" in the Azure portal. Search for and select "SQL Database" and click "Create". In the creation wizard:
- Name the database
- Assign or create a new resource group
- Select a Server
- Select a Pricing tier
- Click Create. Your blade should look like the one below:
Create an SSIS Project
With all of our Azure resources created and our Integration Runtime started, we are ready to deploy an SSIS project to Azure Data Factory. This section walks through creating an SSIS Project to replicate NetSuite data to an Azure SQL database. Only some of the steps below may apply if you have a different task in mind.
- In Visual Studio, create a new Integration Services Project.
- Add a Data Flow Task and open the task.
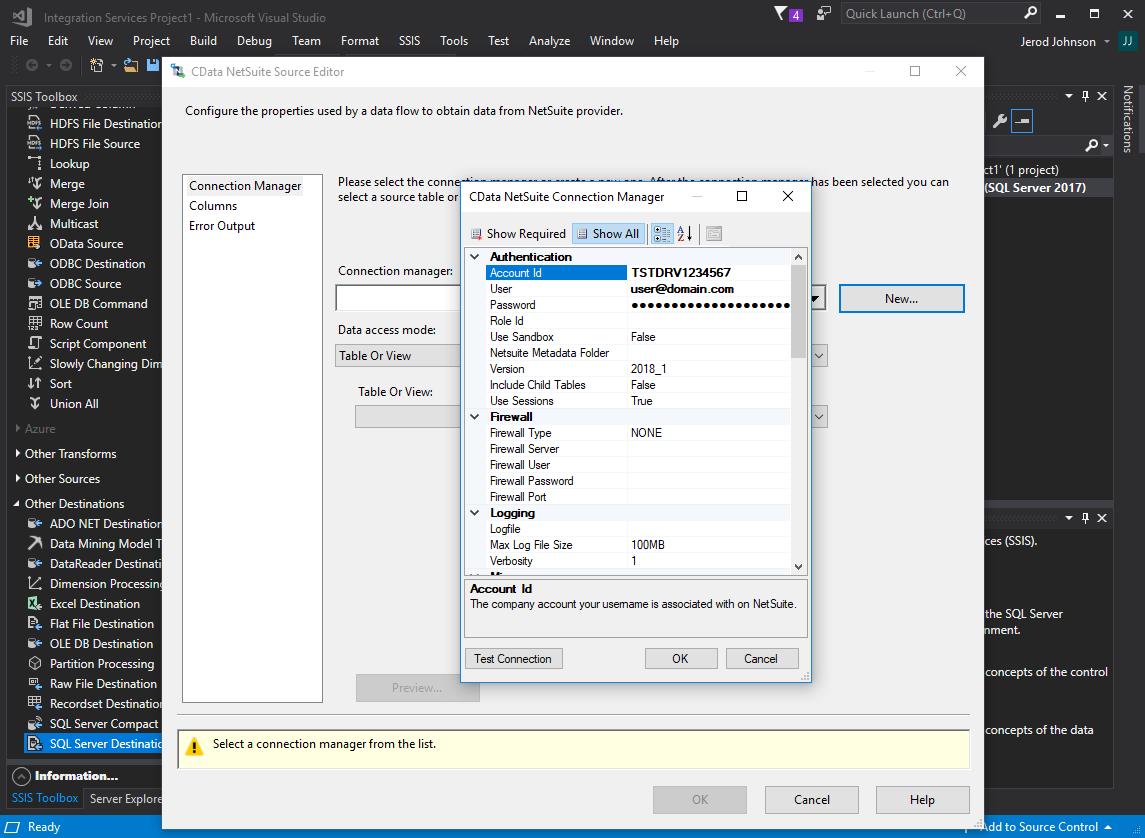
- Add a CData NetSuite Source with this configuration:
- Double-click to configure the Source
- Create a new Connection manager
- Configure the connection (for NetSuite, you will need a User, Password, and Account Id).
- Select a Table or View to replicate.
- Select specific columns to replicate.
- The source should look like the image below. Click OK.
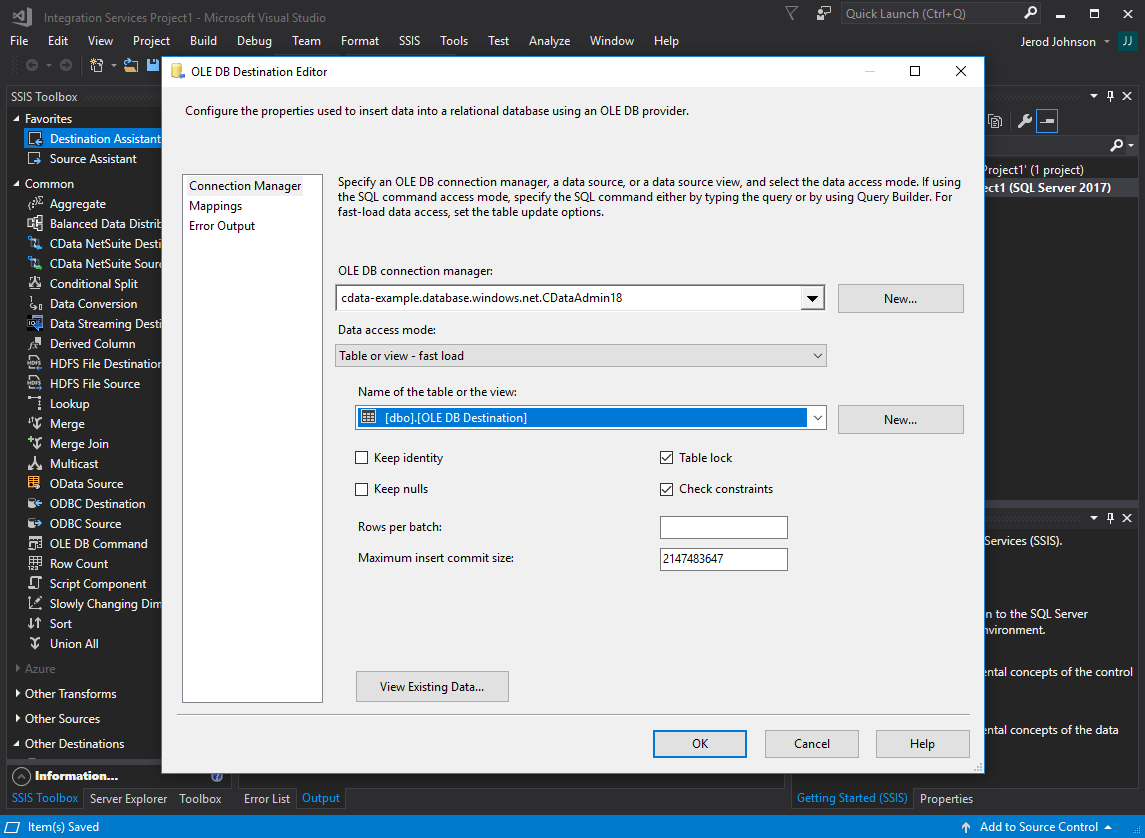
- Add a SQL Server Destination and configure it as follows:
- Double-click to configure the Source
- Create a new Connection manager
- Configure the connection to the Azure SQL database (or another SQL Server database).
- Select a Table or View (or create a new table).
- Configure column mappings.
- This should look like the image below. Click OK.
Deploy the SSIS Project
Once the SSIS Project is created and saved we are ready to deploy.
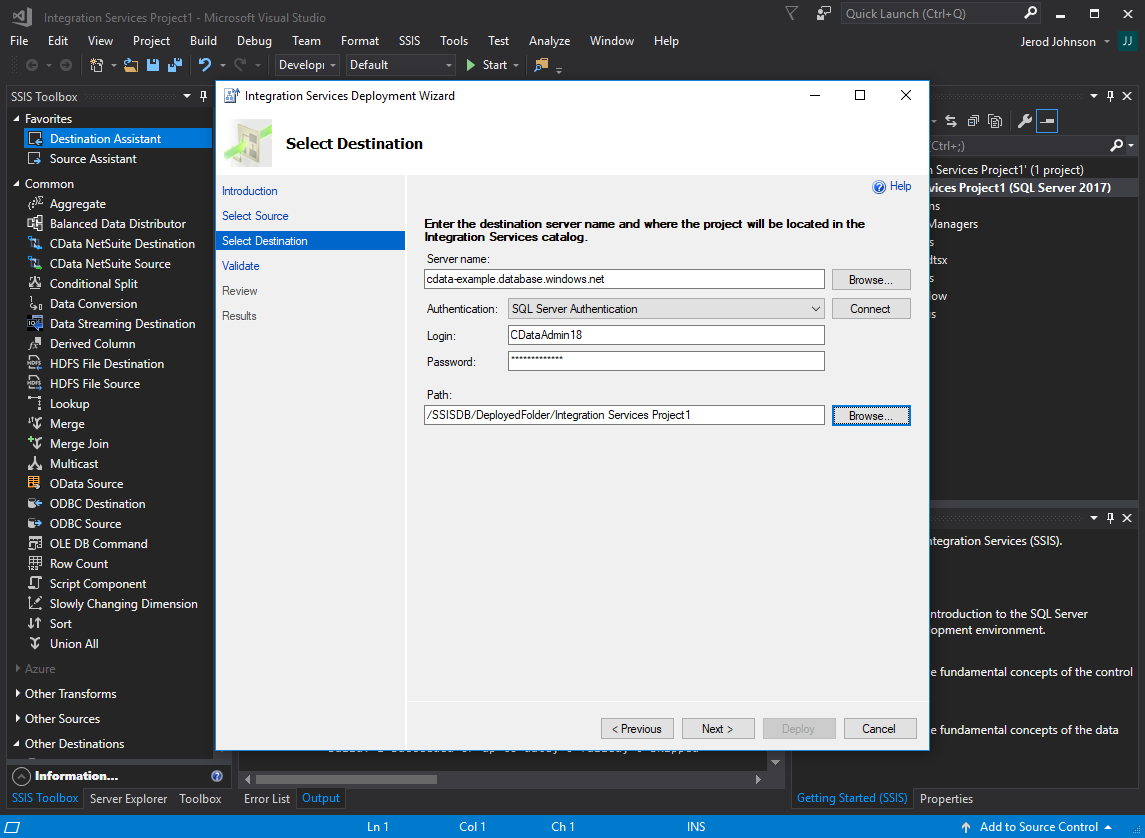
- In Visual Studio, click Project -> Deploy.
- Click through the wizard until the Select Destination screen
- Set Server name to the Azure Database Server
- Set Authentication to SQL Server Authentication and use the configure Login and Password
- Set the Path (/SSISDB/DeployedFolder/ProjectFolder). This should look like the image shown here:
- Validate, Review, and Deploy.
Manage the Project in SSMS
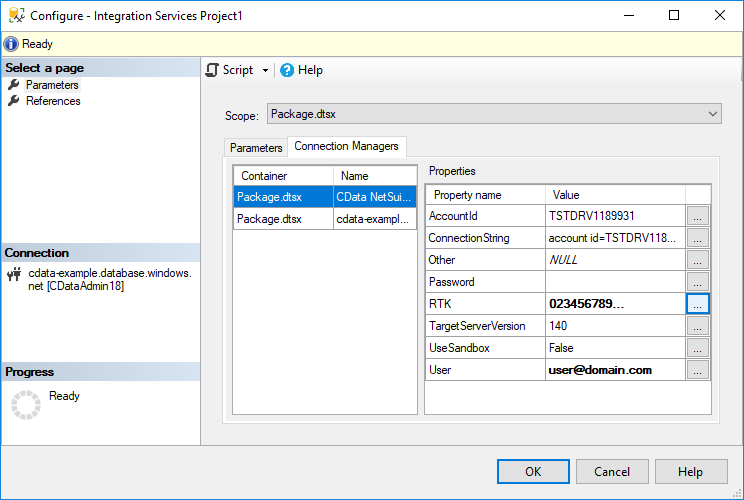
By default, connection settings with sensitive information (passwords, security tokens, etc.) are redacted when deploying to Azure. SQL Server Manage Studio allows you to provide this information, including the RTK value to license the CData components, to the deployed project.
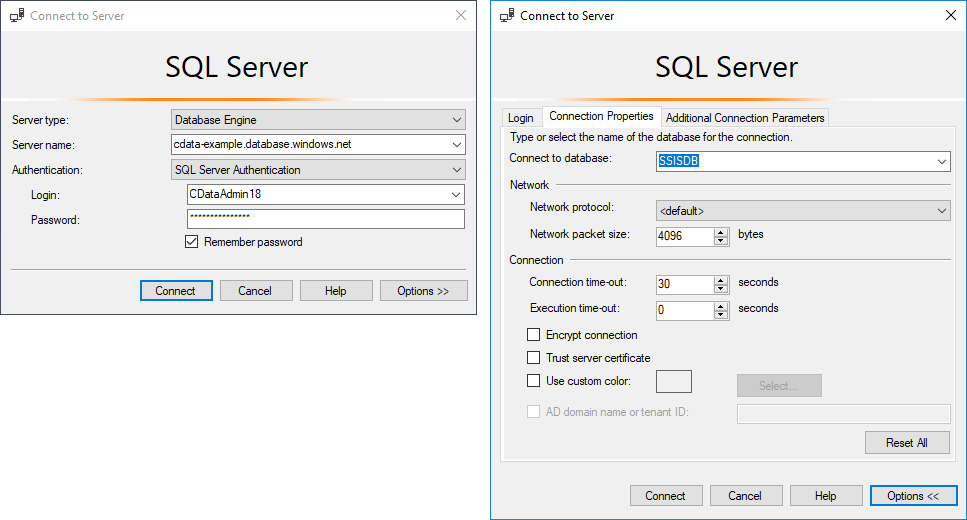
- In SSMS, connect to the Azure SQL Server.
- In Options -> Connection Properties, set Connect to Database to "SSISDB"
- Right-click on the project and select Configure. In the connection managers, add or update any necessary connection information and add the RTK.
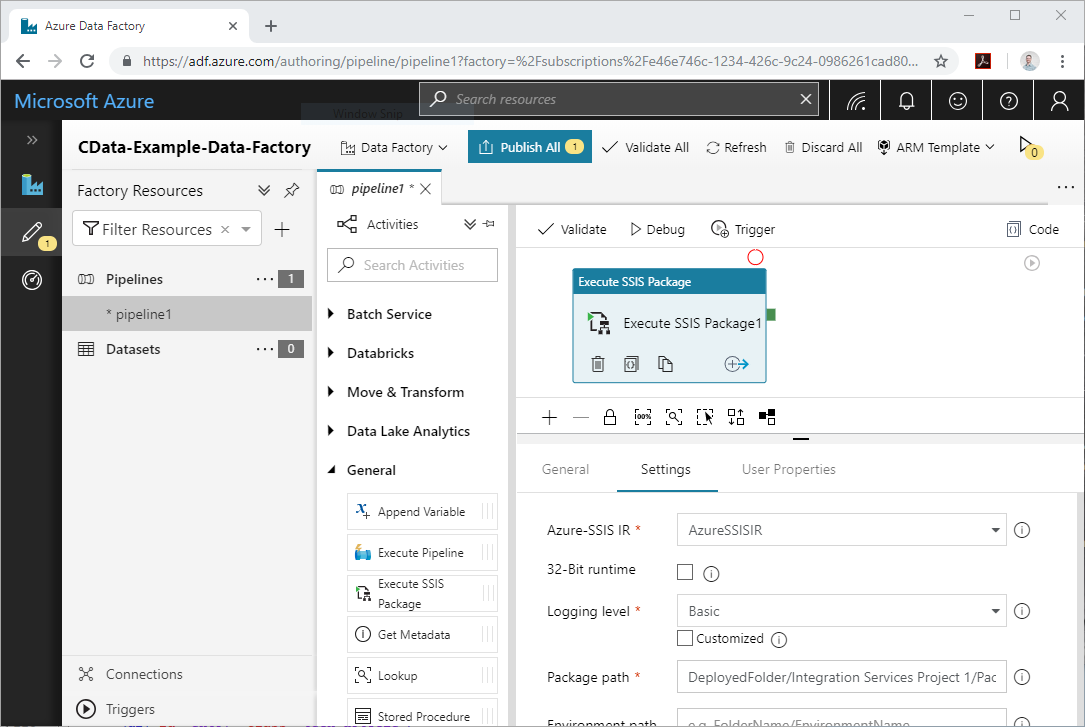
Manage and Execute the SSIS Project in Azure Data Factory
With the setup and configuration complete, we are finally able to manage and execute our SSIS Project in Azure Data Factory. Navigate to the Azure Data Factory dashboard (https://adf.azure.com) and log in.
- Create a new Pipeline and add an Execute an SSIS Package module
- On the Settings tab:
- Select Azure-SSIS IR
- Set the Logging level
- Set the Package Path (DeployedFolder/ProjectFolder/Package.dtsx)
- Click Debug to test or Trigger to execute the pipeline.
With the SSIS Project deployed to Azure Data Factory, you now have an enterprise data replication service that runs in and is fully manageable from the cloud. The CData SSIS Components extend connectivity to SaaS, Big Data, and NoSQL sources from SSIS projects and with ADFv2 IR, you can include those components in projects deployed to the cloud.