

This article is complementary to the book, Hands-on Data Virtualization with Polybase, which you can find here and which contains additional information and tips to test Polybase for free, or at least at the lowest cost.
One of the most impressive features of PolyBase in SQL Server 2019 is the ability to create scale-out groups, pairing it with its predecessors, Parallel Data Warehouse (PDW) and Analytics Platform System (APS). In order to test this feature, you can create a free Azure account that gives you $200 credits for 30 days and allows you to use up to 4 CPUs overall; this means you can create four virtual machines each one with 1 CPU and 3.5 GB RAM with OS Windows 2019 Datacenter each costing $0.117 per hour. Although a similar setup can be made in Amazon Web Services (AWS), you can't create it for free, as I'll explain at the end.
Once you're logged in Azure, either search for "Virtual machines" or under "Azure services" search for "Virtual machines", which will get you to a list of your VMs. If you don't have any, click on "+ Add" to go to the creation blade, and the screen will look like this:
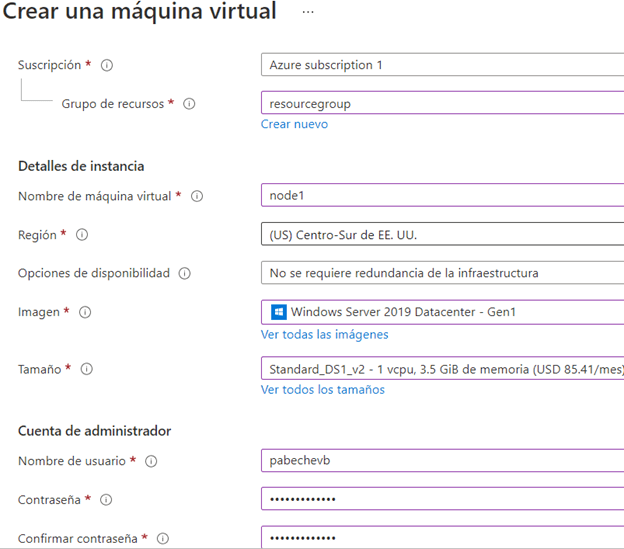
The first VM to create in Azure is going to serve as your Domain Controller (DC), as you can't add VMs in "Azure Active Directory" only users, and because "Azure AD Domain Services" currently gives an unspecified error when you try to create any type of domain during the automated creation step. Once you have created this VM, convert it to a DC following the instructions here.
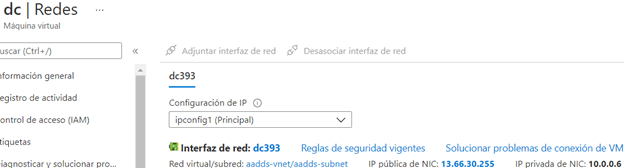
In my case, I named this VM pabechevb.pabechevb. Below is the screenshot of the "networks" for this VM, which I named "dc". You can see the IP is 10.0.0.6.
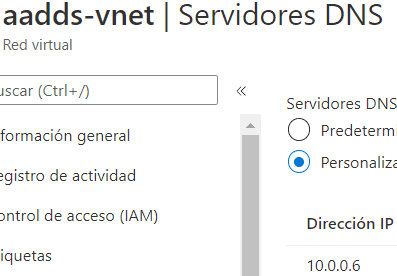
Below is the screenshot after you click on "aadds-vnet" and you change the DNS with this IP:
You will notice in the VMs there are multiple options to login, but I don't recommend using Azure Bastion as this is costly and will consume your free credits in no time. I recommend using Remote Desktop Connection (RDP) instead.
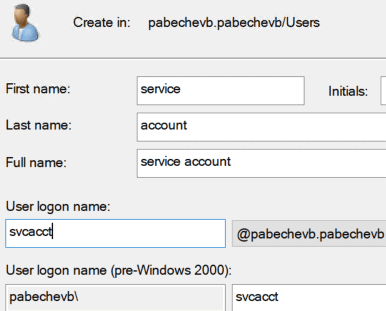
Now you need to create a domain service account. To do this, RDP into the DC with the administrator username and password, and then go to Start -> Windows Administrative Tools -> Active Directory Users and Computers -> select your domain -> Users -> New -> User. In this case the service account name is "svcacct" and belongs to the domain "pabechevb":
Once the DC is created, the Azure network has the DNS of the private IP of the VM as specified in the instructions (which requires you to restart all VMs in that network), and the service account has been created, you can create other two VMs in the same network but don't convert them to domain controllers.
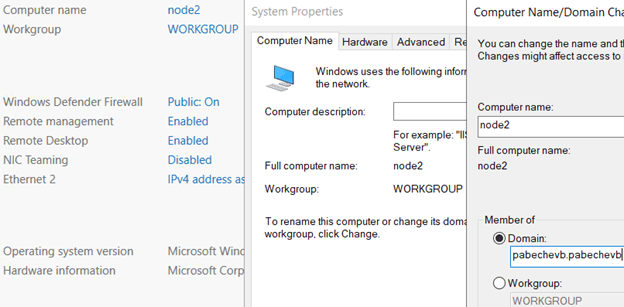
When you login to the second VM, which I named "node1", you need to go to Server Manager -> Local Server -> Domain -> Computer Name -> Domain -> Change and change from "Workgroup" to "Domain". There, enter the domain name. It will prompt you for the user and password with privileges in the domain, so use the administrator account username and password you specified when you created the DC. Once changed, the VM will restart to join the domain. Below are the windows opened when performing this change for the third VM, named "node2":
Within these VMs, you can copy the SQL Server trial file, which you can download from here. This file is named "SQL2019-SSEI-Eval.exe". When executed, this program downloads SQL Server 2019 Evaluation. Once it is downloaded, double click the ISO to mount it. Then, it is easy to install SQL Server from the command line. The command line instruction is shown here:
& "d:\setup.exe" /Q /Action=Install /IAcceptSQLServerLicenseTerms /IndicateProgress /Features=SQLEngine,Conn,Polybase /InstanceName=MSSQLSERVER /TcpEnabled=1 /SecurityMode=SQL /SaPwd=YourPwd /SqlSysAdminAccounts=pabechevb\svcacct /PBScaleOut /PBEngSvcAccount=pabechevb\svcacct /PBEngSvcPassword=YourPwd /PBDMSSvcAccount=pabechevb\svcacct /PBDMSSvcPassword=YourPwd
Note, the file was mounted in the D: drive.
You can specify other features and an instance name as needed. You also need to enter your own password in "SaPwd", and you need to enter the service account name and password in "PBEngSvcAccount", "PBEngSvcPassword", "PBDMSSvcAccount" and "PBDMSSvcPassword".
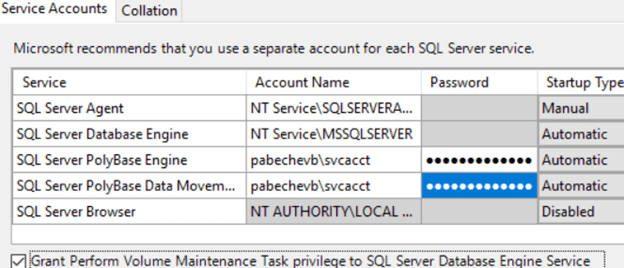
If you instead double click the file "setup.exe" you can install it using the GUI. Remember to select "Use this SQL Server as a part of PolyBase scale-out group" and specify the service account name and password for the Polybase Engine and DMS service as follows:
Once SQL Server is installed, you can use "sqlcmd" to finish the Polybase setup. Running the following command and replace "YourPwd" with the appropriate "sa" password to connect to the local instance of SQL Server:
sqlcmd -Usa -PYourPwd
Then you need to run the following commands in all nodes to enable Polybase (no service restart is needed):
EXEC sp_configure @configname = 'polybase enabled', @configvalue = 1
GO
RECONFIGURE
GO
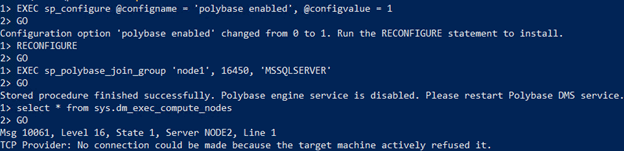
To mark a node as a compute node (secondary), you need to run the command below on the SQL Server instance of the second node, which I named "node2". Note I named my first VM as "node1", and when the command completes, "node1" will be marked as the head node. Note also I will be using the port 16450 as the "DMS control channel port", and I named the SQL Server instance in "node1" as the default instance "MSSQLSERVER":
EXEC sp_polybase_join_group 'node1', 16450, 'MSSQLSERVER'
GO
As indicated in the command output, you need to stop the Polybase Engine service and restart the Polybase DMS service. If you try to get the list of compute nodes in the secondary node "node2" an error is returned because the Polybase Engine service is disabled. Below is the output of the commands executed in "node2":
Below are the Polybase-related services in "node2":

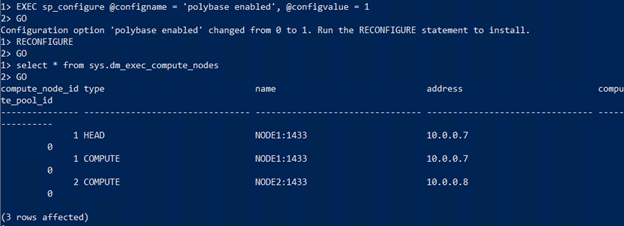
From the head node (primary) you can run the following command to view the scale-out group configuration:
select * from sys.dm_exec_compute_nodes
GO
Below is the output of the commands executed in "node1". Note node1 is the head and is also a compute node. Node2 is only a compute node:
You can find additional information about Polybase scale-out groups in the following links:
- https://docs.microsoft.com/en-us/sql/relational-databases/polybase/configure-scale-out-groups-windows
- https://docs.microsoft.com/en-us/sql/relational-databases/polybase/polybase-scale-out-groups
When you have this configuration running, you can follow several of the examples described in my book to create for free any other data source and consume its information including: SQL Server, Hadoop, Azure storage, Spark, Oracle, Teradata, Cassandra, MongoDB, CosmosDB, MySQL, PostgreSQL, MariaDB and SAP HANA.
Once you're done with your testing, don't forget to delete all your resources in order to not get a surprise at the end of the month in your credit card.
The high-level process for AWS is outlined below. Note in AWS, when you register for the first time, you can use the free tier for 12 months as long as you don't exceed the 750 hours of compute time, and you can use the Directory Service for free during the first 30 days. The steps are as follows:
- In Directory Service, configure an "AWS Managed Microsoft AD"; it will create a user named Admin with the password you specify. The first time used you need to wait for the service to be validated, in my case it took 5 hours.
- In EC2 launch an instance of the free tier, which can be Microsoft Windows Server 2019 Base, but the free tier instance type is t2.micro which only has 1 GB RAM and this is not enough to start the "Polybase Engine" neither the "Polybase DMS" services, so you need an instance type outside of the free tier.
- On the "Review Instance Launch" step, at the right of "Instance details" click on "Edit instance details" to specify the domain directory you created, and an IAM role of type "AWS Service" for "EC2" services with permissions "AmazonSSMManagedInstanceCore" and "AmazonSSMDirectoryServiceAccess".
- When the machines are launched you need to create a key pair or select an existing one; this is used when deciphering the password to connect to the VM. However, you can use the domain user named "Admin" to login with the password you specified when creating it.
- To create a domain user, in any of the EC2s go to Start -> Server Manager -> Add roles and features -> Next -> Role-based or feature-based installation -> Next -> Next -> Next -> choose "Group Policy Management" and "Remote Server Administration Tools"-"Role administration tools"-"AD DS and AD LDS tools" and "DNS server tools" -> Next -> Install -> Close. Once installed you can follow the steps described earlier to create the domain user.
- If you install SQL Server with only 1 GB RAM, you need to first install only the engine and then add the feature "Polybase"; otherwise, you will get a timeout error during the installation without being able to "Retry" because it says one of the Polybase databases is in use and cannot be dropped and you need to rollback the entire installation. Remember the Polybase services won't start with this amount of RAM.
