Overview
As a part of this article, we will learn basics of connecting to MongoDB using a python stand-alone script to make sure that we can push data into our locally setup MongoDB. We will focus on the following areas:
- Downloading and installing MongoDB
- Setting up MongoDB locally
- Writing a python script to connect to MongoDB
Introduction
MongoDB is one of the most popular NoSQL databases. It is flexible, fast, and perfect for modern applications. In this article, we’ll walk through the complete setup and usage of MongoDB on a local (Windows) system, and how to interact with it using Python scripts to perform basic CRUD operations like Create, Read, Update, and Delete.
Prerequisites
We expect to have the following setup locally in our system beforehand:
- Python (any version equal or higher than 3)
Installing MongoDB on Windows System
Though we will walk through the installation step on a Windows system, you can also setup the same in any other OS accordingly. Rest assured, we have it all covered here.
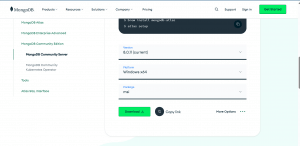
- Download MongoDB locally on your system from here - https://www.mongodb.com/try/download/community
- Select the appropriate version and the platform. Click Download.
- Follow the attachment below:

- Once you click download, the MSI installer will be downloaded.
- After the download completes, run the installer.
- When installing, make sure to choose Complete setup.
- Also, we would recommend to optionally install the MongoDB Compass (GUI) which will be defaulted to selected.
- After installation, make sure the MongoDB service is running.
- Finally, add C:\Program Files\MongoDB\Server\<version>\bin to your System Environment Variables -> Path (Update the same accordingly based on your OS).
- Close any existing terminals open as this would not take effect on existing opened terminals.
So now we are done with MongoDB setup.
Note: We will not cover installation of python as we expect that to be already installed in our system.
Establishing a connection to MongoDB from python
So now, we will write a very basic python script to connect to MongoDB locally. This is just to test the connection and gain some confidence that we are all set to go ahead with CRUD operations slowly. So, below is a python script to connect to MongoDB.
from pymongo import MongoClient

# Connect to local MongoDB server
client = MongoClient("mongodb://localhost:27017/")

# Create or access database and collection
db = client["my_local_db"]
collection = db["users"]

print("Connected to MongoDB!")
You can copy the above script and paste in a notepad. Remember to save the file with the extension as .py (which stands for python). We will name our document as mongo_connect.py.
Now to run the file and test out the connection, you just need to run the following command from terminal (open the terminal in the folder that contains the python script):
python mongo_connect.py
Once you run the above command in the terminal, you will see a following output in the terminal:
![]()
CRUD operations in MongoDB with python
We will now take one step ahead by trying to insert a document into the MongoDB using a python script.
Create Operation
A sample code looks like this:
from pymongo import MongoClient

# Connect to local MongoDB server
client = MongoClient("mongodb://localhost:27017/")

# Create or access database and collection
db = client["my_local_db"]
collection = db["users"]

user = {
    "name": "Alice",
    "email": "alice@example.com",
    "age": 28
}

insert_result = collection.insert_one(user)
print("Inserted ID:", insert_result.inserted_id)
If we run the above script, we get to see the following output in the terminal:
![]()
Clearly, we can see that a document got inserted and the document ID gets printed.
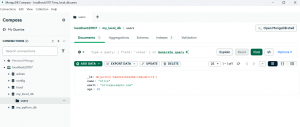
To validate the same, we can try to open MongoDB compass which can be opened by trying to access this link locally. This link navigates to MongoDB Compass. Inside MongoDB compass, we can see that my_local_db has been created with users inside the same. Once we choose users, we get to see the user we just created.
Congratulations! We just connected to MongoDB using python and also inserted a user successfully.
Now we will try to insert multiple users instead of only one user and see how that is done. Here is a script for the same:
from pymongo import MongoClient

# Connect to local MongoDB server
client = MongoClient("mongodb://localhost:27017/")

# Create or access database and collection
db = client["my_local_db"]
collection = db["users"]

users = [
    {"name": "Bob", "email": "bob@example.com", "age": 30},
    {"name": "Charlie", "email": "charlie@example.com", "age": 35},
]

insert_result = collection.insert_many(users)
print("Inserted IDs:", insert_result.inserted_ids)
When the script is run, we should get the following output on the terminal:
![]()
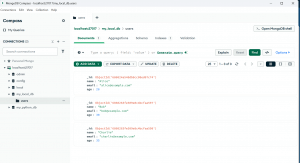
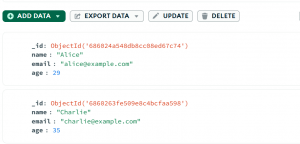
Clearly, 2 objects were inserted. Let's jump over the MongoDB compass and see if it shows appropriately there too:
So now we have seen how we can insert multiple users at once into the MongoDB using python. We are over with the Create operation.
Read Operation
To read data from the MongoDB using python, we can use the following sample script which will read the just entered data in users and print them in our console (or terminal).
from pymongo import MongoClient

# Connect to local MongoDB server
client = MongoClient("mongodb://localhost:27017/")

# Create or access database and collection
db = client["my_local_db"]
collection = db["users"]

for user in collection.find():
    print(user)
The above script will read all the users and print them in the terminal:
![]()
However, we will walk through a more real-time business scenario where we might need to fetch specific users based on some condition instead of fetching all of them. To achieve that, we can write a simple python script like this:
from pymongo import MongoClient

# Connect to local MongoDB server
client = MongoClient("mongodb://localhost:27017/")

# Create or access database and collection
db = client["my_local_db"]
collection = db["users"]

user = collection.find_one({"name": "Alice"})
print("Found:", user)
Once we run the above script, we will see an output like this in the terminal:
![]()
Update Operation
Now we will take a look into updating a user and understand how the same can be done using a simple python script.
We have the following python script to update a user we just entered into the MongoDB.
from pymongo import MongoClient

# Connect to local MongoDB server
client = MongoClient("mongodb://localhost:27017/")

# Create or access database and collection
db = client["my_local_db"]
collection = db["users"]

update_result = collection.update_one(
    {"name": "Alice"},
    {"$set": {"age": 29}}
)

print("Matched:", update_result.matched_count)
print("Modified:", update_result.modified_count)
Before we run this script, we will see the age of user named Alice:

After we run the script, we should see a similar output in the terminal:
![]()
Now, if we take a look into the MongoDB Compass, we see:
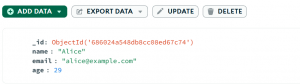
Clearly, the age has been changed from 28 to 29.
We will also try to check on how to update multiple records. Consider the following script which updates all users with age greater than 25 with the status as senior:
from pymongo import MongoClient

# Connect to local MongoDB server
client = MongoClient("mongodb://localhost:27017/")

# Create or access database and collection
db = client["my_local_db"]
collection = db["users"]

update_result = collection.update_many(
    {"age": {"$gt": 25}},
    {"$set": {"status": "senior"}}
)

print("Modified:", update_result.modified_count)
Once we run the script, this will introduce a new parameter as status and value them as senior for all such users whose age is more than 25. Accordingly, we can see the change in the users from MongoDB Compass.
Delete Operation
Now, we will take a look on how we can delete a user from MongoDB using python script.
We have the following sample script to delete a user:
After we run the above script, we should see a similar output in the terminal:
![]()
If we check in the MongoDB Compass, we will see that the user has been deleted:
To delete multiple users, we can now make use of the status as senior condition which will delete the 2 records in the users we had. A sample python script for the same would look like:
from pymongo import MongoClient

# Connect to local MongoDB server
client = MongoClient("mongodb://localhost:27017/")

# Create or access database and collection
db = client["my_local_db"]
collection = db["users"]

delete_result = collection.delete_many({"status": "senior"})
print("Deleted count:", delete_result.deleted_count)
Once we run the above code from terminal, we would see the deleted count being printed as 2.
![]()
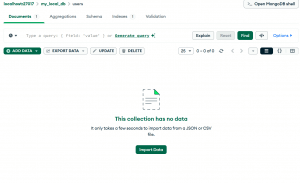
If we jump back to MongoDB compass to validate the changes, we would see that users is empty now.
Summary
We just learnt on how to setup MongoDB locally on our system and also how we can quickly connect to MongoDB locally using a python script. We also learnt on how we can do basic CRUD operations using a python script on MongoDB.