Overview
MongoDB is a popular NoSQL database used for building modern, scalable applications. In this article, we’ll cover how to set up MongoDB on Windows and connect to it using Node.js. We will also perform some basic Create, Read, Update, and Delete (CRUD) operations to ensure we understand fully on how Node.js can be made to interact with MongoDB.
Prerequisites
Before we begin, make sure you have the following installed on your Windows machine:
- Node.js and npm: Download and install from https://nodejs.org
- MongoDB: Download and install the MongoDB Community Server from https://www.mongodb.com/try/download/community
- MongoDB Compass (Optional): A GUI for MongoDB. Download here
Once the installation is complete, we can consider that our environment setup is complete and now we are good to start with the next part - establishing a connection to MongoDB using Node.js.
Connecting to the MongoDB using Node.js
Step 1 - Setting up our Node.js project
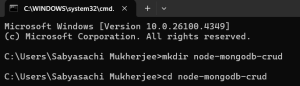
To setup a new Node.js project, we will go to the folder where we want to create a new project and run the following commands opening a command prompt terminal from there:
mkdir node-mongodb-crud
cd node-mongodb-crud
This will create a new folder named node-mongodb-crud in the current folder and navigate inside the folder like this:
Now, we will initiate our Node.js project inside this folder by running the following command:
npm init -y
This will generate the following response:
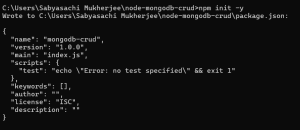
Now that the initial Node.js project setup is complete, we need to install MongoDB Node.js driver for interaction (consider it like a dependency download) running the following command from the terminal:
npm install mongodb
![]()
Once this is done, we have our Node.js project setup and also required dependency installed.
Step 2 - Start the MongoDB service
Make sure MongoDB is running. If you installed it with the default settings, run it as a Windows service or open a terminal and start the server manually:
"C:\Program Files\MongoDB\Server\<your-version>\bin\mongod.exe"
Make sure to replace <your-version> above with the version of MongoDB installed on your local machine.
Step 3 - Connecting to MongoDB using Node.js
First, we will create a file named app.js inside the project directory using the following command:
echo. > app.js
This creates a file name app.js inside the project directory. Open this file in a notepad and put the following contents inside. Save the file.
const { MongoClient } = require('mongodb');

const uri = "mongodb://localhost:27017";
const client = new MongoClient(uri);
const dbName = "mongo_node_db";

async function connectToDB() {
    try {
        await client.connect();
        console.log("✅ Connected successfully to MongoDB");

        const db = client.db(dbName);
        const collection = db.collection('users');

        // Optional: count to verify
        const count = await collection.countDocuments();
        console.log(📄 Documents in collection: ${count});

        return { db, collection, client }; // ✅ return all needed
    } catch (err) {
        console.error("❌ Connection failed:", err);
        return null; // ✅ fail-safe return to prevent destructure errors
    }
}

module.exports = connectToDB;
The above code connects to the local MongoDB server into the database named mondo_node_db and tries to fetch the count of documents already existing in the DB (which will be 0 since the database is yet to be created).
The output would look like this:
![]()
So now we have successfully connected to our local MongoDB server using Node.js.
Step 4 - CRUD operation into MongoDB using Node.js
Create a document
Next, inside the same project directory, create a new JS file named create.js using the following command:
echo. > create.js
Next, open the file in a text editor and put the following contents inside. Save the file.
const connectToDB = require('./app');

async function createUser() {
    const dbConnection = await connectToDB();
    if (!dbConnection) {
        console.log("❌ Could not connect to database");
        return;
    }

    const { collection, client } = dbConnection;

    try {
        const result = await collection.insertOne({
            name: "John Doe",
            email: "john@example.com",
            age: 28
        });

        console.log("✅ User created:", result.insertedId);
    } catch (err) {
        console.error("❌ Error inserting user:", err);
    } finally {
        await client.close();
        console.log("🔌 MongoDB connection closed");
    }
}

createUser();
The above code uses the app.js file content by importing it using the require keyword and using the connectToDB() method. It connects to the MongoDB local server using the app.js file content and inserts a new user into it.
After running the above file, you should see the following output:
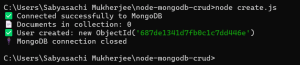
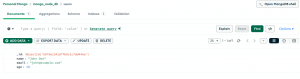
Also, if you have MongoDB Compass installed, you can verify the same from the application:
Read a document
Next, we will try to read the document that is already created above. For that, we will create a new file called read.js using the following command:
echo. > read.js
Next, open the read.js file in a text editor and paste the contents inside as follows:
const connectToDB = require('./app');

async function readUsers() {
    const { collection } = await connectToDB();

    const users = await collection.find({}).toArray();
    console.log("Users:", users);
    process.exit();
}

readUsers();
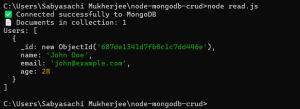
The above code reuses the app.js connection details to connect to the MongoDB local server database and read all the users and list them in the console.
Once we run the above read.js file, we should see the following output:
Update a document
Next, we will try to update the same user we just created. For that, we will again create a new file called update.js using the following command:
echo. > update.js
and open the newly created file in a common text editor and paste the following contents inside:
const connectToDB = require('./app');
const { ObjectId } = require('mongodb');
const readline = require('readline');

const rl = readline.createInterface({
    input: process.stdin,
    output: process.stdout
});

rl.question("Enter the user ObjectId to update: ", (userId) => {
    rl.close();

    if (!userId || userId.length !== 24) {
        console.error("❌ Invalid ObjectId.");
        process.exit(1);
    }

    updateUser(userId);
});

async function updateUser(id) {
    const dbConnection = await connectToDB();
    if (!dbConnection) return;

    const { collection, client } = dbConnection;

    try {
        const result = await collection.updateOne(
            { _id: new ObjectId(id) },
            {
                $set: {
                    email: "john.doe.updated@example.com",
                    age: 35
                }
            }
        );

        if (result.modifiedCount > 0) {
            console.log("✅ User updated successfully.");
        } else {
            console.log("ℹ️ No user was updated.");
        }
    } catch (err) {
        console.error("❌ Error updating user:", err);
    } finally {
        await client.close();
        console.log("🔌 MongoDB connection closed");
    }
}
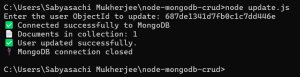
The above file updates the email address and the age of the user for the userid that will be passed in during the execution. Once we save and run the file, it will prompt for the user id which when provided, the email and age will be updated.
Delete a document
To delete a document, we will create a new JS file named delete.js using the same command and paste the following contents inside it:
const connectToDB = require('./app');
const { ObjectId } = require('mongodb');

// Get user ID from command line argument
const userId = process.argv[2];

if (!userId || userId.length !== 24) {
    console.error("❌ Please provide a valid 24-character ObjectId as an argument.");
    console.error("👉 Example: node delete.js 687de1341d7fb0c1c7dd446e");
    process.exit(1);
}

async function deleteUser(id) {
    const dbConnection = await connectToDB();
    if (!dbConnection) return;

    const { collection, client } = dbConnection;

    try {
        const result = await collection.deleteOne({ _id: new ObjectId(id) });

        if (result.deletedCount === 1) {
            console.log("✅ User deleted successfully.");
        } else {
            console.log("ℹ️ No user found with that ID.");
        }
    } catch (err) {
        console.error("❌ Error deleting user:", err);
    } finally {
        await client.close();
        console.log("🔌 MongoDB connection closed");
    }
}

deleteUser(userId);
The above code deletes a specific user by the user id mentioned as a 2nd parameter in the command line argument. We will save the file and run it to see the following output:
![]()
Conclusion
We have seen how we can install node js in our local windows machine and also connect to MongoDB and perform basic CRUD operations using Node JS.