The Problem
The performance and stability of the storage layer is extremely critical for large databases, especially when the data size has grown to terabytes. When there is a shared storage among multiple servers, the storage layer can be upgraded without touching the servers. In such a situation one of the challenging tasks is moving the databases to the new storage. Due to the enormous size of the database, it usually takes several hours to copy the database files, which requires several hours of downtime. In this article I will be discussing how to minimize the downtime for larger databases during a storage migration.
How this is done for a small database
Generally, If the databases are small, following simple steps are followed to migrate the databases.
- Attach the new storage to the SQL Server instance with different drive letters of mount points.
- Stop the SQL Server Service.
- Copy the data files to the new disks with the same directory structure.
- Swap the disks and start the SQL Server Service.
This same process can be followed to migrate a list of databases on the SQL instance, including system databases.
How this can be done for a large database
As I described earlier, if the databases are large, the time it takes to copy files (step 3 above) is larger, and hence, the required downtime window will be large. To reduce this, we can use SQL Server Log Shipping to reduce the downtime. This section will describe how this works.
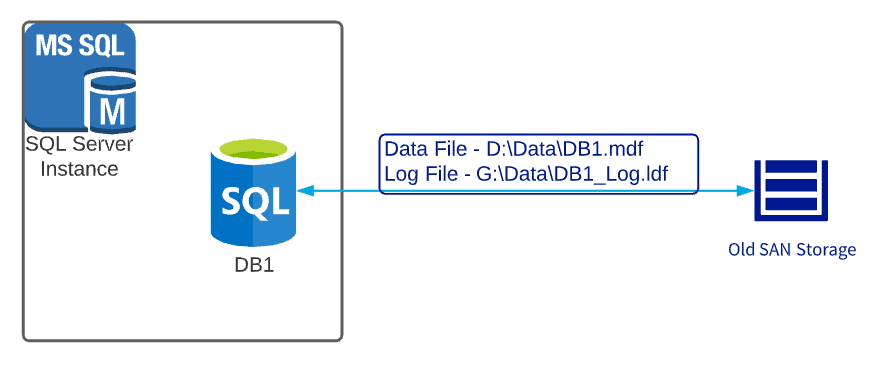
The below image shows the initial setup of the database.

Figure 1: Original setup of the database “DB1”.
Before you begin a migration, there are a few tasks to complete. The pre-downtime tasks are listed below:
- Attach the new storage to the SQL Server instance with different drive letters or mount points.
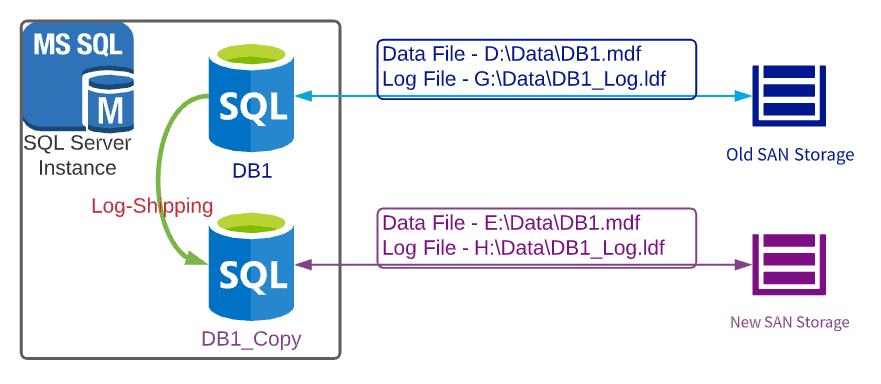
- Take a full backup of the large database (“DB1”) and restore it in the same SQL instance with a different name (“DB1_Copy”)
- The recovery mode should be “No Recovery”.
- The data and log files of the new database should reside in the new storage disks with same directory structure as the original database.
- During the restoration, it is a good idea to name the data and log files as same as the original database data and log file names
- Setup Log-Shipping from “DB1” to “DB1_Copy”. The below diagram shows the new setup of the database instance.

Figure 2: Setup after setting up Log-Shipping from “DB1” to “DB1_Copy”.
Now, you need to let the Log Shipping to run until the planned downtime window starts. Once the downtime window starts, follow the below steps.
Tasks during the downtime window
Once you have downtime, you need to ensure these items are completed:
- Restore final log backup
- Stop the Log Shipping
- Set the recovery mode of the DB1_Copy database to Recovery. Make sure to set the “KEEP REPLICATION” setting, if this database is a replicated database (either publisher or subscriber)
- Now stop the SQL Server service
- swap the disk drive letters and start the SQL Server service.
- Remove D, E, G and H drives from the cluster
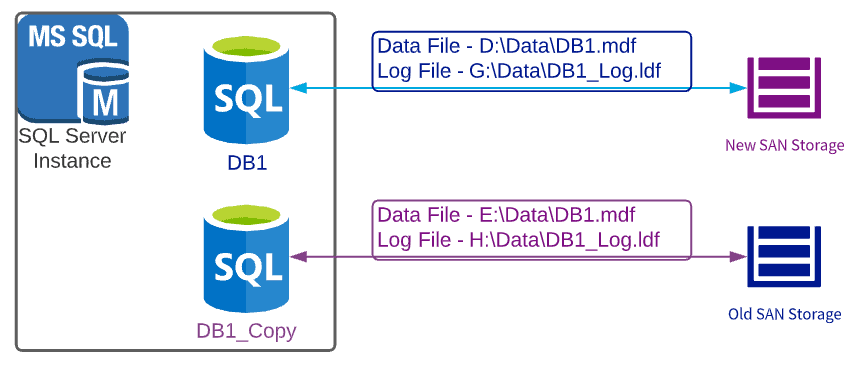
- Using my images, I did the following: re-attach the old E: drive as the D: drive, the old H: drive as the G: drive. I also set the old D: drive as the E: drive and the old G: drive as H: drive.
The setup of the SQL instance will look like the image below at this stage

Figure 3: Setup after swapping the disks on SAN.
At this point, the original database, DB1, points to the data and log files that reside in new storage device while the other database, DB1_Copy points to the data and log files that reside on the old storage. Now verify that the databases are working fine and if all looks good, confirm the end of the downtime window.
To rollback, just follow same steps to swap the disks back.
If your databases and application(s) are working fine, it is possible to drop, detach, or even keep the “DB1_Copy” database as necessary.
Conclusion
Using this method, it required only about 30 minutes of downtime to migrate the storage of our large databases. Assuming your log restore is quick, you should be able to minimize your downtime window. This is a great saving compared to 4+ hours of coping time to copy a data file of 4TB in the environment I tested.


