

Introduction
This article explores a very common construct in standard SQL and Transact-SQL - the SQL Server Update Statement. The standard SQL language as defined in the original standard is composed of just a few declarative commands. SQL is described as a declarative language because you tell the database engine what to do but not how to do it. Incidentally, SQL commands are English-like making it easy to guess what each command does.
In this article, we shall focus on just one of these commands – UPDATE. UPDATE statements are used to change the value in the table by specifying the column name and restricting the set of rows to be updated.
Understanding the SQL Update Statement
To update records in a table, the SQL Server Update Statement specifies the table name, the column name and the new value to introduce at the minimum. The syntax is shown below:
UPDATE <table_name> SET <column_name> = ‘new_value’;
The SQL statement removes the existing value in the column specified and replaces it with the new value. In practice, an UPDATE statement is executed every time you make changes to data already existing in an application if that application uses a relational database in the back end. For example, you login to your CRM system to provide the new phone number or address of an existing customer.
Updating Single Columns
To demonstrate the tasks, we are going to do in this article, we shall use a simple table with the data shown in Figure 1.
-- Listing 1: Reviewing Production.Product

USE AdventureWorks

GO

SELECT

 ProductID

 ,[Name]

 ,ProductID

 ,SafetyStockLevel

 ,Color

 FROM Production.Product;
Figure 1 shows a subset of the result set from the query above.
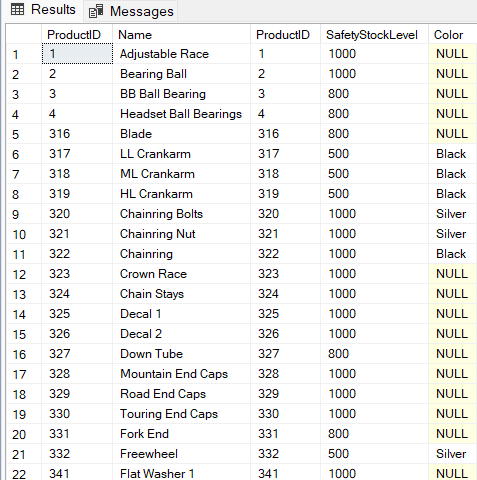
Fig. 1 Subset of Listing 1 Result SetTo update a single column using the UPDATE command, we execute the equivalent of the statement we highlighted in the previous section. This statement updates all rows in the column specified. We shall illustrate this using the dbo.Product table shown in Listing 1:
 -- Listing 2: Update StockCount Column

USE AdventureWorks

GO

UPDATE Production.Product

  SET SafetyStockLevel = 2500;

GO

SELECT

 ProductID

 ,[Name]

 ,ProductID

 ,SafetyStockLevel

 ,Color

 FROM Production.Product;
Notice that in the image below, all the rows have the same value.
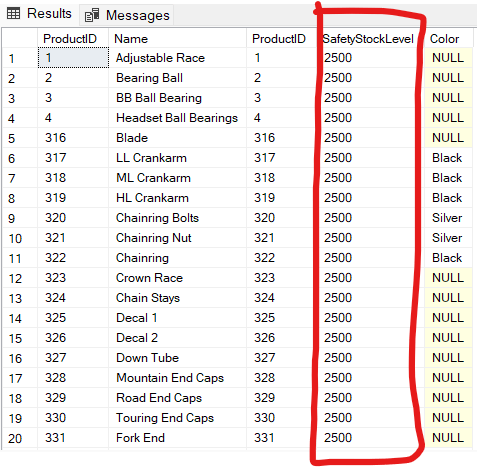
Figure 2: Subset of Listing 2 Result Set, Update Applied
Updating Multiple Columns
We shall repeat a similar UPDATE statement with the same table Production.Product. This time we will update two columns in one statement. We will also encapsulate the statement in a transaction, so we preserve the table as it is by rolling back our statement.
The reader can leader more about transactions in this Microsoft Article. In summary, using transactions implies that the database engine captures a point at which the data involved in the transaction is consistent. Using changes recorded in the transaction log, the engine can revert to that point. By explicit issuing BEGIN TRAN in the SQL code, a COMMIT is required to persist the changes in the database and a ROLLBACK can be issued to get back to a consistent point. Consistency and other ACID properties of relational database transactions are discussed in this article and this article.
 -- Listing 3: Update StockCount and Colour Column

USE AdventureWorks

GO

BEGIN TRAN

UPDATE Production.Product

  SET SafetyStockLevel = 3000, Color = 'Red';

GO

SELECT

 ProductID

 ,[Name]

 ,ProductID

 ,SafetyStockLevel

 ,Color

 FROM Production.Product;

ROLLBACK;
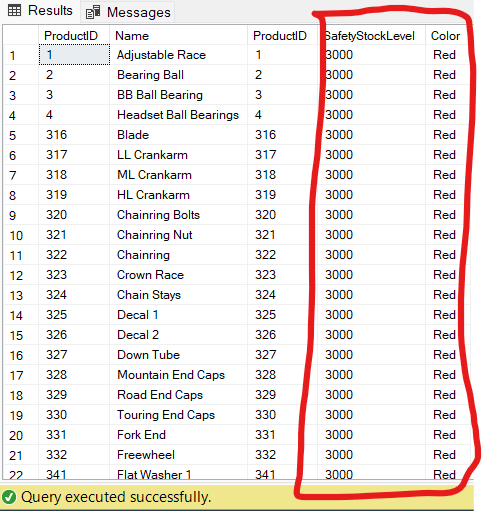
Figure 3: Subset of Listing 3 Result Set, Update Two ColumnsObserve that two columns are updated by issuing one T-SQL statement – the SafetyStockLevel and Color columns. We could extend this to more columns. In SQL Server 2022, you can include up to 4096 columns in an UPDATE statement. Here's an example updating three columns.
-- Listing 4: Update Three Columns - StockCount, Colour and ProductName


USE AdventureWorks

GO

BEGIN TRAN


DECLARE @getdatenow datetime

SET @getdatenow = GETDATE()


UPDATE Production.Product

   SET SafetyStockLevel = 4000, Color = 'Blue', [ModifiedDate] = @getdatenow;

GO


SELECT

 ProductID

 ,[Name]

 ,ProductID

 ,SafetyStockLevel

 ,Color

 ,[ModifiedDate]

FROM Production.Product;


ROLLBACK;
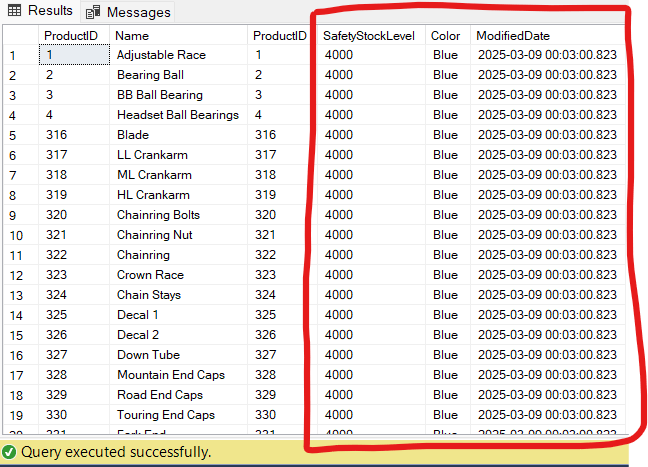
Figure 4: Subset of Listing 4 Result Set, Update Three Columns
The Role of the WHERE Clause in an Update Query
Introducing a WHERE clause limits the number of rows that are updated. In all flavors T-SQL, the WHERE clause is used as a filter. The database engine would typically execute a T-SQL statement with a WHERE clause by invoking an execution plan that includes the use of an index seek or scan if the required index exists. The syntax of the query in Listing 4 is modified as follows when we introduce a WHERE clause:
-- Listing 5: Update Columns with a WHERE Clause

USE AdventureWorks

GO

BEGIN TRAN


UPDATE dbo.Product

  SET StockCount = 4000, Colour = 'Blue', ProductName = 'Spanner'

  WHERE ProductID = 1;

GO


SELECT

 ProductID

 ,ProductName

 ,ProductCode

 ,StockCount

 ,Colour

 FROM dbo.Product;

ROLLBACK;
A WHERE clause ensures we do not update all rows in the table if we really do not want to. In practice it is not likely that you want to update all rows in a table in a single statement so the WHERE clause is very important to ensure you do not issue unwanted UPDATEs. The WHERE clause is the second step in the order of execution for SQL statements. The engine retrieves records from the table specified and then filters out unwanted records based on the predicate. A predicate is an expression that evaluates to TRUE or FALSE and typical sits after the WHERE key word (or after a HAVING key word as the case may be).
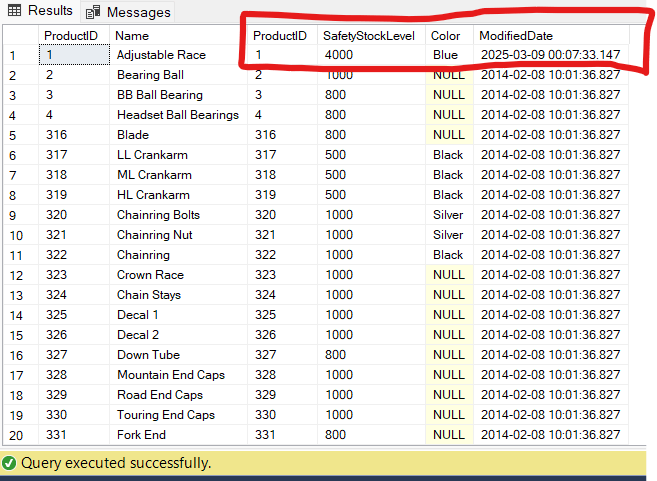
Figure 5: Updating a Single Row
Advanced Usage of the SQL Update Statement
We can use a subquery to UPDATE data in Table T1 with data from Table T2. In the illustration shown in Listing 6, T1 is Production.Product while T2 is Production.ProductInventory. We use the subquery in the parenthesis to isolate a single value from the dbo.ProductInventory table, which we introduce in the dba.Product table. In the real world, it only makes sense that there exists some relationship between these two tables otherwise such an update might be meaningless.
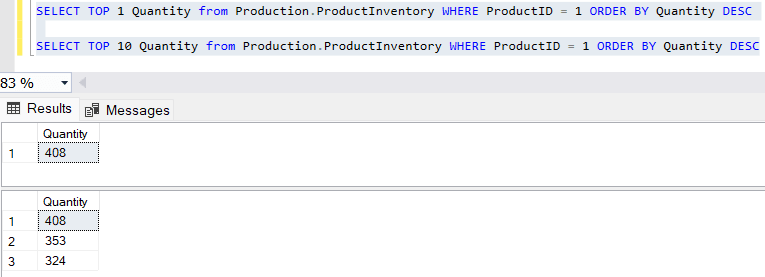
Observe that the subquery also has a WHERE clause and an ORDER BY clause which helps to narrow down the result set to one value relevant to the parent statement. The WHERE clause ensures we are picking up the Quantity associated with the ProductID 1 and the ORDER BY clause (DESC) ensures we are picking the highest Quantity associated with ProductID 1.
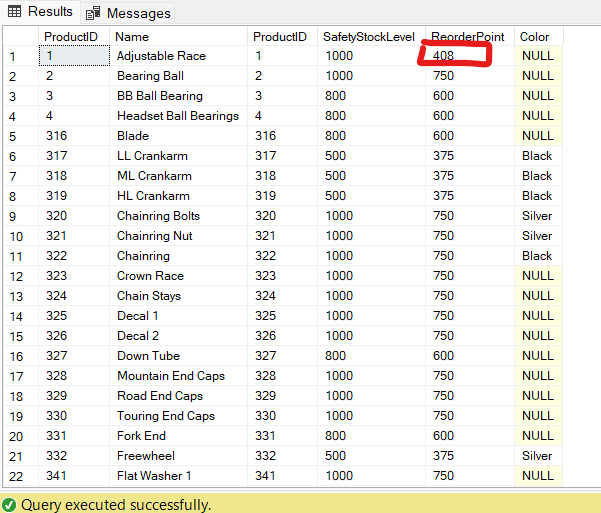
-- Listing 6: Update Columns with Data from Another Table

USE AdventureWorks

GO

BEGIN TRAN


UPDATE Production.Product

 SET ReorderPoint = (SELECT TOP 1 Quantity from Production.ProductInventory WHERE ProductID = 1 ORDER BY Quantity DESC)

 WHERE ProductID = 1;

GO


SELECT

 ProductID

 ,[Name]

 ,ProductID

 ,SafetyStockLevel

 ,ReorderPoint

 ,Color

 FROM Production.Product;

ROLLBACK;
Figure 6 shows us the exact value we are dealing with - 408. We can confirm that we have done the correct update by querying the Production.ProductInventory table (see Figure 7).
SQL Server Update Statement - Common Mistakes
This section highlights a few errors that may occur when working with update statement in SQL Server Management Studio. This is not an exhaustive list but if you have been working with SQL Server for a while, you may be familiar with these problems.
1. Excluding a WHERE Clause
We have already highlighted the effect of omitting a WHERE clause when issuing an UPDATE command. Doing this will update all rows in the column specified in your UPDATE statement. Fixing the resulting problem may require going through a recovery process with a backup set since, by default, the transaction is immediately committed.
To avoid executing such unconditional updates inadvertently it may help to wrap your update (and other DML) statements in transactions or enable SET IMPLICIT TRANSACTIONS at session level (see Listing 8). This ensure a COMMIT is requiremd for each DML and gives you the opportunity to rollback if need be. This may be a life saver in production environments and should be useful for more sensitive work. DBAs familiar with Oracle Databases know that a rollback can be a life-saving command.
-- Listing 8: Enabling Implicit Transactions

SELECT

CASE

WHEN @@OPTIONS & 2 = 2 THEN 'ON'

ELSE 'OFF'

END AS ImplicitTransactionsStatus;


SET IMPLICIT_TRANSACTIONS ON;


SELECT

CASE

WHEN @@OPTIONS & 2 = 2 THEN 'ON'

ELSE 'OFF'

END AS ImplicitTransactionsStatus;
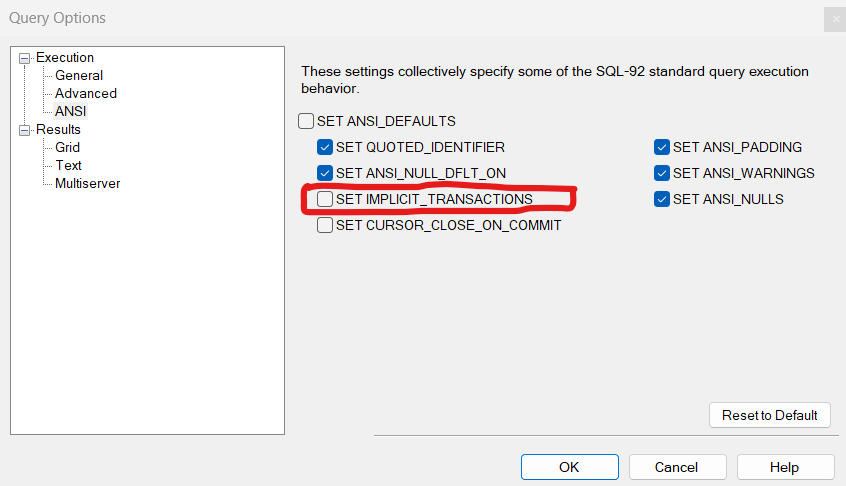
SET IMPLICIT TRANSACTIONS is disabled by default in the SSMS environment. This means when you execute a T-SQL statement, it is automatically committed. This is largely an issue of convenience. If you enable SET IMPLICIT TRANSACTIONS, you will need to issue a commit or rollback for every DML statement - safe but inconvenient. Figure 8 shows the option to Enable SET IMPLICIT TRANSTIONS in your SSMS environment - this impacts all sessions.
2. Leaving Transactions Open
The option of enabling IMPLICIT TRANSACTION in SQL Server Management Studio (SSMS) opens up another loophole for errors. Forgeting to issue the COMMIT command on one query window and then attempt to issue an UPDATE STATEMENT on a table which is part of an open transaction in another query window leads to locks. This is even more profound if it happens in application code.
Avoiding this problem begins with being careful about reviewing code. Being meticulous can be a valuable skill for DBAs. In these days of Generative AI, you may also want to explore validation. Microsoft provides AI-powered SQL validation and assistance features using Copilot in more modern platforms such as Fabric. Devart's dbForge Studio for SQL Server supports comes with a full SQL debugger. Microsoft SQL Server 2025 also promises to ship with AI-assisted coding and validation.
3. Swapping the Column and Tables to UPDATE
The syntax of the UPDATE statement implies that one is updating a table and changing the value of a column in that table. It may be intuitive to some to think that the task is to update a column this issuing UPDATE <column> SET <table> = <value>, This would be the wrong syntax.
Conclusion
The UPDATE statement is a very common T-SQL command used to modify rows in an existing database table or similar structures. The UPDATE command can be used with WHERE clauses, HAVING clauses, JOINS and so forth. WHERE clause predicates can help reduce the probability of updating rows unintentionally. Using an equivalent SELECT statement or explicit transactions can also mitigate the impact of errors resulting from unintended updates.
Most developers and data experts who work with SQL Server use SQL Server Management Studio. However, other tools exist that can help manage issues such as explicit transactions and syntax correction more easily. Devart’s dbForge Studio for SQL Server is worth exploring.
REFERENCES
