

An important part of any report is formatting, to both ensure that it is easily readable but also that key information can be quickly and easily identified. In this article I'll be covering how you can change the formatting of a cell in a tablix or matrix based on it's value, or other values in the row, just like you are likely already accustomed to in Microsoft Excel.
I'm going to start off with the base template SSRS uses in Visual Studio 2017. This is quite a "bland" format, with headings in grey and just horizontal lines in the tablix. The design view therefore looks like this:

And the preview of the the sample data I'm using results in this basic looking report:
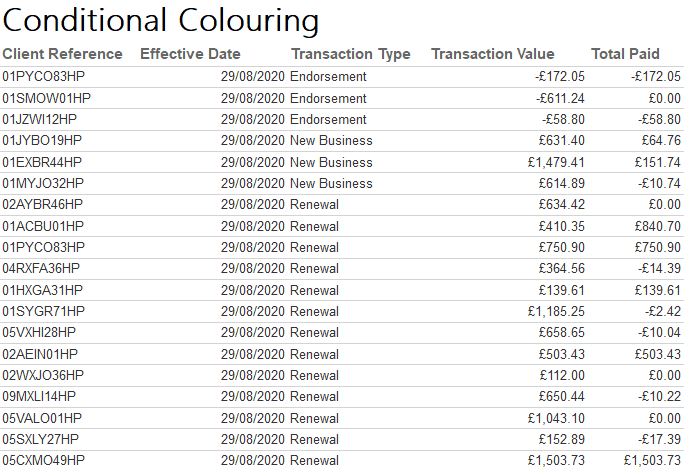
Let's start with changing the formatting on the column Transaction Value, so that the text is red if the value is negative.
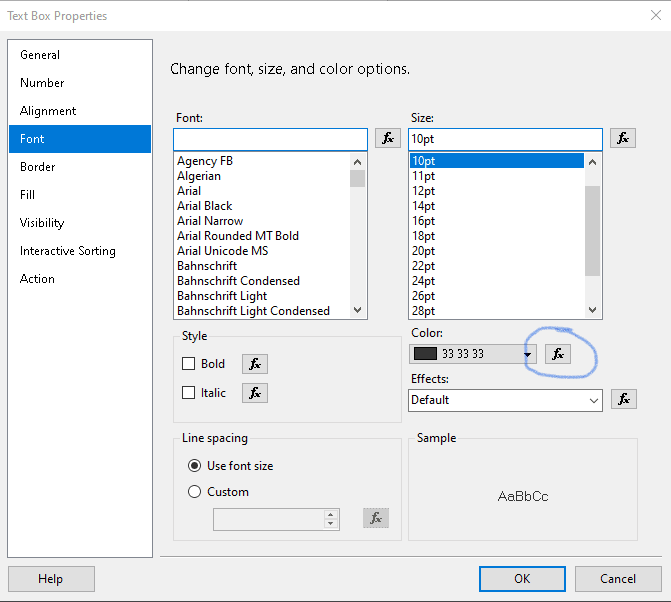
In the design view, within Visual Studio, right click the cell you want to apply the conditional formatting to. In this example, that's the cell with the value "[TransactionValue]". Then select "Text Box Properties" in the dialogue window. We want to change the colour of the font here, so select the Font Pane, and then click the fx button to the right of the Color drop down, as highlighted below:
This will open up the Expression window, which is where we'll be defining our conditional formatting. We need to define colours for both when the value is negative and not. I'm going to use the report's default colour for when the value isn't negative, which is #333333. SSRS Expressions are quite similar to VB expressions, and what we need here is an inline if, followed by the true and false values. We need to reference the field from the dataset as well, which is done in the format "Fields!{FieldName}.Value". This gives us the following expression:
=IIf(Fields!TransactionValue.Value < 0, "Red", "#333333")
Notice you can use both literal names for colours (in this case Red) as well as their hex code. If you're struggling to choose a colour SSRS has an expansive selection, which you can find in the Expressions Window. Select Constants in the Category box at the bottom left of the window, and then "More colors..." on the right. You'll be presented a huge palette of inbuilt colours, as well has the option of inputting you're own RGB or HSB values. Once you've chosen your colours, and entered a valid expression, click OK and you'll then notice that the value in the Color drop down menu has changed to "«Expr»". We can then preview the report to check that the expression is working:
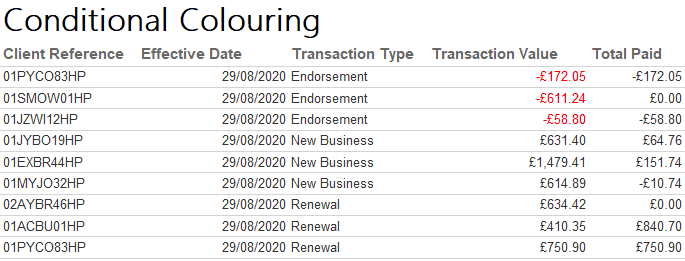
Now we can quickly identify transactions that have a negative value.
Comparing columns to others
Let's now take a look at the "Total Paid" column. Let's say that we want to colour the font in a green when the value is the same as "Transaction Value", Amber when it is part paid (greater than zero, less than Transaction Value) and red otherwise. We have a couple of parts to do here, first we need to instead compare the value of "Total Paid" to "Transaction Value", but also we have more than 2 results. I'm going to use a couple of nested IIf functions for this.
Again, open up the Expression Window for the Text Box's Font Color setting. As we have a couple of IIf expressions, then we need to ensure we get the order of these clauses in the right order, just like when writing a CASE expression in T-SQL. Only the value for the first IIf that returns True will be returned, so even if a latter expression would be true as well, if a prior one is true, then the latter true result won't be returned. With this in mind, we can use the following expression:
=IIf(Fields!TransactionValue.Value = Fields!TotalPaid.Value, "ForestGreen", IIf(Fields!TotalPaid.Value > 0, "Orange", "Red"))
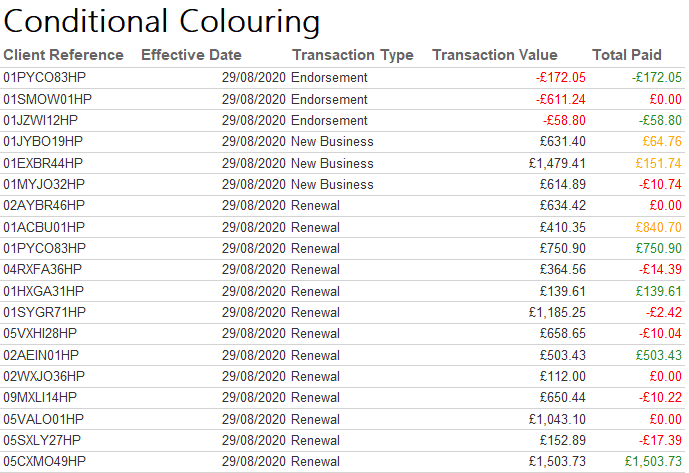
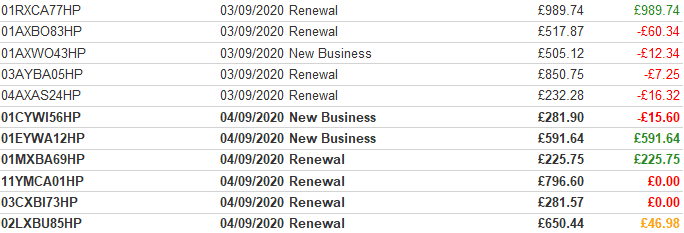
The first comparison is between the Transaction's Value and the Total Paid, which colours the font a green colour if true. This will include both the transactions that have a negative and positive value, such as the first value of Total Paid, which is negative, but also the same value as "Transaction Value". Secondly, we then check if the Paid value of greater than 0, and colour the font orange. As mentioned, this will not change the colour of the cell if it's already been coloured green, where the Paid and Transaction values are the same, as the second IIf will only be evaluated if the prior IIf returned False. Finally, if both IIf's evaluated to False, then the font will be coloured red.
Again, we can validate if this works by previewing the report:
Changing other settings
It's not just the colour of the font that you can change. Almost anything can be customised. When looking at the Text Box properties you will have noticed that many of the options had a fx button adjacent to it, denoting that the value of the properly can be set using an expression. Some can still be customised even if they don't, using the properties pane. For example, we might want to make rows which have today's date for "Effective Date" in bold.
As we'll effecting a row, we're going to use a slightly different process. In the Design view, select all the cells for a particular row, and then press F4 on your keyboard. This will take you to the Properties Pane. As we're effecting the font's weight (making it bold) locate and expand the Font option, and find the Font Weight option, click the drop down and select <expression...>. I demonstrate this below:
The expression box we have now will effect all the previously selected cells. As we want to change the font to bold then when the value is today, we need to compare the value of "EffectiveDate", and we can use the function "Today()" to get today's date. You'll also notice that the values in Constants now give you a full list of the different weights, rather than colours as it did when we were editing the font's color setting. We can therefore use the following expression to achieve our goal:
=IIf(Fields!EffectiveDate.Value = Today(), "Bold", "Normal")
Click OK, and then we can again preview our report to check it worked:
Note that when using the Properties pane, some settings are not displayed when you have multiple cells are selected or you have multiple cells selected with different settings. If a setting is available, but the cells have different settings, the value will be shown as blank but will not be changed unless you amend the value.
The Sky's the Limit
You can continue to customise your cells however you want, and it doesn't just have to be the font. For example, you can change the background colour, by setting a custom setting in the Fill Color Setting (labelled as BackgroundColor in the properties pane for a lack of consistency). Even things like the formatting of the text and the alignment of the cell can be changed using expressions.
You aren't just limited to using an IIf either. When you have the Expression window open, you can see a full list of all the functions available within SSRS Expressions. In addition for the IIf you have Choose (which operates identically to the T-SQL CHOOSE function) as well as a Switch function; which we could have use previously instead of the nested IIfs like below:
=Switch(Fields!TransactionValue.Value = Fields!TotalPaid.Value, "ForestGreen", Fields!TotalPaid.Value > 0, "Orange", True, "Red")
The Switch function has no "Else" option, so I use a literal True at the end, which will force "Red" to be returned if neither of the prior functions returned True.
For very complex expressions, which might be difficult or cumbersome to evaluate in an SSRS Expression, you can also use T-SQL to "help" SSRS. For example, you might decide to add a column in your dataset, which you don't display in the report, which returns different colours. You can then use the value of the column in the SSRS Expression instead. For example, let's say you want to use T-SQL to determine the background colour based on the date:
CASE WHEN EffectiveDate < CONVERT(date,GETDATE()) THEN '#888888'
     WHEN EffectiveDate = CONVERT(date, GETDATE()) THEN '#AAAAAA'
     ELSE '#CCCCCC'
END AS FillColour
You can then simply change the value for the cell's fill color setting to "=Fields!FillColour.Value" and it will use the value of the colour for that row for the setting.