

Introduction
Azure provides different storage solutions that enterprises can use. This article will go through how we can use two main features of Azure Storage – Azure Files and Azure Blobs. Azure Files typically can be used to replace an enterprise’s on-prem file server or NAS devices. We can mount Azure Files on a cloud or on-prem VM. Azure Blob can be used where a vast amount of data needs to be stored and accessed. As the usage and cost are different for both types of storage, they should be used judiciously. The Introduction to the core Azure Storage services describes these features in more detail.
There two scenarios we will be discussing in this article are:
An application needs to store files in a shared location for further processing
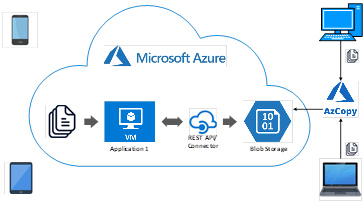
Application 1 receives many data/files from multiple sources and stores these files in a shared location. This location needs to be in the cloud (Azure Storage) and is replacing the organization’s current NAS device. Application 2 polls on this shared location, and once any files are found, initiates workflow to process these files further. The requirement is to store files in such a way that the files can be accessed from anywhere using the SMB protocol.
A large set of data and content needs to be stored in inexpensive cloud storage
There is a content management solution that an organization wants to move to the cloud. The storage also needs to be moved from expensive on-premises NAS storage to inexpensive cloud storage. Data files, media files, and document files are huge in size and must be saved for archival purposes. We need to design a solution in such a way that files can be moved from multiple sources to inexpensive cloud storage and migrate the on-prem content to cloud storage.
Azure File Storage (AFS)
Using this storage option, we can achieve the requirements stated in the first scenario. Azure Files helps provide enterprises with a high-performing and highly available network file shares (NFS) solution. These shares are provided as a drive that can then be mounted on an Application 1 VM.
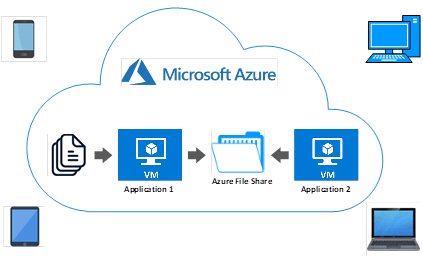
The diagram below shows that files are being received from multiple sources by Application 1. Application 1 has an Azure file share as a mapped drive and stores all these received files in this share. Application 2 VM also shares the same Azure file share, and once a file is received in the share, Application 2 can further initiate a business transaction. This article aims not to show what Application 2 does with the files but rather how a file is being moved from Application 1 VM to Azure File Share.
The next section will show how we can create Azure file share that a client/ application can use .
Create an Azure Files Storage Account
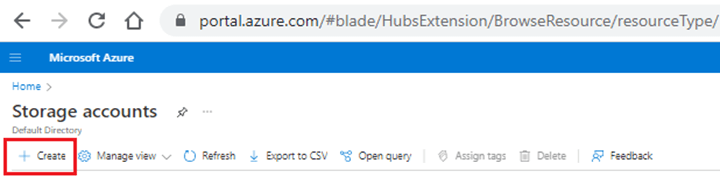
In this section, we will create an Azure File Storage account. We will then see how to add and mount this Azure file share in an Azure VM. First, log on to Azure Portal and click on Storage Accounts from the Azure services.

Click on the “+” button to create a new account.
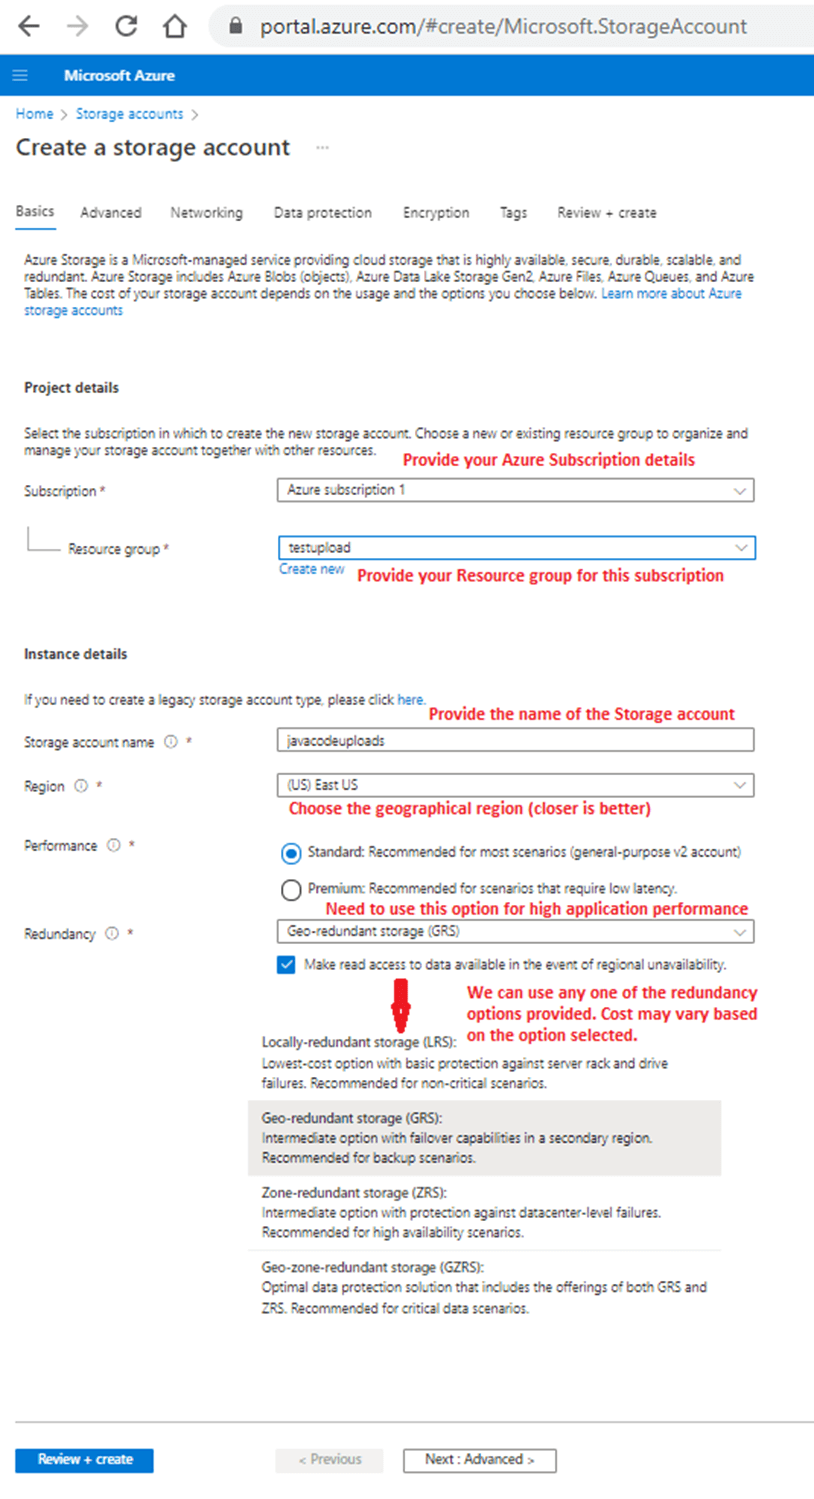
You will be presented with the “Create a storage account” form to fill so that storage account can be deployed. Users should fill out the form based on their subscription. The figure below has been annotated to describe each item that the user needs to fill out. Use options that will be most beneficial yet cost-effective for the business/ application.
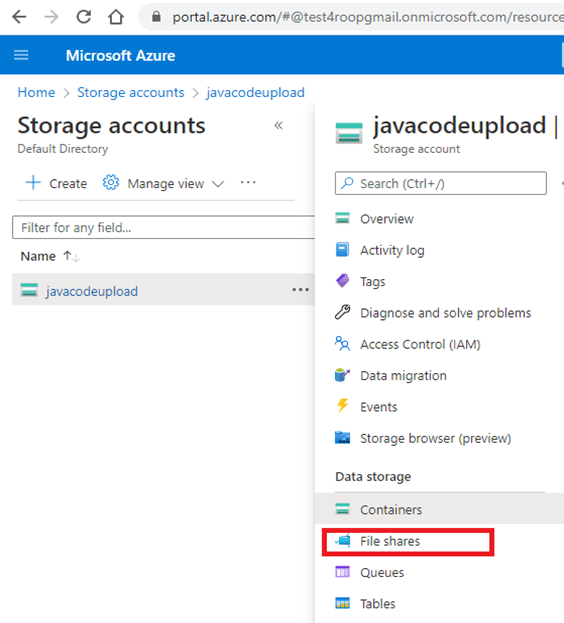
After making all the required configuration settings for the storage account, click the Review + create button. The system will ask you to review your settings. Once reviewed, you can click on the Create button. Since I provided “javacodeupload” as a storage account name, Azure created this storage account, showing this name at the top of the main detail page.
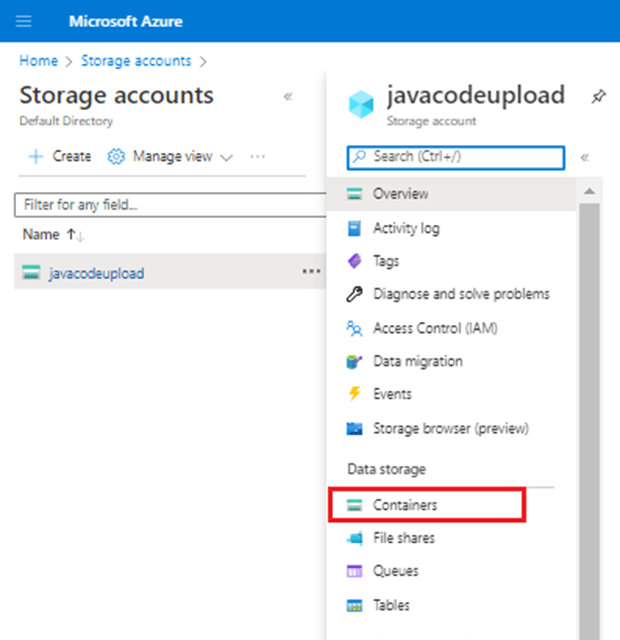
Now we are ready to create the Azure File Share. Since File Share is a feature of Azure Storage, we need to log on to Storage account and click on File shares under the Data storage section.
Once under File shares, click + to deploy a new file share. Provide a share name and tier that you want to use. Once we click on Create, Azure will deploy and generate a new file share.
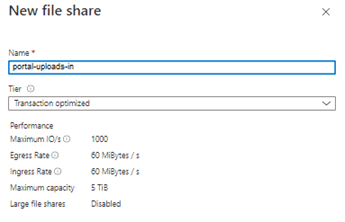
The details of the different Tier types are:
| Tier | Description |
| Premium | Premium file shares enable highly I/O-intensive workloads, with high throughput and low latency. Premium file shares are offered on high-performance solid-state drive (SSD) based storage. |
| Transaction optimized | Transaction optimized file shares enable transaction heavy workloads that don’t need the latency offered by premium file shares with consistent latency. Transaction optimized file shares are a great fit for applications that require file storage or for backend storage. |
| Hot | Hot file shares offer storage optimized for general purpose file sharing scenarios such as team shares and Azure File Sync. |
| Cool | Cool file shares offer cost-efficient storage optimized for online archive storage scenarios. Azure File Sync may also be a good fit for lower churn workloads. |
Source: Azure File Pricing
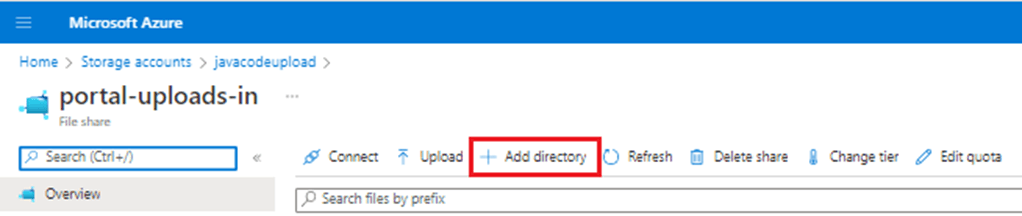
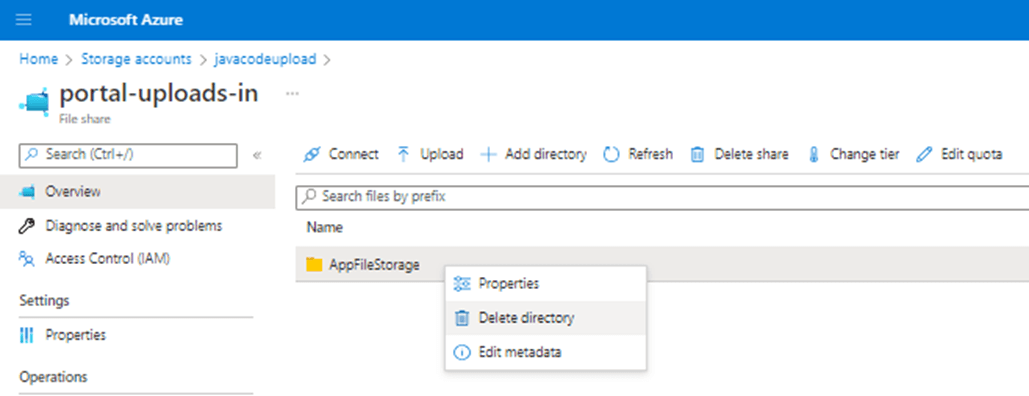
To create a directory under our Azure file share, click on + Add directory as shown below.We successfully created the Azure File Share, portal-uploads-in. However, before we start using this share, let’s create a directory under this share. It's a good practice not to store files directly at the share's root. We can also segregate different application data in different directories under one Azure file share.
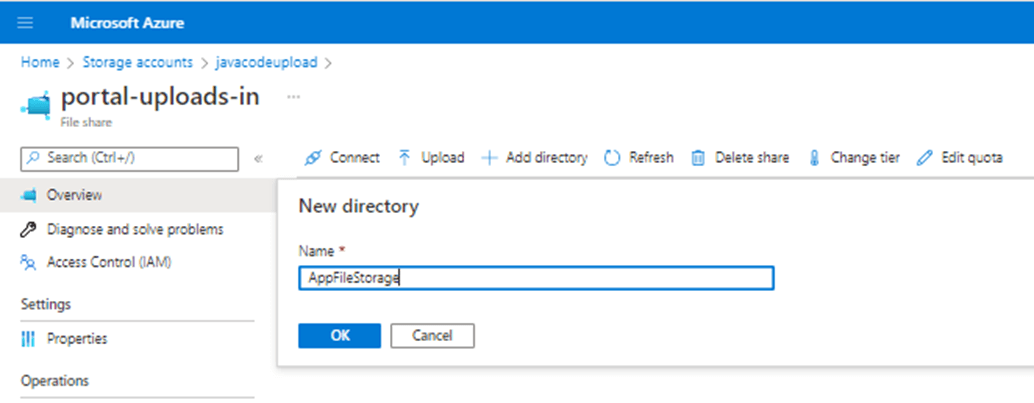
Provide the name of the directory you want to create and click on OK.
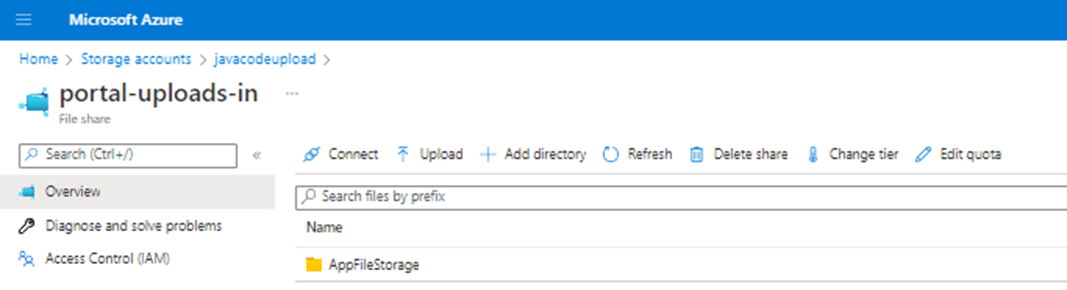
Azure deployed the “AppFileStorage” directory, and it is now ready for use.
We can look at the properties, edit metadata, or even delete this directory if it is not required. We must make sure the directory is empty before deleting it.
Here is a list of some of the parameters that will be useful in the future when mapping this Azure File share:
| Parameter | Example | Path |
| File Share name | portal-uploads-in | \\javacodeupload.file.core.windows.net\portal-uploads-in |
| Directory name | AppFileStorage | \\javacodeupload.file.core.windows.net\portal-uploads-in\AppFileStorage |
| Username | Azure\javacodeupload | |
| Password | Storage Account Access Key | |
| Azure Files URL | portal-uploads-in | https://javacodeupload.file.core.windows.net/portal-uploads-in |
Mapping the Azure File Share
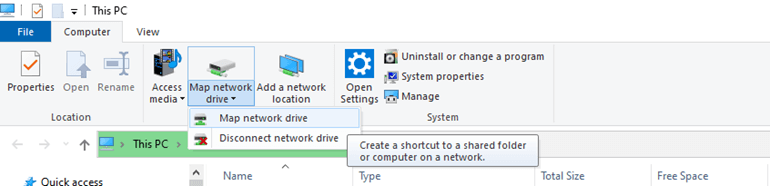
Log on to Azure VM using Remote Desktop Protocol (RDP). Once on Azure VM, we can map the Azure Files share directory. Open “This PC” and click on “Map Network Drive” to map the Azure share to this Azure VM.
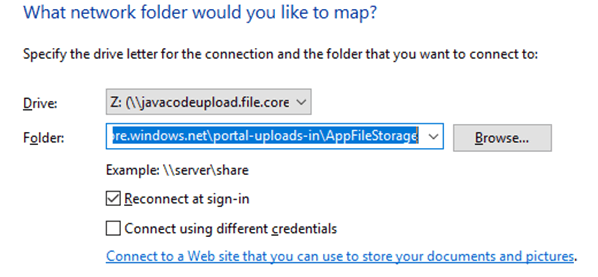
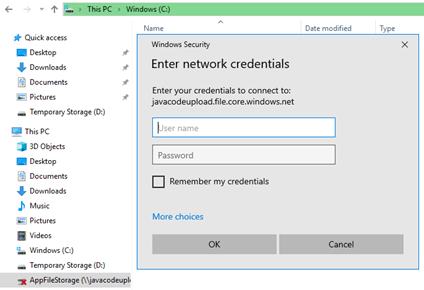
We need to map the directory, AppFileStorage, created under the Azure file share, portal-uploads-in, as mentioned in the previous section. The below figure shows how we can map Azure share to a local drive. We picked the Z drive for this test. Provide the directory name path mentioned in the last section under the folder. Then, click on the checkbox, connect using different credentials.
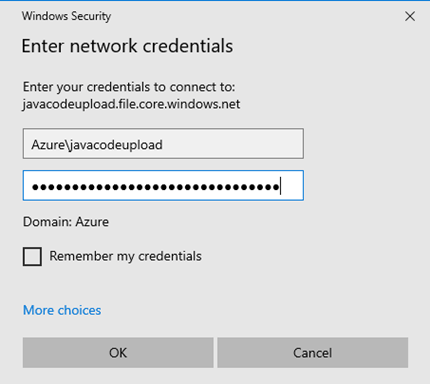
Finally, provide credentials for the share as mentioned in the last section's table to complete the share mapping.
Upload local VM Files to this folder
This section will show how to copy local files from Azure VM to the mapped Z drive, which is nothing but an Azure File share.
First, log on to the VM and pick Z: in the file explorer. We may have to log on to the mapped share, if it asks for credentials. The Azure portal also provides a script that we can use to mount the file share directly to a host. The script will check if the storage account is accessible via TCP port 445. If port 445 is available, the Azure file share will be persistently mounted.
(Source: How to use files)
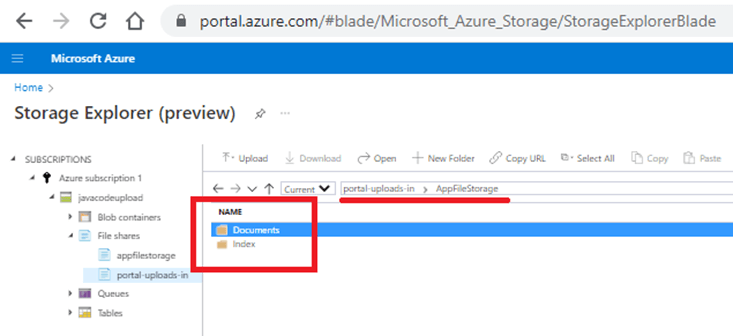
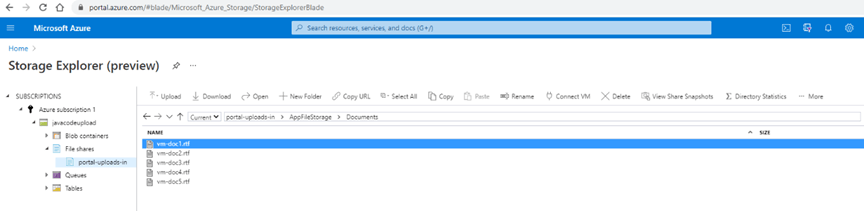
Once in the Z: drive, create subfolders, called “Documents” and “Index”, as you would do on any Windows machine. These subfolders can also be viewed from Azure Storage Explorer.
Create some files in the D: drive of Azure VM for this test.
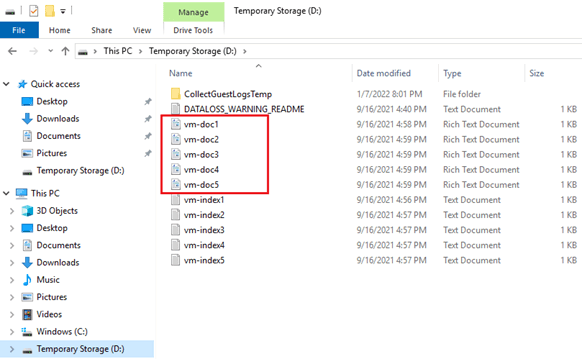
Copy (drag and drop) the local files from the Azure VM’s D: drive to the Azure File share location, AppFileStorage\Documents.
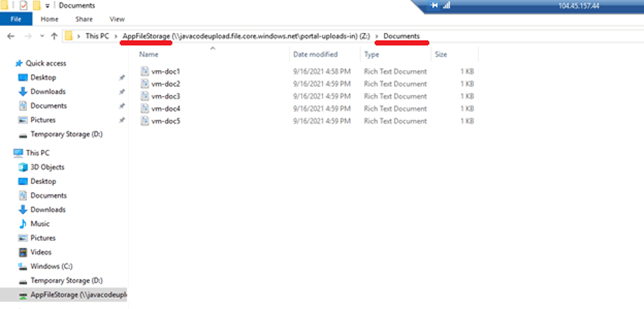
We can see these files copied successfully to the Azure storage container (AFS) from the Azure Storage Explorer. These steps showed how easy it is to use Azure File Storage and access it from Azure Virtual Machines.
Since files are in the Azure fIle share, the Application 2 VM will also see these files, and accessing files residing on the share by Application 2 will be the same as Application 1.
Azure Blob Storage and Data Migration
Using the Azure Blob storage option, we can achieve the requirements stated in scenario 2. An application can receive files from multiple sources and push them to Azure blob storage using REST APIs or the application's connector to Azure Storage. Usually, an enterprise wants to migrate data from on-prem storage to Azure Storage/ container in a cloud migration initiative. This next section will show how we can move data from on-prem NAS storage to Azure Blob Storage using azCopy.
Create an Azure Blob Storage Container
This section will first create the Azure blob storage container under the storage account that we created earlier. We will then generate the Shared Access Signature (SAS) token. Lastly, this exercise will mimic how an enterprise can migrate content residing on their NAS to Azure blob storage.
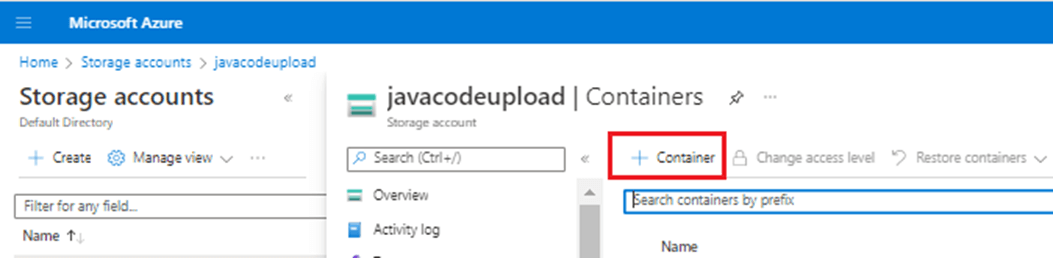
First, log on to the Storage account “javacodeupload”.
Once you click on “Container,” the system takes us to the Containers section. We can now click on + Container to create a new container.
Provide the name and public access level to the container. For this test, let’s set container access level as Blob.
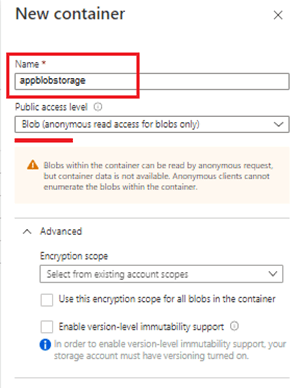
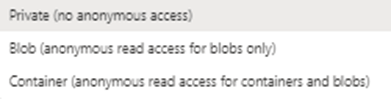
The public access level needs to be set. By default, it is accessed privately only. We are setting it as Blob for this test. Here are the options that we can choose from:
We can select encryption scope to ensure that data stored is encrypted by a specific key scoped to a container or an individual blob. For this test, we are not selecting anything and will go with the default, which sets the storage account files to be encrypted with a key that is scoped to the entire storage account.
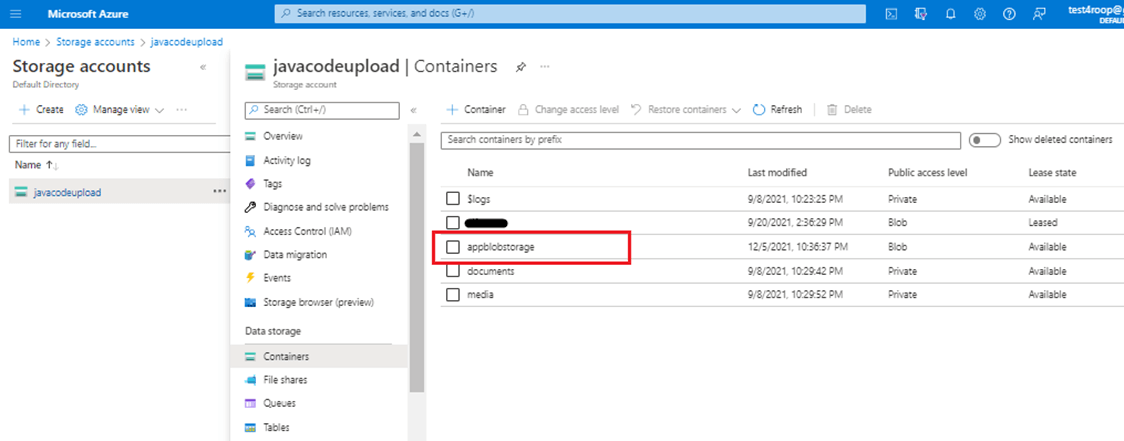
Once we click on Create in the New Container form, the Azure Blob container, appblobstorage, gets deployed and can be seen under Containers.
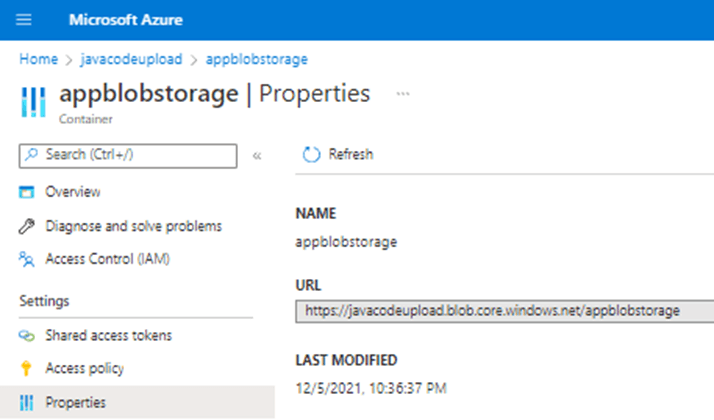
Let's now get the Azure Blob container URL so that we can migrate content to it. Right-click on the appblobstorage container and click on Container properties. The properties page will be opened and will show the URL for the container. The Azure Blob container appblobstorage URL is https://javacodeupload.blob.core.windows.net/appblobstorage/.
Generate the SAS token for blob container
We now need to generate the Shared Access Signature (SAS) token. We need SAS token to generate the destination when migrating content. Go to Storage accounts and then click on Shared access signature under Security + networking.
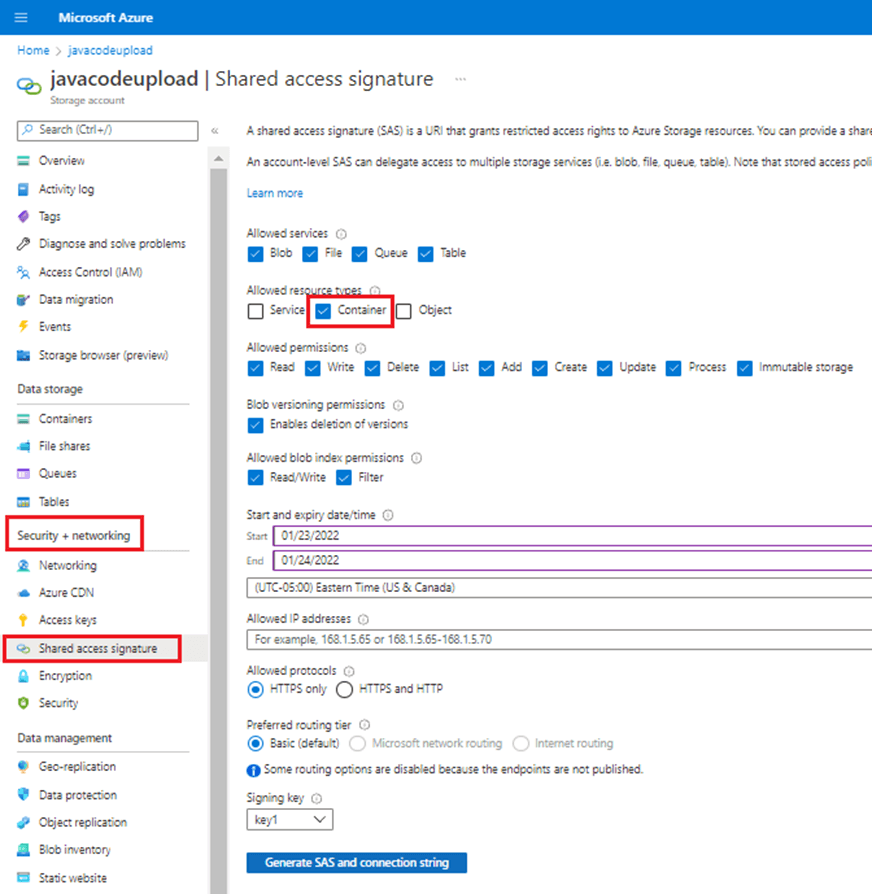
Click on container checkbox under the Allowed resource type. "Generate SAS and connection string" button will be enabled and once you click on it, the SAS token will be generated and displayed as shown below.

The SAS Token something like “?sv=2020-08-04&ss=bfqt&srt=c&sp=rwdlacupitfx&se=2021-12-06T11:37:54Z&st=2021-12-06T03:37:54Z&spr=https&sig=34534”. Please note that your SAS token will be different as your storage account and container will be different.
Migrate data from local storage to Azure blob storage
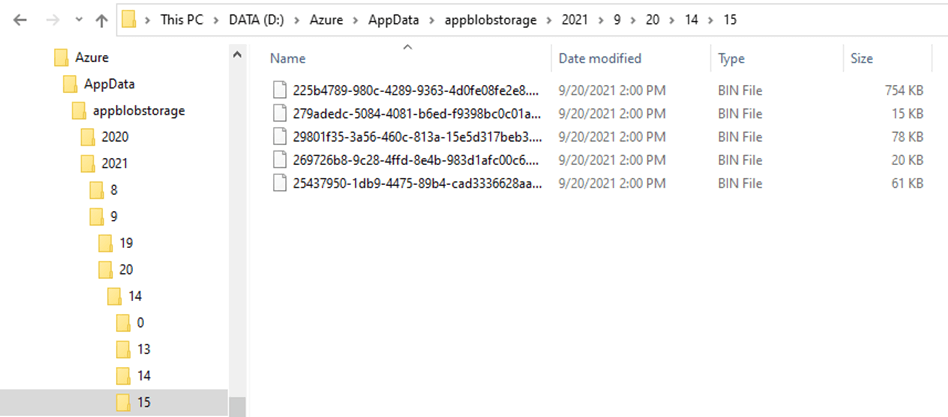
Now we are ready to migrate content from the local machine to the Azure blob storage container. Our system has a hierarchical file system and organizes folders based on Year, Month, Date, Hour, and Minute. There are five files listed in the folders: Year – 2021; Month – 9; Date – 20; Hour – 14; Minute – 15.
We will use the azCopy CLI to migrate content from the local machine to the Azure Blob container. azCopy is a command-line utility provided by Azure that can be used to copy files to or from a storage account. The azCopy Sync command will be used to sync the source and destination locations. Merge the Azure Blob container URL (mentioned in #1 above) with the SAS Token (mentioned in #2 above) to get the destination where we want all our local files to be migrated in Azure. Below are the components of the azCopy command.
| Utility | azcopy.exe |
| Command | sync |
| Source | D:\Azure\AppData\appblobstorage |
| Destination | https://javacodeupload.blob.core.windows.net/appblobstorage/?sv=2020-08-04&ss=bfqt&srt=c&sp=rwdlacupitfx&se=2021-12-06T11:37:54Z&st=2021-12-06T03:37:54Z&spr=https&sig=5oRtvgYCVJfplvJsJYYemBcePGhGUOSIswtb05RX2oM%3D |
We need to start this command with the utility name, azCopy, followed by the "sync" command, which will help sync files between two locations. Then we need to provide the source location from where the files will be synced. Lastly, we need to provide a destination, a complete path of the Azure Blob storage container.
Open the command prompt and go to the location where azCopy has been installed on the machine (C:\Apps\azcopy_windows_amd64_10.12.1). Once in this folder, run azCopy sync command by providing source and destination location.
C:\Apps\azcopy_windows_amd64_10.12.1>azcopy.exe sync "D:\Azure\AppData\appblobstorage" "https://javacodeupload.blob.core.windows.net/appblobstorage/?sv=2020-08-04&ss=bfqt&srt=c&sp=rwdlacupitfx&se=2021-12-06T11:37:54Z&st=2021-12-06T03:37:54Z&spr=https&sig=5oRtvgYCVJfplvJsJYYemBcePGhGUOSIswtb05RX2oM%3D"

INFO: Any empty folders will not be processed, because source and/or destination doesn't have full folder support
Job e5b6ab16-16dd-834e-40f2-8f4a5f34b326 has started
Log file is located at: C:\Users\runiyal\.azcopy\e5b6ab16-16dd-834e-40f2-8f4a5f34b326.log

100.0 %, 59 Done, 0 Failed, 1 Pending, 60 Total, 2-sec Throughput (Mb/s): 13.7331

Job e5b6ab16-16dd-834e-40f2-8f4a5f34b326 Summary
Files Scanned at Source: 60
Files Scanned at Destination: 0
Elapsed Time (Minutes): 0.7351
Number of Copy Transfers for Files: 0
Number of Copy Transfers for Folder Properties: 0
Total Number Of Copy Transfers: 60
Number of Copy Transfers Completed: 60
Number of Copy Transfers Failed: 0
Number of Deletions at Destination: 0
Total Number of Bytes Transferred: 55381100
Total Number of Bytes Enumerated: 0
Final Job Status: Completed
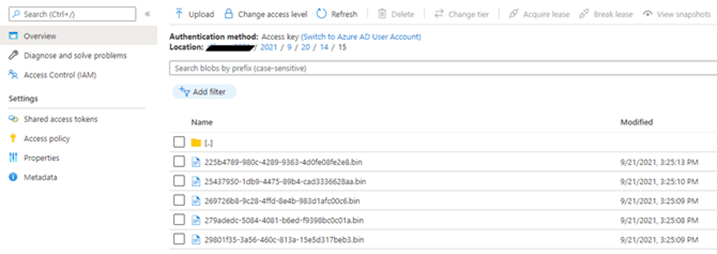
You can now see all these folder/subfolders/files in Azure Blob Storage under the assigned Container, appblobstorage.
Conclusion
It is straightforward to use Azure storage. However, organizations must assess when to use which type of storage. We can map Azure Files and present them as a NAS share. We can quickly create the Azure blob storage and migrate data easily using the azCopy utility apart from other utilities like Azure PowerShell, Import/ Export, or Data Box. In addition, enterprises can easily integrate Azure storage to their application VMs created on Azure or on-prem.
Types of storage that we have not discussed in this document are Azure Disks, Azure Queues, and Azure Tables. In addition, enterprises can use other cloud storage options, like Amazon’s AWS storage services or NetApp's CVO. It depends on enterprises, which cloud storage suits the enterprise’s needs, and can help them during the catastrophic situation. Enterprises are looking at all options to get the best service and low cost while managing their data in the cloud throughout its lifecycle.
Resources
- https://docs.microsoft.com/en-us/azure/storage/common/storage-introduction
- https://www.c-sharpcorner.com/article/setting-up-blob-hierarchies-understanding-blob-storage-part-4/
- https://azure.microsoft.com/en-us/pricing/details/storage/files/
- https://docs.microsoft.com/en-us/azure/storage/common/storage-use-azcopy-optimize
- https://docs.microsoft.com/en-us/azure/storage/common/storage-use-azcopy-v10