

Introduction
Installing SQL Server can be a very boring and time consuming task, especially when you have to repeat the same steps across multiple servers. It not only takes your time, but doing the repetitive things makes it a tiresome activity for any DBA. To avoid doing such repetitive tasks, today we will learn about 'SQL Automate' - A Simple SQL Installer tool which automates entire SQL Installation and Post-Installation process. With SQL Automate you can streamline installation, save time and focus on more important DBA tasks.
Minimum Software Requirements
SQL Automate is a lightweight and simple tool written in PowerShell to simplify and speed up the SQL Installation process. To run SQL Automate, you will need a Windows Machine with PowerShell 5.1 or higher installed
Modules Overview
The various modules are described below.
SQLInstaller - Automating the Installation
The SQLInstallerhandles SQL Server Installation process. It mounts the sql setup files, checks prerequisites, validates parameters from a parameters text file. The installation process is parameter driven, it requires a text file containing details like sql setup path, data directories file path, sql collation type, installer mode, etc. You can choose between two installation modes: SQLDBEngine (for Database Engine only) and SQLSuite(for Database Engine, SSIS, SSAS and SSRS). Each mode uses its own parameter text file.
PostInstaller - Automating the Configuration
The PostInstaller takes care of Post SQL Server Installation configurations. This includes TempDB setup, DB mail setup, memory settings, MAX DOP settings, DB alerts, maintenance jobs, firewall rules, and more. It works by executing a series of PowerShell and T-SQL scripts, each targeting a specific part of the configuration process. Just like with the installation module, you’ll use a parameter file to define your SQL instance details and point to the script locations.
SQLAutomate code is available at - SQLAutomate
Folder Structure and Program Flow
The root folder contains the main script - master.ps1 which starts the execution. Based on the user input, it calls the either SQLInstaller or PostInstaller module.
The SQLInstaller folder contains everything related to SQL Server Installation. SQLInstaller.ps1 is the main script which initiates the SQL Server installation. It calls different PowerShell functions based on the user selected Installer mode (SQLDBEngine or SQLSuite). This folder also contains a Parameters subfolder, which stores the text files with Installation parameters. Another subfolder, Func, stores the PowerShell functions that handles validation and execution.
Next is PostInstaller folder which contains everything which handles the Post-Installation configuration tasks such as TempDB setup, DB mail setup, memory settings, MAX DOP settings, DB alerts, maintenance jobs, firewall rules, and more. PostInstaller.ps1 is the main script which execute the different PowerShell and SQL scripts stored in Scripts subfolder. PostInstallParameters.txt contains the parameters such as SQL Instance Name(where post-installation will take place), credentials to connect to the instance, scripts location(which will be executed).
To skip any post-installation step, simply remove the corresponding script from the appropriate subfolder (SQL_Scripts or PS_Scripts) before execution.
Finally, all logging activities, whether during installation or post-configuration, are captured in the Logs folder. It keeps track of both high-level progress and detailed script output, making it easy to review or troubleshoot if anything goes wrong.
How to Use
SQL Automate breaks down SQL Server setup into two stages: Installation and Post-Installation configuration. Let's first see the Installation process:
Installation
Start by preparing your environment. First, download the SQL Server Image(.iso) file and save it to a folder. Then download the SQLAutomate tool and extract it to a working folder.
Inside the extracted folder, navigate to SQLInstaller\Parameters.There will be 2 parameters text file. Edit the appropriate file based on your installation type. If you are installing only Database Engine, use SQLDBEngine_Install_Parameters.txt. If you are installing Full Suite, use SQLSuite_Install_Parameters.txt.Open the appropriate file and carefully fill in the required parameters, such as the SQL setup path, data directories, collation settings, etc.
It's crucial not to change the formatting or add extra spaces, as the script expects a specific structure. If you want to view the full list of parameters and their detailed description refer README_Parameters.txt file
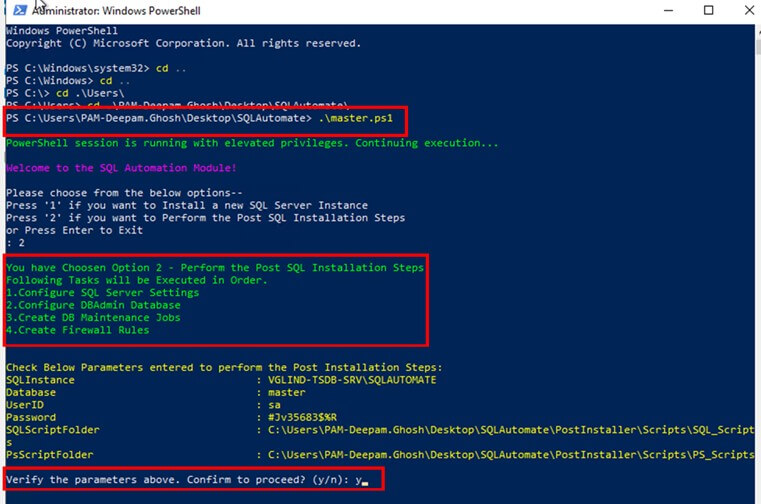
Once your parameter file is ready, open PowerShell as an Administrator, navigate to the SQLAutomate root directory, and run the master script:
cd C:\Users\DeepamGhosh\Desktop\SQLAutomate
.\master.ps1
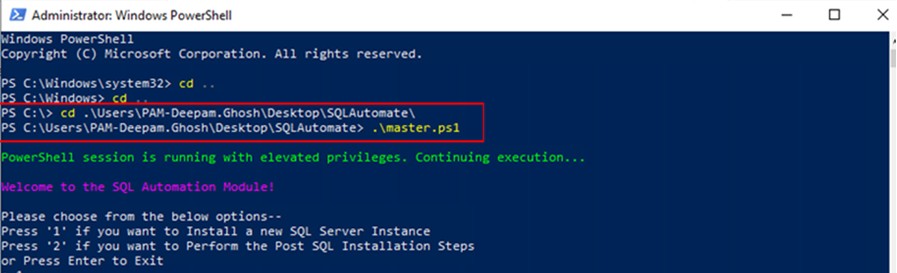
When prompted, press 1 to initiate a new SQL Server installation. You’ll be asked to choose between the Database Engine or SQL Suite mode. The script then validates your inputs and begins the installation process. SQLAutomate automatically mounts the installer ISO, launches the setup, and logs progress along the way. Once complete, you’ll see a success or failure message
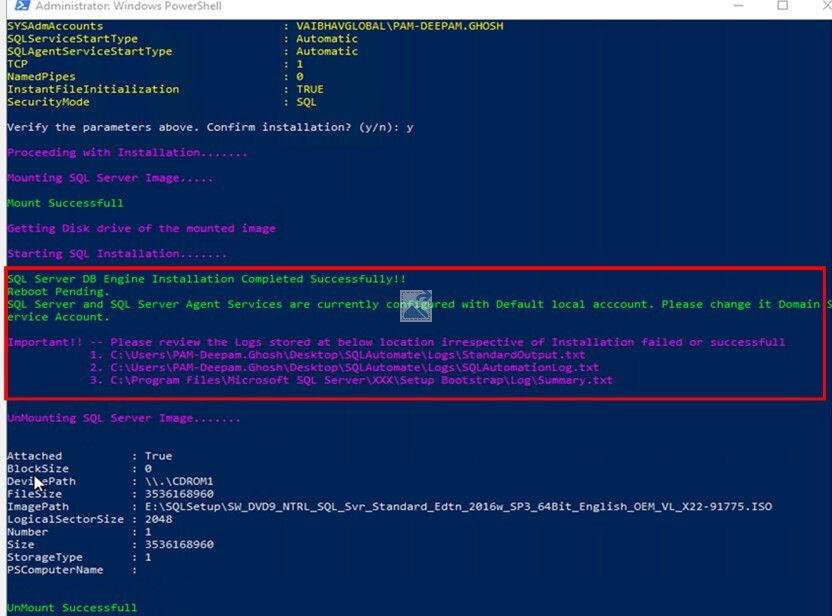
You can check detailed logs in the Logs folder. The main log file, SQLAutomate.log, provides a step-by-step summary, while StandardOutput.txt contains messages from the SQL Server installer itself.
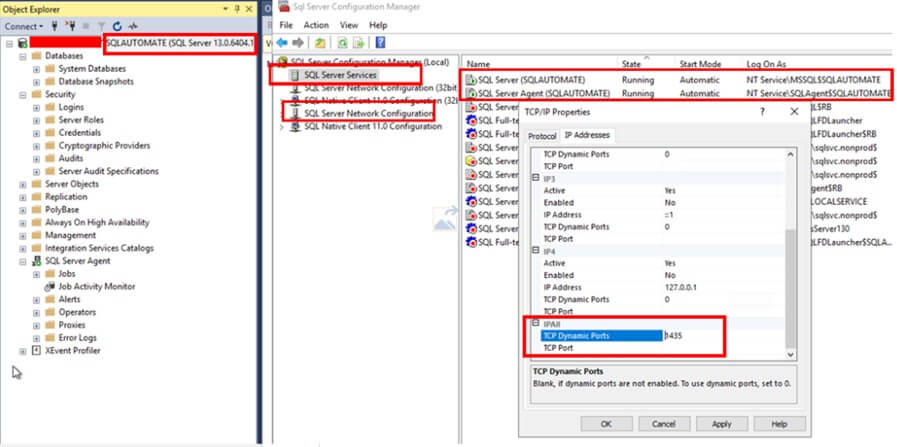
Finally, open SQL Server Management Studio (SSMS) and connect to the new instance. Review the configuration settings, and if necessary, update the service account, modify ports, or make other adjustments.
Post Installation
Once SQL Server is installed, next step is to perform the Post-Installation.
To begin with, open PostInstaller\Scripts folder. You will find 2 subfolders PS_Scripts and SQL_Scripts. These sub folders contains various scripts required during post installation. Before running them, you may want to customize these scripts based on your environment. Each folder includes a README file (README_PSScripts_Modifications.txt and README_SQLScripts_Modifications.txt) to guide you through any necessary modifications.
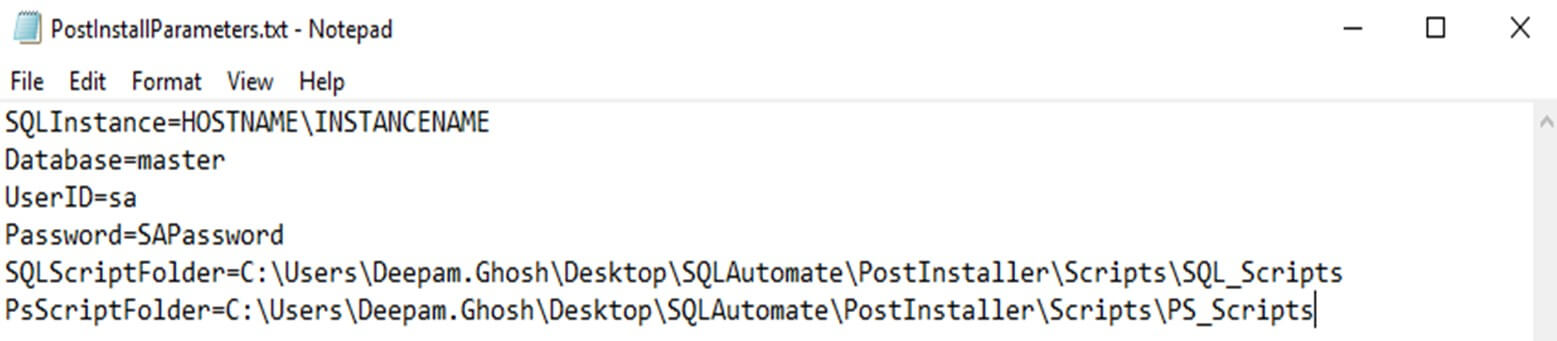
Next, Open PostInstallParameters.txt and fill in the required details such as target SQL instance name, login credentials, and script locations.
Once that’s done, go back to PowerShell, run the master script again, and this time choose option 2 for post-installation. The tool will validate your input and sequentially run each script, reporting success or failure as it goes.
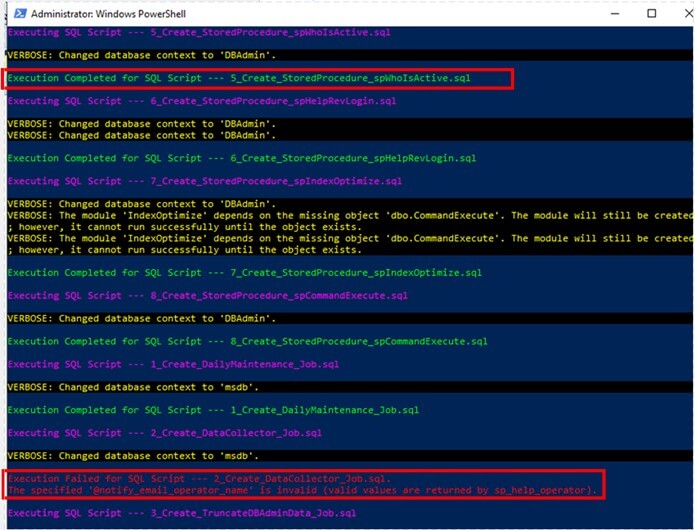
Again, logs are written to the Logs folder so you can review what happened during the configuration step-by-step.
Finally, review the applied SQL configurations from SSMS and firewall rules in Windows Defender settings. If any script fails, you can always run it manually.
Conclusion
In this article, we learn about SQLAutomate - A very simple but powerful tool. By automating installation and post-installation tasks, this PowerShell based tool speed ups the installation process, reduces chances of error and eliminates the manual work. Whether you are building single or dozens of SQL Instances, SQL Automate saves your time and allows you to focus on other important strategic tasks. If you're looking to streamline SQL Server setups and bring some sanity back to your workflow, give SQL Automate a try.
