

Background history
The SQL Server tools team at Microsoft introduced Notebooks to Azure Data Studio (ADS) around March 2019. Since then, data professionals from the SQL Server community have been posting and sharing knowledge on how to make the most of this awesome new feature. It was probably May of 2019 when I decided to give ADS Notebooks a try. I started simply just creating some simplified versions of T-SQL notebooks. Then, I decided to move a step forward experimenting with the code cells that support markdown. I felt this step very natural for me, because of my familiarity with the markup language.
However, I was looking for something else. Then, I discovered that ADS notebooks also support Python as one of the built-in kernels. That's when notebooks got my attention! I'm a big fan of Python, therefore I started to experiment around immediately. Python is a very modular language with many libraries and SDK's at our disposal, being the Docker SDK one of the most popular and personal favorites.
As a result of my first iteration with ADS notebooks, I ended up creating an ADS Notebook that uses Markdown, Python, and T-SQL combined - not bad ha! Noticing such versatility, I decided to incorporate this ADS Notebook as part of my SQL container demos so I can showcase how powerful is this new addition of Azure Data Studio. That brings me here, I can finally share how to integrate Azure Data Studio notebooks with Python to create SQL Server containers something I have been looking forward to doing for a while.
Prerequisites
- Azure Data Studio installed (1.5.2 version or higher).
- Python v3 installed, along with its package manager (pip).
- Docker engine installed, configured and started on your laptop/computer.
Introduction
My recommendation to get you started with Azure Data Studio notebooks is to check this great article from Steve Jones (b|t). As usual, Steve goes above and beyond explaining how to use every section/ component of this great tool. Also, you can complement this information with this series of examples shared by the SQL Server tools team here.
This article is not an introduction to Azure Data Studio notebooks though. I will make heavy use of Docker's SDK for Python to create and manage my SQL container using the built-in "kernel" functionality of Azure Data Studio notebooks. If you want to learn more about the Docker SDK for Python, I recommend you to take a look at my previous articles about this topic.
- Check SQL Server images
- Ubuntu-based images
- RHEL based images
- Create a SQL Server 2019 container
- Get SQL Server version
Checking the SQL Server images in MCR
I will show how to check the images that Microsoft has released for SQL Server.
Ubuntu-based images
This example does not require a Docker library, I will use the "request" Python library instead. This library is kind of the standard in the Python language when working with HTTP requests, it also makes the output readable for humans. Please note, this step will require having the "Python 3" kernel selected for this code block.
Here is an explanation of what the following code block is doing:
The ubuntu_mcr_images is just a response object that will receive the response sent back by the requests.get method. This method is receiving a website URL as a parameter which can be anything, however, for our purposes I passing down the Microsoft container registry URL which is supposed to have all the information about the available SQL Server container images for Ubuntu. Then, the ubuntu_mcr_images object information is decoded and displayed in JSON format.
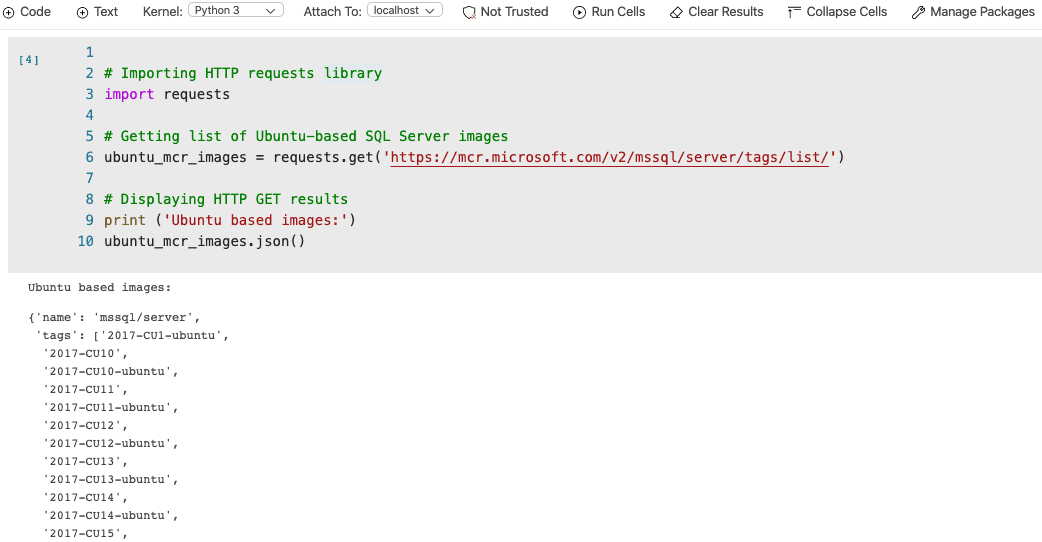
The screenshot above does not contain the complete list of available SQL Server images because the list is quite large. I decided to crop the image just for presentation purposes.
RHEL based images
The following code block is very similar to the previous example, with the small difference that I'm interested in getting the list of available SQL Server container images for Red Hat. Therefore, the URL and the response object are different however the main idea of the code block persists. The rhel_mcr_imagesobject information is decoded and displayed in JSON format. Here is a how it looks int the practice:
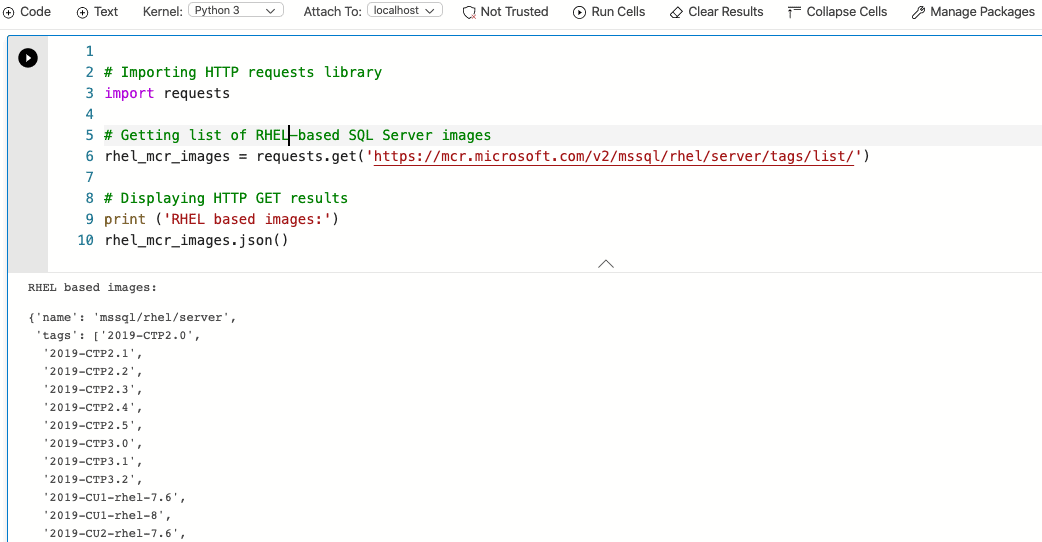
Once again, a portion of the output was cropped for presentation purposes.
Creating a SQL container
Once again, we will keep the "Python 3" kernel selected. A difference with the previous step, this code block will make use of a specific library to create a container –of course, Docker. Having this library imported, allows me to start running and managing containers through the API. A new docker client object gets instantiated in my session through this instruction:
client = docker.from_env()
The next step is to create the container using the client.containers.run method. However, before start going straight to that path we need to define a few parameters first. I'm talking about the container image, environment variables, name, and port. Do you remember about the list of available SQL Server images we got in the first step? Here is where you choose the specific version of SQL Server to spawn as a container. You can decide things like the patch level and the operating system to use (Ubuntu / RedHat). I will choose the latest image available for SQL Server 2019 for Ubuntu: 2019-CU2-ubuntu-16.04 (at the time I'm writing this article).
The next item in our list is to provide values for a couple of environment variables, to be precise ACCEPT_EULA and SA_PASSWORD. ACCEPT_EULA is always required to accept the terms of the end-user license agreement. The second environment variable, SA_PASSWORD is simply the value of the SA password. I decided to use the "P1th0nR0ck5" password for this container. I want my container to have a specific container and hostname for administration purposes, therefore I will use the "Python_SQL" value for both parameters.
For connectivity purposes, the listening port for this SQL container is going to be 1433 —SQL Server's default port. Here is how it looks putting all pieces together:
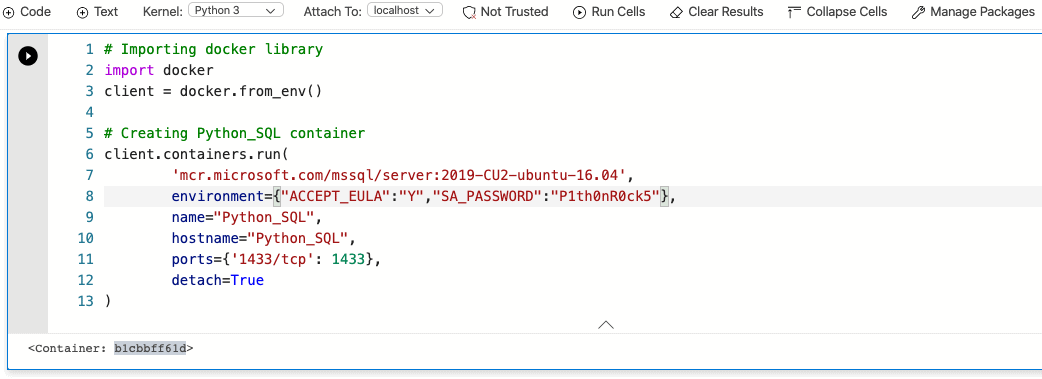
The client.containers.run method returned the container ID (b1cbbff61b). The SQL container was successfully created!
Connecting to our SQL container
The last two sections of this article explained how to use the "Python 3" kernel to create a SQL container. It is time to switch gears and get back to the SQL Server world.
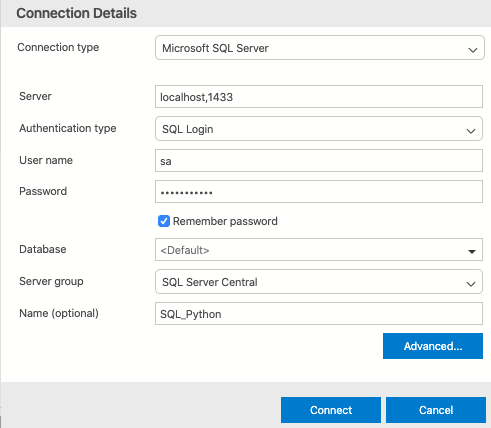
I will start adding a new code section, also changing the notebook kernel to "SQL" at the same time. This allows me to choose from an existing or to create a new connection to SQL Server. Because this is a fresh SQL Server instance I don't have any connection yet, I will proceed to select the"new connection" option.
A panel called "Connection details" will show up in the right-hand side of ADS, just provide with the hostname and port, followed by user name and password (for SA user), then simply click on connect:
Make sure the "Attach To" shows the name of the connection you previously defined:
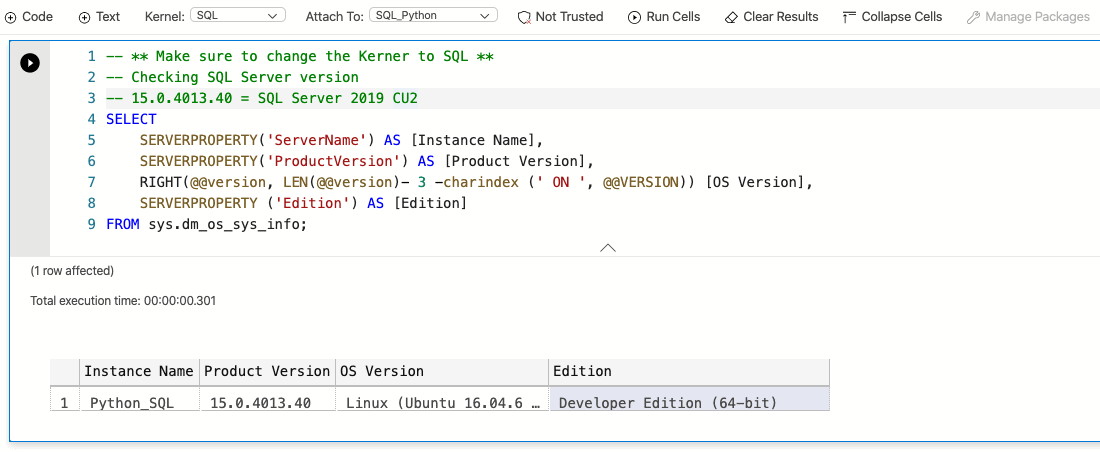
Running a T-SQL code block
I'm connected to my SQL container, right after completing the previous step. Therefore, I will proceed to execute the following SQL code to get basic information about my SQL instance:
Cleaning up the environment
I was able to achieve my goal: To have a living SQL Server instance up and running ready to go for all my new development needs, or perhaps just to try something cool with the SQL Server 2019 new features.
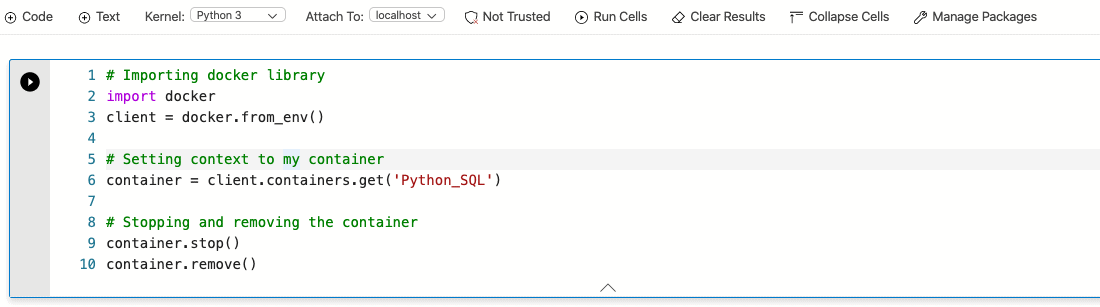
Suppose I no longer need this container, therefore I should make sure to remove it to avoid wasting resources from my local computer. The following block code will take care of stopping and removing the container for me. The first I need to do again is importing the Docker library because the previous block code used the SQL kernel, thus the Python session needs to start over again.
Once again, I have to instantiate a new docker client object. However, this is not enough for me to be able to manage my container. I have to call containers.get method passing the container name as parameter, this will set my Docker client context to Python_SQL.
Finally, it simply takes to call the container.stop and container.remove methods to clean up my local Docker environment.
Conclusion
Azure Data Studio is indeed a very valuable addition to the DBA / Developer toolset. We can do many cool things like the creation of customized dashboards and widgets through JSON, use of the integrated terminal and source control (Git) or even to create SQL containers through Notebooks with Python —as I just explained to you in this article.
What's next? You creating an AD Notebook with a set of pre-defined queries for diagnostic purposes. That at the same time restores a database using a container created with Python? Call me crazy, but I do see much of potential here.
If you are interested to check ADS Notebook more examples, take a look at my GitHub repository here.
Thanks for reading!