

Scenario
According to universal laws, nothing is certain except death and taxes. But if we are talking about the life of a company, we can add Excel to the mix. Newer or more efficient tools will come and go, but it’s a reality that Excel is and will be the tool of choice for many people who work with numbers.
Excel works very well with our local SQL Server when we are on the same network, but when we are out of the network, updating our Excel spreadsheet becomes a bit difficult. The professional and “clean” way to solve this is to use a VPN, but that’s usually not very cheap. I say ‘usually’ because, for small implementations, we can use a software-based solution like CloudConnexa from OpenVPN which is easy to setup and offers free VPN access for two users and affordable pricing for additional users. I have CloudConnexa implemented and I can vouch for it. But today I want to talk about another solution.
Although, as of today, it’s not possible to connect Excel to an on-prem SQL Server, it is possible to do it with Power BI, and Excel can connect live to Power BI. So, by using Power BI as a bridge, we can access our on-prem SQL Server data in real time. Configuring this solution is not for the faint of heart, but it’s also nothing out of this world. Before getting started, a few conditions must be met:
- If you want to share the Excel file with other users who will simply use the connection in an Excel file, you require a Power Bi Pro license (14USD / month as of January 2026). The other users can use a free account. And if you don’t have a Pro License you can get a free 60-day trial.
- The software that allows ower BI service to connect to the on-prem SQL Server,an On-premises data gateway, must be installed. It can be installed on any machine with access to the server.
And for the sake of this article, I’ll add a third condition:
- Familiarity with SQL Server and Power BI service/app. Explaining all the underlying concepts is outside the scope of this article.
Having said that, let’s begin!
Expected Result
For our tests we will use the AdventureWorks database, the database everybody knows and loves. Our goal is to access it from Excel and retrieve live data anywhere and anytime, as long as we have an Internet connection, of course. We don’t need anything too elaborated, so we will just work with the list of orders:

Figure 1 List of orders from AdventureWorks database
From SQL to Power BI
The first part is quite simple: we open the Power BI app and choose SQL Server as our data source. We enter server and database names and the query we want to run. For our purpose, we select DirectQuery mode, so the data is retrieved in real time. If we choose Import mode, we can schedule the updates in Power BI service. It’s also a good option depending on our needs, but today we want to see how it works in real time.
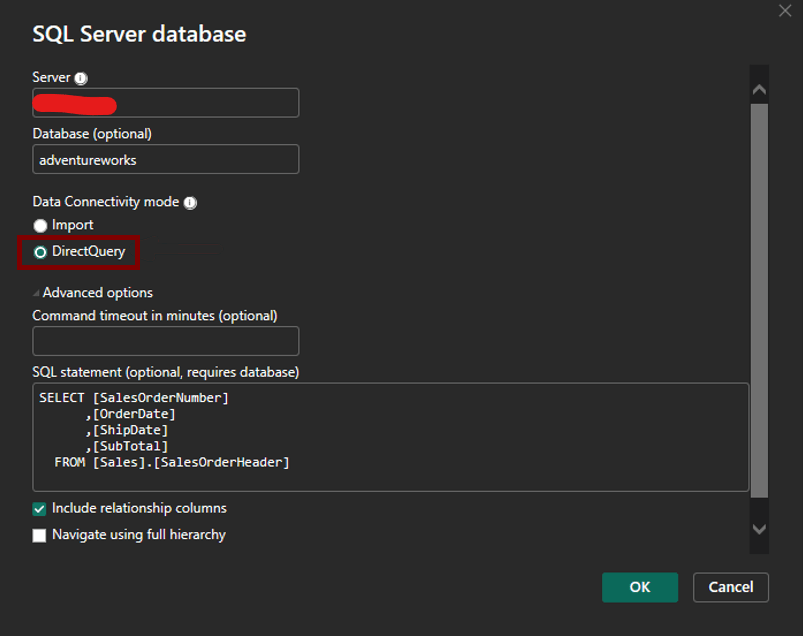
Figure 2 Server Configuration. Choose data source, query and data connectivity mode
The next step is to define the credentials used to access the data. I like to create a database user specifically for this purpose. This user only needs read-only access to the database.
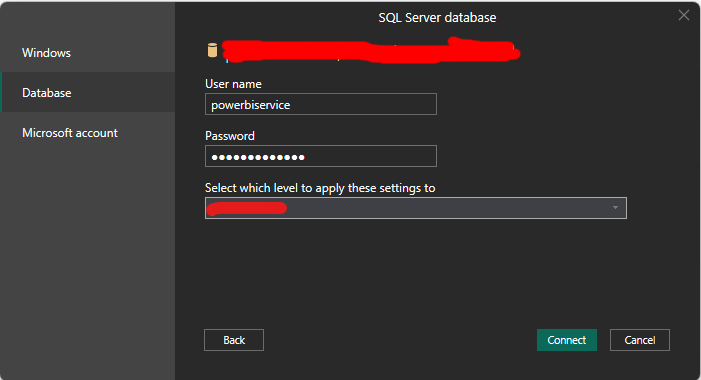
Figure 3 Configuring credentials for database access
And that’s all we need. After pressing Connect, we are taken to Power BI with our query already created (shown in the screenshot already renamed to Orders).
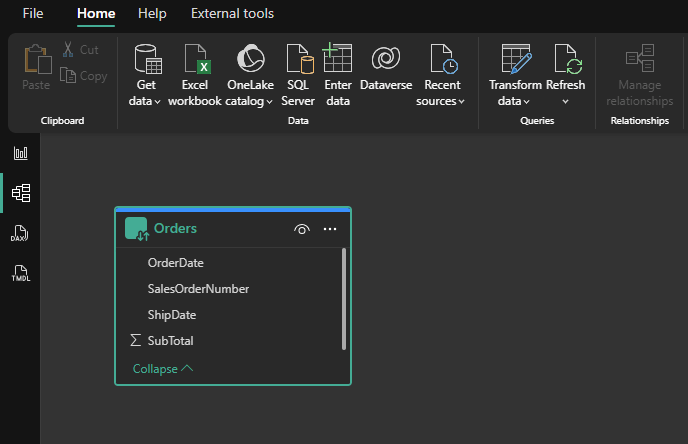
Figure 4 Query created inside Power BI
Although it’s not required, we can create some visualizations to check if the data is correct. They won’t be used in our example, but they don’t interfere with anything either.
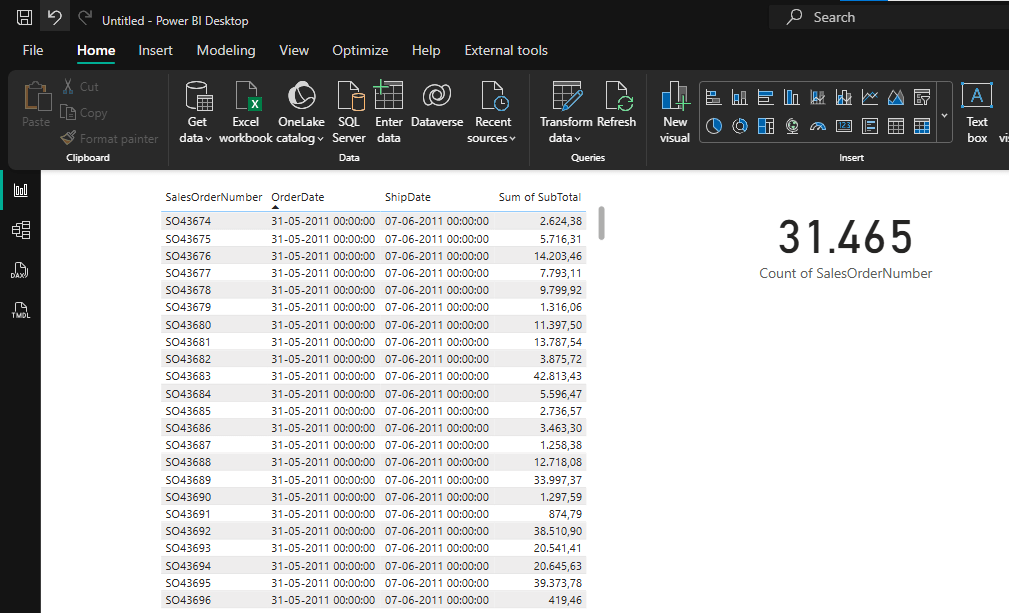
Figure 5 Table and card visuals showing the orders
Please be aware that we are working with live connection to the database, so we need to be very cautious. While Power BI Service is executing the query, and if the database is in the default Read Committed isolation level, SQL Server will place a shared lock to the row/page being read that will block any update. As a result, users working in the database may notice delays on their day-to-day activities. Please be careful with your queries and speak with the users to check if they notice anything unusual. Alternatively, if we don’t mind the possibility of dirty reads, we can use the WITH (NOLOCK) hint to avoid locks altogether but be sure you understand the danger of this approach.
And that’s all we need for our test. Now let’s publish the file in the Power Bi Service.
At this point, as we want to see how to share the connection with other users, we need to use a PowerBI Workspace, but for personal use we can use My Workspace.
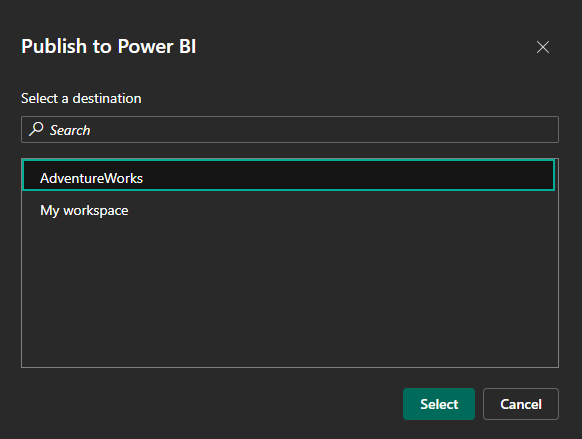
Figure 6 Selecting the AdventureWorks workspace
As soon as we publish the file, we’re greeted with a warning stating that our file was published but doesn’t have access to the data. This happens because our file uses a direct connection to an on-prem SQL Server which the Power BI service can’t find.
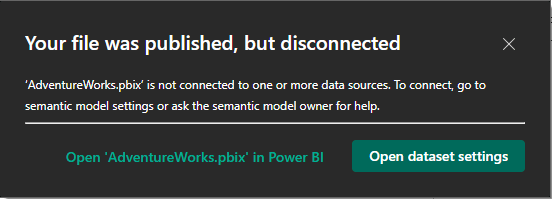
Figure 7 disconnected data warning
And if we try to open the report in the Power BI Service, we get another friendly warning.
![]()
Figure 8 The data is live, no cache. So, no connection, no visualization.
To solve this, we move on to the second step of our work: installing and configuring the local gateway so the service can access our server.
From Power BI Service to SQL
Now, for some easy work, let’s install the on-premises gateway. This is an operation you can do on any Windows 10 or 11 machine or servers starting with Windows 2019. Go to the Power BI site and in the upper right corner click on the down arrow and choose Data Gateway.
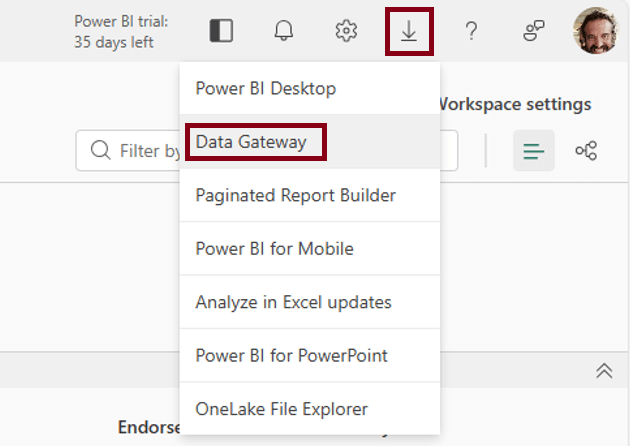
Figure 9 Downloading On-premises data gateway
In the page that opens, you will see two options: Download standard mode and Download personal mode. You must choose the standard mode, the personal is very limited and one of the features missing is exactly DirectQuery.
The installation is quite straightforward. First, it will ask for an e-mail to register the gateway. Use the account that has the Power BI PRO License and choose Register a new gateway. Other gateways registered by other people on the same network won’t be a problem as they don’t interfere with each other. Anyway, be cautious when installing this kind of powerful software on your network.
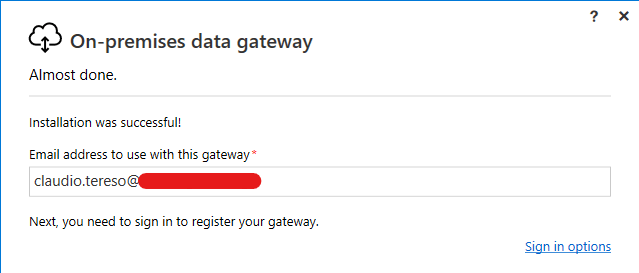
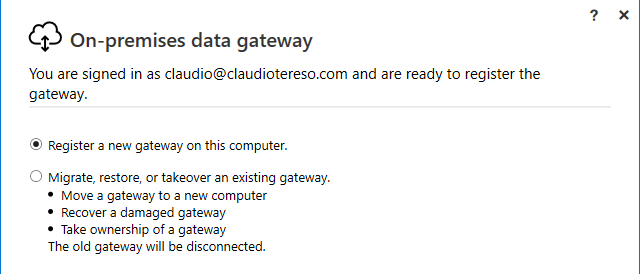
Figure 10 Installing On-premises data gateway
Finally, just give a name to your gateway and type a recovery key. This key will be needed to install other gateways in the same local network associated with the same account (which creates a cluster of gateways). It can also be used to migrate this gateway to another machine or recover it if the machine holding it fails.
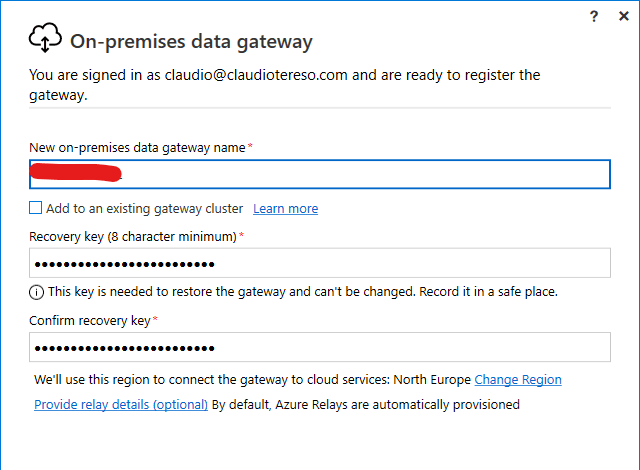
Figure 11 Inputting On-premises data gateway name and recovery key
With the gateway installed we proceed to configure the Power BI service. For that, we open the workspace where we published the file. There we see its reports and semantic model. On the semantic model, select the ellipsis (…) and next Setting from the menu.
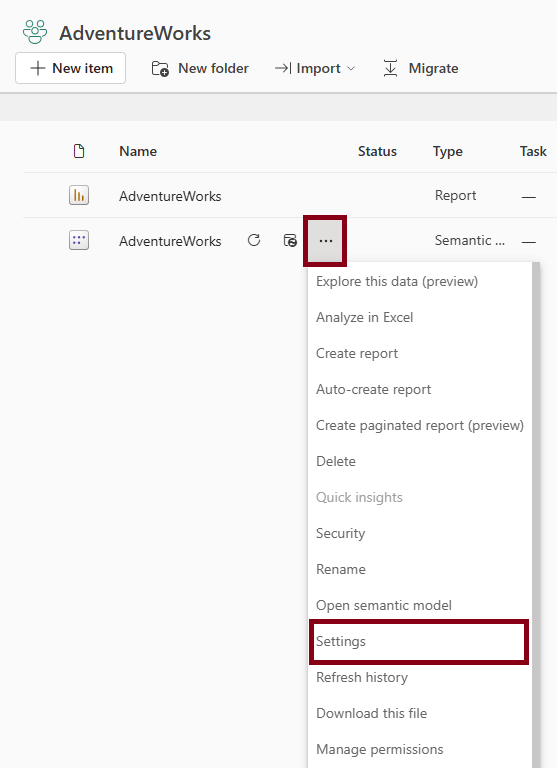
Figure 12 Opening Settings to define the gateway for the semantic model
In Settings, open Gateway connections where the gateway should be listed. Press the arrow under Actions.
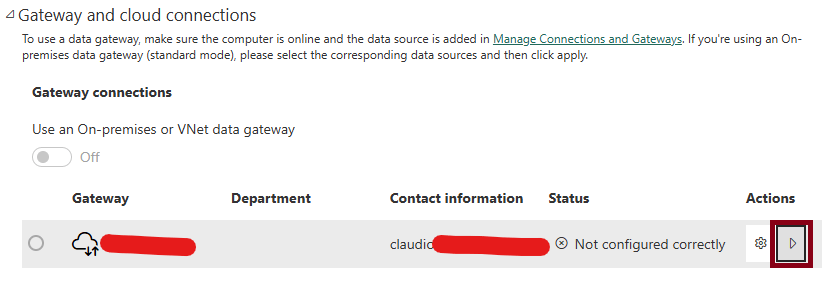
Figure 13 Gateway connections configuration
This will display a list of data sources in the semantic model. Choose the Add to gateway option on the data source to create a new connection.
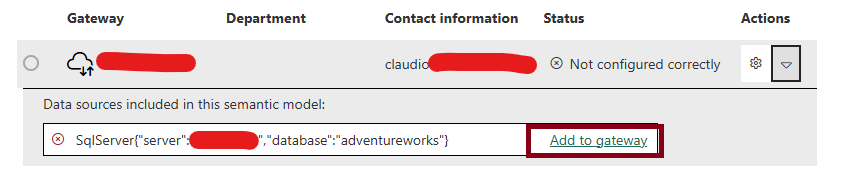
Figure 14 Adding the data source do the selected gateway
This option will open the New connection window. Give a meaningful name to the connection and choose the authentication method. Since we are using a SQL server user, choose Basic and enter the username and password chosen in the beginning of the process.
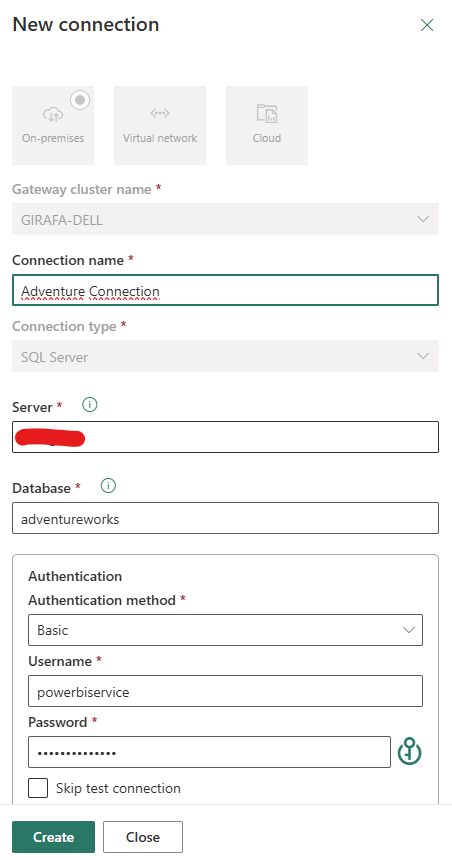
Figure 15 Creating the connection that will be used in our data source.
The connection is created, now you just need to apply it to the data source in the dropdown:
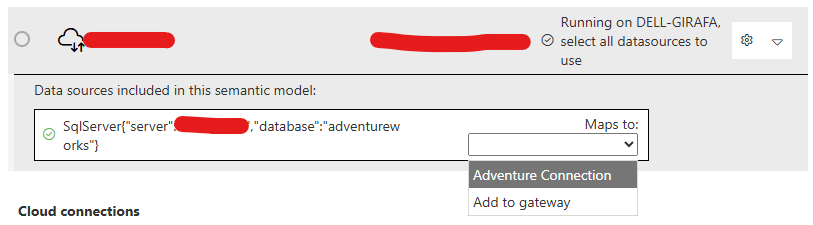
Figure 16 Applying the created connection to the data source
This step is done!
If everything is correct, you can now open the report on the Power BI service. Data will come directly from the on-prem SQL server so it could take a while. In my scenario, the first update took some seconds but following ones took less than one.
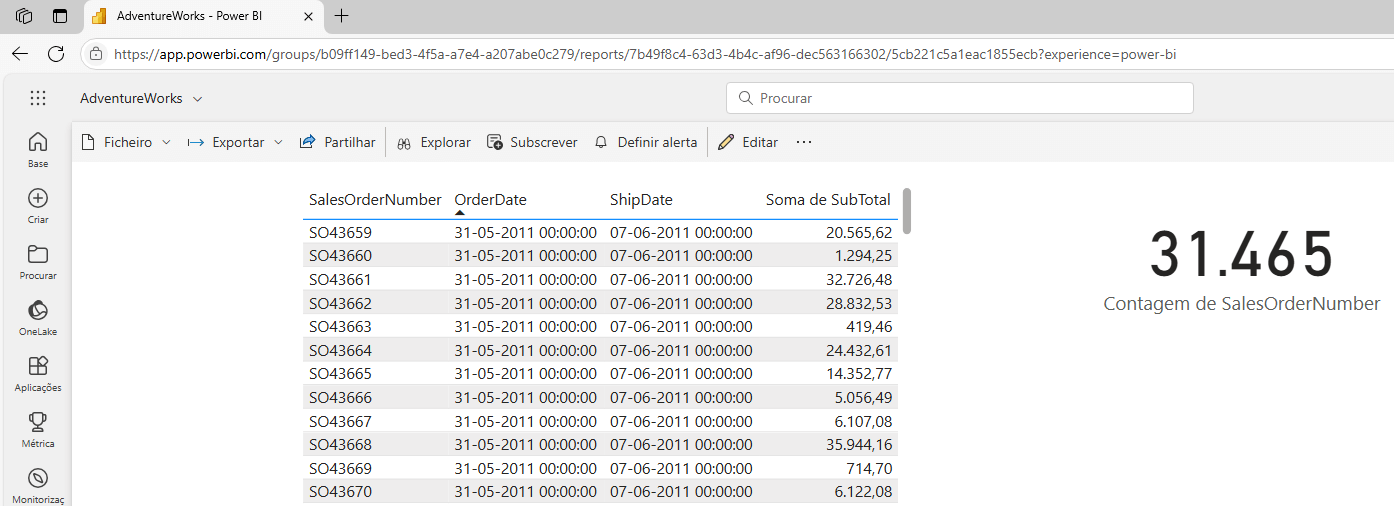
Figure 17 Visualizing the report on Power Bi service confirming that all configurations are correct
From Power BI Service To Excel
Now, for the last and easiest step, getting the data into Excel. Open Excel and make sure the logged in user is the same you have been using throughout the process. This will be used to connect to Power BI Service.
Figure 18 Excel should have the correct user logged in.
Now, Open Data => Get Data => From Power Platform => From Power BI.
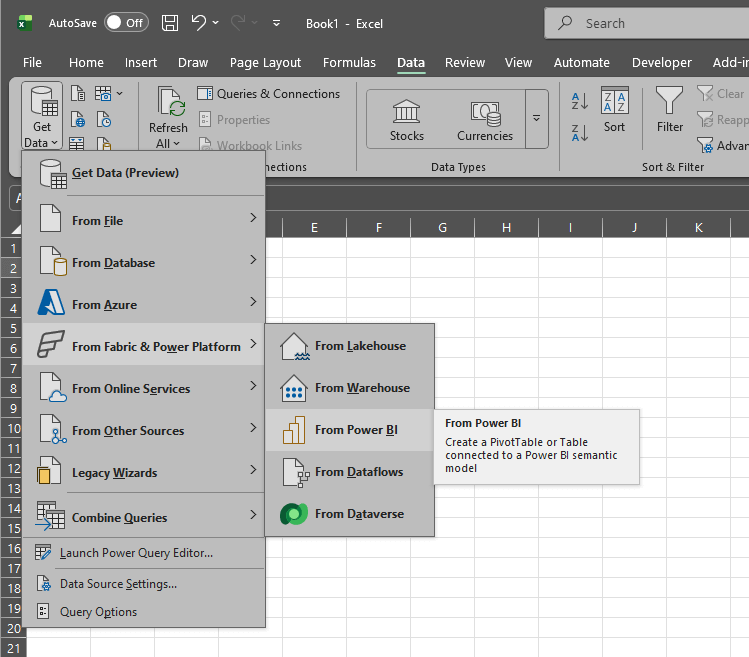
Figure 19 Choosing the Power BI as the data source for our data
This opens the Data pane, where you see the semantic models available to you. If there are many, some may not appear immediately; if yours is missing, use the Search for a semantic model option.
We have now the option of getting a pivot table or a regular table with the data. For our example we just want to see a list of the orders, so we go with Insert Table.
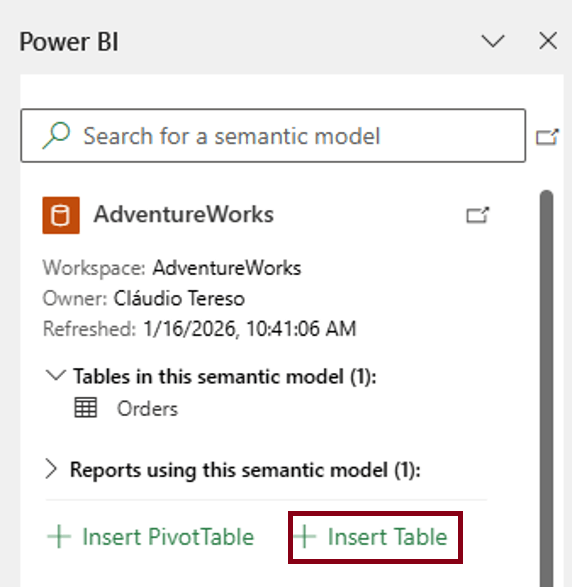
Figure 20 Excel showing available semantic models
At this point, Excel may ask for your credentials again. Provide them if needed. When the connection is established, a window will open with the details of your table and a preview; choose all fields and click Insert Table.
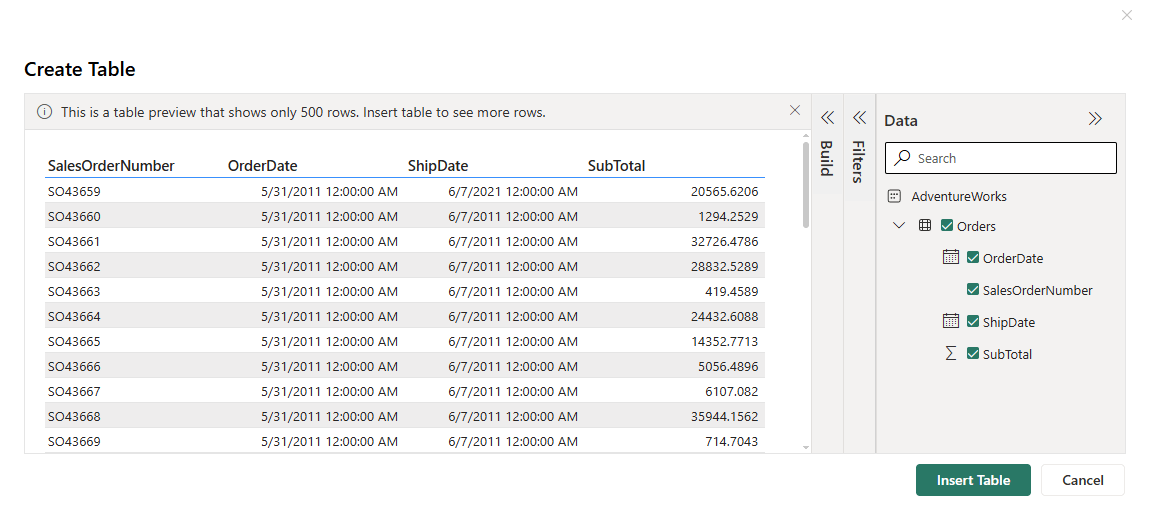
Figure 21 Visualizing Orders table from AdventureWorks semantic model.
After some seconds you should see your data live on your Excel. And how live is it? Realtime live! I made a change in the database and, after pressing update, the data was updated in less than it takes to say “Excel, update my data”.
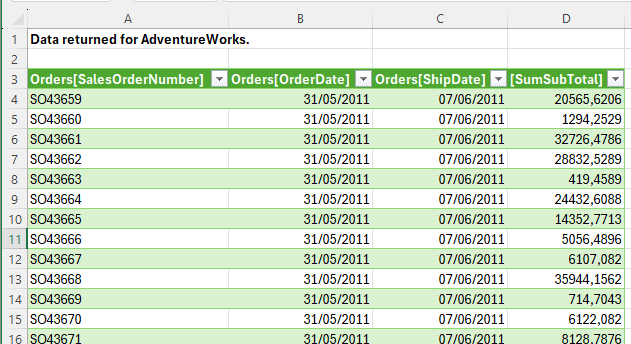
Figure 22 Finally, the data is live in Excel!
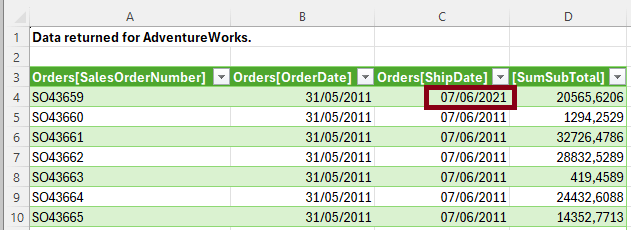
Figure 23 Updated data in Excel.
As an extra feature, if we have a PRO license and publish our data in a Power BI workspace, like in this example, we can give other users access to the file, and all it takes is a free Power BI license. To give then access, go to Manage Permissions in the semantic model, write the user’s name and click Grant Access. No permissions need to be selected in the dialog box.
That’s all you need to do. When the user opens the file, Excel will ask for his credentials and apply the appropriate permissions.
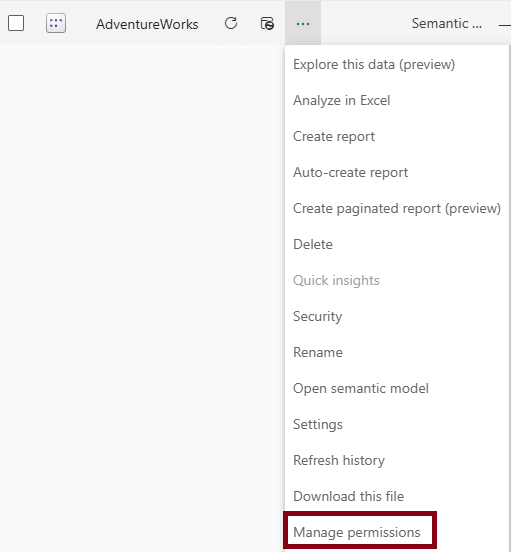
Figure 24 Adding read permission to other users.
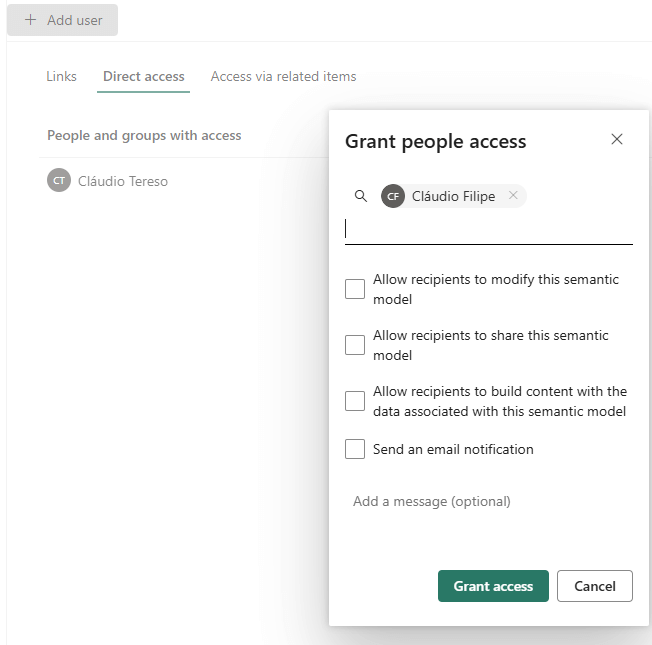
Figure 25 Adding the user is enough, no need to select any of the additional permissions.
Conclusion
It’s not a panacea and it’s an intricate process, but once you get past the growing pains it’s easy to manage and allows interesting results. I wouldn’t recommend it for scenarios with many users or big datasets but for home offices or small companies it’s a solution worth considering.