

We have an SQL Server 2019 server running on Linux Ubuntu, and we want to migrate to Windows for its user-friendliness, software and hardware compatibility, and readily supportiveness.
To do that, we’re going to use a read-scale cross-platform Availability Group to reduce the downtime, being the primary instance the Linux server and the secondary the Windows one. Note this configuration is not for high availability.
Before starting, see this link for additional details and sample configuration.
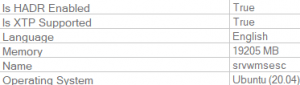
The primary node is SQL Server 2019 on Linux with the availability group feature enabled:
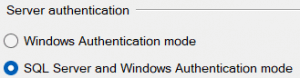
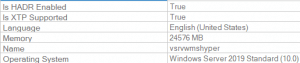
The secondary node is SQL Server 2019 on Windows with the availability group feature enabled and “SQL Server and Windows Authentication mode”:
Step 1: Ensure port 5022 is open on both servers
It’s not enough to have port 5022 open on IPv6, so if the “ufw” command in Linux shows this:
$ ufw status verbose

To                         Action      From

5022 (v6)                  ALLOW IN    Anywhere (v6)
You need to run the command below to open the TCP port for IPv4 from the Windows IP address:
ufw allow 5022/tcp from <WindowsIP>
Once done, use telnet to check the Linux-Windows intercommunication using:
telnet <WindowsIP> 5022

telnet <LinuxIP> 5022
Step 2: Create a database login on both servers and the master key encryption
Run the commands below on both servers to create the login and user, using a strong password:
CREATE LOGIN dbm_login WITH PASSWORD = '<password>';
CREATE USER dbm_user FOR LOGIN dbm_login;
Then, run the command below on both servers to create the master key encryption, using a strong password:
CREATE MASTER KEY ENCRYPTION BY PASSWORD = '<master-key-password>';
Step 3: Create certificates on both servers
Run the commands below on the Linux instance using a strong password:
CREATE CERTIFICATE dbm_certificate WITH SUBJECT = 'dbm';
BACKUP CERTIFICATE dbm_certificate TO FILE='/var/opt/mssql/dbm_certificate.cer' WITH PRIVATE KEY (FILE='/var/opt/mssql/dbm_certificate.pvk', ENCRYPTION BY PASSWORD = '<private-key-password>');
Note the owner of the files in “/var/opt/mssql/dbm*” is the “mssql” user in Linux, so you may need to copy the files to another folder using a privileged user, then change the copied files permissions, before using “scp” to copy the files to the Windows server using a non-privileged user.
Then copy the files to the Windows server to the folder “C:\Program Files\Microsoft SQL Server\MSSQL15.MSSQLSERVER\MSSQL\DATA”. This location may be different if you specified a different drive during installation, or if you created a named instance.
Now, run this command on the Windows instance specifying the same password used previously:
CREATE CERTIFICATE dbm_certificate AUTHORIZATION dbm_user FROM FILE = 'C:\Program Files\Microsoft SQL Server\MSSQL15.MSSQLSERVER\MSSQL\DATA\dbm_certificate.cer' WITH PRIVATE KEY (FILE = 'C:\Program Files\Microsoft SQL Server\MSSQL15.MSSQLSERVER\MSSQL\DATA\dbm_certificate.pvk', DECRYPTION BY PASSWORD = '<private-key-password>');
Step 4: Create the endpoints on both servers
It doesn’t matter if there’s already an endpoint created on the Windows instance, you need to run these commands on both servers to create (or re-create) the endpoint using the new certificate, then grant the new SQL login access to it:
CREATE ENDPOINT [Hadr_endpoint] AS TCP (LISTENER_IP = (0.0.0.0), LISTENER_PORT = 5022) FOR DATABASE_MIRRORING (ROLE = ALL, AUTHENTICATION = CERTIFICATE dbm_certificate, ENCRYPTION = REQUIRED ALGORITHM AES);
ALTER ENDPOINT [Hadr_endpoint] STATE = STARTED;
GRANT CONNECT ON ENDPOINT::[Hadr_endpoint] TO [dbm_login];
Step 5: Ensure the databases are in Full recovery mode, and there are full and log backup jobs running
You will need to restore the full backups from the Linux instance into the Windows instance, specifying different directories for the data and log files in Windows, different than the ones used in Linux. After the Availability Group is created, you will need to restore in the Windows instance at least one log backup in all databases.
Step 6: Create the Availability Group
I have used the “New availability group wizard” to get this script, which needs to be run in SQLCMD mode as indicated. You need to set the names of the Linux instance, the Windows instance, the Availability Group, and one database:
--- YOU MUST EXECUTE THE FOLLOWING SCRIPT IN SQLCMD MODE.
:Connect <LinuxInstance>
USE [master];
CREATE AVAILABILITY GROUP [<AvailabilityGroupName>] WITH (AUTOMATED_BACKUP_PREFERENCE = SECONDARY, DB_FAILOVER = ON, DTC_SUPPORT = NONE, CLUSTER_TYPE = NONE, REQUIRED_SYNCHRONIZED_SECONDARIES_TO_COMMIT = 0)
FOR DATABASE [<DatabaseName>] REPLICA ON
N'<LinuxInstance>' WITH (ENDPOINT_URL = N'TCP://<LinuxInstance>.testdomain.com:5022', FAILOVER_MODE = MANUAL, AVAILABILITY_MODE = ASYNCHRONOUS_COMMIT, BACKUP_PRIORITY = 50, SEEDING_MODE = MANUAL, SECONDARY_ROLE(ALLOW_CONNECTIONS = NO)),
N'<WindowsInstance>' WITH (ENDPOINT_URL = N'TCP://<WindowsInstance>.testdomain.com:5022', FAILOVER_MODE = MANUAL, AVAILABILITY_MODE = ASYNCHRONOUS_COMMIT, BACKUP_PRIORITY = 50, SEEDING_MODE = MANUAL, SECONDARY_ROLE(ALLOW_CONNECTIONS = NO));
GO
:Connect <WindowsInstance>
ALTER AVAILABILITY GROUP [<AvailabilityGroupName>] JOIN WITH (CLUSTER_TYPE = NONE);
GO
After the Availability Group is created with one database, you need to do the following in the Windows instance:
- Restore the transaction logs to leave the database at a point-in-time closer to the primary. At least one transaction log needs to be restored.
- Go to “Always On High Availability”, then “Availability Groups”, expand the new Availability Group, select “Availability Databases”, right click the database name, and select “Join availability group”.
Finally, in the Linux instance you need to add the remaining databases to the Availability Group, and in the Windows instance you need to repeat the two steps above to have all databases in-sync.
Note there is no way to know if the endpoints are Linux or Windows, but you can run the following command in SQLCMD mode:
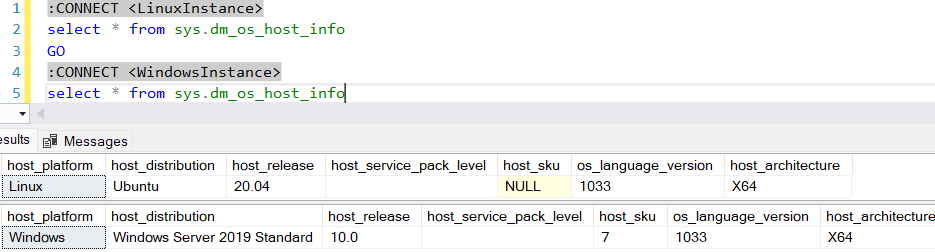
Other than that, you can use the dynamic management views described in this link to monitor the state of the Availability Group and its databases.
With this configuration in place, you need to migrate to the Windows instance the server objects and users, copy the necessary SQL Agent jobs, and create new SQL Agent jobs if necessary. Then, you can plan on stopping all user activity in the Linux instance, do the failover to the Windows instance, and resume the user activity but now in Windows.
