

Apache TinkerPop is an open source graph computing framework. A graph computing network is a set of vertices and edges in the network. If we compare a graph database to traditional relational databases, we can assume that every row in a table of a relational database is equivalent to a vertex in graph network. Similarly, every column of a row in a table of relational database is equivalent to the properties of a vertex. Edges connect the vertices in a graph database, just like primary and foreign key relationships connect records across different tables.
Setting up the Gremlin Console
To use a graph database and navigate through vertices and edges, we need a query language to perform the operations. A query language to help us in this process is Gremlin. Just like SQL is a query language to navigate within a relational database, similarly Gremlin is the query language to navigate in graph database. To type in the gremlin commands and start navigating, we need to first download the Gremlin console which can be downloaded from here: Download the gremlin console.
Once downloaded, we can extract the zip folder from the download location and navigate into the bin folder and double click on the gremlin.bat file. This will open up the gremlin console. Now we need to have a graph database created so that we can understand the details about it. For that, the simplest and easiest way to create a sample graph is by running the command:
graph = TinkerFactory.createModern()
This will create a sample graph of 6 vertices and 6 edges in the graph database network.
Tinkerpop is a graph abstraction layer while the actual graph implementation to iterate of the graph structure will be something specific. We'll choose the Tinkergraph as our graph instance to iterate over the graph structure as it's a fast and in-memory graph database.
To instantiate the graph traversal, type in console:
g = graph.traversal()
This will give the instance of the Tinkergraph to us. Going forward, we can refer to our graph instance as g.
Getting acquainted with gremlin query language
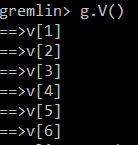
Remember that we just created a graph of 6 vertices and 6 edges. To list all the vertices in the graph now, then we just type in:
g.V()
and you get to see 6 vertices as follows:
To count the number of vertices, we can use the command:
g.V().count()
which will mention the count of all vertices existing in the graph database.
Here are a handful of commands which we can use to interact with the graph database.
To check the properties and their values in a specific vertex:
g.V(1).values()
We can check the properties and their values in a specific edge with this code:
g.E(7).values()
Get the node (or vertex) with name as "marko" with this code:
g.V().has('name', 'marko')We can do all operations in graph database just like that we do in relational databases.
Setup a Custom Graph Network
To setup a customized graph network instead of using the default graph database, you need to install a the gremlin server on your local system. The installation process is very simple and is described below. Use the link above to download the software.
Starting the Gremlin Server
Once installed, navigate to the bin folder and you will see a file, called gremlin-server.bat. Run this file on a Windows machine (or gremlin-server.sh for linux) and the Gremlin server starts up. Now, if you already have the gremlin console running, close it and rerun the same console. You can start it from the bin folder of the gremlin console installation folder running the file name gremlin.bat.
Now, this time you need to run the command:
:remote connect tinkerpop.server conf/remote.yaml session
This will read the configuration from the remote.yaml file under the conf folder of gremlin-console installtion directory. Next you need to run the command:
:remote console
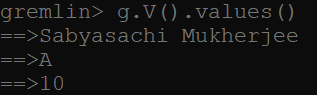
This will now send all the scripts/commands we run to the gremlin server (which is also running on the local machine). Now you can just create a node for a student running the query as follows:
g.addV('Student').property('name', 'Sabyasachi Mukherjee').property('class', 10).property('section', 'A')This will add a vertex named Student with the properties specified. You can also list the recently added vertex and it's properties as:
g.V().values()
The result would look like:
In the next tutorial we will discuss about configuring and setting up Neo4j browser to view the graph network on the UI.
