

Managing SQL Server inventory is crucial when your organization has many SQL Server Instances. A central database that stores details like SQL Version counts, Operating System details , SQL Configurations, SQL License counts and other important metadata, improves manageability, visibility, compliance, and decision-making.
This article introduces SQLInventory, a free and automated tool that collects and combines SQL Server metadata across your organization. You can use this combined data for reports through a web portal, spreadsheets, or Power BI. This helps streamline SQL Server management.
In this article, we will learn in detail about SQLInventory, it's working and implementation. So let's get started..
Minimum Requirements
Before starting, ensure:
- You have basic understand of T-SQL and PowerShell scripting.
- SQL CMS Server has connectivity with all other SQL Servers.
- SQL Agent enabled on all SQL Servers.
How it Works
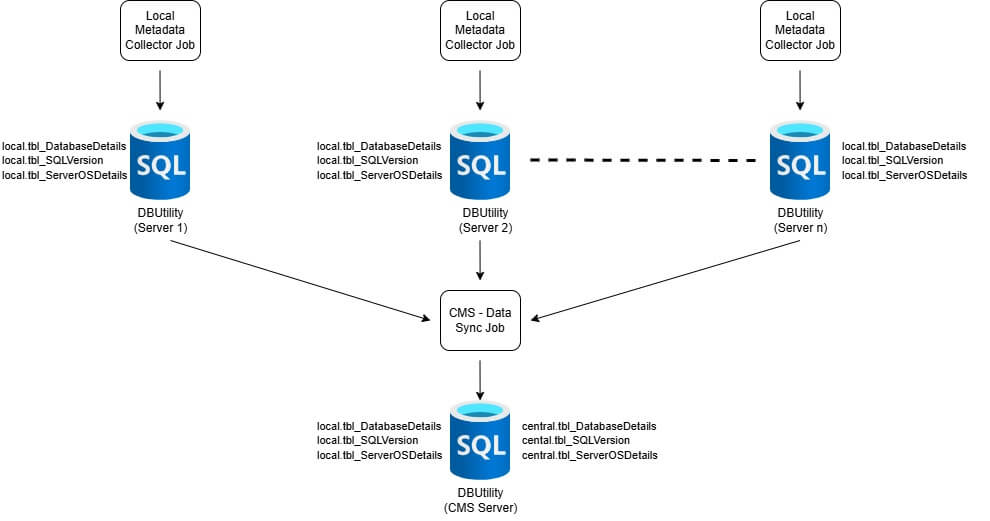
Gathering and storing data from multiple databases is a two-step process. Each SQL Server runs a local metadata collector SQL Agent job. This job gathers the data and stores it in local database, called DBUtility.
A central SQL Server (CMS - Central Management Server) pulls the metadata from each individual server via a SQL Agent Data Sync Job and stores the data in its own DBUtility centralized database.
Full Code Available at SQLInventory
Step-by-Step Setup
To demonstrate the data collection process, we'll use two SQL Servers—SQLNODE1 and SQLNODE2—as examples. Metadata from these servers will be collected and stored in a central CMS Server called SQLCMS.
Configuring Individual SQL Servers for metadata collection
(Repeat the below process for both SQLNODE1 and SQLNODE2)
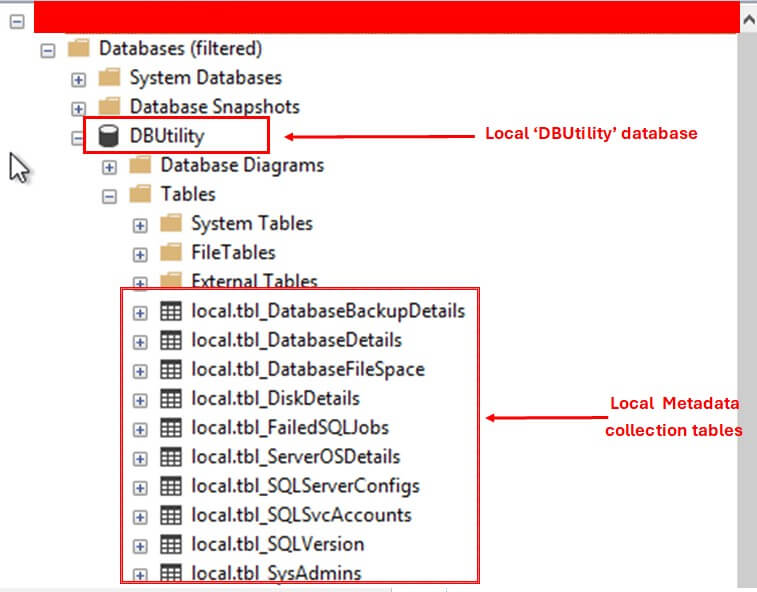
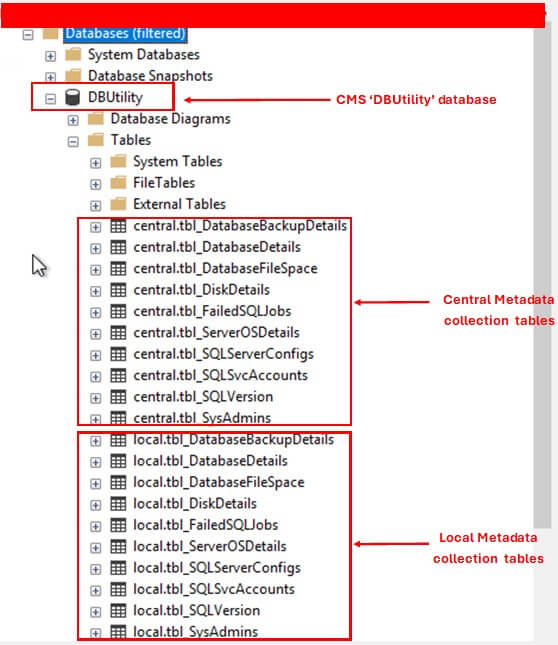
First create a local database, named DBUtility, to store metadata. The data includes SQL versions, operating system details, database information, and disk usage (For a complete list of tables, refer to the README_TableList.txt file). Next, create a SQL user, named SQLInventoryUser, with db_owner rights on DBUtility. Then create the required Local Tables.
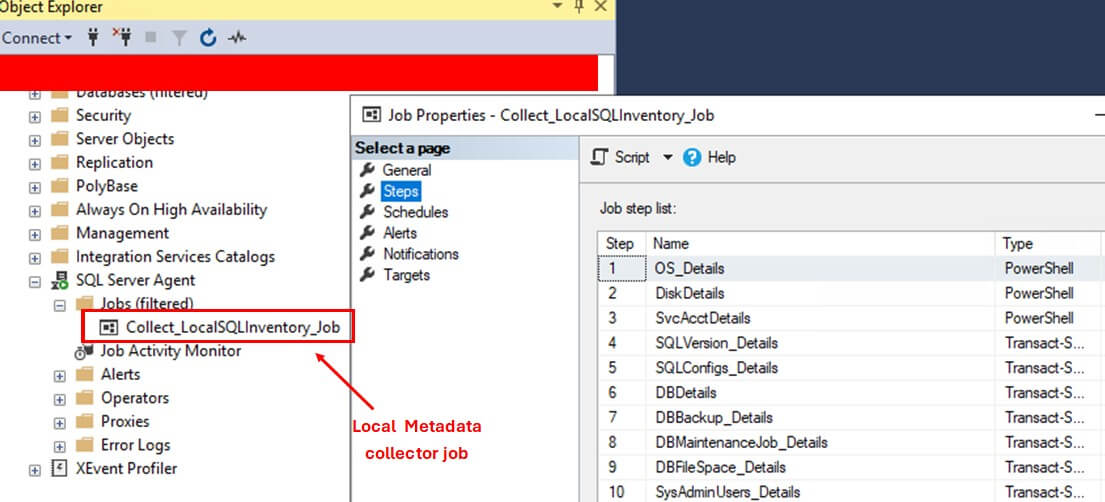
Finally, create a SQL Agent job called Collect_LocalSQLInventory_Job to collect and insert data on these tables. The first three steps in the job use PowerShell scripts to gather OS and disk details and the remaining steps use T-SQL scripts to collect system table data. These scripts need elevated privileges. Make sure the SQL Server Agent service is added in the Local Administrators group and has Sysadmin privilege in SQL Server. Adjust the job schedule and notifications to meet your needs. Run the job manually to check if data is populating correctly.
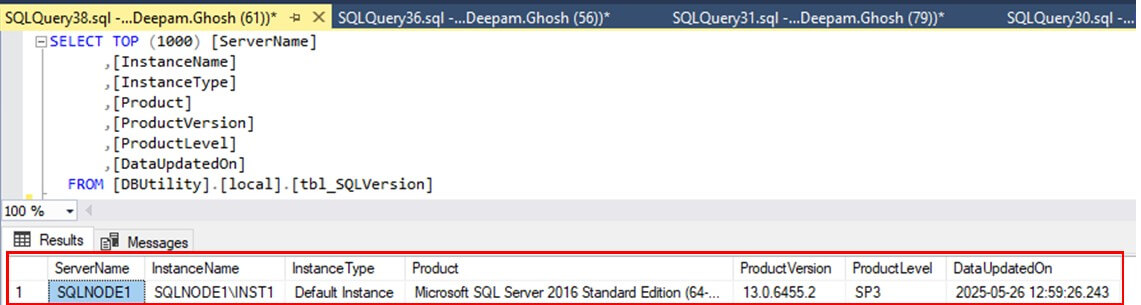
Once the local Data Collector jobs completes, run a query on any of the local tables to verify the collected data.
Configuring the CMS
Next, set up the Central Management Server (CMS), called SQLCMS here. Because the CMS is also a SQL Server, follow the same process described in previous section to collect its metadata. Then, create Central Tables using the schema 'Central'. These tables store metadata from SQLNODE1, SQLNODE2, and SQLCMS. The 'Central' schema helps avoid confusion with the local tables that use the 'Local' schema.
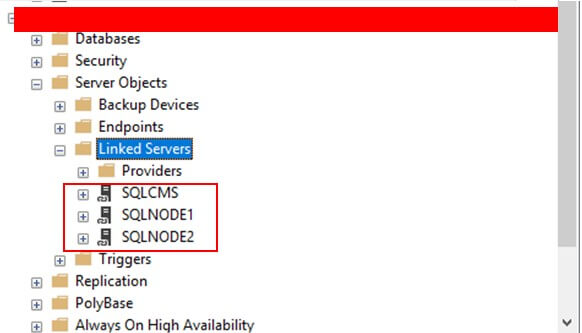
Set up LinkedServers in SQLCMS. These connect to SQLNODE1, SQLNODE2, and SQLCMS itself and will be used by DataSync job to pull the metadata. Use the 'SQLInventoryUser' credentials for these connections.
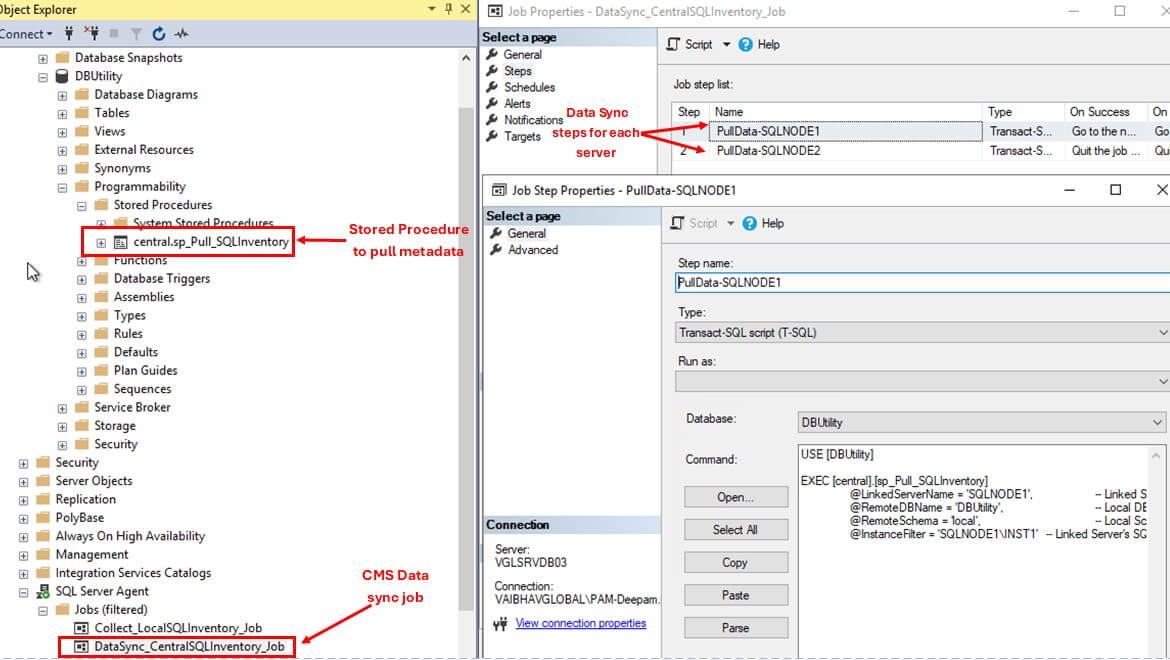
Then create a stored procedure named sp_Pull_SQLInventory. This procedure deletes old data and inserts new metadata into the central tables. To automate this process, create a SQL Agent job named DataSync_CentralSQLInventory_Job. This job runs the procedure every day. Make sure this job runs after the local collection jobs. For example, if the local job runs at 5:00 AM, schedule the sync job for 5:15 AM.
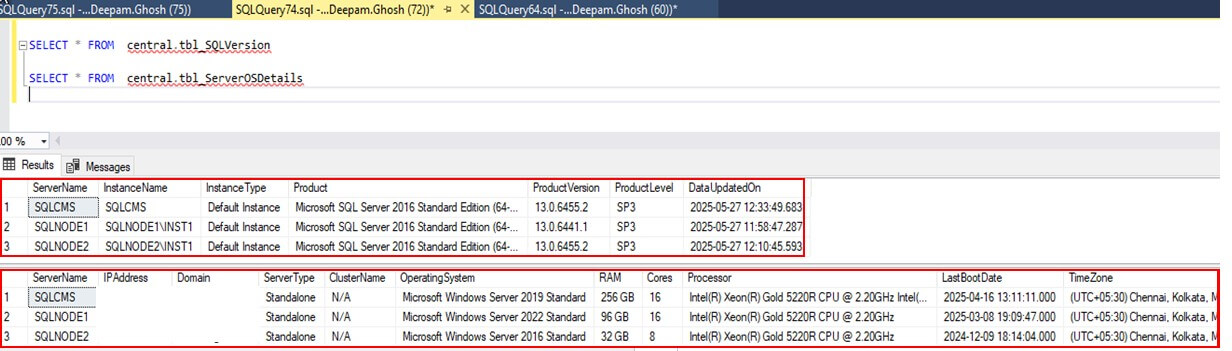
Once the Data Sync jobs completes, run a query on any of the central tables to verify the collected data.
Reporting
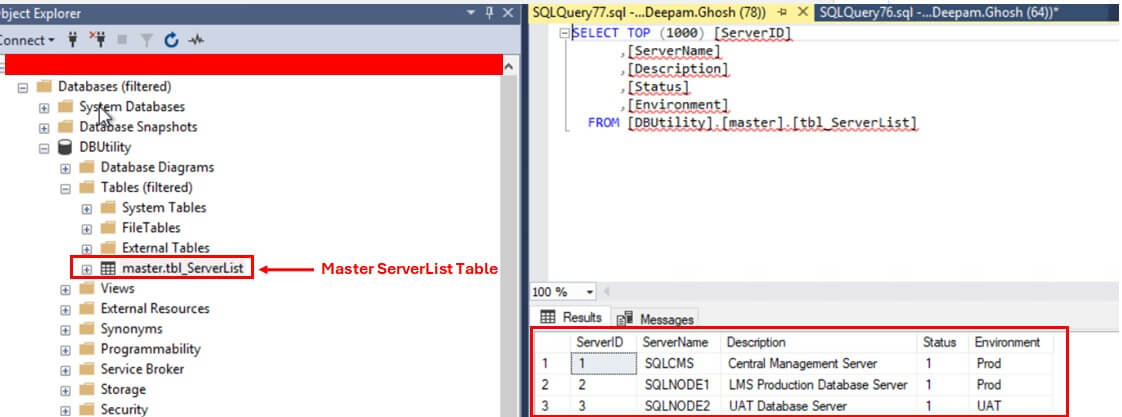
Now that the metadata is centralized, you can create meaningful reports. First, create a master table named ServerList. This table includes columns like Server Name, Description, Status (Active/Inactive), and Environment (Prod/UAT/Dev). Update this table manually when you add or remove servers.
Then, create Custom Views by joining the 'ServerList' table with the central tables. For example,
- 'vw_OSDetails' reports on OS information.
- 'vw_SQLServerDetails' shows SQL Server versions.
- 'vw_SQLConfigDetails' provides configuration settings.
- 'vw_SQLLicenseSummary' gives license summary data.
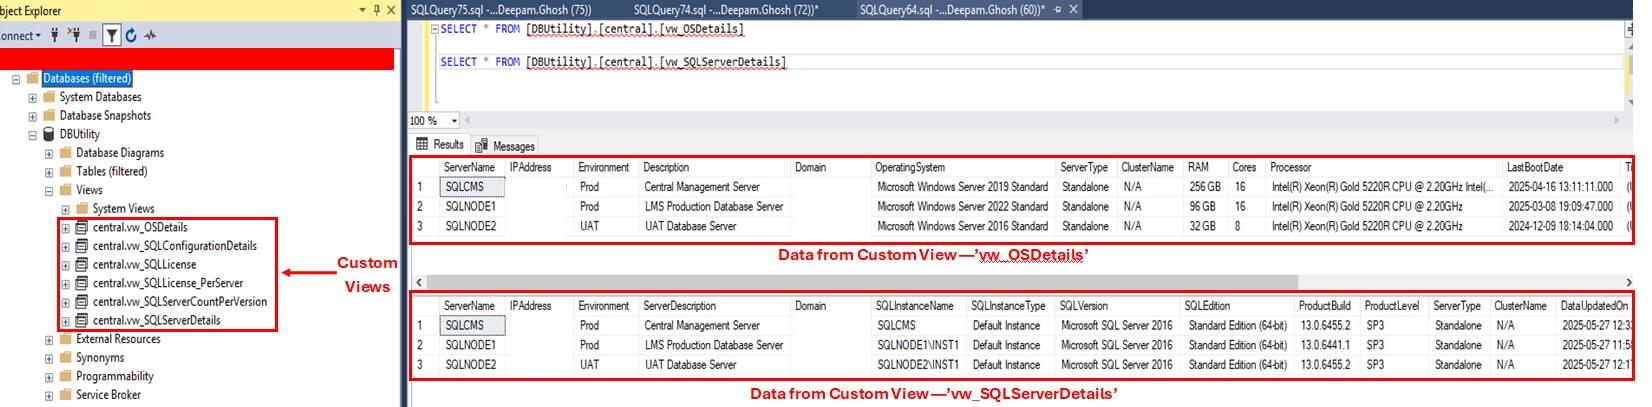
You can use these views in Excel, Power BI, or internal dashboards.
Adding or Removing a Server
To add a new server, for example SQLNODE3, follow the same steps for local metadata collection. Then, Add SQLNODE3 to the 'ServerList' table. Set up a linked server in SQLCMS. Finally, update the data sync job to include SQLNODE3.
INSERT INTO [DBUtility].[master].[tbl_ServerList](ServerName, Description, Status,Environment)
VALUES ('SQLNODE3', 'Production Database Server',1,'Prod')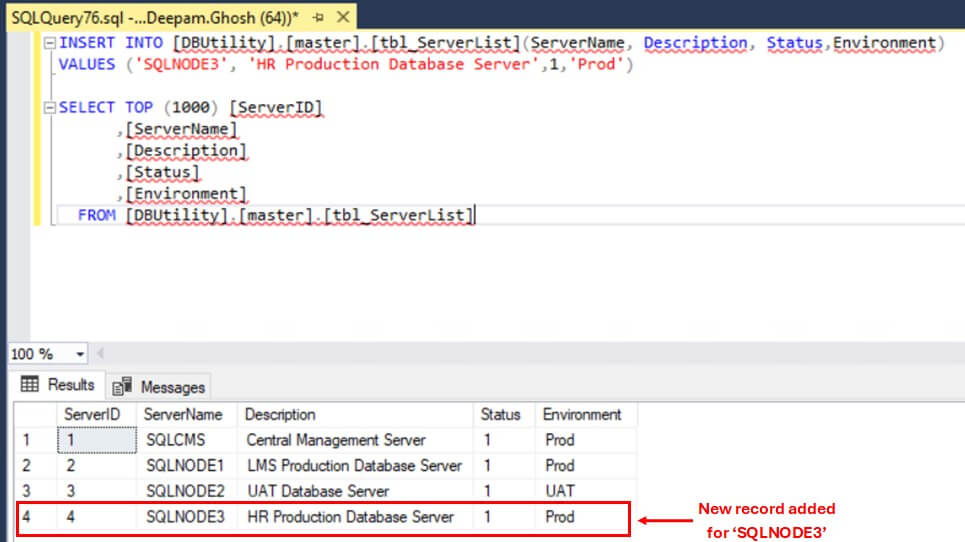
Additionally, run a query on the central tables to verify the data after the data sync job completes.
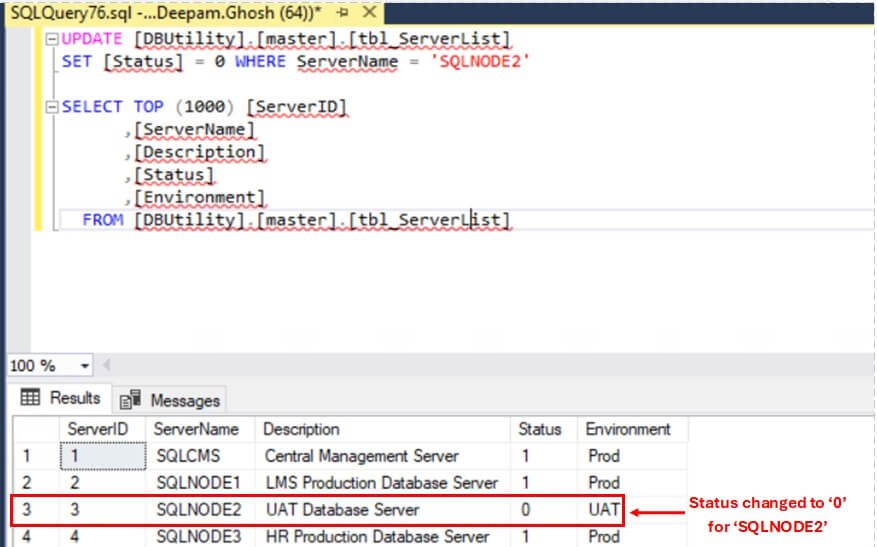
To remove a server for example, SQLNODE2, update its status to '0' in the 'ServerList' table. Delete its records from the central tables. Remove its linked server in SQLCMS. Finally, update the sync job to remove its step.
UPDATE [DBUtility].[master].[tbl_ServerList]
SET [Status] = 0 WHERE ServerName = 'SQLNODE2'
Conclusion
In summary, SQLInventory offers a simple and effective way to manage SQL Server inventory. It works well for small and large environments. By automating data collection, it replaces manual spreadsheets and boosts operational efficiency.

