

What is a LEFT OUTER JOIN?
In SQL, a LEFT OUTER JOIN is a type of join operation that combines rows from two or more tables based on a specified condition and includes unmatched rows from the left table. It allows you to retrieve data from multiple tables based on their related values. A JOIN operation combines rows from two or more tables based on a common column or columns between them. However, a regular (inner) JOIN only includes the matching rows from both tables, excluding any unmatched rows. This is where a LEFT OUTER JOIN comes in.
With a LEFT OUTER JOIN, all rows from the left table (referred to as the "left" or "first" table) are included in the result set, regardless of whether they have matching rows in the right table (referred to as the "right" or "second" table). If a matching row exists in the right table, it is included in the result set along with the corresponding row from the left table. If there is no matching row in the right table, the result will contain NULL values for the columns of the right table.
To understand how a LEFT OUTER JOIN works, let's consider an example with three tables: Employees, Departments, and Salaries. The Employees table contains information about employees, the Departments table contains information about departments, and the Salaries table contains information about the salaries of employees. If you want to retrieve all employees along with their departments and salaries (if available), you can use a LEFT OUTER JOIN to achieve this. Here's an example query:
SELECT E.EmployeeID, E.Name, D.DepartmentName, S.SalaryAmount
FROM Employees E
LEFT OUTER JOIN Departments D ON E.DepartmentID = D.DepartmentID
LEFT OUTER JOIN Salaries S ON E.EmployeeID = S.EmployeeID;
In this query, the Employees table is the left table, and we perform a LEFT OUTER JOIN with the Departments table using the join condition E.DepartmentID = D.DepartmentID. This ensures that all employees from the Employees table are included in the result set, regardless of whether they have a matching department.
Next, we perform another LEFT OUTER JOIN with the Salaries table using the join condition E.EmployeeID = S.EmployeeID. This allows us to include the salary information for employees if it exists. If there is no matching salary record for an employee, the SalaryAmount column will have a NULL value in the result set.
By using a LEFT OUTER JOIN, we can retrieve data from the left table (Employees) even if there are no matching rows in the right tables (Departments and Salaries). This provides us with a comprehensive view of employees, their departments, and their salaries if available.
It's important to note that when using multiple LEFT OUTER JOINs or including additional tables, you need to specify the appropriate join conditions to establish the relationships between the tables. This ensures that the query returns the desired data from multiple sources.
Keep in mind that the specific syntax and conventions may vary slightly depending on the database management system you are using. Therefore, it's always recommended to consult the documentation or guidelines provided by your specific database system for accurate syntax and usage.
What’s the Difference Between LEFT OUTER JOIN And LEFT JOIN?
In SQL, there is no functional difference between LEFT OUTER JOIN and LEFT JOIN. They are two different ways to specify the same type of join operation. Both LEFT OUTER JOIN and LEFT JOIN perform the same task of combining rows from two or more tables based on a specified condition and including unmatched rows from the left table.
The keywords LEFT OUTER JOIN and LEFT JOIN can be used interchangeably in most database management systems. They produce the same result set by including all rows from the left table, regardless of whether they have matching rows in the right table. If there is a match, the corresponding rows from the right table are included in the result set. If there is no match, the result will contain NULL values for the columns of the right table.
The choice of using LEFT OUTER JOIN or LEFT JOIN typically depends on personal preference or the coding style guidelines of your organization. Some database developers may prefer using LEFT JOIN as it is shorter and more concise, while others may prefer using LEFT OUTER JOIN to emphasize the intention of performing an outer join.
In summary, LEFT OUTER JOIN and LEFT JOIN are synonymous in SQL, and you can use either of them to achieve the same result of retrieving data from the left table and including any matching rows from the right table, along with NULL values for non-matching rows.
LEFT [OUTER] JOIN Syntax
The syntax for a left outer join in SQL is as follows:
SELECT column_name(s)
FROM table1
LEFT JOIN table2
ON table1.column_name = table2.column_name;
In this syntax, table1 and table2 are the names of the tables you want to join. column_name(s) represents the column or columns you want to select from the tables. The ON clause specifies the condition for the join, typically matching the columns in both tables.
The keyword LEFT indicates that it is a left outer join. This type of join will include all the rows from the left table (table1 in this case) and the matching rows from the right table (table2). If there is no match, the result will contain NULL values for the columns from the right table.
Feel free to adjust the table names, column names, and join conditions to match your specific use case.
The use of the LEFT [OUTER] keyword is necessary when you want to perform a left outer join. Without specifying this keyword, the default join type is an inner join. Therefore, to achieve a left outer join, it is essential to include the LEFT keyword in your query.
For example, the following query would return all customers, even if they haven't placed any orders:
SELECT *
FROM Customers
LEFT JOIN Orders
ON Customers.CustomerID = Orders.CustomerID;
This query would return all rows from the Customers table, even if there are no matching rows in the Orders table. The unmatched rows in the Customers table would have NULL values in the OrdersID column.
Here is an example of the output of the above query:
CustomerID | Name | OrdersID
----------+-------+---------
1          | John Doe | NULL
2          | Jane Doe | 100
3          | Mary Smith | 200
4          | Peter Jones | 300
As you can see, the unmatched rows in the Customers table have NULL values in the OrdersID column. This indicates that these customers have not placed any orders.
I hope this helps! Let me know if you have any other questions.
Examples of LEFT OUTER JOIN
The first table, departments, has the following data:
iddepartment_name
1Accounting
2Sales
5Compliance
The second table is employees, and you can create it using this query. The table has the following data:
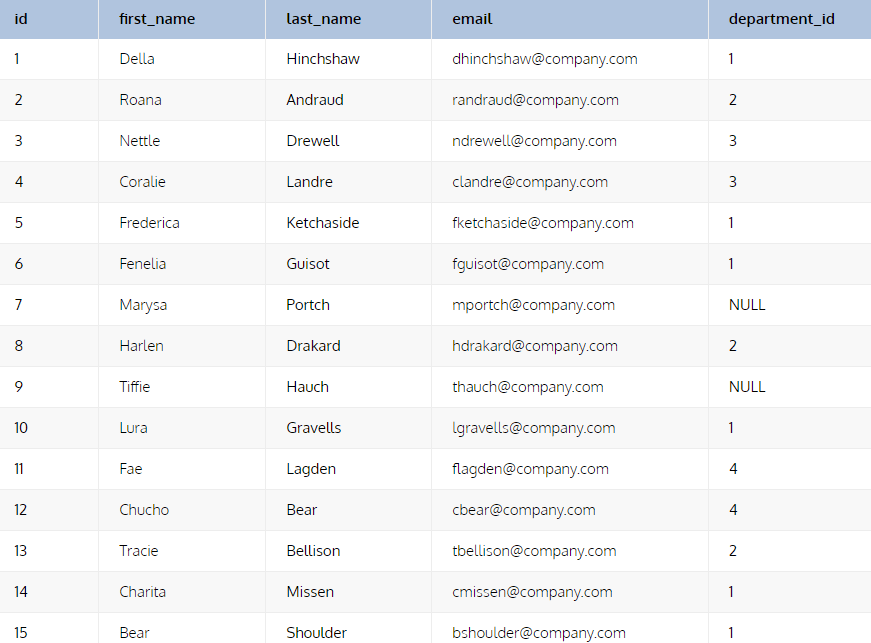
Two employees have a NULL value in the column department_id. These are new employee records that haven’t been updated with the department yet.
Example - Find All Employees and Their Departments
This is an article about LEFT OUTER JOIN, so there’s no surprise: we’ll use exactly that join to solve this problem. Here’s the query:
SELECT e.id,
     e.first_name,
     e.last_name,
     d.department_name
FROM employees e
LEFT JOIN departments d
ON e.department_id = d.id
ORDER BY e.id;
The ID numbers, names, and departments of the workers are the outcome data that we require. These columns are in SELECT because of this. We must access the data from both tables in order to acquire all of these columns. Let's look at the procedure.
The table workers are first mentioned in FROM. Why did you choose this table over the other? Keep in mind that in an LEFT JOIN, it matters which table is referred first. Why? Given that it is the left table, a LEFT JOIN will always return all of the data from that table.
Because we need to list every employees from that database, we start by referring to the table's workers. The table departments are then referred to. If the column department_id from the table workers matches the column id from the table departments, we link the two tables. These two columns are perfect for usage in the join condition since they are common dimensions (the primary key and foreign key) between these two tables.
We group the outcomes according to employee ID to make the output easier to read:
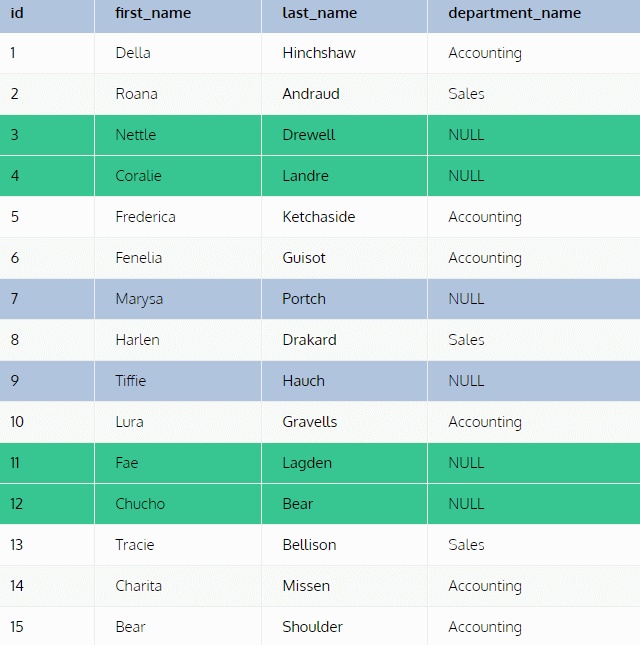
The output lists all 15 employees and their departments, which are Accounting and Sales. Some employees have NULL values in the department_name column. Two of these employees are new employees without an updated department ID in the table. These had NULL values in the initial employee table, and are marked in blue.
Other employees, marked in green, also have NULL values. This is because of the LEFT JOIN. All these employees have a department ID of 4, but the table departments do not contain this value. It seems that the table departments might also need to be updated. A really shabby database for such a respectable fictive company!
Remember: Values from the left table that are not found in the right table will be shown as NULL.
What If We Used an INNER JOIN?
Let’s write the above query again, this time with an INNER JOIN (usually abbreviated to just JOIN) instead of a LEFT JOIN:
SELECT e.id,
e.first_name,
e.last_name,
d.department_name
FROM departments d
JOIN employees e
ON e.department_id = d.id
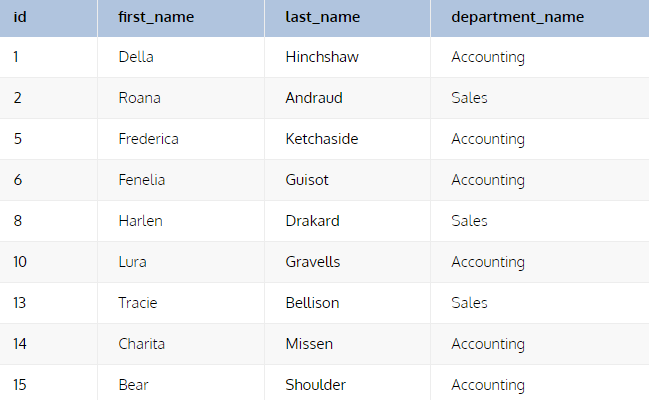
ORDER BY e.id;The syntax is exactly the same; we just used a different join type. Let’s see what the result will be:
Sure, here is the text with the same meaning:
The output shows only nine employees, but there are actually 15 employees in the database. The missing employees are those with IDs 3, 4, 7, 9, 11, and 12. These employees are not included in the result because they have NULL values in the department_name column.
INNER JOIN will only return rows that match both tables. This means that the employees with NULL values in the department_name column are not included in the result, because they do not have a matching row in the departments table.
LEFT JOIN, on the other hand, will return all rows from the left table, even if there are no matches in the right table. This is why the missing employees are included in the LEFT JOIN output.
In this situation, where we wanted to see all employees and their departments, the LEFT JOIN is the right choice. This is because it allows us to see the employees who do not have a department, which can help us to identify any problems with our database.
Beginner's Guide to Writing JOINs in SQL
Writing JOINs in SQL allows you to retrieve data from multiple tables based on their relationships. Here's a beginner's guide to writing JOINs in SQL:
- Understand the relationship between tables: Before writing a JOIN, it's crucial to have a clear understanding of how the tables are related. Identify the common columns or keys that establish the relationship between the tables.
- Choose the appropriate JOIN type: There are various types of JOINs, including INNER JOIN, LEFT OUTER JOIN, RIGHT OUTER JOIN, and FULL OUTER JOIN. Each type serves a different purpose. For beginners, let's focus on the INNER JOIN and LEFT OUTER JOIN:
- INNER JOIN: Retrieves only the matching rows from both tables based on the join condition.
- LEFT OUTER JOIN: Retrieves all rows from the left table and matching rows from the right table. If there's no match, NULL values are included for the columns from the right table.
Depending on your requirement, choose the appropriate JOIN type.
- Specify the join condition: Define the join condition using the ON keyword. It typically involves specifying the columns from each table that should match for the join to occur. Double-check that the join condition accurately reflects the relationship between the tables.
- Write the JOIN statement: Use the JOIN keyword along with the selected JOIN type to combine the tables. Here's the basic syntax for both INNER JOIN and LEFT OUTER JOIN:INNER JOIN:
SELECT column_list
FROM table1
INNER JOIN table2
ON table1.column = table2.column;
LEFT OUTER JOIN:
SELECT column_list
FROM table1
LEFT OUTER JOIN table2
ON table1.column = table2.column;
Replace
column_listwith the columns you want to retrieve from the result set,table1andtable2with the appropriate table names, andcolumnwith the common column used for the join. - Test incrementally: If you're new to JOINs or working with a large dataset, it's advisable to test your JOINs incrementally. Start with simpler queries involving fewer tables and gradually add complexity. Verify the results at each stage to ensure they match your expectations.
- Validate the query results: After writing your JOIN, run the query and review the output. Check for unexpected results, missing data, or incorrect matches. It's essential to validate that the JOIN is producing the desired outcome.
- Consider performance: Depending on the size of the tables and the complexity of the JOIN, it's essential to consider performance implications. Ensure that proper indexes are in place on the columns used for joining to optimize query execution.
- Document your JOINs: Commenting your code and providing explanatory notes can be immensely helpful for future reference and collaboration. Document the purpose of the JOIN, the tables involved, and any assumptions or considerations.
- Seek help and learn from examples: JOINs can be complex, especially when dealing with more intricate relationships or advanced scenarios. Don't hesitate to seek guidance from documentation, tutorials, or online resources. Studying examples and practicing JOINs will help you improve your understanding and proficiency.
Remember, writing JOINs becomes easier with experience. By gradually building your knowledge, understanding the relationships between tables, and practicing JOINs, you'll become more comfortable and proficient in working with JOINs in SQL.
Selecting the Proper Join
Here is a brief overview of the four main types of joins:
- INNER JOIN: This is the most common type of join. It returns all rows from the left table that have matching rows in the right table.
- LEFT JOIN: This type of join returns all rows from the left table, even if there are no matching rows in the right table. This is useful if you want to see all of the data in the left table, even if some of it doesn't have a match in the right table.
- RIGHT JOIN: This type of join is similar to LEFT JOIN, but it returns all rows from the right table, even if there are no matching rows in the left table. This is useful if you want to see all of the data in the right table, even if some of it doesn't have a match in the left table.
- FULL JOIN: This type of join returns all rows from both the left and right tables, even if there are no matching rows in the other table. This is useful if you want to see all of the data in both tables, even if some of it doesn't have a match in the other table.
So, how do you choose the right join? Here are a few things to consider:
- What data do you need? Do you need all of the data from both tables, or just the data that matches?
- Are there any NULL values? If there are NULL values in either table, you'll need to use a LEFT or RIGHT JOIN to see all of the data.
- What is the purpose of the query? Are you trying to find all of the customers who have placed an order, or are you trying to find all of the orders that have been placed?
Once you've considered these factors, you can choose the right join for your query.
How do you determine which table should be the left table after you decide to perform the LEFT JOIN?
When writing a SQL query that involves a JOIN, including a LEFT JOIN, there are two main clauses involved: the FROM clause and the JOIN clause.
- FROM clause: The FROM clause specifies the tables from which you want to retrieve data. The order of the tables in the FROM clause determines the sequence in which they are processed. The table listed first in the FROM clause is typically referred to as the "left" table.
- JOIN clause: The JOIN clause, which follows the FROM clause, specifies the type of join you want to perform and the conditions for the join. In the case of a LEFT JOIN, the left table is explicitly specified in the JOIN clause using the LEFT JOIN keyword.For example, consider the following query:
SELECT *
FROM table1
LEFT JOIN table2
   ON table1.column = table2.column;
In this query,
table1is the left table, as it appears first in the FROM clause. The LEFT JOIN keyword in the JOIN clause indicates that we want to perform a left join, which means we want to retrieve all rows fromtable1and any matching rows fromtable2.The distinction between the left table and the right table is crucial in a LEFT JOIN. The left table is the one from which you want to include all rows, regardless of whether they have matching rows in the right table. The right table is the one from which you want to include matching rows, if any.
To summarize, the order of tables in the FROM clause determines the left table, and the JOIN clause specifies the type of join (e.g., LEFT JOIN) and the conditions for the join. The left table is the one from which you want to include all rows, and the right table is the one from which you want to include matching rows, if any.
Cascading LEFT JOINs
In cascading LEFT JOINs, each LEFT JOIN operation includes all the rows from the left table and matches them with the corresponding rows from the right table based on the join condition. The unmatched rows from the right table are included with NULL values in the result set.
When you perform a LEFT JOIN followed by another LEFT JOIN, the second LEFT JOIN uses the result set from the first JOIN as its left table. This means that all the rows from the left table in the first JOIN will be retained, regardless of whether there is a match in the subsequent JOIN. If a match is found in the right table of the second JOIN, the corresponding rows will be included in the result set along with the previous matching rows. If there is no match in the right table, the result will contain NULL values for the columns of the right table.
Here's an example to illustrate the difference between cascading LEFT JOINs and combining LEFT JOIN and INNER JOIN:
-- Cascading LEFT JOINs
SELECT *
FROM table1
LEFT JOIN table2 ON table1.column = table2.column
LEFT JOIN table3 ON table2.column = table3.column;
In this example, the result will include all rows from table1, along with matching rows from table2 and table3. Unmatched rows in table2 and table3 will have NULL values in the result.
-- Combining LEFT JOIN and INNER JOIN
SELECT *
FROM table1
LEFT JOIN table2 ON table1.column = table2.column
INNER JOIN table3 ON table2.column = table3.column;
In this example, the result will include all rows from table1 and table2 that have a matching value in the join condition. The INNER JOIN between table2 and table3 further filters the result, including only the matching rows between these two tables. Unmatched rows in table2 or table3 will be excluded from the final result.
So, the key difference between cascading LEFT JOINs and combining LEFT JOIN and INNER JOIN is that cascading LEFT JOINs retain all rows from the left table in each join, while combining LEFT JOIN and INNER JOIN filters the result based on the matching rows between the tables involved.
It's important to consider your specific data and requirements when choosing the appropriate approach, as each has its own implications for the result set.
Summary
This article provides an overview of SQL joins, focusing on the left outer join. It includes examples on the SQL Server SQL terminal. The left outer join preserves unmatched rows from the first table, combining them with a NULL row from the second table.
