

Users are getting addicted to generative AIand want to do everything through it. One of these days one of my users asked me if he could use Claude Desktop to access our ERP data instead of opening the application and navigating to the info he needed. Do I think it's wrong? No, I don’t. It’s my job as the IT Guy to make users as happy as possible (terms apply) and that’s what I did. I built a quick and rough MCP that allows Claude Desktop to read info from my SQL Server database. It was much easier than expected but still with some quirks.
In this article I’m going to show what I learned, and we will build an MCP Server to query the Wide World Importers database. Some MCP background comes in handy here but fortunately, Greg Low has just published an article that covers everything required to follow along. Thanks, Greg!
Security Concerns
For this article I assumed we live in a perfect world, and security is not a big issue; here are the problems I didn’t cover properly:
- SQL Security: I created a user with read-only access to all the needed tables and views in the database. Whoever uses the MCP will have access to that data.
- Data from your SQL server is sent to Anthropic for LLM processing. Anyway, most of us already do this all the time: we have data on OneDrive/SharePoint/Azure/etc. and we use Copilot to help us on our documents. The only way to avoid this is to use a local LLM Server like Ollama.
Besides that, the Wide World Importers database has Row-Level Security (RLS) enabled. For simplicity of the example, we need to disable it:
ALTER SECURITY POLICY Application.FilterCustomersBySalesTerritoryRole WITH (STATE = OFF);
Big picture
Our goal is to enable Claude Desktop to query our SQL Database through MCP. We will use the following architecture:
- HTTP MCP Server (written in Python with the fastMCP library);
- HTTP to STDIO proxy, since at the time of writing, Claude Desktop doesn’t support HTTP MCP, only STDIO (also written in Python);
- Deployment of the HTTP service in a docker container.
You can get the code and instructions on building the example in GitHub.
Building the HTTP MCP Server
Let’s start simple. We will build a MCP Server that will only acknowledge that it’s working. You query it and if the connection to MCP Server is working it will reply with an “Hello World”:
from fastmcp import FastMCP

mcp = FastMCP("MCP Simple Server", version="1.0.0")

@mcp.tool()
def helloWorld() -> str:
    """
    Simple hello world tool to test mcp server is connected and working.
    If client ask for presence of mcp simple server use this.
    """
    return "Hello World"

if __name__ == "__main__":
    mcp.run(
        transport="http",
        host="0.0.0.0",
        port=8000
    )
The code is almost self-explanatory. We begin by importing and creating an instance of the fastMCP class.
Then, we create the helloWord tool (have you read Greg’s article?). You create a tool by using the @mcp.tool() decorator before the function definition; all tools will be visible to the MCP client.
The docstring (the text between the """) is a very important part of the tool! In Python it’s used to document the code, but in fastMCP it’s used to tell the MCP client what the tool does. We will see better examples of it when creating the SQL version of the MCP Server.
Finally, we run the MCP Server using HTTP protocol on port 8000.
And that’s all we need for a simple MCP Server! When you run the code, the server will start listening to requests.
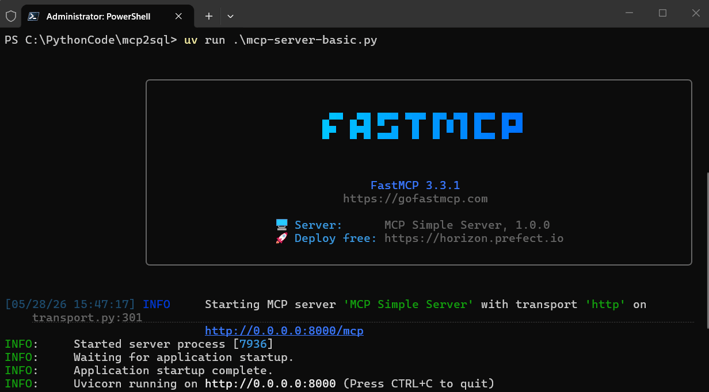
You can now open the MCP address in a browser, but because browsers don’t support streamable HTTP, you’ll get an error. And remember: 0.0.0.0 just means “all network interfaces on this machine” — you can’t use it directly in a browser. Use 127.0.0.1 instead. The result is this:
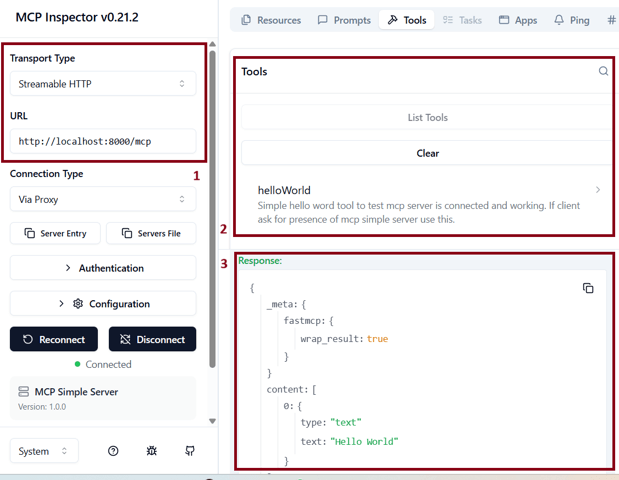
{"jsonrpc":"2.0","id":"server-error","error":{"code":-32600,"message":"Not Acceptable: Client must accept text/event-stream"}}To see any meaningful results the best tool to use is MCP Inspector. When you run it, you configure where MCP server is listening (1) and then you can list the tools available (2) and even query the tool (3).
With MCP Inspector you can see what the tools return, but the real magic happens when that information is fed into an LLM — and for that we need an LLM client that supports local MCP Servers which at the time of writing only Claude Desktop does.
Building the HTTP - stdio Proxy
Unfortunately, as of this writing, Claude Desktop doesn’t support HTTP MCPs, just stdio so we will need a proxy that talks stdio with Claude and HTTP with our server.
The only proxy I could find is a Node.JS tool, which to be used, needs to have Node.JS installed on the client's machine. I don’t like the idea of having to install Node.JS on every client's machine just to use a simple tool as a proxy so I turned to fastMCP, because besides implementing MCP Server it also implements a proxy and it’s very easy to do it:
import sys
from fastmcp.server import create_proxy
from fastmcp.server.providers.proxy import ProxyClient

if len(sys.argv) < 2:
   print(f"Use: {sys.argv[0]} http://server:port/mcp", file=sys.stderr)
   sys.exit(1)

url = sys.argv[1]
proxy = create_proxy(ProxyClient(url))

if __name__ == "__main__":
   proxy.run()
This small code implements the proxy and accepts the MCP server address as a parameter so you can use the same code to any server.
At this point we got rid of Node.JS but now we need to install Python to run the proxy which isn’t good either, so we need to go a step further and use PyInstaller to create a standalone EXE that we can deliver to the client (full instructions on GitHub).
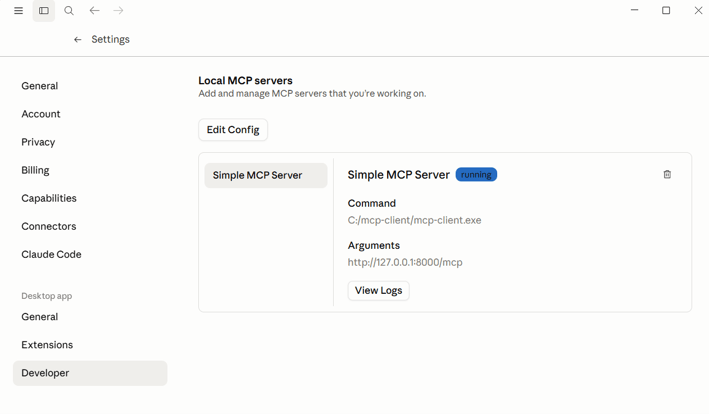
With our EXE ready we just need to add it as a MCP Server on Claude. For that, click your account name in the bottom left corner and access Settings->Developer->Edit Config, which will open the folder where claude_desktop_config.json is. Edit it and add:
"mcpServers": {
   "Simple MCP Server": {
      "command": "C:/mcp-client/mcp-client.exe",
      "args": [
          "http://127.0.0.1:8000/mcp"
      ]
    }
},
You should now have something as:

Close Claude (you must close it in the Taskbar, if you just close the window, it will remain working in the background). Now, when you open it and go to Settings->Developer you should see you MCP Server:
Finally, we are ready to test it! And if everything is working fine and after accepting to trust the helloWorld function, you will see the famous “Hello Word”

Handling multiple requests
This is all we need to know about fastMCP to create our server. We just need to handle another small issue before going to the SQL Code, and that is assuring our server doesn’t block when doing a SQL query. If we don’t take some measures, our server will be blocked while doing a query to the database and no other user will be able to make requests.
We need to run the SQL queries in separate threads so the server can continue to run the main thread normally and accepting requests. The “SQL thread” will create a connection to the server, run the query and notify the main thread that it’s ready. Then main thread replies to the MCP client with the data. To create a new thread for query we just need to use:
return await asyncio.to_thread(run_query)
Threads are recyclable. That means they stay around when they are not in use and when a new thread request comes around, they are used. Why is this useful? Because we can open the database connection only once by thread and thus save time. It works like this:
- Request 1 comes, thread 1 is created, connection to database is created, query 1 is sent to SQL Server;
- Request 2 comes, thread 2 is created, connection to database is created, query 2 is sent to SQL Server;
- Query 1 ends, thread 1 is released and response is sent to client;
- Request 3 comes, thread 1 is reopened, connection is already open, query 3 is sent to SQL Server:
- ………..
To ensure that each thread gets its own connection instance, preventing conflicts and making the code thread-safe we use:
_local = threading.local()

def get_conn():
   if not hasattr(_local, "conn"):
       _local.conn = pyodbc.connect(
           "DRIVER={ODBC Driver 18 for SQL Server};"
     ……
     ……
   )
   return _local.conn
Getting SQL Data
The hard work is done! We now just need to write the code to query the SQL server. The best part is that after the first function/tool we just copy/paste and change the query accordingly. Let’s go!
Our first tool will get a list of customers:
@mcp.tool()
async def customers() -> list[dict]:
"""
lists WideWorldImporters customers.
use this to get the customerid for a customer requested by the user and needed for other queries.
"""
def run_query():
with get_conn() as conn:
rows = conn.execute(
"SELECT [CustomerID], [CustomerName], [CustomerCategoryName], [PrimaryContact]"
",[BuyingGroupName] ,[CityName] "
"FROM [Website].[Customers]"
).fetchall()
print("Returning " + str(len(rows)) + " costumers")
return [
{"customerid": r.CustomerID, "customername": r.CustomerName, "customercategoryname": r.CustomerCategoryName,
"primarycontact": r.PrimaryContact, "buyinggroupname": r.BuyingGroupName, "cityname": r.CityName}
for r in rows
]
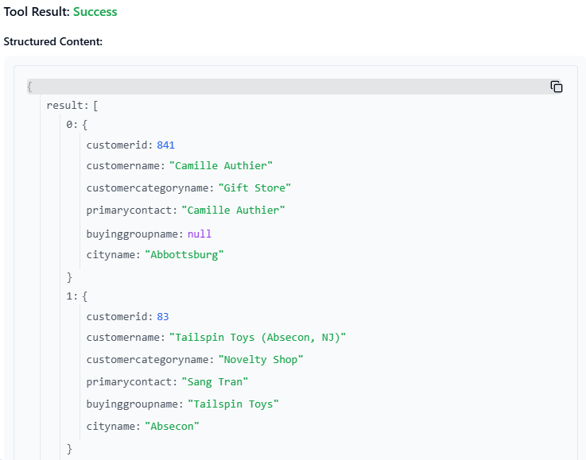
return await asyncio.to_thread(run_query)Nothing to fancy, gets a connection to SQL with get_conn(), executes the query and saves the result in rows; then enumerates all rows (for r in rows) to return them. Just be aware that the code is case-sensitive. If your SQL query returns a column named CustomerID, then you must access it as r.CustomerID — the attribute name must match the column name exactly.
If we run the tool in MCP Inspector, we can already see what’s coming from SQL Server.
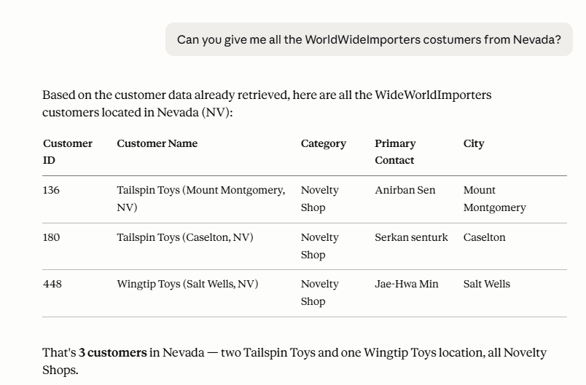
In Claude we can already look for Customers and thanks to LLM we can ask for queries that the data can’t answer, for example, “list customers from Nevada”. The LLM will try to match the cityname to the State and return only relevant ones.
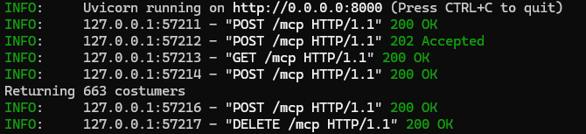
You can also add some debugging if you want. For example,
print("Returning " + str(len(rows)) + " costumers")will print the number of customers fetched from the database on the server standard output device:
From here it’s quite easy to create other tools. To create a function to retrieve customers’ balance just copy and paste the previous function and just change the name of the function and the query code:
rows = conn.execute(
"select CustomerID,sum(TransactionAmount) as Balance from Sales.CustomerTransactions"
" group by CustomerID"
).fetchall()
print("Returning " + str(len(rows)) + " costumers")
return [
{"customerid": r.CustomerID, "balance": r.Balance}
for r in rows
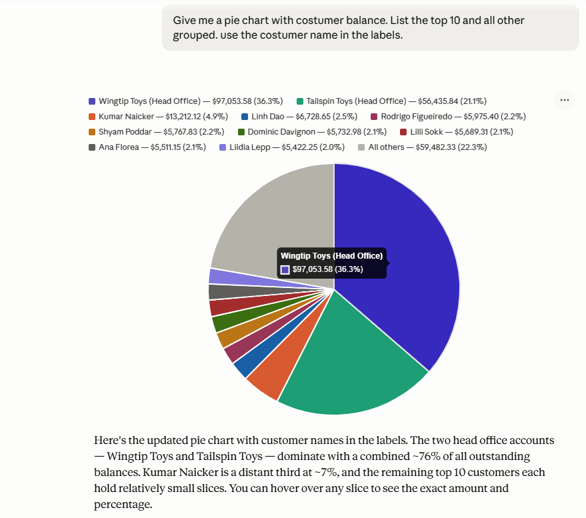
]You can now ask for balances:
You can also use parameters in the tool when you want to focus on specific data. For example, to get open invoices for a specific client.
@mcp.tool()
async def customeropeninvoices(customerid: int):
    """
    Returns open invoices for a specific customer.
    allways use the customers() tool to get the costumerid of a specific costumer
    never call this tool wihout a valid customerid, otherwise it will return an error.
    """

    ……
    ……

            rows = conn.execute(
                """
                SELECT InvoiceID, TransactionDate,TransactionAmount
                FROM Sales.CustomerTransactions
                WHERE CustomerID = ? and outstandingbalance <> 0
                ORDER BY TransactionDate
                """,
                (customerid,)
            ).fetchall()
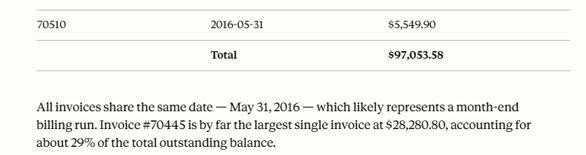
There are good reasons to use parameters instead of just getting all available data. First, it would take much longer to return all data and second if it’s a lot of data you may reach a limit. This happens if, for example, you try to get all invoices, not just the open ones, for customers with a lot of invoices:

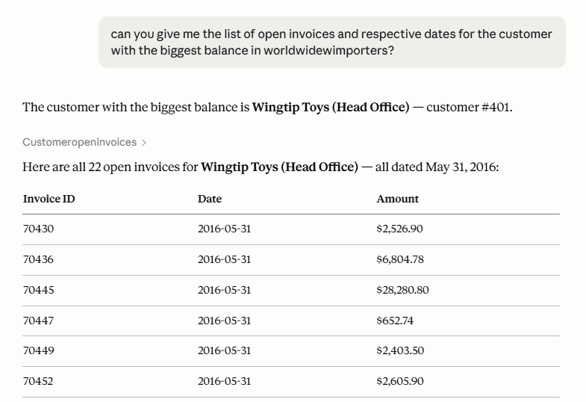
We now have 3 tools, one to get costumer names, one for costumer balances and another one to get open invoices. Claude will use what it needs to get your answer and because we used docstrings to explain what each function does and when to use it, Claude won’t have a problem using all of them to get an answer to queries like:
…
…
This will need to check costumersbalance() to search for the biggest one, then with the customerid look at the name on customers() tool and get invoices for it in the customeropeninvoices() tool.
And that’s all you need to start writing SQL MCP Servers! After the initial pain of getting everything working, adding tools is as easy as it could get. Now, to be perfect, we just need an extra step.
Docker Time
At this poing we have a MCP server that we can run from the command line with something like uv run .\mcp-server-sql.py. It’s nice for testing but not suitable for production.
The easiest way to get our server into production is to deploy it on Docker. That could be Docker Desktop on your Windows computer or a Docker in your network. In my case, I have an underused VMware ESXi 6.5 (that’s old!) where I installed a new ubuntu virtual machine, installed Docker on the Ubuntu and published my MCP served there:
docker -H ssh://<username>@<IPADDRESS> build -t mcp-server-sql
docker -H ssh:// ://<username>@<IPADDRESS> run -d --name mcp-server-sql -p 8000:8000 mcp-server-sql
And it’s up and running like a charm!
Docker will need a Dockerfile to know how to build the image. It’s out of the scope of this article to show what is needed to build it, but I supplied one in GitHub, so you just need to run the commands!
Note that if you shall use Docker Desktop on your local machine and SQL is also in your machine, you must change the 127.0.0.1 address because in Docker that will point to the Docker container address not your PC’s address!
I had a great time building this project, and I hope you love it as well!

