
The Subscriber is the server where all the changes that are published by replication get delivered to. Every publication needs to have at least one subscriber, but it can have many of them. There are several configurations possible. This level of the Stairway assumes that you have followed the first six levels and that you have a merge publication setup ready to be subscribed to.
Setting up a Subscription
To be able to create a subscription to a merge publication you must connect to SQL Server using a login that is defined on the subscriber as well as on the publisher and has at least db_owner level permissions in both the subscription database and the publication database.
Connecting to Publisher
To start out you need to connect with object explorer to the subscriber. Expand the Replication folder and right click on "Local Subscriptions". Select "New Subscription…" in the context menu that opens, as shown in Figure 1. This will open the "New Subscription Wizard".
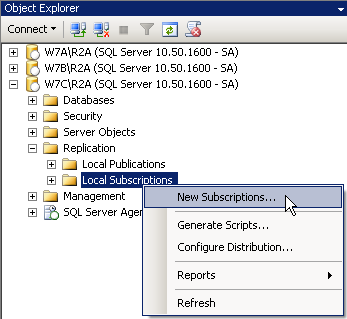
Figure 1: Selecting "New Subscriptions…"
The first step here is to let the subscriber know which publisher to use. The second page in this wizard, the one after the welcome screen, is the "Publication" page shown in Figure 2. This is the place where you identify the publisher, the publication database and the publication itself.
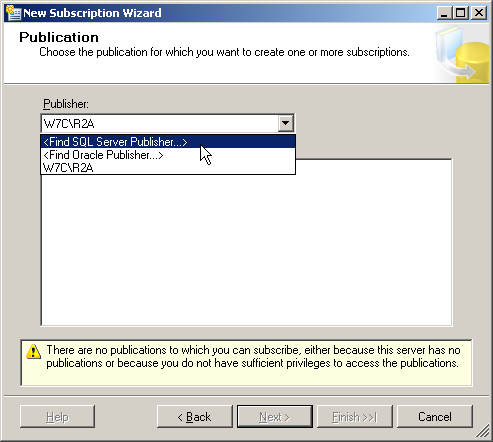
Figure 2: Identifying the publisher
When this page opens, the "Publisher" dropdown menu contains the name of the server you are connected to right now, which is the subscriber. Pick "<Find SQL Server Publisher…>" from the dropdown to select your publisher instead. This opens the standard connection dialog, allowing you to connect to your publisher.

Figure 3: Selecting the publication to subscribe to
After you connected successfully, the "Databases and publications" field will show all published databases and their respective publications that are defined on your publisher. Figure 3 shows the merge publication we created in Level 6 of this Stairway.
Selecting subscription type
If you read the levels about transactional publication you will remember that while you do not have to select the replication type again as that is defined by the publication, you have to choose between push and pull as the model for your subscription. This is true for merge replication as well. For transactional replication the difference between a push subscription and a pull subscription is the location where the distribution agent executes. Merge replication does not use the distribution agent. Instead every subscription has its own merge agent. The choice of push or pull for a subscription for a merge publication therefore selects where the merge agent executes.
Push subscription or Pull subscription
The "Merge Agent Location" page of the new subscription wizard, shown in Figure 4, allows you to make your selection between the push and the pull subscription model. If you choose push subscription, the merge agent of each subscription that you set up in this wizard execution will reside on the distributor.

Figure 4: Specifying the merge agent location
If you instead select pull subscription, each subscriptions merge agent will be executed on its subscriber.
Having each agent execute at its subscriber gives the subscriber full control over when the synchronizations are happening while it also reduces the stress on the distributor. With merge replication primarily designed for the "work disconnected – synchronize when connected" model, pull subscription is most often the prefered choice.
As it is the case with transactional replication, you can have some subscribers of a single publication be push subscribers while others are pull subscribers. You just need to execute the wizard more than once to create such a layout.
The selection of the subscription type here will cause some minor changes in the following pages of the wizard. Where appropriate, both versions are shown, so no matter what your selection at this point is, you will still be able to follow the examples in this level.
Target Database
The next page of the "New Subscription Wizard" is shown in Figure 5.

Figure 5: Selecting the subscription databases
Here you can connect to as many subscribers as you like (by pressing the "Add SQL Server Subscriber" button) and select the target database for each of them. The server you started the wizard from is automatically present in the list. While it is possible to have the same server subscribe twice to a publication with different target databases, this wizard does not allow you to add the same subscriber more than once.
When selecting the target database for a subscriber, you can choose from the existing databases on that server. You can also select "<New database…>". That option opens the "New Database Wizard" and allows you to create a new database right from here. When you pick an existing database you need to be careful to pick the correct database. The initialization step of replication drops and recreates all objects that are part of the publication in the subscription database. If you picked the wrong database and that database has objects of the same name as objects that are replicated, those objects will be dropped. There is no warning anywhere in the process.
Security
The next wizard page allows you to set the accounts used to connect to the publisher, distributor and subscriber and to execute the agents. For each subscriber that you selected on the previous page you have to make a selection here by clicking on the ellipsis button at the end of the row that names the subscriber. Figure 6 is an example of this form page showing multiple subscribers.
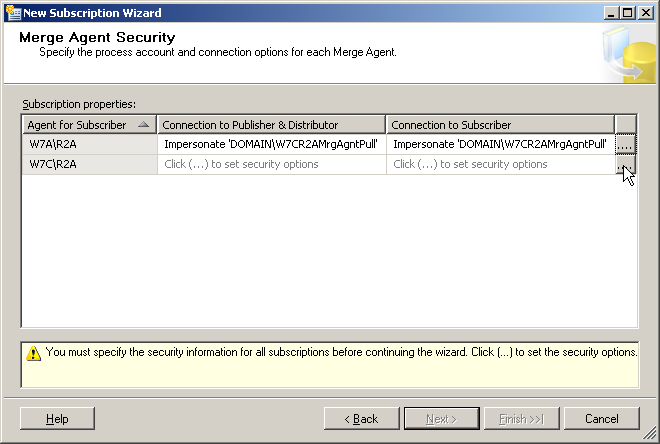
Figure 6: Controlling the merge agent accounts
Pressing the ellipsis button will open a new form that allows you to provide the security information. The accounts you provide in this form will show up in the two columns that are shown in Figure 6. They are greyed out until you made a selection. The security information form looks a little different, depending on your selection of the push or pull subscription method. Similar to transactional replication, there is an overwhelming amount of connection information needed to setup merge replication. Level 8 of this Stairway will show in more detail the inner workings of merge replication and shed some light on the connections necessary. For now we need to allow the merge agent to connect to the Publisher, to the Distributor and to the Subscriber.
Push Subscriptions
If you selected push subscription earlier in the wizard, pressing the ellipsis button on the Merge Agent Security page will open the form that is displayed in Figure 7. It requires you to specify the Windows account that should execute the merge agent. That Windows account will also be used to connect to the publisher and the distributor. For the connection to the subscriber you can either choose to use the same Windows account, or you can specify a separate SQL Server login.
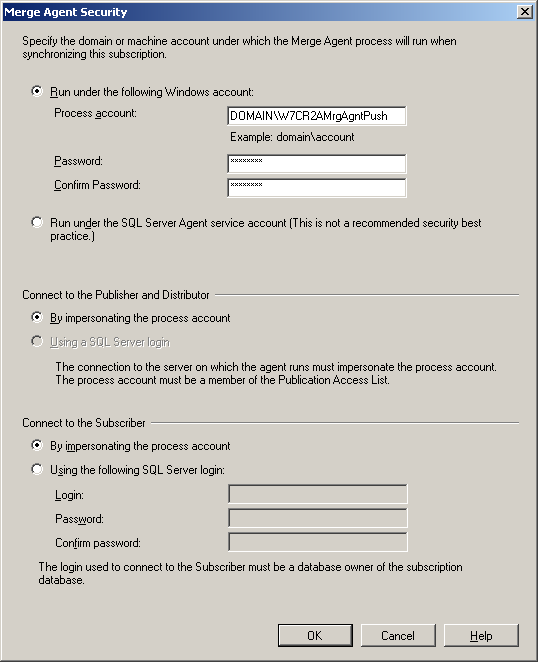
Figure 7: Selecting the merge agent security properties for a push subscription
The account used to execute the merge agent needs to have the following permissions:
- Member of the db_owner fixed database role in the distribution database
- Member of the Publication Access List
- Read permissions to the snapshot share
The account used to connect to the subscriber needs to be a member of the db_owner fixed database role in the subscription database.
Pull Subscription
Figure 8 shows the form that opens, when you selected pull subscription earlier. Again you need to provide a Windows account for the agent to execute under. In pull subscriptions the agent executes on the subscriber, so this same Windows account will also be used to connect to the subscribers SQL Server instance. For the connection to the publisher and the distributor you can choose to provide a separate SQL Server login or to have the agent use integrated security.
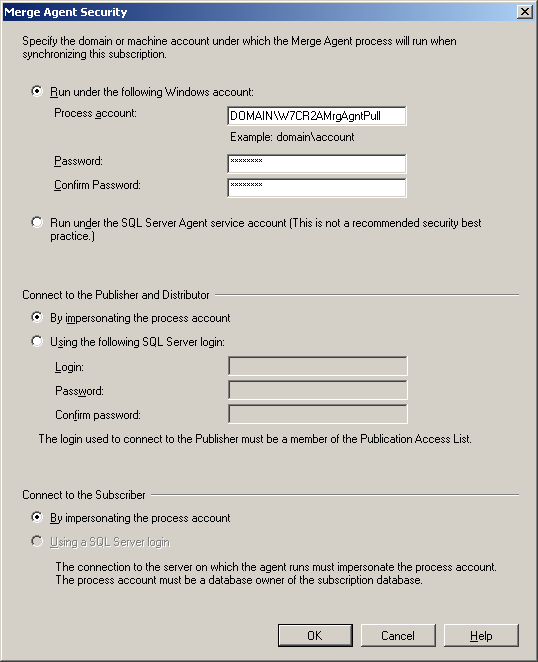
Figure 8: Selecting the merge agent security properties for a pull subscription
The account used to execute the merge agent needs to be a member of the db_owner fixed database role in the subscription database. The account used to connect to the publisher and distributor needs to have the following permissions:
- Member of the Publication Access List
- Guest access to the distribution database
- Read permissions to the snapshot share
The account does not need to be db_owner in the distribution database as it is the case for push subscriptions.
If you compare these forms to their counterpart for transactional replication you will notice the additional requirement of connecting to the publisher. That was not an obvious requirement for transactional replication, where this form only mentioned the distributor and the subscriber. However, even in transactional replication the credentials for the connection to the distributor needed to be on the publication access list. To be on the publication access list an account needs to have access to the publication database. Being on the publication access list is a requirement for the connection credentials used to connect to the distributor for merge replication as well. Therefore it also makes sense to require the credentials used to connect to the distributor to be the same as the ones used for the publisher.
The Publication Access List
The Publication Access List was described in detail in Level 4 of this Stairway. It is accessible in the properties dialog for the publication. To be eligible to be a member of the PAL, a login must have these properties:
- It must be a login on the publisher
- It must be a login on the distributor
- It must have access to the publication database
For more information of how to add an account to the PAL, please refer to Level 4.
Once a login is added to the PAL it automatically becomes a member of several additional database roles in the publication database. Do not manually remove it from those roles.
Schedule
The next step after setting up security is to define the schedule for synchronizations. The "Synchronization Schedule" page of the wizard, shown in Figure 9, allows you to specify for each subscriber separate if you would like synchronization to happen continuously, on a fixed schedule or on demand only. The continuous option is the default for transactional replication but does not make a lot of sense if the connection between the subscriber and the publisher cannot always be guaranteed. If you know that your subscriber will be connected at fixed times, say every day at midnight, you can define a schedule for the synchronization. The default setting is to start the synchronization by manual request only. That "manual" request could be triggered by an external application, for example every time a VPN connection is established.
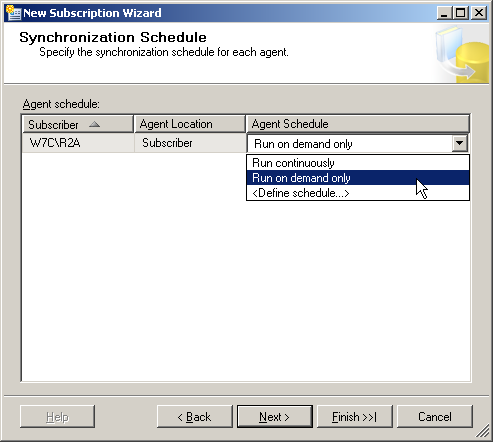
Figure 9: Setting the schedule for synchronization
Initialization
Following the schedule page in the wizard is the page that is shown in Figure 10. It allows you to specify if and when the subscription database should be initialized. As with transactional replication, in most cases you need initialization to happen. Check out Books Online for details on when the initialization step can be skipped.
If you have a lot of data that needs to be replicated, that initialization will take some time, so you need to execute it when you can ensure that the connection between the subscriber and the publisher will be uninterrupted for that entire timeframe. If you select "At first synchronization" here, the user starting the first synchronization will have to wait for initialization to finish. If you select "immediately" you will have to wait before you can disconnect the subscriber.

Figure 10: Specifying when to initialize the subscriptions
Subscription Type
While the previous four wizard pages were probably familiar to you if you read the Levels about transactional replication, the next page which you can see in Figure 11 is unique to merge replication.
It allows you to select the subscription type. The available options are "Server" and "Client". This setting has two implications:
- If you want to republish the data on this subscriber, you have to select "Server" here. If you pick client, you will get an error when you later try to create a publication in this subscription database.
- You can specify a priority value for "Server" subscriptions. This priority value gets used when conflicts between different subscribers have to be resolved. A "Client" subscription always gets handled on a "first in wins" basis. You can find details about conflict resolution in Level 8 of this Stairway.

Figure 11: Specifying subscription types and conflict priorities
Finishing Up
The last three pages of the wizard should be familiar to you by now. They allow you to select whether you want the wizard to create the subscription or create a script that you can use later to create the subscription. You get a chance to review all your settings and you can watch the spinning wheel, while the wizard does its work. After everything is done you can check out the report that gives details about what succeeded and what went wrong. The three pages are shown in Figure 12, Figure 13 and Figure 14.
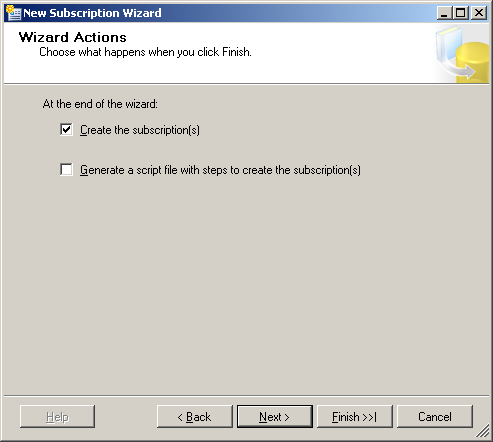
Figure 12: Wizard Actions

Figure 13: Reviewing the options chosen
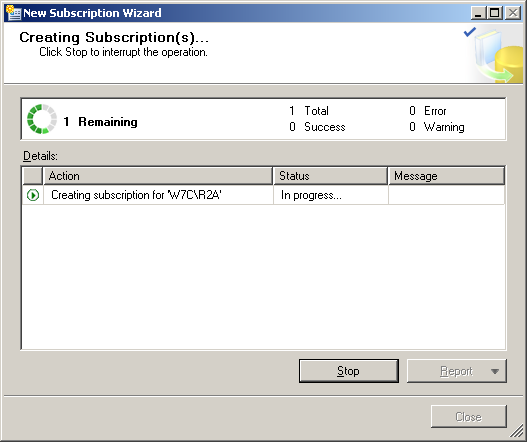
Figure 14: Creating the subscription
Retention
Retention, as it is the case for transactional replication, is really a property of the publication. However, it affects the subscribers directly and is therefore mentioned here.
The retention settings for merge replication are a lot simpler than the ones for transactional replication.
Transactional replication has three retention settings, two of which deal with the retention of transactional data in the distribution database.
Merge replication on the other hand has only a single setting that defines how long a subscriber can be offline. Once a subscriber exceeded that time limit without a successful synchronization happening, you have to reinitialize that subscriber. Changes that happened on the subscriber since the last synchronization will be lost in that case.
You can set the retention period on the "General" page of the properties dialog of the publication. To get to this dialog you need to connect to the publisher in Object Explorer, open the Replication folder and the Local Publications subfolder and right click on the publication you want to change. In the context menu select "Properties", and the properties dialog will open showing the "General" page. This page is shown in Figure 15.

Figure 15: Subscription expiration
Manual Synchronization
If you want to synchronize a subscriber with its publisher manually you can follow these steps:
Connect to the subscriber in Object Explorer open the Replication folder and under it the Local Subscriptions subfolder and right click on the subscription you want to synchronize. In the context menu that opens – it is shown in Figure 16 – select "View Synchronization Status".

Figure 16: View Synchronization Status
The dialog that opens is shown in Figure 17. It allows you to start the synchronization and it shows the status of the last synchronization. To initiate the synchronization click the "Start" button. You can also get to the history of the merge agent job from here by clicking the "View Job History" button.
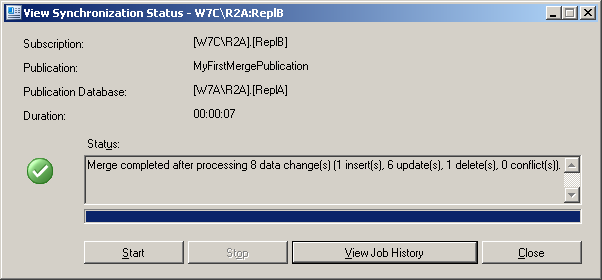
Figure 17: Synchronization dialog
Summary
In this Stairway Level 7 we worked through the setup of a merge replication subscriber. First we covered how to connect to the publisher followed by a discussion of the differences between push and pull subscriptions. We saw how to select the target database and how to setup agent security including the Publication Access List. We learned how to schedule the synchronization events and how to select subscription initialization options. The Subscription Type was introduced together with the conflict priority setting. Finally the subscription expiration setting was discussed.
If you followed all the steps you now should have a working merge replication setup. You can now test your replication scenario, by making some data changes on the publisher as well as the subscriber and see how they get replicated across. Keep in mind that you need to either synchronize manually or wait for the scheduled synchronizations to happen (depending on the settings you chose on the "Synchronization Schedule" page) before you can see the data changes on the other side of your replication setup.
The next level of this Stairway will explain how merge replication works internally. It will also lay out how conflicts are handled in merge replication and introduce conflict resolvers.