
Level 4: Transactional Replication – The Subscriber
The Subscriber is the server where all the changes that are published by replication get delivered to. Every publication needs to have at least one subscriber, but a publication can have many subscribers. This level assumes that you have followed the first three levels and that you have a publication set up, to which you can subscribe.
Setting up a subscription
To be able to create a subscription you must connect to SQL Server using a login that has access to the subscriber as well as the publisher. Additionally this login needs to have at least db_owner level permissions in the subscription database as well as in the publication database.
Connecting to Publisher
First you need to connect with object explorer to the subscriber. Open the Replication folder and right click on “Local Subscriptions”. Select “New Subscription…” in the context menu that opens, as shown in Figure 1. This will open the “New Subscription Wizard”.

Figure 1: Selecting "New Subscriptions..."
The first page in this wizard that requires a decision to be made is the “Publication” page shown in Figure 2. Here we need to identify the publisher, the publication database and the publication itself.

Figure 2: Publication
The dropdown menu at the top contains the name of the server you are connected to right now, which is the subscriber. As the publisher in our scenario is a different SQL Server instance, you need to pick “” from the dropdown. This opens the standard connection dialog, allowing you to connect to the publisher.

Figure 3: Select a publication
After the publisher is identified and connected to, the form displays a list of all publications on that publisher, grouped by their publication databases. In Figure 3 you can see the publication we created in Level3 of this Stairway.
Selecting subscription type
Unlike the steps involved in creating a publication, to create a subscription you do not need to select which type of replication you want to use. That makes sense, as the type of replication is defined by the publication that we selected. In the case of transactional replication there is however one thing you need to decide for every subscriber independently. That decision defines the subscription type. You have the choice between PushSubscription and Pull Subscription.
The data gets moved from the distribution database to the subscription database by the distribution agent. Each subscription is served by its own distribution agent. The difference between push and pull subscriptions lies in where this agent executes, and therefore who has control over when the data movement occurs.
Push subscription
For a push subscription this agent executes on the distributor, “pushing” the data to the subscriber.
If you need the data to be moved from the publisher to the subscriber in the shortest timeframe possible in a continuous manner, it is best to go with push subscription. This is by far the most common scenario in transactional replication.

Figure 4: Select Push Subscription
Figure 4 shows the “Distribution Agent Location” page of the wizard. Pick “Run all agents at the Distributor” if you want this subscription to be a push subscription.
Pull subscription
For a pull subscription the distribution agent executes on the subscriber, “pulling” the data from the distributor. If the subscriber needs to be in control over when the data flows, maybe because the subscriber is not always connected to the network, or because you do not want the data to be changing on the subscriber until a given process finished, it is better to select a pull subscription. That gives the subscriber full control over when the data flow happens.
Pick “Run each agent at its Subscriber”, as shown in Figure 5 on the “Distributor Agent Location” page, if you want this subscription to be a pull subscription.

Figure 5: Select Pull Subscription
The selection of the subscription type here will cause some minor changes in the following pages of the wizard. Where appropriate, both versions are shown, so no matter what your selection at this point is, you will still be able to follow the examples in this level.
Target Database
On the next page of the “New Subscription Wizard”, shown in Figure 6, you can select the database you want to be the target for this subscription. In the “Subscription Database” dropdown you have a list of all databases that you have access to. You can also select “”. That option opens the “New Database Wizard” and allows you to create a new database right from here.

Figure 6: Subscribers
When you pick an existing database you need to be careful to pick the correct database. The initialization step of replication drops and recreates all objects that are part of the publication in the subscription database.
Note:
If you picked the wrong database and that database has objects of the same name as objects that are replicated, those objects will be dropped. There is no warning anywhere in the process.
The form shown in Figure 6 actually does allow you to select more than just the database. It also allows you to pick the server for your subscription. To be exact, it allows you to setup a whole list of subscribers and subscription databases at once. If you press the “Add Subscriber” button at the bottom of the form, a standard connection dialog allows you to select an additional server as subscriber. You can add as many servers as you like; however each server can be selected only once. For each server you can then in the same way as above select the target database for this subscription. An example of multiple selected subscribers is shown in Figure 7.

Figure 7: Multiple Subscribers
Security
The next wizard page allows you to set the accounts used to connect to distributor and subscriber and to execute the agents. For each subscriber that you selected on the previous form you have to make a selection here by clicking on the ellipsis button at the end of the row that names the subscriber. Figure 8 is an example of this form page showing multiple subscribers.

Figure 8: Distribution Agent Security
After pressing the ellipsis button a new form opens that allows you to provide the appropriate information. The information you provide in this form will show up in the two columns that are shown greyed out in Figure 8. The form that opens looks a little different, depending on your selection of the push or pull subscription method.
The number of connections and accounts needed to setup replication can seem overwhelming at first. A more detailed explanation of how this all works and who is connecting to whom will be given in Level 5 of this Stairway. At the moment we need to allow the distribution agent to connect to the Distributor as well as to the Subscriber. How these connections should be made is all that the forms in Figure 8 as well as Figure 9 or Figure 10 allow you to specify.
Push Subscriptions
In both cases you have to provide a Windows account for the distribution agent to run under.
In the case of a push subscription the distribution agent executes on the distributor. The connection to the distribution database is therefore made by impersonating the account the agent executes under. For the connection to the subscription database you can choose between using impersonation as well as providing a SQL Server Login. If all machines are in a domain, choosing impersonation is a good idea in most cases. If you are trying to replicate between machines that are not in the same domain, you might have to go with a SQL Server Login. You can see the different options in Figure 9.
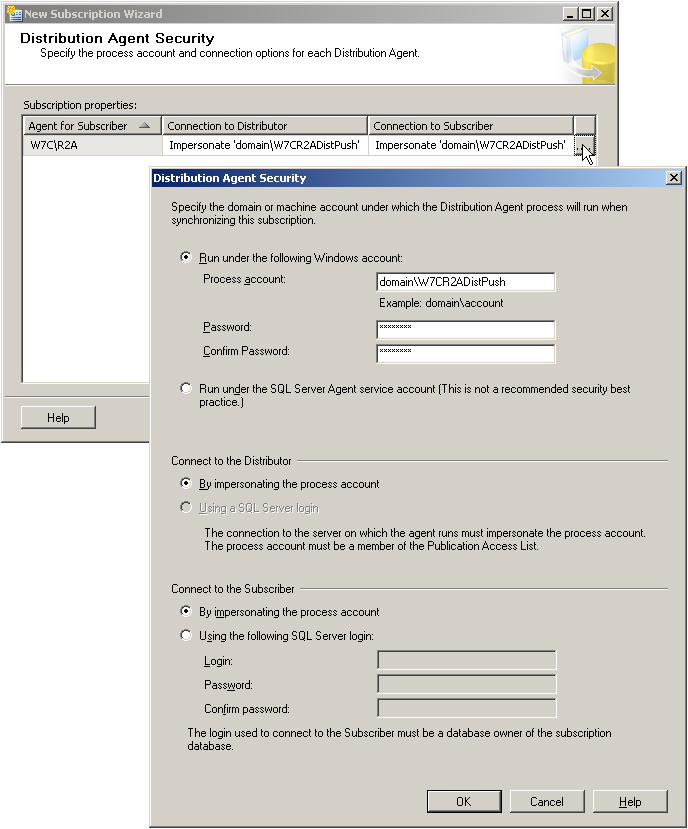
Figure 9: Distribution Agent Security for Push Subscriptions
Pull Subscription
In the case of a pull subscription the distribution agent executes on the subscriber. Here the connection to the subscription database is fixed to use process account impersonation, while you can choose between impersonation and a SQL Server Login for the connection to the distribution database. An example for this is given in Figure 10.

Figure 10: Distribution Agent Security for Pull Subscriptions
The Publication Access List
Independent of the selection of push or pull subscription, there are a set of security permissions that need to be granted to the accounts specified in the earlier steps. First the account running the agent must have read access to the snapshot folder/share. The account used to connect to the subscription database must be a member of the db_owner fixed database role in the subscription database. The account that is used to connect to the distribution database must be a member of the publication access list (PAL) and also a member of the db_owner fixed database role in the distribution database.
The PAL is an additional security measure that prevents unauthorized users from getting access to the replication data. Any login that needs to read data for a publication on the distributor needs to be a member of this list. The PAL is maintained as internal information in the publication database that is not directly accessible using Transact-SQL.
To add a login to the PAL you need to connect Object Explorer to your publisher. Open the Replication folder and the “Local Publications” subfolder. Right click the publication that needs the new user added to its PAL and select “Properties” in the context menu that opens. This is shown in Figure 11.

Figure 11: Publication Properties
The Publication Properties form has several pages. Find and select the “Publication Access List” page as shown in Figure 12.

Figure 12: PAL Page
The “Publication Access List” page contains a list of all logins that are a member of the PAL. To add a new login press the “Add” button on the right. This opens the “Add Publication Access” form as shown in Figure 13.

Figure 13: Add Publication Access
This form contains all logins that are eligible to be a member of the PAL. To be eligible, a login must have these properties:
- It must be a login on the publisher
- It must be a login on the distributor
- It must have access to the publication database
Select the login(s) that you want to add to the PAL and click OK twice. This is all you need to do to add new logins to the PAL
Retention
While really a property of the distributor and the publisher, retention must be mentioned here because it can have a significant impact on your subscriber planning. Retention controls how long a subscriber can be offline without becoming invalid. It also controls how much space you need to provide for the distribution database, because data that has not yet been delivered to all subscribers has to be held in the distribution database. So you need to select these values high enough, that your subscribers can reconnect within that timeframe, but low enough for the distribution database to not outgrow the space available.
If a subscriber does not request the data that is published quickly enough, the subscriber can become deactivated. That scenario can for example happen if a pull subscriber that runs on a schedule instead of continuously does not request a data update in time. What “in time” means in this context is defined by two settings: Transaction Retention Period and Maximum Retention Time.
Transaction Retention Period
The first setting is the Transaction Retention Period. This is defined on the distribution database. It specifies how long the transaction information is kept in the distribution database. This setting we briefly encountered in the section about multiple distribution databases in Level 2, but left it at its default at the time.
To change this setting you need to connect to the distributor in Object Explorer, right click on the Replication folder and select “Distributor Properties” as shown in Figure 14.

Figure 14: Distributor Properties
This opens the Distributor Properties form displaying the list of configured distribution databases. For each of them it also lists the configured retention values. Clicking the ellipsis button at the end of the row of the distribution database that you want to change opens the Distribution Database Properties form. Here you can change this setting, as shown in Figure 15.

Figure 15: Transaction Retention Period
The transaction retention setting is made up of two values. One is the minimum retention time. All transactional data is kept at least as long as this value specifies, even if all subscribers have received these transactions already.
Maximum Retention Time
The second setting is the Maximum Retention Time. If there is transactional data in the distribution database that has not been synchronized with a subscriber for more than the maximum retention time, that subscriber gets marked as inactive. To reactivate the subscriber the subscription has to be completely reinitialized.
If you have a subscriber that becomes incapable of synchronizing from time to time, for example because of scheduled or unscheduled connection interruptions, you need to set this value high enough to guarantee the subscriber can reconnect in time before it gets deactivated.
On the other hand, the longer the maximum retention time, the more data needs to be stored and kept in the distribution database. So the higher this value the more storage you need for the distribution database. Besides of the distribution database being bigger, the replication throughput will also decrease.
So you need to find a happy medium between subscriber availability and storage and performance requirements to set this value. The default value for transaction retention is 0-72 hours.
Other Retention Settings
Figure 15 also shows a History Retention setting, which defines how long information about the health of the replication setup is kept in the distribution database. This setting does not affect the subscribers.
Another important retention setting is a setting on the publication. It is called the Publication Retention Period” and is usually a lot higher than the Maximum distribution retention period. If a subscription lapses past this time, it is completely removed from the distributor. For push subscriptions that is a clean and complete removal. For pull subscriptions you are left with an orphan on the subscriber side that you need to clean up manually. In either case, if you are still interested in this subscriber you need to set it up from scratch again. The default value for this setting is two weeks (336 hours).
To change the Publication Retention Period you need to connect to the publisher in Object Explorer, open the Replicationfolder and the Local Publications subfolder and right click on the publication you want to change. In the context menu select Properties. The “Publication Properties” form opens on the “General” page as shown in Figure 16. Here you can change the description of the publication as well as the Subscription Expiration setting. This second setting defines the Publication Retention Period.

Table 1: Retention Settings
To recap, there are four retention settings for transactional replication. They are summarized in Table 1.

Figure 16: General Publication Properties
Summary
In this Stairway Level 4 we worked through the final piece of a replication setup, the subscriber. We discussed how to connect to a publisher, how to select the subscription type and the subscription database. We discovered the differences between push and pull subscriptions and the importance of the retention periods. We also learned about the security requirements and the publication access list.
Now that all the parts of replication are in place, we now can actually see something happening.
By now the first synchronization should have finished. If you connect to the subscription database you should see all the replicated objects have been created. If the database does not contain these objects yet, wait a little longer. It can take several minutes for the first synchronization to finish, even on a very small table.
After the first synchronization is completed, you can insert or update a row in the publication database. You can see that change happening in the subscription database as well as it is replicated to the subscriber.
Transactional replication consists of many parts. There are agents and jobs and special databases involved. Most of the parts we touched on already. If you want to dive deeper into the internals of transactional replication, Level 5 of this Stairway is all about how these pieces work together.