
In the previous levels of this Stairway you have learned how to set up merge replication in a multi-server environment. This level will introduce the merge agent and explain the role it plays in the replication process. This will include a detailed discussion of conflict resolution.
Agents
Level 5 of this Stairway gave an in-depth overview of the SQL Agent jobs and the Replication Agents involved in transactional replication. A lot of those jobs are involved in merge replication as well.
The only two components that are not part of the merge replication setup are the log reader agent and the distribution agent. Their roles are covered by the merge agent. If you want to know more about the other jobs involved please refer back to Level 5 of this Stairway.
The main components in a merge replication setup are:
- Snapshot agent
- Merge agent
- Table and database triggers
An overview of these different components is shown in Figure 1.
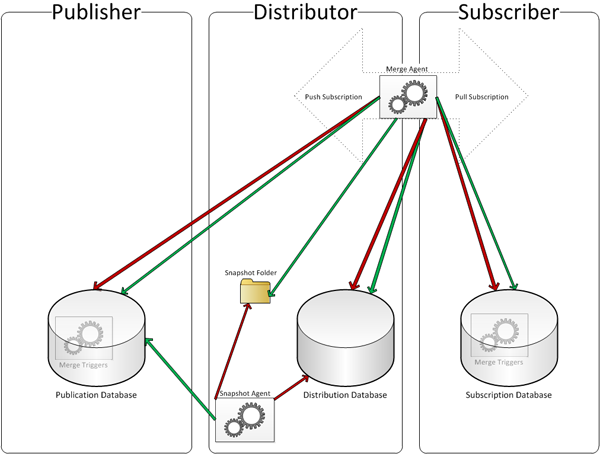
Figure 1: Merge Replication Agents and Triggers
The green arrows depict read access while the red arrows show where write access is happening. The Merge Agent lives either on the Distributor or the Subscriber, depending on the subscription model.
Snapshot Agent
As in transactional replication, the snapshot agent is used in merge replication to generate a snapshot of the data in the publication database that can be used to perform the initial synchronization of a subscription database. This is not the only way to execute the initial synchronization; however it is certainly the most convenient way.
Compared to transactional replication there is one big difference in how the snapshot agent is used in merge replication. In transactional replication the snapshot agent could do its processing in a “concurrent” way. Concurrent processing means that the snapshot agent does not take any locks on the published articles for an extended period of time. (See Level 4 for details.) This technique relies on markers that are written to the database log during the snapshot generation. These markers are picked up by the log reader agent and then used by the distribution agent to figure out which of those changes between the markers need to be applied to the subscriber and which were picked up by the snapshot agent.
As merge replication does not use the log reader agent, it cannot use these markers and therefore concurrent snapshot processing is not an option with merge replication. That means that the snapshot agent is taking a shared lock on all published tables during the entire time it takes to generate the snapshot. The lock needs to be taken on all tables for the entire time, as transactional consistency could not be guaranteed otherwise. That means that no updates to the published tables can happen during this time and processes attempting to update any of the published tables (or to change non-table articles) will be blocked.
In Level 6 of this Stairway in the “Snapshot” section it was recommended to schedule the snapshot generation to happen during off peak hours. The previous paragraph explains the reasoning behind that recommendation.
By default SQL Server creates a new SQL Agent job to execute the Snapshot Agent for every publication. These jobs are named following this pattern: <Server>-<Publication Database>-<Publication>-<number>.
Data Movement
In transactional replication the data movement after the initial synchronization is orchestrated by two agents: The log reader agent whose responsibility it is to monitor for changes to the publication articles and record them in the distribution database and the distribution agent that applies the changes to the subscribers.
In merge replication there are also two parts involved in the data movement but only one of them is implemented as a replication agent.
Triggers
The monitoring and recording of changes to published articles is done by a set of triggers and tables that get added to the publication database. Because in merge replication data can flow from the publisher to the subscriber as well as from the subscriber to the publisher, the same set of triggers and tables is also added to each subscription database.
Every table that is published has three triggers defined on it. They follow the naming convention: MSmerge_???_FA62745126C846858453EEF185F94618, where the long hexadecimal number at the end is the internal article identifier and the “???” is one of the following three values:
- “del” for the delete trigger
- “ins” for the insert trigger
- “upd” for the update trigger.
These triggers are responsible for recording every change that is applied to the data in the published tables.There is also a set of database triggers that are responsible for capturing schema changes to published articles. These triggers are MSmerge_tr_alterschemaonly, MSmerge_tr_altertable, MSmerge_tr_altertrigger and MSmerge_tr_alterview.
The replication metadata and all the information about changes is stored in several system tables. All are named starting with MSmerge_. There are also several system views that follow the same naming pattern. For more information check out Books Online.
Merge Agent
The information that is recorded by the MSmerge triggers is then used by the Merge Agent to synchronize the changes between the publisher and all its subscribers. The Merge Agent, like the other replication agents we encountered so far, is an autonomous program separate from the SQL Server service.
By default, SQL Server creates a job for each subscription to execute the Merge Agent. This job executes either on the distributor (“Push Subscription”) or on the subscriber itself (“Pull Subscription”). The push subscription merge agent jobs follow this naming convention: <Publisher>-<Publication Database>-<Publication>-<Subscriber>-<number>
The naming convention for pull subscription merge agent jobs looks a little different: <Publisher>-<Publication Database>-<Publication>-<Subscriber>-<Subscription Database>-<number>.
In both cases the <number> is a generally small number that is used to prevent name collisions.
Conflicts
Merge replication allows data changes to be synchronized between the publisher and several subscribers. If one subscriber changes a row in a published table, that change will be replicated to the publisher during the next synchronization of this subscriber. From there it will be picked up by all other subscribers during their next synchronization.
That opens up the possibility for conflicts. Assume subscriber A changes the phone number for an existing customer and subscriber B also changes the phone number for that same customer to a different value (e.g. cell phone instead of home phone). Assuming subscriber A synchronizes first, its change will be accepted by the publisher. When subscriber B synchronizes afterwards, a conflict is detected.
Now there are two ways to handle this situation. One option is that subscriber B overwrites the existing change so that Subscriber A's change is lost. The other option is that subscriber B's change is ignored and therefore lost.
How to influence what kind of changes are considered conflicts by SQL Server and how those conflicts are resolved will be covered in the following sections.
Tracking Level
When setting up merge replication you can choose between two options that influence how the merge agent compares concurrent changes to identify conflicts:
- Row Level Tracking
- Column Level Tracking
That decision can be made in the properties dialog of each table article. The setting is called “Tracking Level” and is shown in Figure 2.
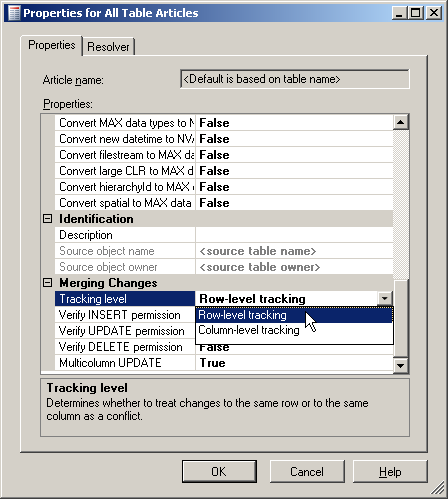
Figure 2: Selecting the Tracking Level
You can get to this setting on the Publication Wizard – Articles page that was shown in Level 6 of this Stairway. After the fact you can also connect to the publisher in object explorer, open the Local Publications Folder under the Replication folder and select properties in the context menu of your publication. In the dialog select the Articles page and pull up the Article Properties dialog by using the Article Properties button.
The difference between Row and Column Level Tracking is explained in the following two sections.
Row Level Tracking
Row level tracking is the default setting. It is also the setting that requires the least amount of resources. If a row gets updated, the merge triggers record that fact by noting the value of the UNIQUEIDENTIFIER column. If during a synchronization the same UNIQUEIDENTIFIER value shows up as being changed on both sides, a conflict is detected and the appropriate measures are taken.
This requires only the UNIQUEIDENTIFIER value to be stored in the change log and therefore uses less storage space. But it potentially marks non-conflicting changes as conflict. Assume person A updates the phone number of a customer and person B updates the email address of that same customer. Those two changes are not in conflict with each other. However, if both values are stored in the customer table in the same row, Row Level Tracking will mark those changes as a conflict because the two processes both changed that row.
Column Level Tracking
Column Level Tracking does not see changes to two different columns in the same row as a conflict, but in turn requires more resources. Besides of the UNIQUEIDENTIFIER value for each changed row, Column Level Tracking also records information about which column(s) got changed.
In the same scenario that was used above, where one person updates the phone number and another person updates the email address of the same customer, the additional information about what was changed allows the merge agent to correctly identify this situation as a non-conflict.
Only if the same column in the same row was changed by both customers is the changemarked as a conflict and handled according to the conflict resolution rules.
Logical Records
There is a third option that allows you to detect changes based on logical records. In the above example, if the phone number is stored in a CustomerPhone table and the email in a CustomerEmail table, both linked to the customer table with a foreign key, neither Row nor Column level tracking would detect a conflict. SQL Server allows you to declare the relationship between those tables in merge replication as a Logical Record. If you also select Logical Record Level Tracking, this scenario would be treated as a conflict again. Logical Record Level Tracking was introduced in SQL 2005. However, Logical Records are marked deprecated since SQL 2008. Therefore you should not plan to use this feature in new development.
Conflict types
The most common cause for a conflict is that a row got changed at one node (publisher or subscriber) and also changed at another node. This type of conflict is called and Update-Update Conflict.
If a row got updated at one node and deleted at another node the resulting conflict is called an Update-Delete Conflict.
A conflict can also occur if a change that was applied to one node cannot be applied to another node, for example because of a constraint violation. This type of conflict is called a Failed Change Conflict.
Failed Change Conflicts can occur due to a number of reasons including mismatching constraint definitions, using identity columns without automated identity management and triggers; for a complete list check out Books Online.
Conflict Resolvers
When a conflict is detected, the merge agent employs a conflict resolver to determine which version of the changes is kept. You can choose which conflict resolver is used on a per article basis. How to select a resolver was briefly mentioned in Level 6 of the Stairway. When you add an article to the publication you can set its properties by clicking on the “Article Properties” button. The dialog that opens contains a second tab called “Resolver”, as shown in Figure 3.
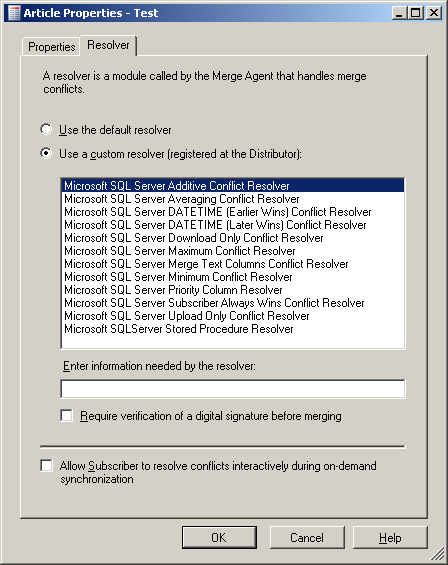
Figure 3: Selecting a Conflict Resolver
Here you can choose to use the default resolver or any other resolver that was previously registered with the distributor. You can also select interactive conflict resolution. Any resolver will decide which version of the row wins, meaning which version of the changes will be used at both nodes. The version that did not get selected as winner will be copied into a conflict table where you can review them at a later time. See the section about “Reviewing Conflicts” for details.
The Default Resolver
In Level 7 of this Stairway the “Subscription type” as well as the “Priority” of a subscription were briefly mentioned. The priority is what gets used by the default resolver to decide which version of the data survives a conflict situation.
The first publisher always has a priority of 100. For every subscriber you can pick a type of “Client” or “Server”. All changes made on a “Client” assume the priority of the client’s publisher at the time of synchronization. For a “Server” you can pick a priority value between 0 and 99.99. All changes originating on a server type subscriber assume the priority of that subscriber.
You can create a publication containing the articles of a subscription only on a server type subscriber.
Once a change has a priority assigned to it, that priority does not change again.
Let’s look at an example. Figure 4 contains 8 nodes in a merge replication setup.
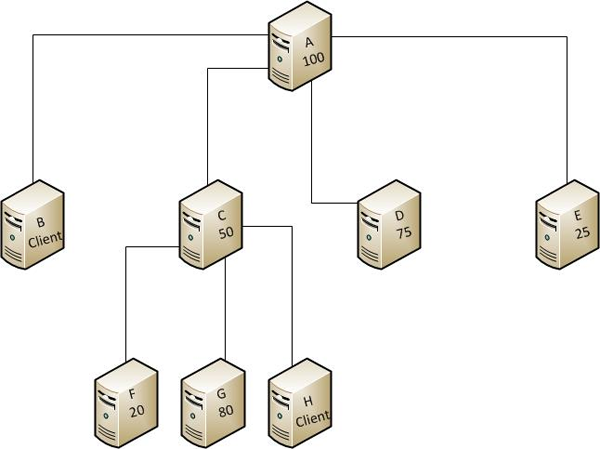
Figure 4: Example Merge Replication Setup
Node A is the first publisher (with priority 100). Node C is a “Server” type subscriber of A with priority 50. It is re-published with three subscribers of its own. Nodes B and H are of type “Client”, all other nodes are of type “Server” with a priority as shown.
In a topology like this you have to run several synchronization steps to get every change to every node. Assume a change on node F happens. To distribute this change first F and C have to sync, then C with A, G and H and finally A with B, D and E. If at that point a conflict between D and the original change is detected, D’s change will win because of the higher priority. Now A has to sync again with B, C and E. After that C has to sync with all of its subscribers to get all nodes in sync. In this scenario, five synchronization steps were required to fully synchronize this change. Keep this in mind when you design a complicated layout of merge replication participants.
For the rest of this section the term “synchronization” means a complete synchronization including all steps necessary to get all nodes in sync.
Table 1 shows which change survives a synchronization if two conflicting changes happen on two nodes in this setup with all articles involved using the default resolver. It assumes that both changes happen before the synchronization starts.
Nodes with a change | Result | |
| A | Any other node | A wins |
| B | D | The first node that synchronizes with A wins. |
| D | E | D wins |
| D | G | G wins |
| F | E | E wins |
| H | E | The first node that synchronizes with C wins |
| H | B | The first node that synchronizes with A wins |
Table 1: Synchronization priorities for the topology shown in Figure 4
In short, the rules are as follows:
- A change to the main publisher always wins.
- A change to a client type node loses if its publisher also changed before the synchronization. For this it is immaterial if the change to the publisher was applied directly or due to synchronization with another node.
- A change to a client type node that got synchronized with its unchanged publisher will be treated as if it originated on that same publisher.
- Of two changes to server type nodes the one that was applied to the node with the higher priority wins, independent of the type and number of nodes between them and independent of the order of synchronization steps.
Custom Resolvers
Custom resolvers allow you to change the rules used to determine the conflict survivor. They need to be registered with the distributor. For details on how to create a custom resolver and register it with a distributor, check out Books Online. There are several resolvers that come installed with SQL Server. They range from date dependent resolvers to resolvers that use the maximum or minimum value of the conflicting values or that build an average of the conflicting values. Figure 3(above), shows the complete list. For details see Books Online.
Business Logic Handlers
Another way to influence the outcome of conflicts is the usage of a Business Logic Handler (BLH). BLHs are assemblies written in managed code. They get installed the same way as custom resolvers but allow for a lot more flexibility. They can be executed at the subscriber or at the distributor and can react to a long list of events, including data changes with no conflict. A BLH that is registered for Updates will get executed for every row that got updated. During the execution a BLH can reject changes, resolve conflicts and even modify the values. More details can be found in Books Online.
Interactive Conflict Resolution
You can resolve conflicts interactively by using the Windows Synchronization Manager. The Windows Synchronization Manager needs to be executed on the subscriber and the subscription needs to be a pull subscription. The synchronization manager features a dialog that looks similar to the conflict viewer introduced in the next section. This dialog will be shown for every conflict that is encountered and allows you to manually select the outcome of the conflict resolution. If you want to use Interactive Conflict resolution you have to enable it in the subscriber properties. After it is enabled, you need to disable all synchronization schedules you have. If a synchronization gets executed not using the Windows Synchronization Manager, the standard conflict resolution rules will be applied and you will not get to see those conflicts during synchronization.
For more information about interactive conflict resolution check out Books Online.
Reviewing Conflicts
All resolved conflicts are recorded by the merge agent. You can review them later and even change their outcome. To review the conflicts, connect to the publisher in Object Explorer.Open the Replication node and the Local Publications folder under it. Right click on the publication. In the context menu that appears click on “View Conflicts”. This menu is shown in Figure 5.
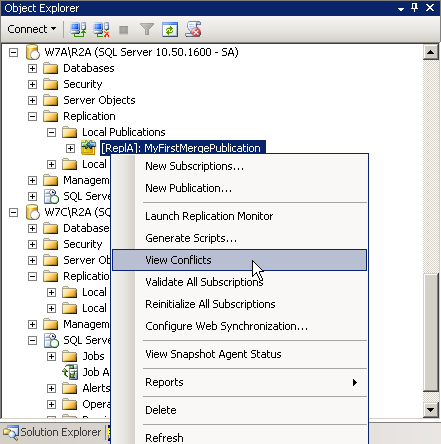
Figure 5: View Conflicts
The dialog that opens allows you to select the table for which you want to review the conflicts. Only tables that encountered conflicts are shown, together with the number of conflicts for each of them. You can see this dialog in Figure 6.
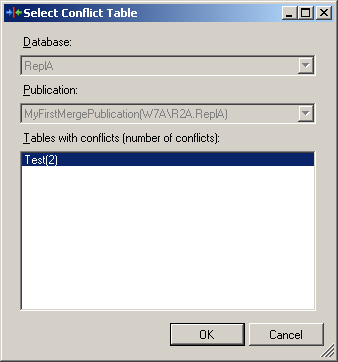
Figure 6: Select a Conflict Table
After you select a table, the Replication Conflict Viewer will display. You can see this dialog in Figure 7. In the upper half it contains the list of all conflicts that occurred on the selected table. The list specifies the conflict loser, the type of conflict and when it was detected.
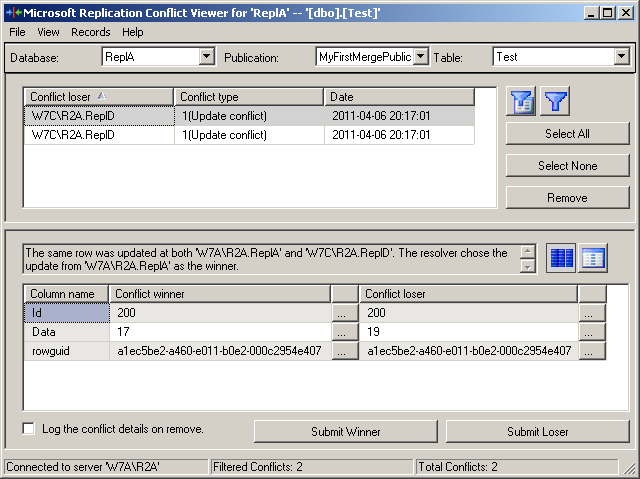
Figure 7: The Conflict Viewer
In the bottom half you can find details about the column values of the winner and the loser. You have now the option to remove one or more conflicts from the list. (Removing an entry from this list will not change any data in the replicated tables.) You can also submit a new winner for each conflict. For this click the “Submit Winner” or the “Submit Loser” button at the bottom.
Submitting a new Winner will remove the entry from the conflict list and will update the publisher to reflect the new values. From there the changes will be distributed to the other nodes during their next synchronization.
Summary
In this Level the inner workings of merge replication were explained. The snapshot agent as well as the merge agent were introduced and their roles in the merge replication process were discussed. Afterwards the different options for conflict resolution were described. Finally the Conflict viewer was introduced and it was explained how it can be used to influence the outcome of the conflict resolution process after the fact.