

Introduction
According to the official documentation, the READ COMMITTED isolation level “specifies that statements cannot read data that has been modified but not committed by other transactions”. So, one could think that a record returned under this isolation level existed in the committed state at the time of reading.
In this article, I am going to prove that there could be borderline situations where the read data never existed at all, at least in a committed state.
Note: During this article, I am going to refer to a row-store table, to set the isolation level to READ COMMITTED and to set the READ_COMMITTED_SNAPSHOT setting to OFF, which is the default on SQL Server. This is in contrast to Azure SQL Database where the default is ON.
The Setup
To create the table that I need for the example, I am going to do the following steps:
- Create a copy of the table Sales.SalesOrderDetail of the well-known AdventureWorks database using the SELECT…INTO syntax and naming it OrderDetails
- Create the Primary Key, as it is in the original table, on SalesOrderDetailID
- Create two non-clustered indexes. The first one, named Idx_ProdId_TrackNumb, is defined by ProductID and CarrierTrackingNumber while the second, named Idx_ModDate_LineTot, is defined by ModifiedDate and LineTotal.
This is the code to accomplish these steps:
use master;
go
alter database AdventureWorks set read_committed_snapshot off with no_wait;
go
use AdventureWorks;
go
---------------------------------
--Setup data
---------------------------------
drop table if exists OrderDetail;
go
--Create table
select *
into OrderDetail
from Sales.SalesOrderDetail;
go
alter table OrderDetail add constraint PK_OrderDetail primary key (SalesOrderDetailID);
go
create nonclustered index Idx_ProdId_TrackNumb on OrderDetail (ProductID, CarrierTrackingNumber);
go
create nonclustered index Idx_ModDate_LineTot on OrderDetail (ModifiedDate, LineTotal);
go
Listing 1
The Query and the Plan
Now consider the following query:
set transaction isolation level read committed;
go

select SalesOrderDetailID, CarrierTrackingNumber, ProductID, LineTotal, ModifiedDate
from OrderDetail
where ProductID = 804 and ModifiedDate = '20130430';
Listing 2
If we look carefully at the query, we will notice that it is covered by the two non-clustered indexes just defined. Remember that SalesOrderDetailID is the column that defines the clustered index and therefore is “included” in both non-clustered ones.
Moreover, in the WHERE clause, there are two filter conditions set. There is one on ProductID, which is the first field of the index Idx_ProdId_TrackNumb. There is a second filter on ModifiedDate, which is the first field of Idx_ModDate_LineTot.
It is not surprising that the execution plan involves only the two non-clustered indexes, without touching the clustered one. Analyzing the plan, we can see that the optimizer chooses the Hash Match operator to “Join” the results of the two “index seek” operators.

Figure 1
The Hash Match has two inputs:
- the so called “build” input related to the smallest of the two inputs. This is the first to be executed and graphically it appears at the same level of the Hash Match operator
- the “probe” input that appears just below the previous one and that is the second to be executed.
In our case, the build phase consists in an Index Seek of Idx_ProdId_TrackNumb, with filter on ProductID and it returns the values of SalesOrderDetailID, CarrierTrackingNumber and ProductID. We can see this in Figure 2 below, in the “Output List” section. If you generate the plan, you put your mouse over the Idx_ProdId_TrackNumb graphical component to examine the whole tooltip.
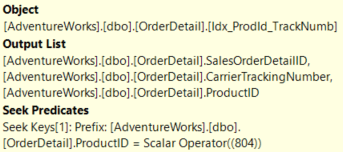
Figure 2
The probe phase consists in an Index Seek of the other non-clustered index with filter on ModifiedDate and with the fields SalesOrderDetailID, LineTotal and ModifiedDate as output list (Figure 3).
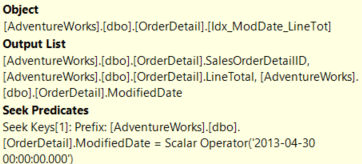
Figure 3
The following is the result of the query:
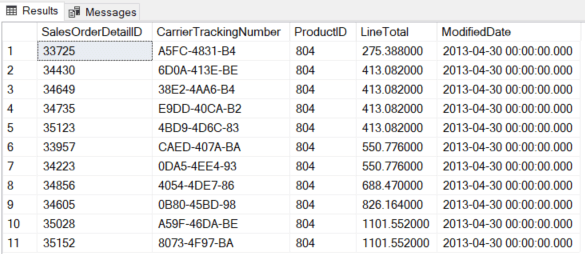
Figure 4
What Could Happen
The result shown in Figure 4 is obviously correct, but let us see what could happen in a borderline situation. Suppose two concurrent connections are carrying out the following operations in this exact order:
TIME 1 – Connection #1
Connection #1 opens a transaction and updates the record identified by SalesOrderDetailID equal to 33725, modifying the column LineTotal setting its value to 999:
BEGIN TRAN;

UPDATE OrderDetail
 SET LineTotal = 999
 WHERE SalesOrderDetailID = 33725;
Listing 3
Note that the updated field LineTotal will update the non-clustered index Idx_ModDate_LineTot and NOT to the other one. At this point, the transaction has just set Exclusive Locks only on the clustered index and on the Idx_ModDate_LineTot index at the KEY level. Also, observe that the index Idx_ModDate_LineTot, where there is an Exclusive Lock now, is involved in the probe phase, the second to be executed in the plan shown in Figure 1.
In the last paragraph of the article, I am going to give you more details about the locks that the execution of this UPDATE statement produces.
TIME 2 – Connection #2
Connection #2 carries out the query just analysed above (Listing 2). The record modified by the Connection #1 belongs to the set that Connection #2 is reading. As we saw previously, the execution plan starts with the build phase accessing to the Idx_ProdId_TrackNumb index that is currently free from locks and so it can read the original values of ProductID and CarrierTrackingNumber that, for the record just modified by the Connection #1, is A5FC-4831-B4.
Afterwards according to the plan, it tries to read from the Idx_ModDate_LineTot index (the probe phase), but it finds an Exclusive Lock that prevents it from proceeding, so it has to wait.
TIME 3 – Connection #1
The Connection #1 carries out a second update, always on the same record, this time modifying the value of the column CarrierTrackingNumber setting it to “YYZ”. The statement succeeds although the value has just been read by the Connection #2 because in READ COMMITTED the reader does not maintain any lock after the reading.
Immediately after the update, Connection #1 commits, removing any exclusive lock.
UPDATE OrderDetail
 SET CarrierTrackingNumber = 'YYZ'
 WHERE SalesOrderDetailID = 33725;

COMMIT;
Listing 4
TIME 4 – Connection #2
We left Connection #2 at Time 2 waiting because of an Exclusive Lock. At Time 3, that lock has been released; the probe phase can now go on reading the new value of LineTotal. This has been updated at Time 1 by Connection #1.
The Recap and the Result
Summarizing, Connection #2 at Time 2 read the original value of CarrierTrackingNumber whereas at Time 4 it read the new value of LineTotal.
The following table gives a synthetic overview of the sequence of the events:
| Connection #1 | Connection #2 | |
| TIME 1 | BEGIN TRAN; UPDATE OrderDetail SET LineTotal = 999 WHERE SalesOrderDetailID = 33725; | |
| TIME 2 | Start reading – Build Phase It reads ‘A5FC-4831-B4’ as CarrierTrackingNumber (original value) | |
| It tries reading LineTotal (Probe Phase) but it has to wait because an X lock | ||
| TIME 3 | UPDATE OrderDetail SET CarrierTrackingNumber = 'YYZ' WHERE SalesOrderDetailID = 33725; COMMIT; | |
| TIME 4 | No more locks. It reads the new value of LineTotal |
This is the result returned by the query seen in Listing 2 executed by the Connection #2:
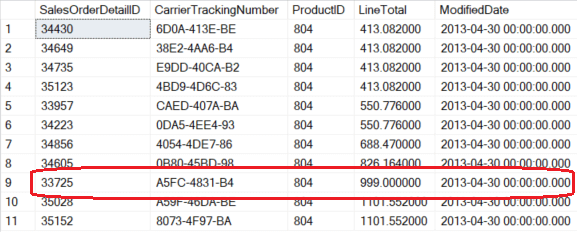
Figure 5
At first sight, it could seem a correct result, but there is a little problem: the red circled record NEVER existed in a committed state! In fact CarrierTrackingNumber reports the original value whereas LineTotal has the new one. Only the first update of Connection #1 is shown and basically this is the situation of the record in the mid of the first connection's transaction.
You can have a look at the real situation executing the query again without any lock in place. Now you will obtain the correct result with both fields reporting the new values.
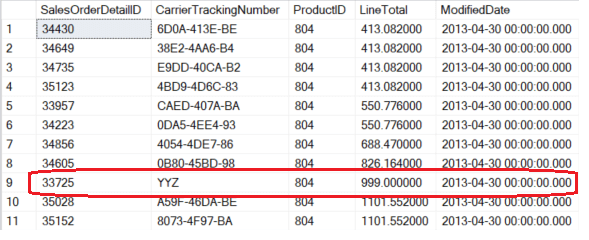
Figure 6
How to Avoid This
The example shown in the previous paragraph is without any doubt a borderline situation. In order to avoid the situation, you can simply use a different isolation level. For Connection #2 you could choose a row versioning solution either using the SNAPSHOT ISOLATION LEVEL or switching on the READ COMMITTED SNAPSHOT setting.
Otherwise, you could choose a lock-based solution raising the level of the isolation using at least the REPEATABLE READ one, but in this case Connection #2 could be killed because of a deadlock.
A Deeper Look at the Locks
For further information, let us have a look at the locks that the statements seen in Listing 3. For convenience’s sake, I will state them here again.
If you have carried out the statements up to now, rebuild the OrderDetail table using the script in Listing 1 in order to reproduce the original scenario. Then run this code:
BEGIN TRAN;

UPDATE OrderDetail
 SET LineTotal = 999
 WHERE SalesOrderDetailID = 33725;
Listing 3
Carrying out the following query we can have a look at the locks involved:
SELECT tl.resource_type,
       tl.resource_description,
       tl.resource_associated_entity_id,
       tl.request_mode,
       tl.request_type,
       tl.request_status,
       p.index_id,
       i.name,
       i.type_desc
FROM sys.dm_tran_locks tl
    INNER JOIN sys.partitions p
        ON tl.resource_associated_entity_id = p.hobt_id
    INNER JOIN sys.indexes i
        ON i.object_id = p.object_id
           AND i.index_id = p.index_id
WHERE OBJECT_NAME(p.object_id) = 'OrderDetail'
ORDER BY tl.resource_type,
         i.type_desc;
Listing 5
This is the result I have got on my laptop:

Figure 7
As expected, we have one X-Lock at KEY level and one IX-Lock at PAGE level for the clustered index.
What can raise a bit of interest are the two X-Locks at the KEY level and the three IX-Locks at the PAGE level for the Idx_ModDate_LineTot non-clustered index. Why do we have three locks at the page level when we have just updated one single record?
Two helpful tools: sys.dm_db_page_info and DBCC PAGE
We can find the answer querying the DMV, sys.dm_db_page_info, available from SQL Server 2019+. We can query this DMV three times, passing as parameters the related page numbers (look at resource_description values in Figure 7):
select page_id, prev_page_page_id, next_page_page_id, has_ghost_records
from sys.dm_db_page_info(db_id(), 1, 29908, 'DETAILED')
union
select page_id, prev_page_page_id, next_page_page_id, has_ghost_records
from sys.dm_db_page_info(db_id(), 1, 29909, 'DETAILED')
union
select page_id, prev_page_page_id, next_page_page_id, has_ghost_records
from sys.dm_db_page_info(db_id(), 1, 30287, 'DETAILED');
Listing 6
The following is the result:
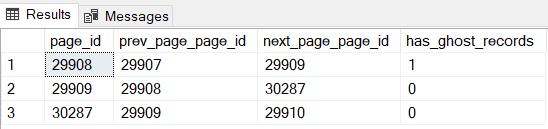
Figure 8
Let us now analyze each of these three pages in details, keeping in mind that the update of the field LineTotal done by Connection #1 has implied a change of the position of the record of the index because the engine has to keep the records in order.
Pages number 29908 and 30287
The page 29908 has “ghost records”, just one in our cases. According to the official documentation, “a ghost record is one that has been marked for deletion but has yet to be removed”; this is the page where the original record of the index was before the update. Instead, the page number 30287 is the page where the record will be, if the transaction commits. You can verify using the undocumented command DBCC PAGE.
In my case, I have carried out the following command where the first parameter is the database_id, the second is the number of the data file, and the third is the page number. You will get the result in SSMS's grid by setting the last parameter to 3.
--dbcc page ( {'dbname' | dbid}, filenum, pagenum [, printopt={0|1|2|3} ])
dbcc page(5, 1, 30287, 3)
Listing 7
The following is a subset of the result. We are looking at the records of Idx_ModDate_LineTot index hosted in the page 30287 and the red circled record is the one just modified. It shows the clustered key value (SalesOrderDetailID = 33725) with the two values of the fields that define the index: ModifiedDate with its original and unmodified value and LineTotal with the new one. As you can see the order is maintained according to the index definition.
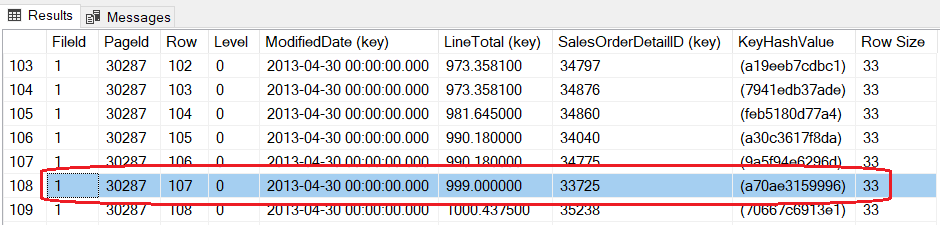
Figure 9
Page number 29909
Looking back again at Figure 8, the third page to analyze is the number 29909.
This is the page where the record should have been moved after the update if there had been enough room. Not being this the case at the time of the update, the page split and the new page, number 30287, was created ready to host the record. It is interesting to observe that Page 29909 has Page 30287 as "next page" because of the split, and Page 30287 has 29910 as "next page". This last one was the "next page" of Page 29909 just before the split.
Conclusion
In this article I have described a border line situation in T-SQL that takes advantage of several factors: the behavior of the isolation level READ COMMITTED, the locking mechanism, the particular shape of a query and the order of the execution of the statements. Playing with two concurrent transactions, from one of them we have obtained a record as it was in the mid of the other one and not yet committed: we only got a subset of the planned updates. The chance of this happening is very very low, but in case this could have consequences if the data were printed on a report or used for further calculations.
