Welcome to my 2nd SQLServerCentral article covering a topic that to me seems to be an issue for most people. I will not cover the set up of the 3 base Virtual Machines required (2 if you already have a test windows DC) as that is outside the scope of this document. Also the install of Virtual Server 2005 is not covered either. You should familiarise yourself with all the software used in this techdoc before attempting to set-up the system.
For clarification the following terms are used:
- VM is a virtual machine
- NIC is a network Interface Card
- vNIC is a virtual Network Interface Card
- DC is a Windows Domain Controller
- OS refers to the Windows operating system
- HA is the VMWare high availability technology used by VMWare Virtual Infra Structure
- ESX is the server operating system used by host machines in the VMWare Virtual Infrastructure
I have recently seen posts from people wishing to test\play with clustering away from the production environment. They have attempted to set this up and encountered problems, and then assuming it doesn't work. The biggest problem with SQL Server clustering is the underlying platform, Windows clustering. Setting this up is usually the task of the Windows\cluster admin, and well now, fellow DBA's, you too can have the necessary knowledge to set up your own 2 node virtual cluster.
A word of warning: do not try using this system in a production scenario even on a well spec'ed host; it should be for test\educational purposes only.. The exception may be for ESX server, but VMWare High Availability makes this redundant anyway. Check the VMWare website for further info on these technologies.
The most popular downfall is setting up the shared storage for the cluster. It is imperative to remember until the first cluster node is installed and active, only 1 VM should be booted to access the shared storage at any one time, otherwise disk corruption will occur (it's the same for physical clustering too). That said let's get on with the task. The following VM's are required (see below).
If you haven't done so already, open "Server Properties" and set the "Search Paths" for the VM's and ISO images. These are the locations on the host's physical disk that Virtual Server 2005 will use to locate ISO images and VM virtual hard disk files. Once this is done boot the DC. While the DC is booting create the virtual networks required. You will need a private heartbeat network for the 2 cluster VM's and this is shown below.
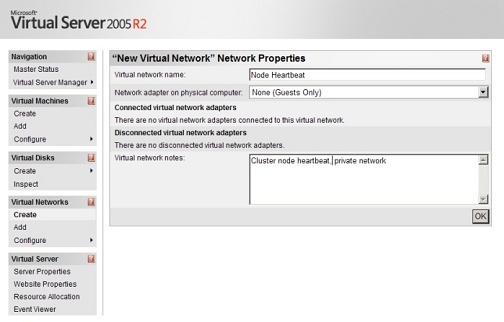
Note: When you install Virtual Server 2005 it will create a single internal virtual switch and 1 for each physical NIC on the machine .
The public vNIC on each cluster VM could be set to either another private virtual switch (internal) or to the existing physical NIC's virtual switch (Nvidia nforce in my case) for access to the physical network, either way it must be the same virtual network the DC is connected to. Below is a typical configuration to use for the cluster VM's
Once the DC has booted, open Active Directory Users and Computers and create an account for the cluster service and any accounts you will use for the SQL Server services. Also you will need a domain group for each of the clustered SQL services (SQL Server, SQL Agent, Full Text, etc).
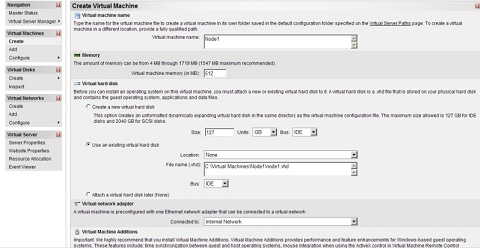
Now boot the first cluster node "SQL1" (or whatever you named it). Login and configure the "Public" vNIC. Do the same for "SQL2". At this point both cluster VM's should be joined to the domain and have a public vNIC configured, try a simple PING between the VM's and the DC to verify connectivity.
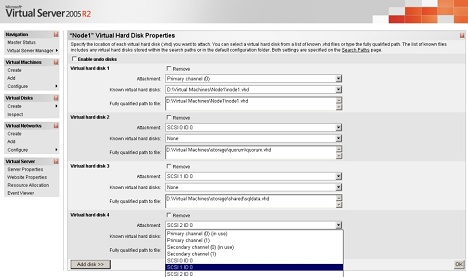
Create the shared cluster disks by clicking Virtual disks > create > and then the disk type (I use fixed size, but you could use dynamic). A sample is shown below
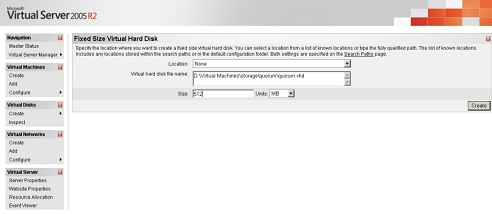
Do this for each disk you require (1 quorum 512MB, 1 for SQL data files and 1 for SQL log files). Shutdown the OS on both nodes and open the settings for "SQL1". Click the "SCSI Adapters" option under the configuration properties. You now need to add a SCSI adapter for each shared disk (3 in total). Node 1 will use SCSI id 6 and Node 2 will use SCSI id 7, this is very important to remember. Set each adapter to "share SCSI bus for clustering".
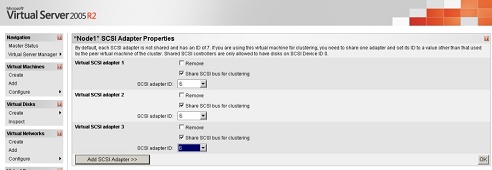
Once you have added the SCSI adapters you need to add the shared disks and assign them to a SCSI id (shown below)
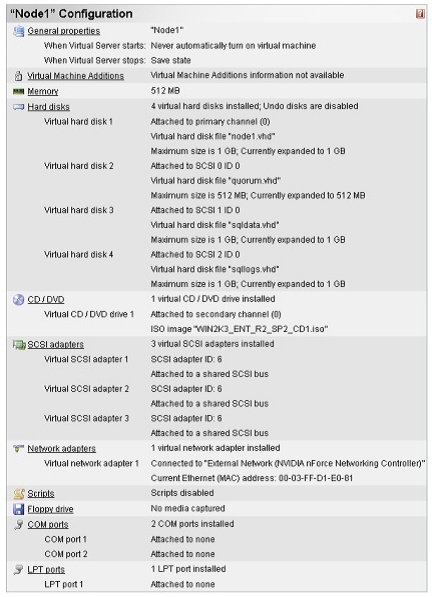
The eventual Node properties should look like
Boot SQL1 and login, and then open Windows Disk Management. Initialize each disk and format the partitions as NTFS, assigning a drive letter to each (note these down). Create a sample text file on each disk and enter some text. Now that node1 has the shared disks configured, shut down the OS. When SQL1 has shutdown open the config for SQL2 and do exactly the same with the SCSI adapters and shared disks as you did for SQL1. Just remember to ensure you use SCSI adapter ID 7 for SQL2.
Boot SQL2 and open Windows Disk Management. The shared disks will show as raw partitions. Open the properties for each of the disks in turn and assign the correct drive letter. Now go into explorer and check the text file is there. If you did everything right the files will be there, so remove them. If the files are not there check your hard disk assignments. If the shared disks are corrupt then start over and re create them.
If everything is as it should be, we can now go install the first cluster node. Shutdown the OS on SQL2 and then open the configuration for SQL1 and add another vNIC, connecting it to the private heartbeat network. Now boot SQL1 and login, then configure the private NIC with your private IP address and subnet mask. Remove any DNS or WINS details from the private NIC configurations. It's a good idea to rename the 2 Windows LAN connections. From the Windows control panel, open Windows network connections and from the advanced menu select advanced settings. Ensure the adapter bindings are set to
- Public Lan (top),
- Private Lan,
- Remote connections (bottom).
Now go into Administrative Tools and start Cluster Administrator
Select "create a new cluster" and click next at the welcome screen. On the next screen select your domain and supply a cluster name. Select the computername (should be the server you're logged onto, SQL1).
The advanced button allows either a full or minimum configuration, we will use full to allocate all storage from the start. Click next and the configuration analyser will start. Click next if the analyser reports no errors.
Now enter the IP address the cluster will use. Click next and enter the cluster service account details. Click next and check the cluster details, when you are happy click next to create the cluster on SQL1. When the installation has completed click next then finish.
Now the first cluster node is active and managing the resources you may now boot SQL2. Add the extra vNIC first, boot the 2nd node and configure the private IP as above. Once this is done, from within inside cluster administrator, right click the cluster and select new > node and the add node wizard will start.
Enter the node computername (or browse) and click the add button. Clicking next will analyse the configuration. Providing there are no errors click next and supply the cluster account info. Review the configuration and click next to complete the addition of the new node. (You may see a warning that cluster resources cannot be found on node2, that is correct they are currently owned by node1!)
Click next and then finished, when configuration has completed. Open cluster administrator and under "Cluster Configuration" > "Networks" right click each network entry and set the properties for each network type. The private network should be set to "Enable this network for cluster use" with "Internal cluster communications only" defined. The public network should be set to "Enable this network for cluster use" with "Client access only". Check the cluster fail over operation (try rebooting the node that is holding the resources) and if you are successful move onto part 2. Should you receive any errors, review your previous steps
Part 2 will cover installing SQL Server 2005 into the newly created cluster