

Introduction
In this article, we will do sentiment analysis of text stored in SQL Server with comments about a product, read the text with AI, and detect customer sentiments. We do this by reading text and then using AI to detect the tone of the text.
In other words, we will do a sentiment analysis of data stored in SQL Server. Read the text and detect if the customer is happy or unhappy with the products and then create a report of the data.
Requirements for the sentiment analysis
- First, you will need SQL Server installed.
- Secondly, a database created in SQL Server. In this example I am using Adventureworks2019, however, any database can be used because we will create new tables from scratch.
- Thirdly, you need a code editor to create Python code. I am using Visual Studio Code, but you can use Visual Studio, Jupiter Notebook, Notepad++, or any other code editor you prefer.
- Optionally, you can install SQL Server Management Studio. It is not mandatory, but it is my favorite tool to handle T-SQL code.
Getting started with Sentiment analysis with AI
Using your code editor write the following code:
from textblob import TextBlob

# Comment
comment = "I hate this product"

# Create an object
obj = TextBlob(comment)

# detect sentiment
sentiment = obj.sentiment

# Get polarity
polarity = sentiment.polarity

# Print polarity and subjetivity
print("Polarity:", polarity)
First, you will need the textblob library. This library is a nice API used for NLP (Natural Language Processing). The library is used for speech tagging, phrase extraction, translation, and in our case sentiment analysis. If it is not installed by default, you will need to go to the command line and run this code where Python is installed:
pip install textbblob
Also, you will need to import the library:
from textblob import TextBlob
In addition, we have the comment. It contains the text that we want to analyze. We will store it in the comment variable.
# Comment
comment = "I hate this product"
Additionally, we create the object and detect the sentiment:
# Create an object
obj = TextBlob(comment)

# detect sentiment
sentiment = obj.sentiment
Finally, we get the polarity and print the results.
polarity = sentiment.polarity

# Print polarity and subjetivity
print("Polarity:", polarity)
Sentiment analysis and the polarity
The polarity is the measure used to analyze the sentiments related to the text. Our library reads the text and detects if the customer is happy or not. The following table shows examples of possible values and their explanations:
| Polarity | Sentiment Explanation |
| -1.0 | Strongly negative sentiment indicating extreme dislike or hatred. |
| -0.9 | Very negative sentiment expressing strong dissatisfaction. |
| -0.8 | Highly negative sentiment indicating strong disapproval. |
| -0.7 | Negative sentiment conveying significant dislike. |
| -0.6 | Moderately negative sentiment expressing dissatisfaction. |
| -0.5 | Mildly negative sentiment indicating slight disappointment. |
| -0.4 | Slightly negative sentiment suggesting some criticism. |
| -0.3 | Slightly negative sentiment conveying minor dissatisfaction. |
| -0.2 | Slight negativity with a hint of dissatisfaction. |
| -0.1 | Slight negativity with a touch of criticism. |
| 0.0 | Neutral sentiment with no clear positive or negative opinion. |
| 0.1 | Slight positivity with a hint of approval. |
| 0.2 | Slight positivity suggests mild satisfaction. |
| 0.3 | Slightly positive sentiment conveying some appreciation. |
| 0.4 | Mildly positive sentiment indicates moderate approval. |
| 0.5 | Positive sentiment expressing satisfaction. |
| 0.6 | Moderately positive sentiment conveying significant approval. |
| 0.7 | Highly positive sentiment indicating strong approval. |
| 0.8 | Very positive sentiment expressing intense satisfaction. |
| 0.9 | Extremely positive sentiment conveying extreme admiration. |
| 1.0 | Strongly positive sentiment suggesting intense love or adoration. |
If we run the code, the value of the comment “I hate this product” will show the following value:
Polarity: -0.8
The text has a highly negative sentiment.
If we modify the comment line with a positive value, the polarity will change:
# Comment

comment = "I liked the product. It was useful to me. Thanks."
If we run the code, the polarity is the following:
Polarity: 0.36666666666666664
This value is a Mildly positive sentiment.
Sentiment Analysis with SQL Server
Previously, we try to work with Python directly. Now we have several sentiments stored in our SQL Server database. How can we detect the sentiment of several users using our data stored in SQL Server?
First, we will create a table for this example:
CREATE TABLE sentiments (
id INT IDENTITY(1,1) PRIMARY KEY,
comment VARCHAR(MAX),
sentiment DECIMAL(4,2)
);
Where id is an identity column and the numbers are generated automatically. The comment will store the comments and the sentiments will be detected later.
Secondly, we will insert some comments:
INSERT INTO sentiments (comment)
VALUES
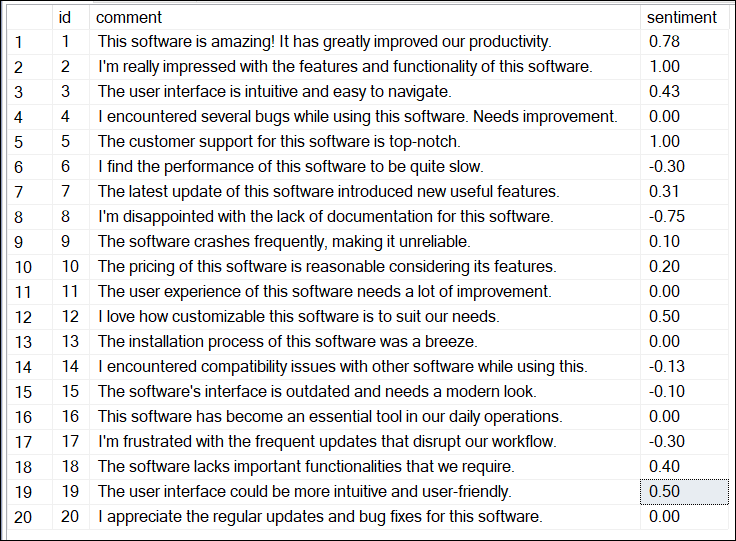
('This software is amazing! It has greatly improved our productivity.'),
('I''m really impressed with the features and functionality of this software.'),
('The user interface is intuitive and easy to navigate.'),
('I encountered several bugs while using this software. Needs improvement.'),
('The customer support for this software is top-notch.'),
('I find the performance of this software to be quite slow.'),
('The latest update of this software introduced new useful features.'),
('I''m disappointed with the lack of documentation for this software.'),
('The software crashes frequently, making it unreliable.'),
('The pricing of this software is reasonable considering its features.'),
('The user experience of this software needs a lot of improvement.'),
('I love how customizable this software is to suit our needs.'),
('The installation process of this software was a breeze.'),
('I encountered compatibility issues with other software while using this.'),
('The software''s interface is outdated and needs a modern look.'),
('This software has become an essential tool in our daily operations.'),
('I''m frustrated with the frequent updates that disrupt our workflow.'),
('The software lacks important functionalities that we require.'),
('The user interface could be more intuitive and user-friendly.'),
('I appreciate the regular updates and bug fixes for this software.');Finally, we will create the Python code to detect and insert the sentiment value into the sentiment column of the sentiments SQL Server table.
Python code for Sentiment Analysis in SQL Server
The following code will read the sentiment assign a polarity value and update the values in the SQL Server table:
import pyodbc

from textblob import TextBlob

# Connect to the SQL Server database
conn = pyodbc.connect('Driver={SQL Server};'
'Server=.;'
'Database=adventureworks2019;'
'Trusted_Connection=yes;')

# Retrieve the comments from the SQL Server database
cursor = conn.cursor()
cursor.execute("SELECT id, comment FROM sentiments;")
rows = cursor.fetchall()

# Iterate over the rows and update the sentiment column
for row in rows:
   comment_id = row.id
   comment_text = row.comment

   # Create a TextBlob object for the comment
   obj = TextBlob(comment_text)

   # Detect sentiment
   sentiment = obj.sentiment

   # Get polarity
   polarity = sentiment.polarity

   # Update the sentiment column in the database
   update_cursor = conn.cursor()
   update_cursor.execute("UPDATE sentiments SET sentiment = ? WHERE id = ?;", polarity, comment_id)
   update_cursor.commit()

# Close the cursors and connection
cursor.close()
conn.close()
The code will connect to SQL Server. If you do not have the pyodbc library installed, you may need to install the pyodbc in Python using the command line (pip install pyodbc). Once installed, the following code can be used.
# Connect to the SQL Server database
conn = pyodbc.connect('Driver={SQL Server};'
'Server=.;'
'Database=adventureworks2019;'
'Trusted_Connection=yes;')
The server is the SQL Server name. In this case. means to use the local SQL Server. Otherwise, write the name of the SQL Server. The database contains the database name where the table sentiments are stored. If your table was created in a different database, change the name accordingly. Finally, trusted connection means connecting to SQL Server using Windows Authentication.
Also, we will retrieve the comments from the sentiments table using a cursor.
# Retrieve the comments from the SQL Server database
cursor = conn.cursor()
cursor.execute("SELECT id, comment FROM sentiments;")
rows = cursor.fetchall()
In addition, we will iterate the values of the rows and store the comments and comment id. Next, we will create the object and detect the sentiment as in the previous example.
# Iterate over the rows and update the sentiment column
for row in rows:
   comment_id = row.id
   comment_text = row.comment
   # Create a TextBlob object for the comment
   obj = TextBlob(comment_text)
   # Detect sentiment
   sentiment = obj.sentiment
Additionally, we will detect the polarity and update the sentiments table and the sentiment column with the polarity detected in each row.
# Get polarity
polarity = sentiment.polarity

# Update the sentiment column in the database
update_cursor = conn.cursor()
update_cursor.execute("UPDATE sentiments SET sentiment = ? WHERE id = ?;", polarity, comment_id)
update_cursor.commit()
Finally, we will close the cursor and the connection.
# Close the cursors and connection
cursor.close()
conn.close()
Sentiment analysis in SQL Server – check final results
Previously, we detected the polarity in the sentiments table. In order to verify the results, we will do a select of the data:
SELECT *
FROM sentiments
Also, we will count the negative sentiments, positive and neutral (0). Finally, we will check the average sentiment.
SELECT
  AVG(sentiment) AS average_sentiment,
  COUNT(CASE WHEN sentiment < 0 THEN 1 END) AS negative_sentiments,
  COUNT(CASE WHEN sentiment = 0 THEN 1 END) AS neutral_sentiments,
  COUNT(CASE WHEN sentiment > 0 THEN 1 END) AS positive_sentiments
 FROM Sentiments

The sentiments are slightly positive in general with a value of 0.18. It is not so positive in general, but at least it is positive. In addition, there are 5/20 negative sentiments and 5/20 neutral sentiments, and 10/20 positive sentiments. There are more positive sentiments in general.
Finally, let’s check the positive/neutral/negative sentiments in percentage.
SELECT
  AVG (sentiment) AS average_sentiment
, COUNT (CASE
           WHEN sentiment < 0 THEN
             1
         END) * 100.0 / COUNT (*) AS negative_sentiments_percentage
, COUNT (CASE
           WHEN sentiment = 0 THEN
             1
         END) * 100.0 / COUNT (*) AS neutral_sentiments_percentage
, COUNT (CASE
           WHEN sentiment > 0 THEN
             1
         END) * 100.0 / COUNT (*) AS positive_sentiments_percentage
FROM Sentiments;
The code shows the positive/neutral/negative sentiments in percentage. The negative sentiments are 25 %, neutral sentiments 25 %, and positive sentiments 50 %.

Conclusion
In this article, we learn how to do sentiment analysis in Python. Also, we learned how to detect the sentiments of comments in an SQL Server table using Python. Finally, we detect some statistics using T-SQL code to analyze the sentiments in general.
