

It doesn’t happen often you have to recover systems databases in SQL Server. Most articles cover restoring a master database on a local instance, if you’re lucky for a named instance, but most do not cover a clustered instance.
As with everything in SQL Server, things evolve over time and versions! So, with every new version you prepare for, you also need to re-evaluate the scenarios you already tested for your current SQL Server instances.
As we recently experienced a production instance that lost the ability to reach its SAN hosted database files, due to a glitch of the SAN backup mechanism. We reached out for the appropriate scenarios to recover the instance. By cheer luck, the glitch vanished in time and the instance picked up its workings, so we double checked it all and didn’t need the actual recoveries to be performed.
The master database
First of all, I want to remind you to not implement any critical objects in the master database, as it is a systems database for SQL Server itself. The Microsoft Docs state: “The master database records all the system-level information for a SQL Server system. This includes instance-wide metadata such as logon accounts, endpoints, linked servers, and system configuration settings. …”
Also read the recommendations in that document.
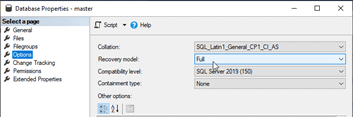
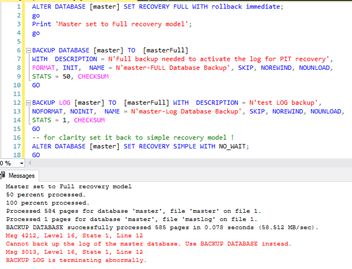
You can create and use tables etc., just like in any user database, but keep in mind this database has a special role when it comes to SQL Server. On top of that, you can put master in Full recovery model, but you will not be able to create log backups for it. See the images below to see that while we can change the recovery model, it does not help us.
Read about the restrictions for master database in the restrictions section of the documentation.
When should you restore or rebuild the master database?
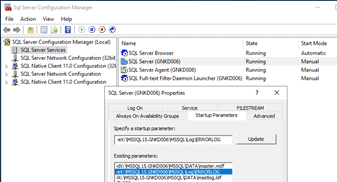
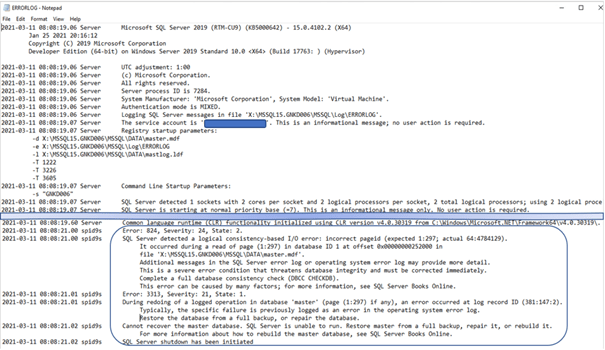
Typically you need to restore or rebuild master database when the instance no longer starts and performs an automatic shutdown after your command to start up the instance or in the case someone has messed up the objects you have put in master against the previous advice. The SQL Server Errorlog will be your first resource to figure out what is going wrong. The SQL Server Configuration Manager will point to the errorlog file used by your instance:
The Error message we found in production is shown below. It turned out this instance had issues getting to its LUN on the SAN. After these issues had been fixed, the instance started normally and ran stable like before.
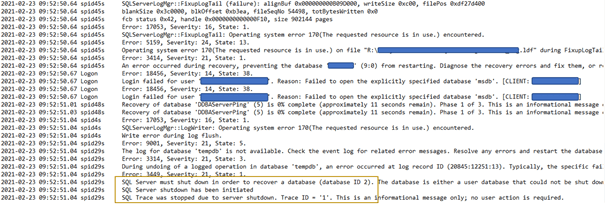
Or an example during my tests, this is the message in the error log. In this case, the instance could not open its systems database “model”, which caused it to stop.

A case of corruption (on my test system) is shown here.

Another test case stating master db itself has corruption (logical consistency-based I/O error)
If SQL Server Errorlog does not show most recent data, chances are your service account has issues. You’ll need to have a look in the Windows Event viewer to get more information about that.
When can you restore the master database?
You can only restore the master database when the instance is able to start up. In all other cases you need to rebuild the instance. You can find guidance in the article "Rebuild System Databases".

Don’t rush in! Read about the limitations and restrictions. Be aware that when SQL Server rebuilds its systems databases, it rebuilds them all (master, model, msdb, tempdb).
Keep in mind, since we are talking a Clustered SQL Server Instance, this has to be performed on the node that hosts the ‘active’ instance!

You need to double check in the shared storage is available.

I have always put the other node(s) in “Pause” state with regards to their cluster membership.
We always install our SQL Server instances using a configuration INI-file and we keep a copy of those files in our safe zone. This way, we know which exact parameters have been used at install time. Our proprietary “DBAStatistics” tool keeps an inventory of all configuration settings for all instances we manage.
When your instance is down, it doesn’t hurt for you to copy the existing systems folder (with data and log files) to a safe zone. Most of them are small anyway, so this should be easy.
Check you have the (latest) backups of at least master and msdb databases available (and model database if you are actually implementing things on it.)
Step 1: Rebuilding the system databases
Below I have listed the ini-file content to actually perform the rebuild for the systems databases:
| ;SQL Server 2019 Configuration File [OPTIONS] ;start /wait D:\setup.exe /ConfigurationFile=C:\ISO\Rebuild_SystemDatabases_clusterd_SQLServer2019_GNKD006_ConfigurationFile.INI ; Specifies a Setup work flow, like INSTALL, UNINSTALL, or UPGRADE. This is a required parameter. ACTION="REBUILDDATABASE" ; Use the /ENU parameter to install the English version of SQL Server on your localized Windows operating system. ENU="True" ; Specifies that SQL Server Setup should not display the paid edition notice when ran from the command line. SUPPRESSPRIVACYSTATEMENTNOTICE="True" ; Setup will not display any user interface. QUIET="False" ; Setup will display progress only, without any user interaction. QUIETSIMPLE="True" ; Displays the command line parameters usage. HELP="False" ; Specifies that the detailed Setup log should be piped to the console. INDICATEPROGRESS="False" ; Specifies that Setup should install into WOW64. X86="False" ; Specify a default or named instance. INSTANCENAME="GNKD006" ; Windows acCOUNT(s) as Computed to provision as SQL Server system administrators. SQLSYSADMINACCOUNTS="mydomain\OurDBAGroup" ; The default is Windows Authentication. Use "SQL" for Mixed Mode Authentication. ; not allowed with REBUILDDATABASE ;SECURITYMODE="SQL" SAPWD="OnlyToBeProvidedWhenMixedModeIsInUse" ;Specifies the directories for tempdb data files. When specifying more than one directory, separate the directories with a blank space. If multiple directories are specified the tempdb data files will be spread across the directories in a round-robin fashion. SQLTEMPDBDIR=X:\MSSQL15.GNKD006\MSSQL\TempData ;Specifies the directory for the tempdb log file. SQLTEMPDBLOGDIR=X:\MSSQL15.GNKD006\MSSQL\TempLog ; The number of Database Engine TempDB files. SQLTEMPDBFILECOUNT="4" ; Specifies the initial size of a Database Engine TempDB data file in MB. SQLTEMPDBFILESIZE="250" ; Specifies the automatic growth increment of each Database Engine TempDB data file in MB. SQLTEMPDBFILEGROWTH="250" ; Specifies the initial size of the Database Engine TempDB log file in MB. SQLTEMPDBLOGFILESIZE="250" ; Specifies the automatic growth increment of the Database Engine TempDB log file in MB. SQLTEMPDBLOGFILEGROWTH="250" ; not allowed with REBUILDDATABASE ;FAILOVERCLUSTERGROUP=… ; not allowed with REBUILDDATABASE ;FAILOVERCLUSTERNETWORKNAME=… |

When Setup has completed rebuilding the system databases, it returns to the command prompt with no messages. At the very least, examine the Summary.txt log file to verify that the process completed successfully. This file is located at C:\Program Files\Microsoft SQL Server\***\Setup Bootstrap\Logs.
This is the Summary log file when the rebuild has been completed successfully:

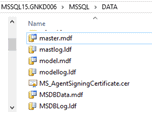
You can also check the (new) systems databases files:
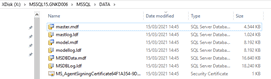
Of course, you would think the tempdb files will reside in the provided directories. This is not correct. But SQL Server will handle it later on.
Keep in mind this process did reset all rights and privileges of the SQL Server installation and its folders to its default values. If you have granted extra authority to accounts, you’ll have to put them back in place.
Step 2 – Restoring the system databases
By now, your instance is back in a state where it can be started, not yet usable, but started. That means you can go on and perform the needed restore operations for the systems databases:
- master
- msdb
- model
You can now use “Backup & restore: systems databases (SQL Server)” as a guideline. Once again: read about the limitations.
Restoring master:
The article, Restore the master Database (Transact-SQL), will guide you to:
- Open an administrative cmd prompt
- Start the instance in maintenance mode. (use the lower case “-s” parameter for the instance name )

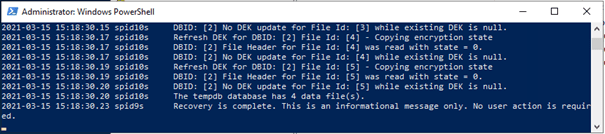
Start the instance in maintenance mode!
( use the lower case “-s” parameter for the instance name ! )

Start Powershell in elevated mode!
set-location 'C:\Program Files\Microsoft SQL Server\instancesoftwarelocation\MSSQL\Binn\'
.\sqlservr.exe -s <InstanceName> -m?
This window will remain open until the restore of master database has been completed and the system has been shut down. Only then you can close this window.
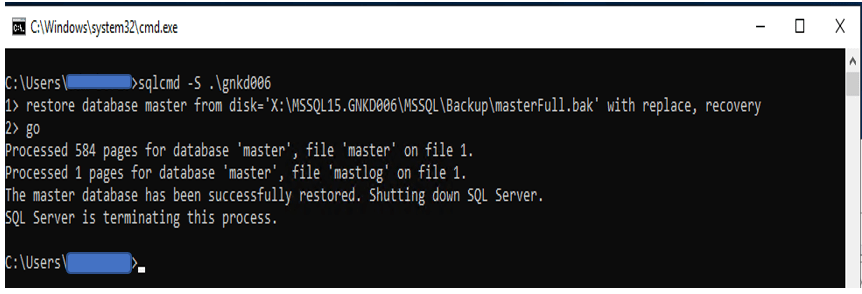
- Open sqlcmd and run the restore command for master database ( use the upper case “-S” parameter for the instance name )
Open sqlcmd and run the restore command for master database
( use the upper case “-S” parameter for the instance name ! )
C:\>sqlcmd -S .\ <InstanceName>
1> restore database master from disk='X:\MSSQL15.<InstanceName>\MSSQL\Backup\masterFull.bak' with replace, recovery
2> go
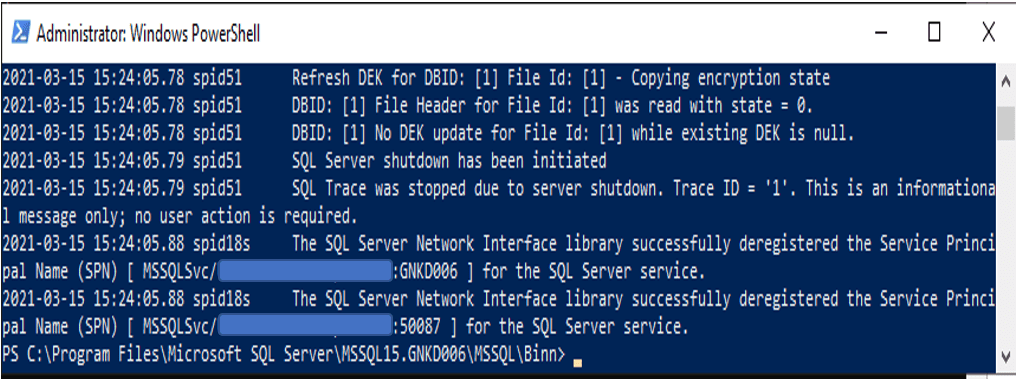
- After completion of this restore the system will shutdown the instance. The elevated PowerShell prompt will show this

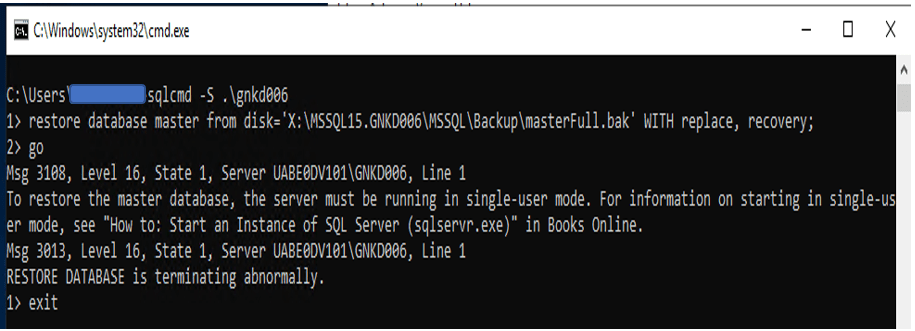
If you did not start the SQL instance using the parameter, -m, the restore database for master will fail.
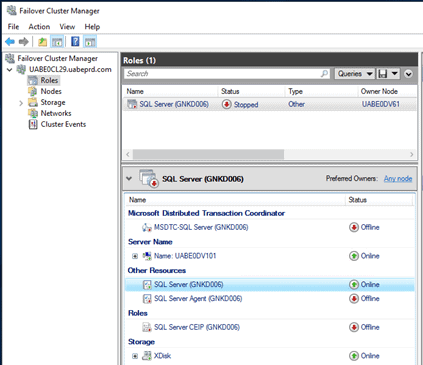
Now you should be able to start the instance again using Windows Failover Cluster Manager. Keep in mind to only start the instance as you still have to restore model and msdb databases.
It may be a wise decision to (temporary) disable all logins except for DBA access, as you still have to check the system and do not want any user activity on non-double-checked objects.
Check the integrity of the restored master with this code:
DBCC CHECKDB (N'master') WITH ALL_ERRORMSGS, EXTENDED_LOGICAL_CHECKS;
This should report no issues at all.

….

As you can see, a Checkdb for the master database also checks mssqlsystemresource.
Restoring msdb
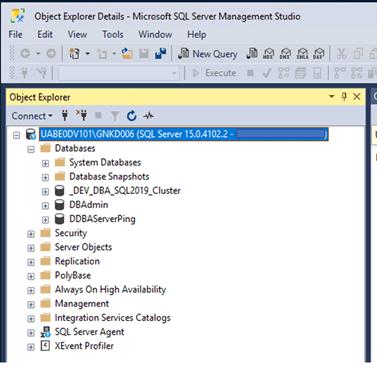
Since by now the instance is running in a regular fashion, you can also use SQL Server Management Studio to perform your remaining restore operations. To avoid any confusion, I use the actual virtual SQL Server instance name when connecting the instance.
SQLCMD -S <VirtSQL>\<InstanceName>
restore database msdb from disk='<BackupPath>\msdbFull.bak' WITH replace, recovery;

This time, it will no longer shutdown the instance.
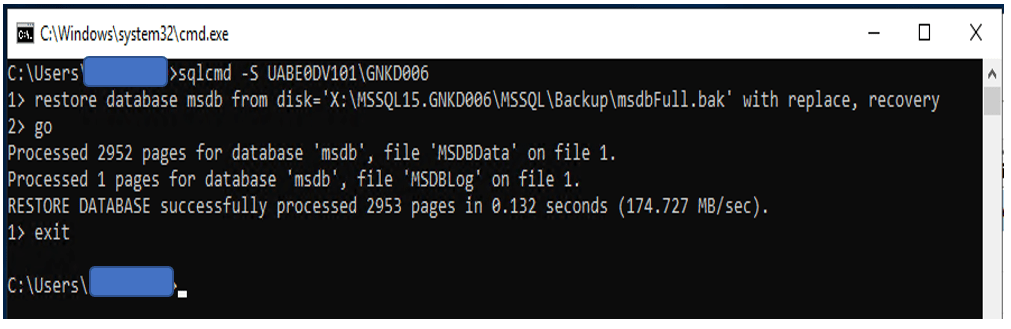
In this example I restored a small instance, your restore execution may result in a larger log list.
Once again: Check the results.
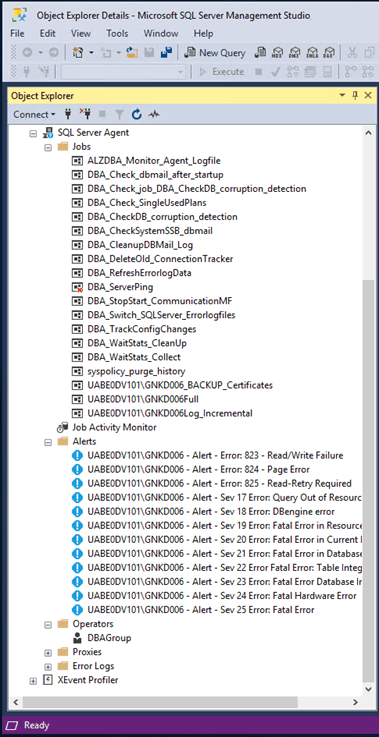
As you can see, the instance now also shows all SQLAgent related stuff (msdb).
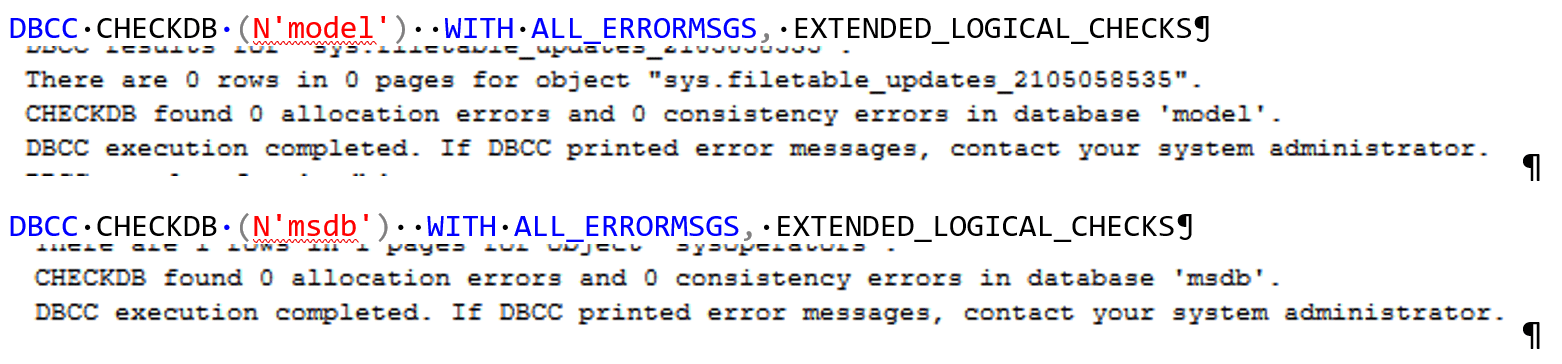
Now is the time to DBCC CHECKDB all user databases. These should also come out clear or you may have to perform some extra (regular) restore operations to get your system in a stable state.
Keep in mind if you use SQL Server Service Broker - Check all your databases for service broker objects. As you have restored msdb, it will have to be provided a new Service Broker ID.
IF EXISTS( SELECT *
FROM sys.databases
WHERE [name]=N'msdb'
AND is_broker_enabled = 0      )
Begin
print 'SSB enabled on msdb';
ALTER DATABASE msdbSET ENABLE_BROKER;
END

ALTER DATABASE msdb SET NEW_BROKER WITH ROLLBACK IMMEDIATE;
( in my case, it only started to work again after I refreshed all SSB queues. Test your recovery paths for SSB.
You may still have to grant Windows authority if you had granted some on the folders of your SQL Server file structure ( e.g. for the backup folder ).
Should you apply a cumulative update?
Because you used the installation parameter “REBUILDDATABASE” only your systems databases have been rebuilt. It did not reset the software itself, so you do not need to reapply CUs/
Finalize the cluster checks
Don’t forget to re-enable the paused nodes and test fail overs before you actually re-activate your production connections. Test it, monitor it, try to be pro-active to prevent further down times.
Finally
If you are happy with the results of your operation, you can re-enable the access for non-DBA accounts and get a well-deserved coffee while you follow up the upcoming instance consumption.
I hope you enjoyed this little article. Maybe it can help out in case you really need it.