Introduction
Attribute Relationships are usually defined in SSAS when there is a one-to-many relationship between the members within the same dimension. A very common example where we need to define attribute relationships is while developing a Geography dimension. In such a dimension, we have many Cities that are related to States, and then States are related to Country and so on. Each record in the relational database refers to exactly one City, which can be used as the unique member (Logical Key) for setting the attribute relationships.
For a quick illustration, let's see the following relational table, Dimension.City, from the WideWorldImoprtersDW database.
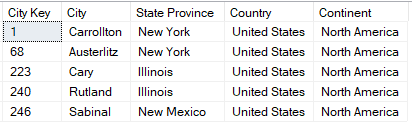
Here, as you can see, multiple cities are linked to one State Province and multiple State Provinces are linked to a Country.
So, there's a one-to-many relationship between City (many) and State Province (one) and also between State Province (many) and Country (one).
The Need for Attribute Relationships
Attribute relationships are one of the most important concepts in SSAS. They inform the processing engine about how the multi-dimensional data is structured and how the database needs to store the aggregated calculations. This information is necessary because if the data is not aggregated properly, then the performance of the cube will be impacted.
Attribute Relationship Types
By default in SSAS, each attribute is related to the key attribute of that dimension. We have two types of relationships in SSAS, namely:
- Flexible: This is the default behavior set by the dimension design wizard. Flexible relationships are those which can change over a period of time. For example, the Address for a Customer might change over time. Similarly, the Department of an Employee can also change over time and so on.
- Rigid: Rigid relationships, on the other hand, are fixed relations that don't change over time. For example, in a time dimension, we know that 01-01-2020 will always belong to the Year = 2020 and Month = January, and it will never change with time. For such a relationship, we can define the relationship type as Rigid.
Example
Now that we have some idea about the Attribute Relations in SSAS, let's dive deep and create something similar. For illustration purposes, I'll use the same WideWorldImportersDW database as the source for the SSAS.
Creating the dimension using the wizard
This article assumes that you already have some idea about how to set up an Analysis Services project and define Data Source and a Data Source View.
Once the Data Source View is defined, the next step is to create the Dimension. We will do this using the New Dimension Wizard in SSAS in the steps below.
- Right-click on Dimensions in the Solution Explorer and select New Dimension.
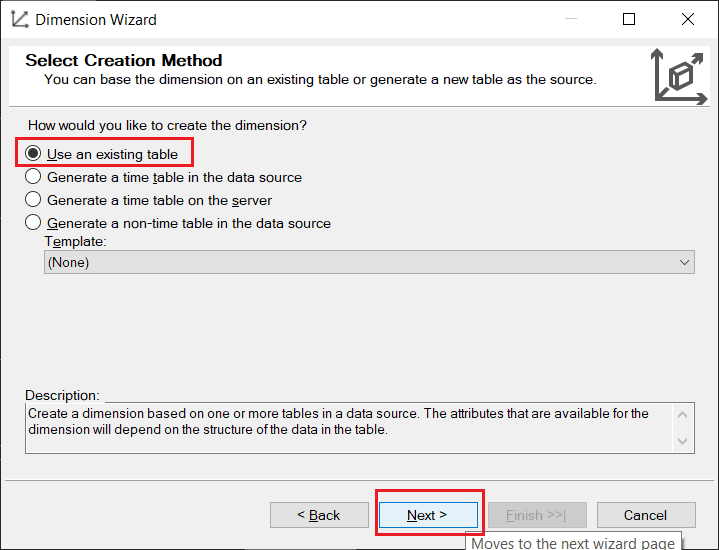
- In the Select Creation Method dialog box, select Use an existing table and click Next.

- In the Specify Source Dimension, select the default Data Source and City as the Main table.
- Select City Key as the Key column and City as the Name column and click Next.
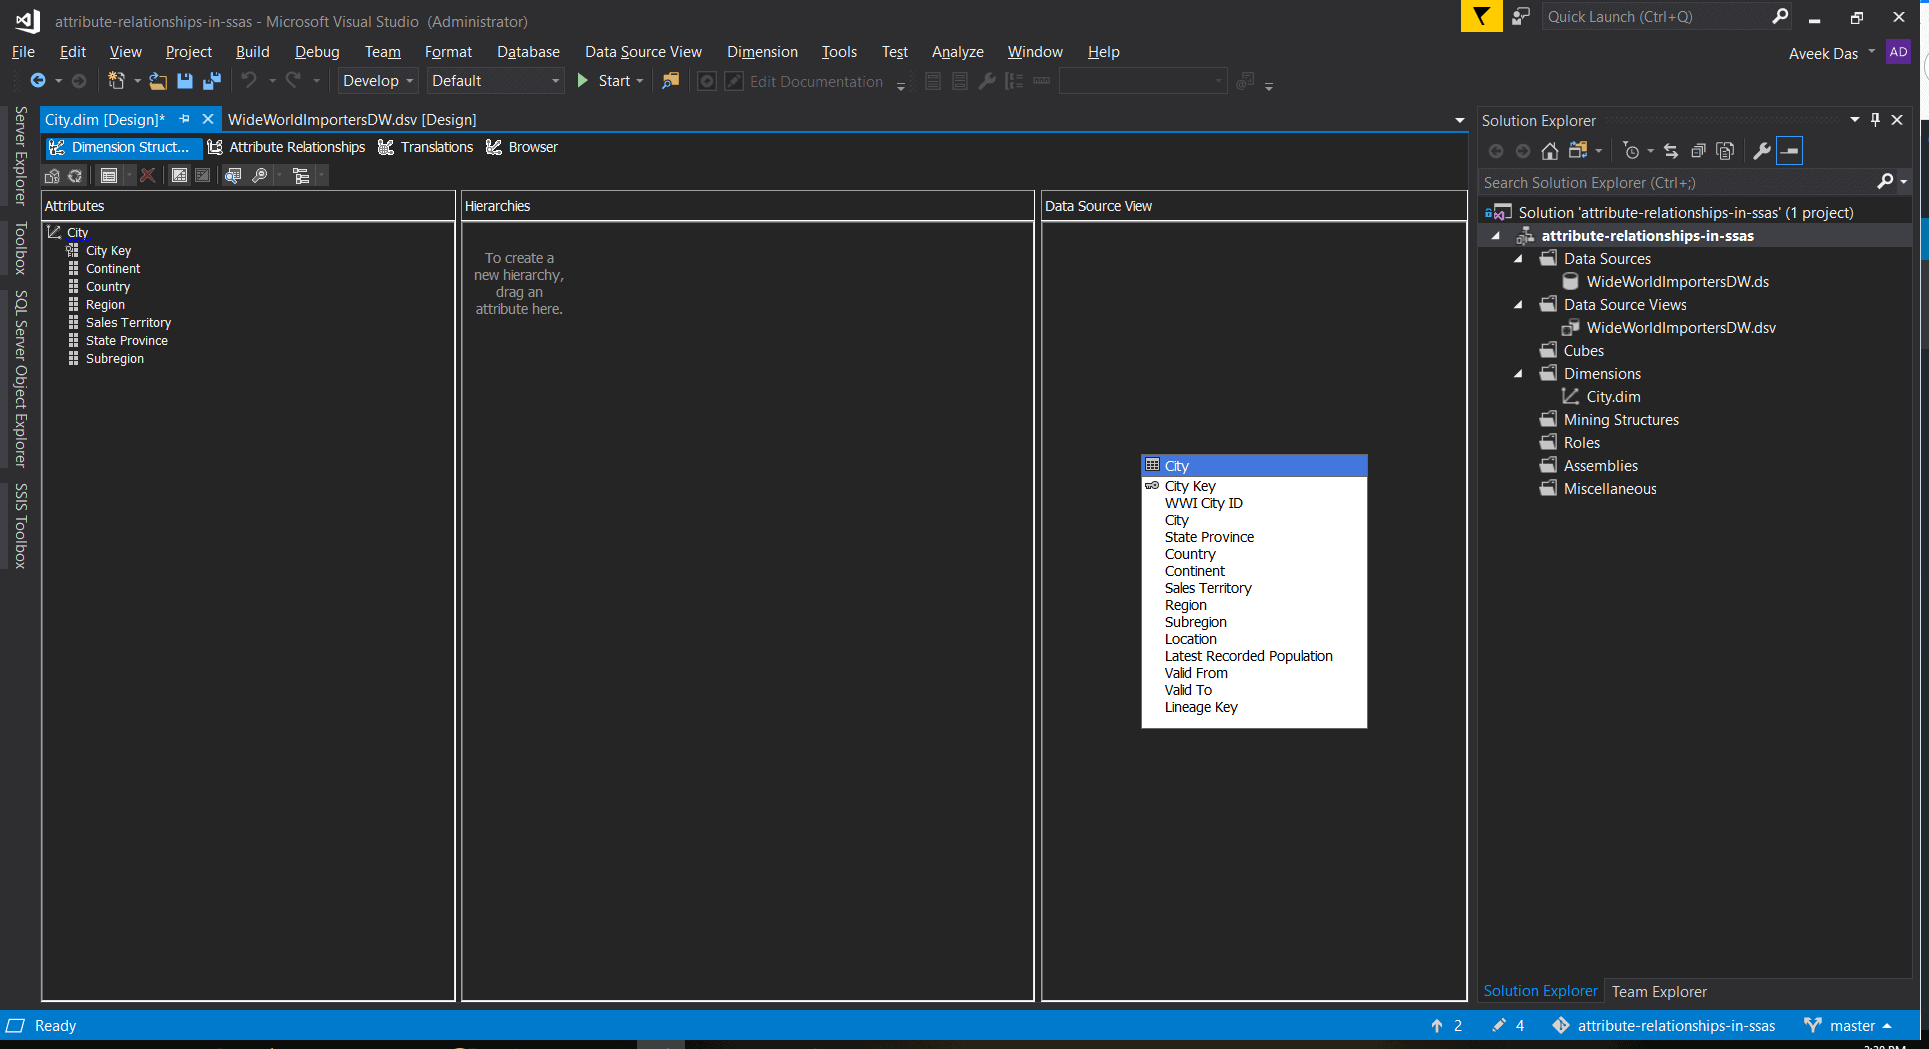
- In the Select Dimension Attributes, select the attributes as shown in the screen print and click Next.
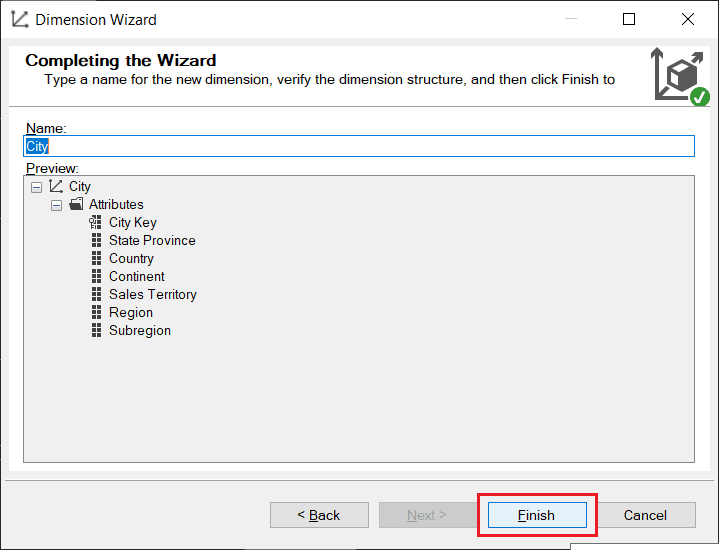
- Finally, provide a name for the dimension, City, in this case, and click Finish on the Completing the Wizard dialog box.
- You should now see the City dimension created under the Dimensions tab in the Solution Explorer.


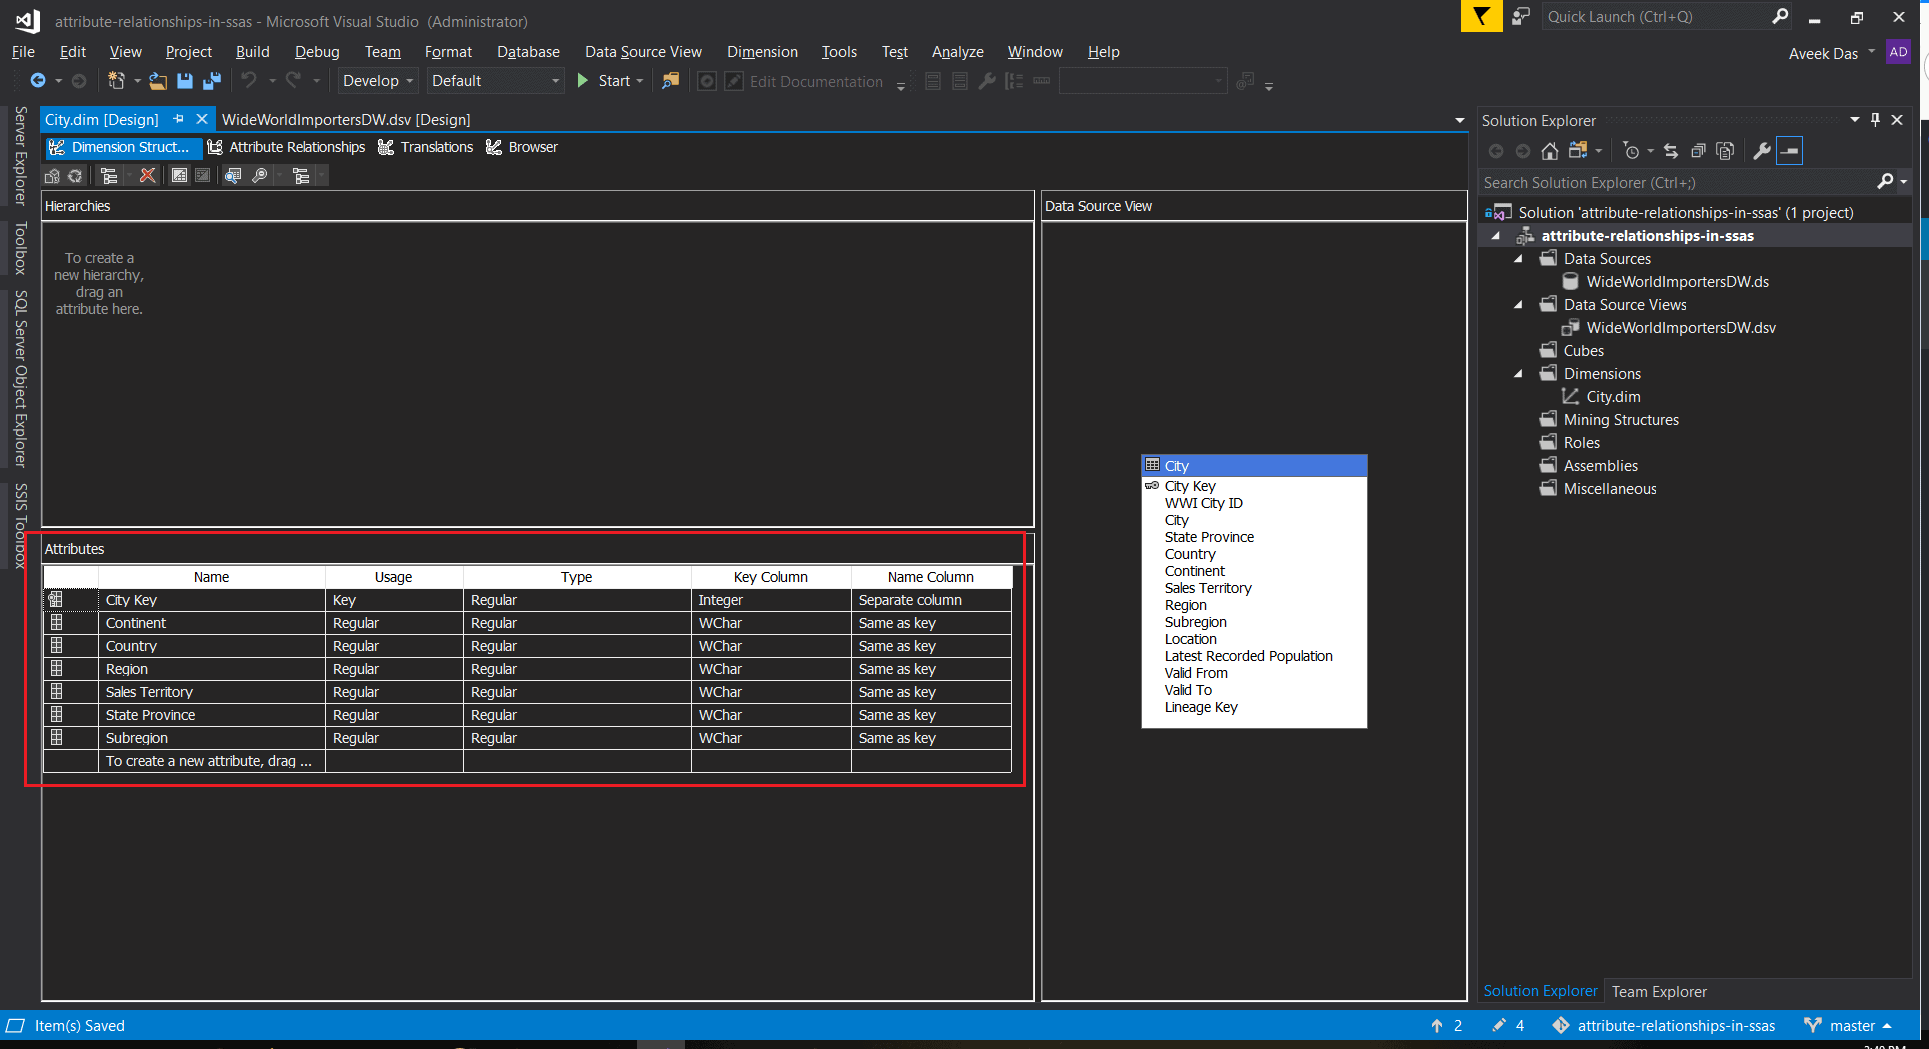
Different Views of Attributes under Dimension Structure
Once the dimension is created, double-click on it and the dimension opens up in the Dimension Designer. The Dimension Designer has four pages:
- Dimension Structure - It is used to model and structure the dimension according to the requirements.
- Attribute Relationships - This is where we define the relations between each member in the dimension.
- Translations - We can also provide translations for other languages for the dimension members if it is required to develop a multi-lingual cube.
- Browser - After the dimension is deployed and processed, we can use this tab to view the dimension members and other properties.
In the Dimension Structure page, there are three sub-panes:
- Attributes - Used to list all the attributes for the selected dimension.
- Hierarchies - If any hierarchies are defined, natural or user-defined, will appear in this pane.
- Data Source View - This pane displays the list of tables from the Data Source View that are being used in the dimension.
The Attributes can be viewed in three different modes as follows:
- Tree View - This is the default view as defined by the Dimension Designer.
- List View - This view is useful when there are a lot of hierarchies defined and we need to work frequently with those hierarchies.
- Grid View - This view is used when there is a need to work with a lot of attributes and other data types frequently.

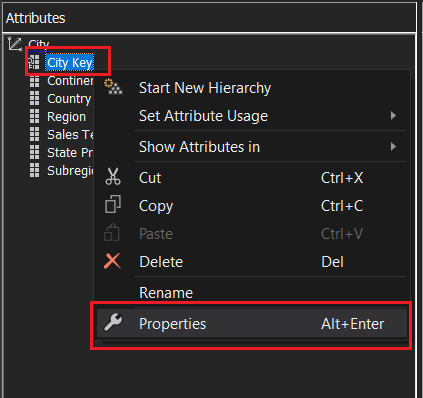
Also, let's rename the City Key property to City since the Name column of this field displays City only.
- Right-click on the City Key member and select Properties.
- Under the Basic tab, update the value for Name to City.
- The member should now be renamed to City.


Setting up Attribute Relationships
Now that our Dimension Structure is set up, let's go ahead and define the Attribute Relationships.
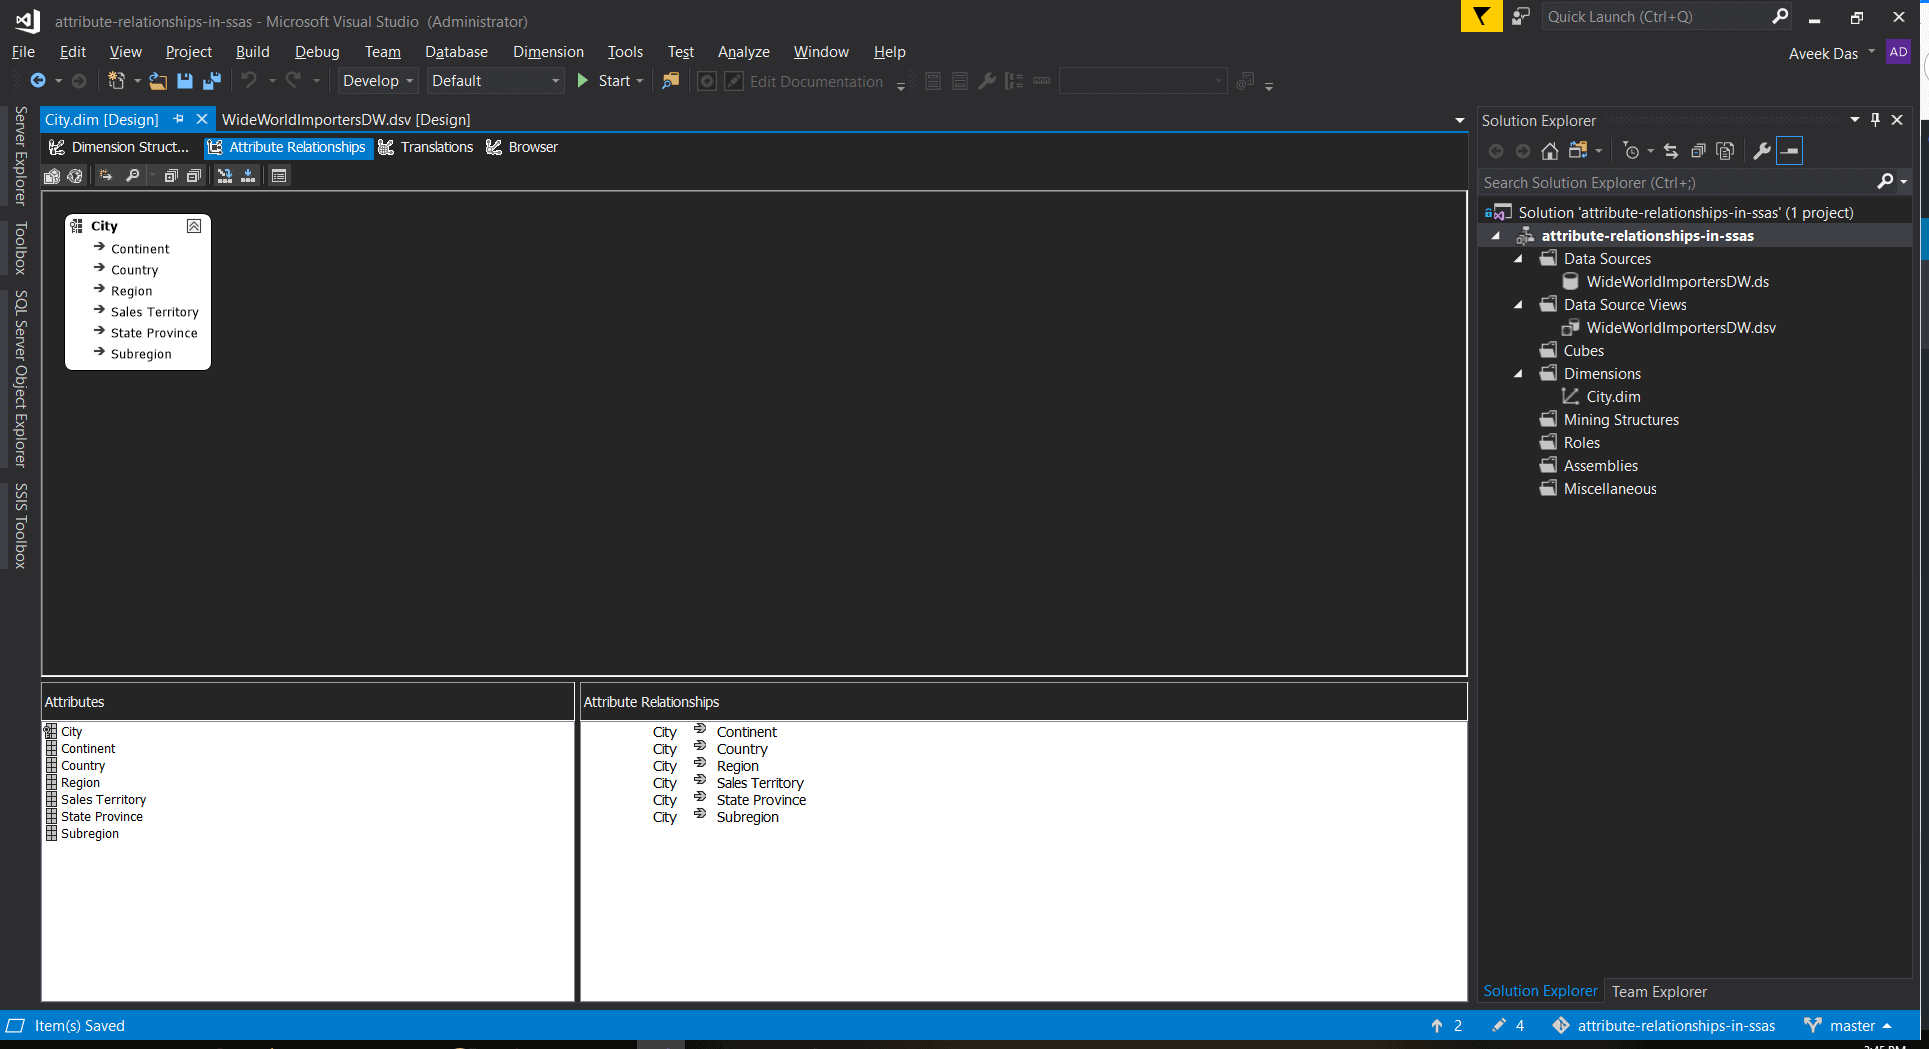
- Navigate to the Attributes Relationships page at the top.
- You can see the Attribute Relationship GUI on the top along with a list of available Attributes and Attribute Relationships list at the bottom. You can define relationships either using the GUI or by using the list on the pane below. Let's define our first relationship using the GUI and then will use the Attribute Relationships list view.
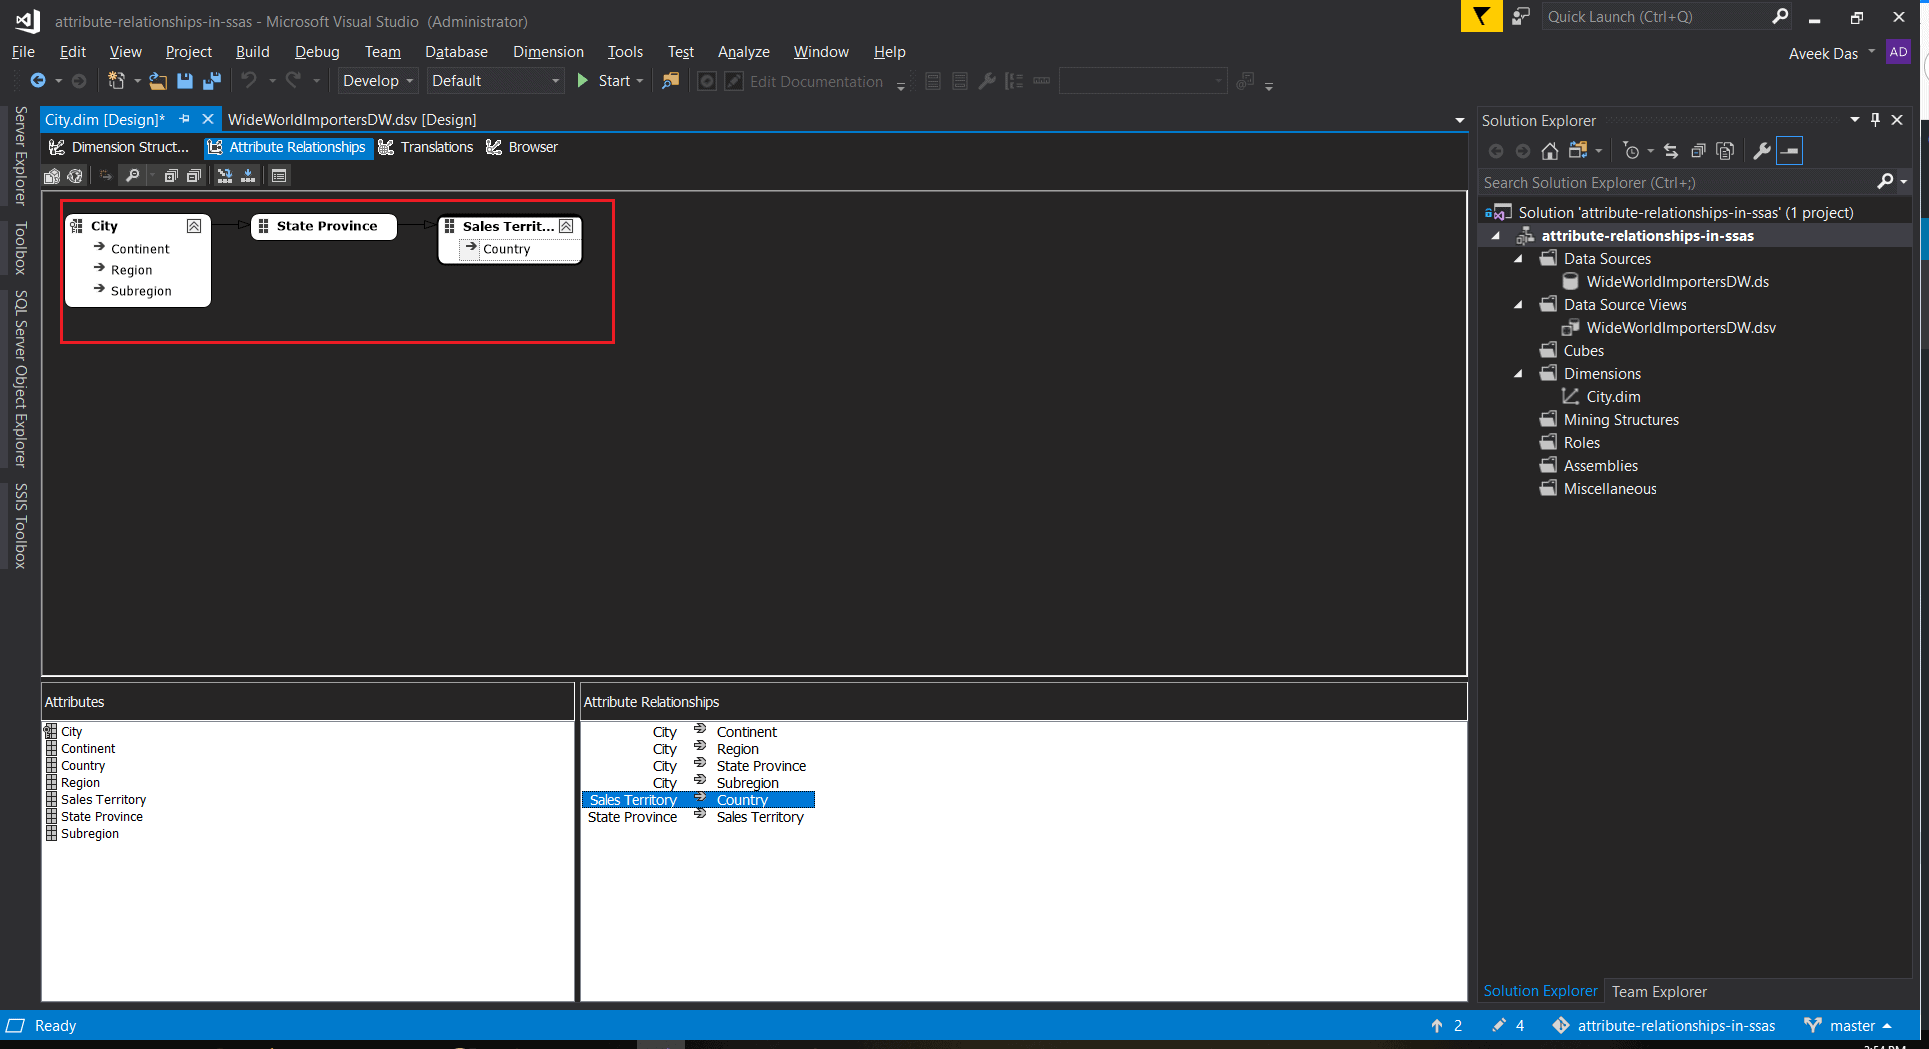
- Now, in order to define a relationship, we need to analyze the one-to-many relation among the members and drag the member with many relations and drop it on the member with one. For example, in our case Sales Territory (one) has a one-to-many relationship with State Province (many). So, we will drag the State Province and drop it on Sales Territory. The State Province will now be shown like this.
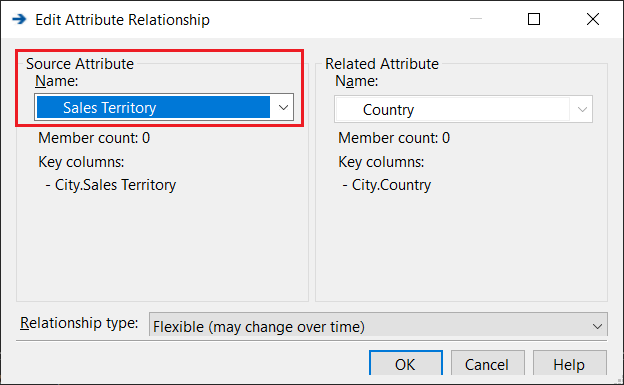
- The next step is to set the relationship between the Sales Territory and Country. Here, Country (one) has a one-to-many relation with Sales Territory (many). In order to achieve this using the list view, right-click on the list with "City -> Country" and select Edit Attribute Relationship.
- In the Edit Attribute Relationship dialog box, select the Sales Territory as the Source Attribute Name and Relationship Type Flexible. Once completed, you can see the new Attribute Relationship between the Country and the Sales Territory appear in the pane.
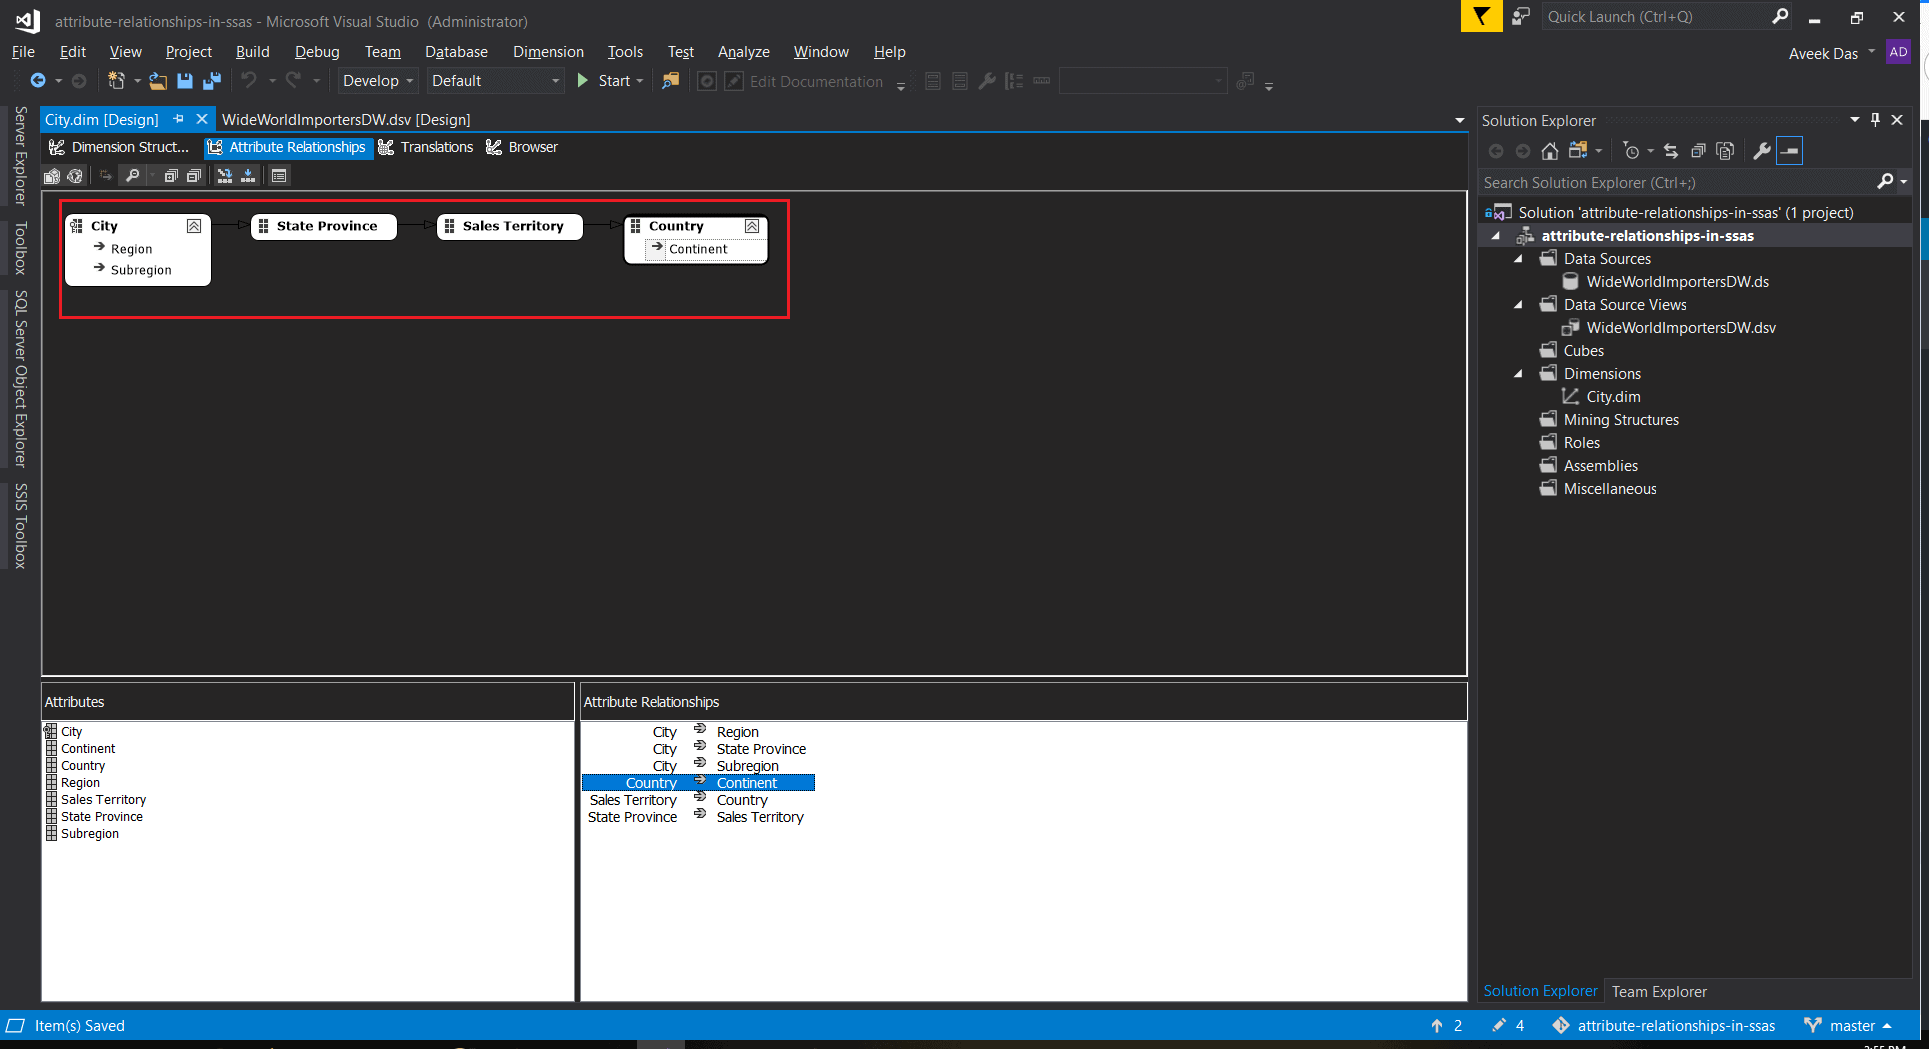
- Similarly, repeat the same for Country and Continent. However, in this case, since the relationship between country and continent will never change, select the Relationship Type as Rigid.
- Now, we have all our Attribute Relationships defined as follows.