

Being able to keep track of deleted records is very important for some customers. They want to see information like:
- who deleted records (first and last name of application user),
- through which application,
- when (exact date and time),
- from which workstation,
- and they also want to see the content of deleted records.
Although there are lots of built-in possibilities inside SQL Server for such audits, there is no technique that presents this information in a comprehensive and intuitive way in Express, Standard or Enterprise editions of SQL Server versions 2005-2016. Also, in my opinion, existing techniques have no ability to adapt. The goal of my module is to bridge this gap.
The intention of this article is not to analyze the techniques that exist within SQL Server like Change Data Capture (Enterprise Edition only), Change Tracking, or Temporal Tables (only for 2016), but to show how to create a solution that fits the specific needs of customers. The module that I've developed can be used from within any application based on SQL Server, and does not cause much system load.
The solution is based on DML triggers, which capture deleted records into separate tables. The reason I utilize DML triggers is in order to be able to keep track of any deletion that can take place through a variety of different end-user applications. To make solution more readable, and easy to maintain, deleted records are stored into separate database schemas.
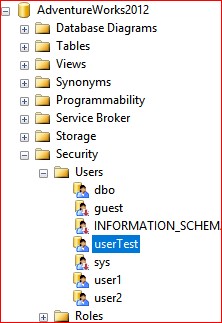
In this example, we will be using the database, AdventureWorks2012. I have created a user account, userTest, with the appropriate rights to the existing database schema. See the screenshot below.
Now, let’s create a new database schema and grant appropriate rights to the database user, userTest. For this purpose, I made a stored procedure, which you can find in the attached file CreateSchemaAndGrantRights.sql. In this stored procedure we will create the database schema and grant SELECT, INSERT, UPDATE, DELETE, and EXECUTE rights to userTest.
Let’s execute stored procedure with the following parameters:
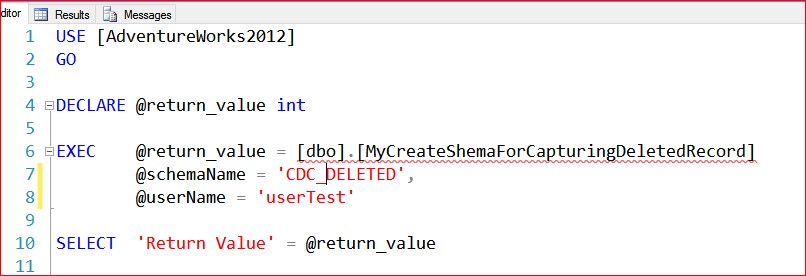
Now, we've created a schema with the name "CDC_DELETED" and granted some rights to the user.
In this demo, I will delete records, and keep track of this deleted records for these 3 tables:
- Person.Person.
- Sales.SalesPerson
- HumanResources.Employee
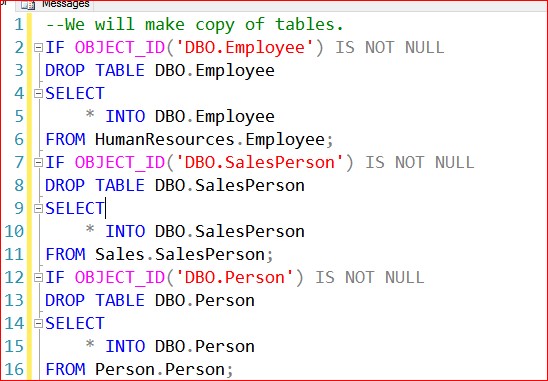
We will make copies of these three tables. The reason we are making copies is simply because these tables have parent-child referential integrity defined between them, which would prevent deleting records just these parent tables without deleting from the child tables. So, let’s issue the following commands:
The records deleted from the table dbo.Person will be inserted into the table, CDC_DELETED.dbo_Person, in the CDC_DELETED database schema. Similarly, records deleted from dbo.SalesPerson will stream into CDC_DELETED.dbo_SalesPerson, and the corresponding table for dbo.Employee is CDC_DELETED.dbo_Employee. To do this, as I said, we will use a DML AFTER trigger, which will insert the original row in a field of type XML.
The next question that arises is what will be the structure of these tables. What will happen when we add new fields in the dbo.Person table or delete an existing field. Techniques that exist within SQL Server cannot manage this easily. For example, in Temporal Tables, DDL changes are not allowed. So, you have to drop the temporal table, make some DDL changes and then recreate the Temporal Table.
The database structure that is quite resistant to changes is the one in which the record of the base table (dbo.Person) is saved in an XML field.
In addition to the "original" data from a particular record, we will also have descriptive part, which includes the time of deletion, application name with application user details (username, first name, last name), workstation, and database user name. You can see the table structure in the screenshot below:

And the default values for some columns in the screenshot below:
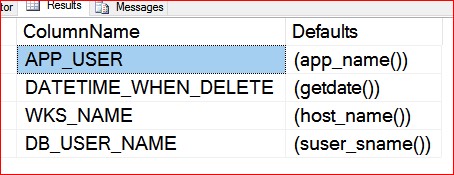
For the column APP_USER, default would be App_Name (). This function returns the application name provided by the client.
For the column DATETIME_WHEN_DELETE, default would be GetDate (). This function returns the current database system timestamp as a datetime value without the database time zone offset. This value is derived from the operating system of the computer on which the instance of SQL Server is running.
For the column WKS_NAME, default would be Host_Name (). This function returns the workstation name.
For the column DB_USER_NAME, default would be SUser_SName (). This function returns the login name associated with a security identification number (SID).
Now, within just one stored procedure, we will incorporate a number of different requirements and functionalities. We will:
- Create CDC_DELETED.dbo_Person, CDC_DELETED.dbo_SalesPerson, and CDC_DELETED.dbo_Employee.
- Create DML trigger type AFTER for each table .
- At any time, through an easy-to-use interface, end-users/customers have the ability to choose whether they will switch-on or switch-off the capturing of deleted records. To do this, the application user should have rights to start/stop the trigger.
- The table of deleted records can significantly grow over time, so a procedure can be set up for how many days of deleted records we want to keep. To enable this, we use extended properties.
For example trigger for dbo.Person table will look like the screenshot below:
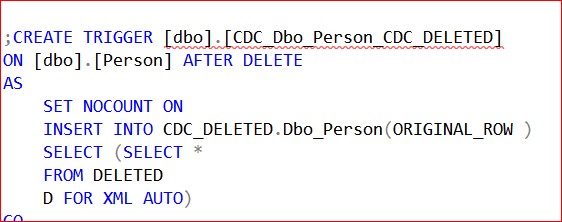
With this code, we will save the original row as a nested xml element with a simple hierarchy. The tables that have columns of type text, ntext or image should be first converted into types nvarachar (max), varchar (max) and varbinary (max).
There are other special situations that may occur. If it's on a table with an AFTER trigger already defined, trigger execution order can be very important. In that case we can use sp_settriggerorder and specify "first" as parameter. In my stored procedure last parametar @setFiringOrder regulates this behavior of the trigger. You can force the newly created trigger to be fired first. If the table has an INSTEAD OF DELETE trigger defined, you should modify this trigger. This means at very top of this trigger you should place code to capture deleted records.
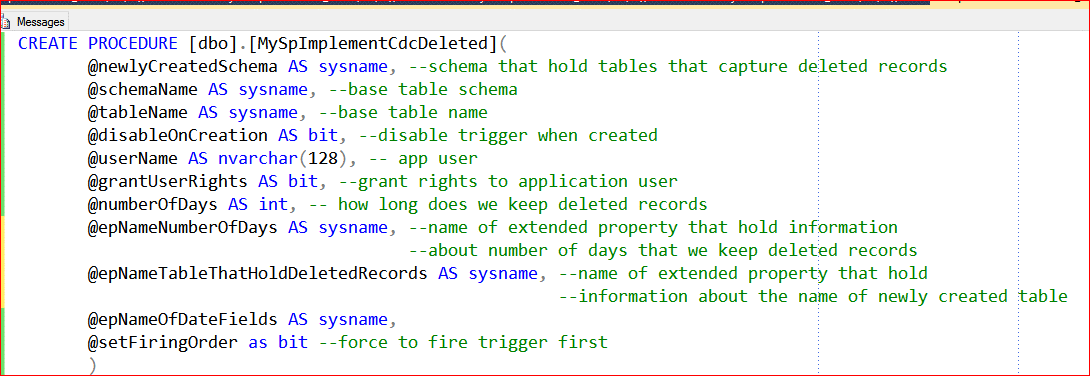
My stored procedure is addressing all of this functionality. You can find this stored procedure in the attachment within SetUpEnviernment.sql. There are many parameters for this stored procedure. An image with the description of each is below:
Let’s execute the stored procedure with the following parameters:
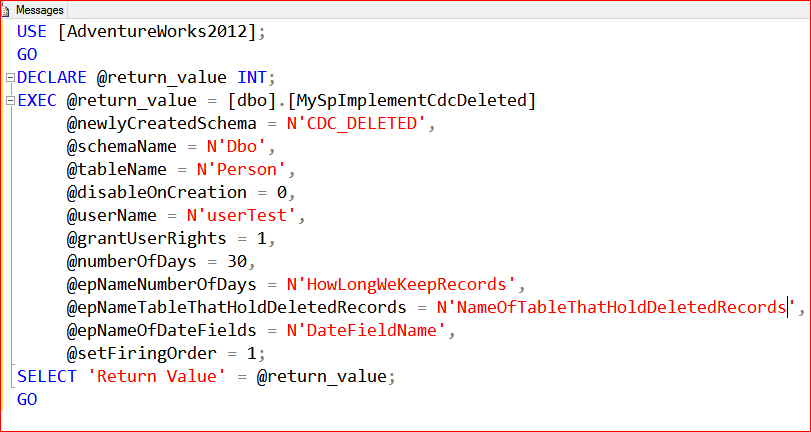
We will execute this procedure 3 times. First for the @tablename parameter with a value of "Person", second with "SalesPerson", and a third time with "Employee". Through the object Explorer in SSMS we can confirm that everything is in order for example for table dbo.Employee.

The first picture is shows that the new table is created in the database schema, CDC_DELETED. The second picture shows the DML trigger is created. In the third picture we check that extended properties are added on the newly created table. The fourth picture shows the extended property's value. So, everything is ready at the database level. Now it's time to switch to the application level.
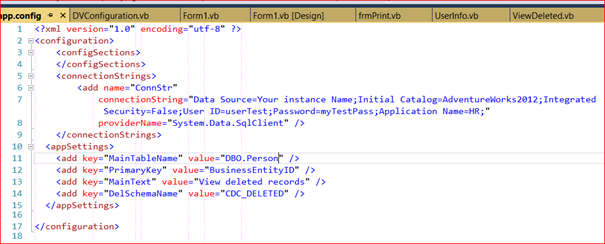
Let's check out now how the end-user interface might look like. The complete solution can be found in the attachment. It is a small WinForms application that will be used for the test. Part of the solution is a config file, which in a WinForms application is named app.config.
Let’s start Visual Studio or double click on solution file. We'll browse and delete records from a single table. In the app.config you have to change connection string. Replace “YourInstanceName” with name of your instance, replace password for the user with one you created.
Start solution using Visual Studio, and press key F5 which builds and start application. At this point you should see the main screen, like in the image below:
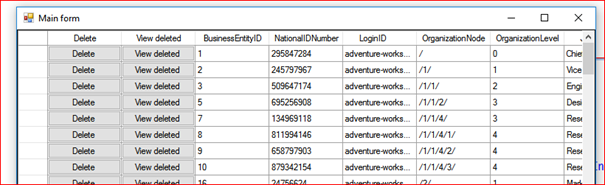
Let’s delete some records. Just click on the delete button to delete that record from the table.
Normally, at this point the end-user of your application would be authenticated through the application, and we would know his name. Since in this test application we are not connecting through the real end-user application, we will generate a username and password randomly (using the code in the screenshot below) that will be stored in the audit table.
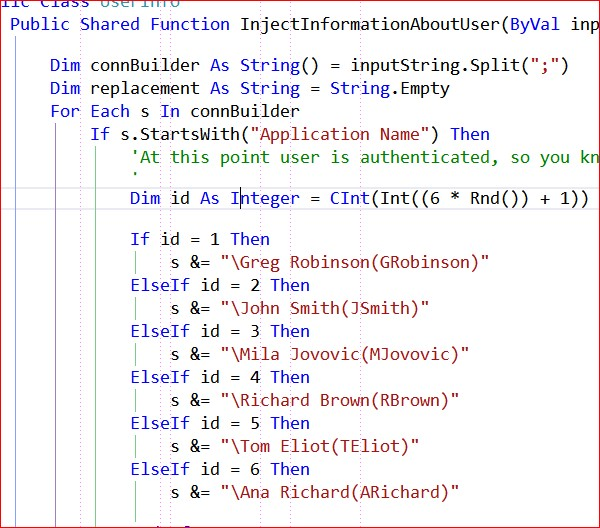
Normally, when you issue SELECT App_Name() you will get application name from app.config. In my case the application name would be "HR", but we want to enrich it with the first and last name of the application user, and the application username, so it would look similar to this:
HR\Darko Martinovic(dmartinovic)
The code required to implement this functionality can be found in UserInfo.vb.
When you click on the button, “View deleted”, you should get a screen like this.
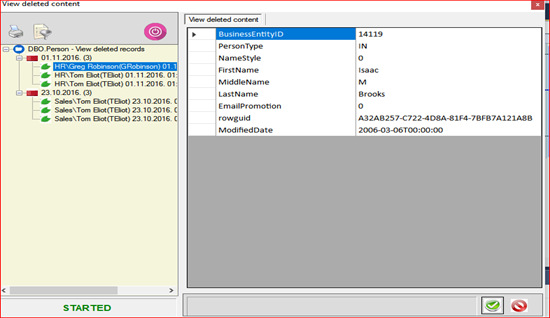
You can explore, and play with this small application. For instance, change the app.config entry for mainTableName from Person to SalesPerson, etc. On the left pane you see in form of tree view, deleted records grouped by date. On the right pane is showed content of deletion. Basic functionality is on top left pane. So, you can print, filter and start/stop capturing. In the three view there is a context menu, which enables you to expand/collapse all nodes. Nodes with a small red icon, should be considered container nodes. Nodes with a small green icon should be considered leaf nodes. When you click on each leaf node, a rebind occurrs in the right pane.
At the right hand of this small application image, you can see the column names as they are defined by the programmer or DBA. In most cases, column names are shortened (for instance ORD_DAT instead of "Order Date") and not easy to understand by the end users.
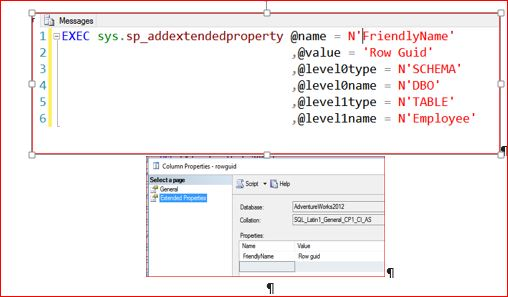
This module enables adding metadata for column names, in the form of an extended property, so the username can see the user friendly names of the columns (e.g. "Order Date" instead of ORD_DAT). For instance, let’s add a new extended property for the column name, "rowguid". We will name this new property “FriendlyName”, and insert "Row Guid" as a value. See screenshots below:
This functionality is enabled by the stored procedure, "TransformColumnName.sql", which you can find in the attachment.
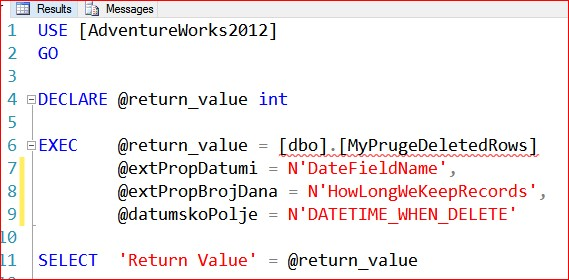
As we mentioned before, capturing deleted records over time can significantly increase the number of records stored in the CDC_DELETED database schema. Earlier I mentioned that we have defined an extended property where we define how many days we want to store deleted records for a particular table. Using this extended property and the stored procedure, MyPurgeDeletedRecords, we can purge deleted records. The complete code for this procedure is in "PurgeDeletedRecords.sql".
Here is the example of executing this procedure:
Once we define this process at the level of one database, it is possible to set up a scheduled job to process all databases that have this stored procedure. This means that we have adequate rights to SQL Server instance and we know how to recognize our databases. A complete listing is enclosed within "ScriptJob.sql".
Conclusion
With these few simple techniques it is possible to implement a comprehensive system for capturing deleted records for a very large number of tables. For each deleted record, all relevant information like: who deleted records, from which workstation, using which application, etc., are captured and saved. Deleted records can be presented with metadata column names which end-users can easily understand. Also, users can set up a time period after which captured deleted records will be purged.
Finally, the most important thing is that this solution works impeccably for all SQL Server editions, from 2005 onwards .
