

Introduction
Azure synapse analytics supports many data loading methods for accessing data stored in the external sources. In my previous articles, Loading data in Azure Synapse using Copy and Loading data in Azure Synapse Analytics using Azure Data Factory, I have discussed about Azure Synapse Analytics and data loading using Copy command and Azure Data Factory (ADF).
In this article, I will discuss the Polybase technique and how it can be used to access data stored in Azure Blob Storage and Azure Data Lake storage.
Polybase
Polybase is a technology that accesses external data stored in Azure Blob storage, Hadoop, or Azure Data Lake store using the Transact-SQL language. This is the most scalable and fastest way of loading data into an Azure Synapse SQL Pool. Polybase helps in the bidirectional transfer of data between Synapse SQL Pool and the external resource to provide fast load performance.
Data need not be copied into SQL Pool in order to access it. There is a concept of external tables through which the data stored in external file storage can be queried.
Polybase can be implemented manually by following the necessary steps to transfer data. Alternatively, Azure Data Factory can be used to schedule the data movement using Polybase.
Data loading process
Here, I explain the step-by-step process for accessing and loading data from Azure Blob storage into Synapse SQL Pool using Polybase.
Step 1: Copy the data file
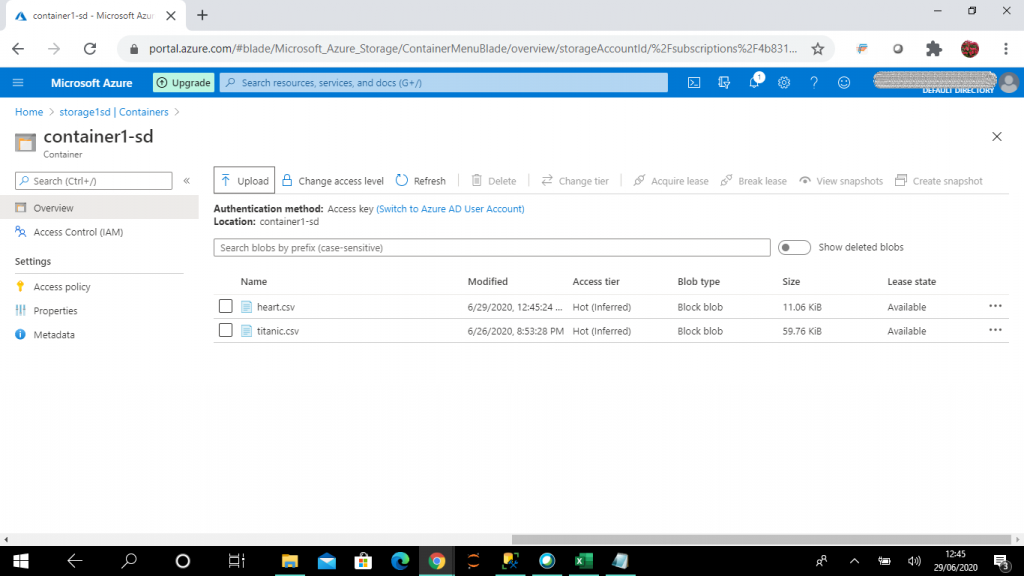
Steps to create a storage account, blob container and upload a .csv file from the explorer are explained in detail in my previous articles.
Step 2: Create a Master Key
A master key should be created only once in a database. The Database Master Key is a symmetric key used to protect the private keys of certificates and asymmetric keys in the database. To execute this statement, the user should have CONTROL permission in the database.
--need to create a master key once per database.
CREATE MASTER KEY ENCRYPTION BY PASSWORD = '<password>'; -- replace <password> with the actual one
Step 3: Create a Database Scoped Credential
A Database Scoped Credential is a record that contains the authentication information required to connect an external resource. The master key needs to be created first before creating the database scoped credential. This statement needs to mention the credential name. Here, I set the name as cred1. There are also arguments, described here.
- IDENTITY - This specifies the name of the account to be used when connecting outside the server. To import a file from Azure Blob storage using a shared key, the identity name must be SHARED ACCESS SIGNATURE.
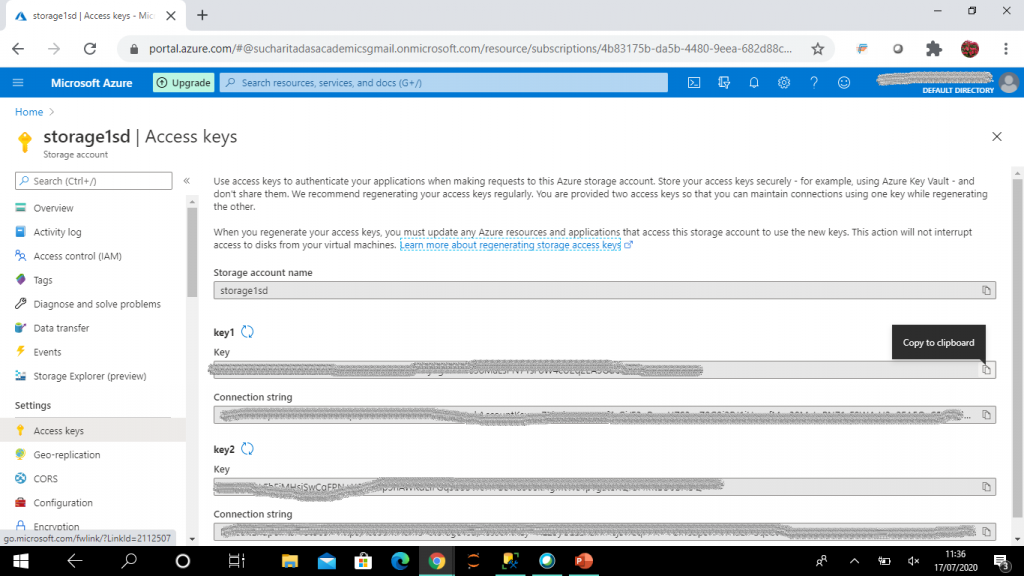
- SECRET - This is the Azure Storage key to import a file from Azure Blob storage. I retrieve the access key of the storage account, storage1sd, and use it in CREATE DATABASE SCOPED CREDENTIAL statement.
Here is the DDL for the credential:
CREATE DATABASE SCOPED CREDENTIAL cred1
WITH IDENTITY = 'SHARED ACCESS SIGNATURE',
SECRET = '<storage account key>'; -- access key of the storage account needs to be given here
Step 4: Create an External Data Source
External data sources are used to establish connectivity for data loading using Polybase.
This statement has few arguments, described below.
- TYPE - This specifies the type of external data source being configured. The value HADOOP is used when data is loaded from Azure storage and data lake.
- LOCATION - This provides the connectivity protocol and path to the external data source. It has the format: '<prefix>://<path[:port]>. The prefix is abfs for Data lake and wasb for storage account. Path has the format: <container>@<storage_account>.dfs.core.windows.net for data lake and <container>@<storage_account>.blob.core.windows.net for storage account.
- CREDENTIAL - This specifies a database-scoped credential for authenticating to the external data source. It is required only for secure data. I use the database scoped credential, cred1, here as created in the last step.
With this code, blob1 is created for retrieving data from the blob container, named container1-sd, which is present in the storage account, storage1sd.
CREATE EXTERNAL DATA SOURCE blob1
WITH
(
    TYPE = Hadoop,
    CREDENTIAL = cred1,
    LOCATION = 'wasbs://container1-sd@storage1sd.blob.core.windows.net'
);
Step 5: Create an External File Format
The file format defines the actual layout of the data as stored in the external data source. This is the prerequisite for creating an external table. I will discuss about external tables in the subsequent steps.
I give a name for the external file format (TextFileFormat1) and then specify the argument values.
- FORMAT TYPE - This specifies the format of the external data. It can have many possible values.
- PARQUET - This specifies a parquet format. There are a few choices: ORC, RCFILE, DELIMITEDTEXT, and JSON.
- ORC: Optimized Row Columnar which requires Hive version 0.11 or higher on the external Hadoop cluster
- RCFILE: Record columnar file format which needs to specify a Hive Serializer and Deserializer (SerDe) method
- DELIMITEDTEXT: specifies a text format with column delimiters
- JSON: specifies a JSON format applicable to Azure SQL Edge only.
There are also few arguments available under FORMAT_OPTIONS which are optional.
- FIELD_TERMINATOR - This specifies one or more characters that mark the end of each column in a text delimited file. The default is the pipe delimiter '|'.
- STRING_DELIMITER - This specifies the field terminator for string data type in a text delimited file.
- FIRST_ROW - This specifies the row number that is read first in the files during a PolyBase load. It can take the values between 1 and 15. Here, I set First_Row as 2 because the first record in the file contains the column names.
- DATE_FORMAT - This specifies a custom format for date and time data in a text delimited file. PolyBase uses the custom date format for importing the date and time data. It doesn't use the custom format for writing data to an external file.
- USE_TYPE_DEFAULT - This specifies how the missing values in a text delimited file are handled when data is retrieved. The possible values are True and False. When set to True, missing column values are replaced with the default value for the data type of the corresponding column in the external table definition. When set to False, missing values are stored as NULL in the destination external table.
- Encoding - Encoding for the input text delimited file is mentioned. Possible values are: UTF8 and UTF16.
- DATA_COMPRESSION - This specifies the data compression used for the compressed external data. For uncompressed data, it need not be mentioned.
Here
CREATE EXTERNAL FILE FORMAT TextFileFormat1
WITH
(
    FORMAT_TYPE = DELIMITEDTEXT,
    FORMAT_OPTIONS
    (
        FIELD_TERMINATOR = ',',
STRING_DELIMITER = '0x22',
FIRST_ROW = 2,
USE_TYPE_DEFAULT = False
    )
);
Step 6: Creating Schemas
A schema is a logical namespace within a database. A schema helps in better management, maintenance, and security of the objects within a database. There can be objects with the same name in a database when they are created in different schemas. Also, a specific schema can be created for managing similar type of objects. Objects created within a schema are owned by the owner of that schema.
Here, I create the schema, ext, to maintain the external tables and the schema, stg, to maintain the staging tables. Tables will be created in the subsequent steps.
CREATE SCHEMA ext;
GO
CREATE SCHEMA stg;
GO
Step 7: Create an External Table
The CREATE EXTERNAL TABLE command creates an external table for Synapse SQL to access data stored in Azure Blob storage or Data lake storage. Table metadata and the statistics information about the referenced file or folder are stored in SQL. The actual data is not stored.
The column name, data type, and nullability can be included for the columns, but default constraints cannot be mentioned. DML statements, INSERT, DELETE, and UPDATE, are not supported on an external table. The same query on an external table may return different results or may give error as the data linked with the external table may be modified or removed.
There are other arguments to be specified.
- LOCATION - This specifies the folder or the file path and file name for the actual data in Hadoop or Azure blob storage. Here, I specify the filename under the blob container.
- DATA_SOURCE - This specifies the name of the external data source that contains the location of the external data. Here, I mention the external data source blob1 as created in an earlier step.
- FILE_FORMAT - This specifies the name of the external file format object that stores the file type and compression method for the external data. I mention the external file format, TextFileFormat1, that was created in an earlier step.
- REJECT_VALUE AND REJECT_TYPE - These parameters define how Polybase handles invalid records retrieved from external data source. REJECT_TYPE specifies whether the value mentioned in REJECT_VALUE is a value or percentage.
- REJECT_SAMPLE_VALUE - This attribute is required when REJECT_TYPE = percentage. It specifies the number of rows to attempt to retrieve before the invalid record percentage is calculated.
Here I create the external table, ext.titanic, based on the data available in the file, titanic.csv, stored in blob storage.
create external table ext.titanic
(
PassengerId INT,
Survived INT,
Pclass INT,
Pname VARCHAR(100),
Gender VARCHAR(20),
Age float,
SibSp INT,
Parch INT,
Ticket VARCHAR(30),
Fare MONEY,
Cabin VARCHAR(30),
Embarked CHAR(1)
)
WITH (LOCATION='/titanic.csv',
    DATA_SOURCE = blob1,
    FILE_FORMAT = TextFileFormat1,
    REJECT_TYPE = VALUE,
    REJECT_VALUE = 0
);
Step 8: Query Data
Table data can be retrieved from the external table, by itself or by joining with other tables. I create a table, named dbo.test, and added some test records in the table to join with the external table, ext.titanic.
select * from ext.titanic
--(891 rows affected)

create table dbo.test
(
PassengerId INT,
Survived INT
)

INSERT INTO dbo.test (PassengerId,Survived) VALUES (1,1)
INSERT INTO dbo.test (PassengerId,Survived) VALUES (2,1)
INSERT INTO dbo.test (PassengerId,Survived) VALUES (3,1)
INSERT INTO dbo.test (PassengerId,Survived) VALUES (4,1)

select t1.*
from ext.titanic as t1
inner join dbo.test as t2 on t1.PassengerId = t2.PassengerId AND t1.Survived = t2.Survived
--(3 rows affected)
Step 9: Load the Data
A two-step data loading process makes loading faster. Here, data is first loaded into the staging table and then from staging table to the final table. The staging table can be truncated before data loading to avoid conflict with old data and error in new data loading.
If the staging table is created as a heap and distribution is kept as round robin, the loading becomes very fast. Alternatively, hash distribution can be set for both the staging and final tables. Data loading may take longer for staging tables but data loading from staging to final table becomes faster.
Data is copied to the staging table from the external table for persistent storage and analysis. Error handling can be done here. Data can be filtered, modified and transformed in the staging table and then the data can be transferred to the final table.
Here, I use CTAS (Create Table As Select) statement to create the table in stg schema. CTAS is the simplest and fastest way to create and insert data into a table with a single command. This is a parallel operation that creates a new table based on the output of a SELECT statement.
CREATE TABLE stg.titanic
WITH
(
    DISTRIBUTION = ROUND_ROBIN
)
AS
SELECT * FROM [ext].[titanic]
;
Step 10: Query the Staged Data
Unlike the external table, this table actually stores data in the SQL Pool. So, the query results on this table remain the same at every execution until the data is modified.
select * from stg.titanic
--(891 rows affected)
Step 11: Create dbo.titanic
The final table is created in the dbo schema. Then, I use SELECT INTO statement to copy data to this table from the staging table. Filter conditions can be added in the SELECT statement to copy a particular set of rows and columns to the final table from the staging table. This is a persistent table in the database.
CREATE TABLE dbo.titanic
(
PassengerId INT,
Survived INT,
Pclass INT,
Pname VARCHAR(100),
Gender VARCHAR(20),
Age float,
SibSp INT,
Parch INT,
Ticket VARCHAR(30),
Fare MONEY,
Cabin VARCHAR(30),
Embarked CHAR(1)
)
WITH
(
    DISTRIBUTION = ROUND_ROBIN,
CLUSTERED COLUMNSTORE INDEX
)

INSERT INTO dbo.titanic
SELECT * FROM stg.titanic
--(891 rows affected)
Step 12: Statistics
Once data loading is done on the final table dbo.titanic, statistics creation helps in query optimization. Statistics gives information about the data to the SQL pool causing faster query execution against the data.
When AUTO_CREATE_STATISTICS option is ON, SQL Pool analyzes incoming queries for missing statistics and create statistics on individual columns in the query predicate or join condition to improve cardinality estimates for the query plan. Statistics need to be updated on a regular basis and after each data load in the table to maintain the query execution performance.
I use the following query to verify if AUTO_CREATE_STATISTICS option is ON in the SQL Pool.
SELECT name, is_auto_create_stats_on
FROM sys.databases
Step 13: Query the Final Table
Data is now available in the final table. I can use this data for further analysis and report generation.
select * from dbo.titanic
--(891 rows affected)
Conclusion
Polybase is a very efficient and effective technique to access data stored in Hadoop, Azure blob storage or Azure data lake. Data can be imported and exported to/from the external data sources using T-SQL. It is not required to import data before accessing it from external data sources. Data is accessed from Hadoop storage using simple T-SQL queries without knowing about Hadoop or installing any additional software to the Hadoop environment. Data can be imported from the external data sources without any ETL tool.
The speed of columnstore technology and analysis capabilities of Synapse SQL can be leveraged to process and analyze the imported data.