

In Part 1 of this series I shared an overview of a system that allows developers to restore production backups to test servers. In Part 2 of this series I went into detail of the SQL side of the system. In this final part of the series I will go into the details of the web site portion of the solution.
First, if you are not familiar with websites a lot of this may go over your head. It might be best to get a .NET developer and/or a network admin in your company to help with the setup this side of the solution. Still, if you aren’t faint of heart read on.
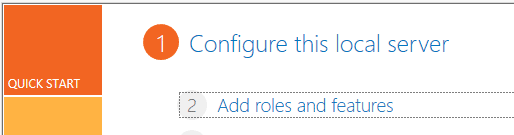
Step 1 - Get IIS Running
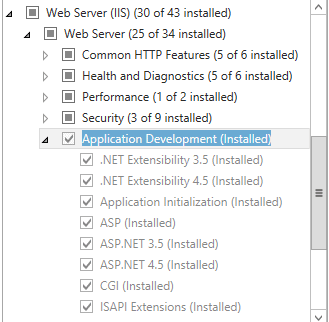
Find a server that has IIS installed which you can install another website. The code for the website is in .NET 4.5, so it would be great if you already have an IIS server that has these things installed. If you don’t, there is a bit of work to do, and it should probably be done by someone that knows what they are doing. The quick answer is you need to add a role (Web Server IIS) and a bunch of features that enable .NET
Step 2 - Create an application pool for the new website
The application pool allows website to run under a certain user context. It also gives the website a sandbox so it doesn’t affect other sites on the server. If you open up IIS manager and click the triangle next to the server name, you should see Application Pools. The reason it is important for us to create an application pool is so that the refresh website can run under the correct user context and be able to access the test DB server databases. You will want to create an active directory user that you will assign rights to the DBcopy database on all your test sql servers. After you have added your application pool, you will want to change the identity of it. Click on Advanced settings, then Identity. Click on custom account and click the set button to enter your service account Active Directory user name and password.
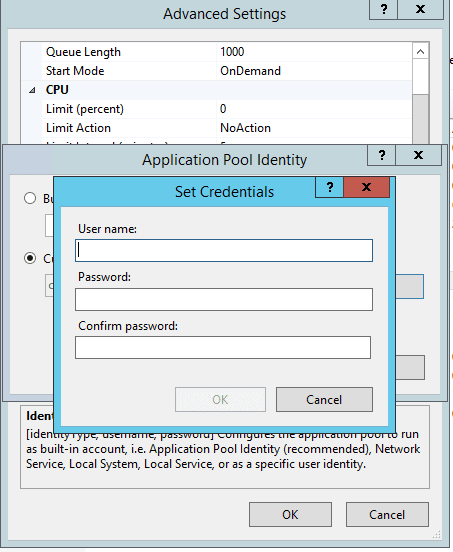
Hopefully, you can have this service account’s password not change otherwise someone will have to go into the application pool and updated it when it gets changed.
Step 3 - Set up the solution
Open up the website solution in visual studio and correct a few things.

You will want to put your company logo in place of the CompanyLogo.png file. You will need to update the web.config file so that your test servers are listed.
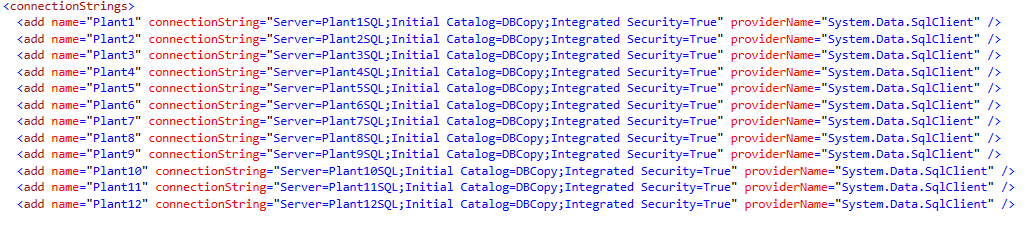
Replace Plant1 thru Plant12 with whatever test servers you have and update the connectionString so that it is actually pointed to the correct test server name. If you have more plants or less of them just setup them up in this section.
Then go into the Default.aspx file and update the dropdown names to match the test server names you put into the web.config file.

That Value settings don’t matter they just need to be unique. In this case they were the actual plant numbers.
Once you have made those changes compile the website. If you are fortunate, it will compile without issue. If not, you will probably have to get a .NET developer involved to figure out what is wrong.
Step 4 - Deploy the website
Copy the website out to your web server. Often, a website will be located here: C:\inetpub\wwwroot. In some cases they will be located on a different drive. You will want to copy just the PYRefresh folder out to the web server.
Step 5 - Configure the website
This next part can be different based off how you plan to expose the website. Some companies a different website is just a new subfolder, so if your web server is called ACMEWeb1, then you could have http://ACMEWeb1/PYRefresh as a website.
The other common way to handle websites is to create a host header. In that case your network people can create a DNS entry and point it to the web server. So you could have something like RefreshTest.YourCompanydomain.com The DNS entry would point traffic for that URL to your ACMEWeb1 server. You cannot configure the site both ways, so if you have no idea what a host header is, you should probably just go with the sub folder option.
If you are going with the subfolder option, go to IIS manager open the Sites folder. You should see your PYRefresh folder. Right click and select add application. When you do that, select your application pool you created. At this point the website should work. You can click the browse website and see if it comes up on the web server. If it does, then try it from your local computer.
If you are going with the host header option, go to IIS manager open the sites folder. On the PYRefresh folder right click and select add application. Next, click on the bindings then the add button.
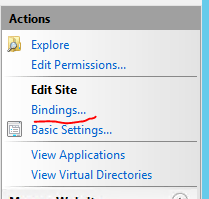
You have to add the host header that was used in the DNS entry. So if they used RefreshTest, that is what you enter here for the Host Name. The DNS will have to propagate before it will work, but in should after a short period of time allow you to use the url from your local computer.

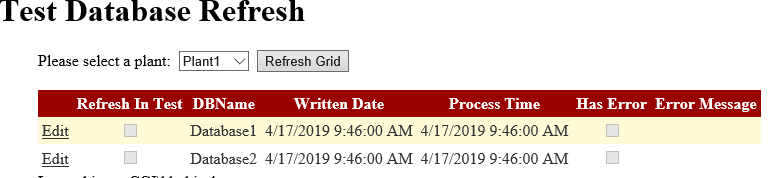
Step 6 - Launch a database refresh
Use the website to test launch a database refresh. Select a plant.
Click the edit link, click the Refresh in test check box and click update.
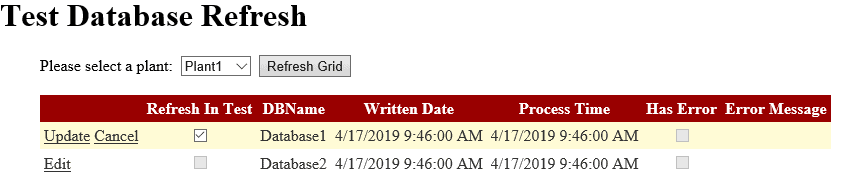
If you want to cancel a refresh click edit and un check the refresh in test checkbox and click update.
Potential Problems
Sadly, there can be many problems in the initial setup. If you can’t get the site to compile: you just change the default.aspx and the web.config file. It should work, anyway, since you aren’t actually changing any of the code that gets compiled.
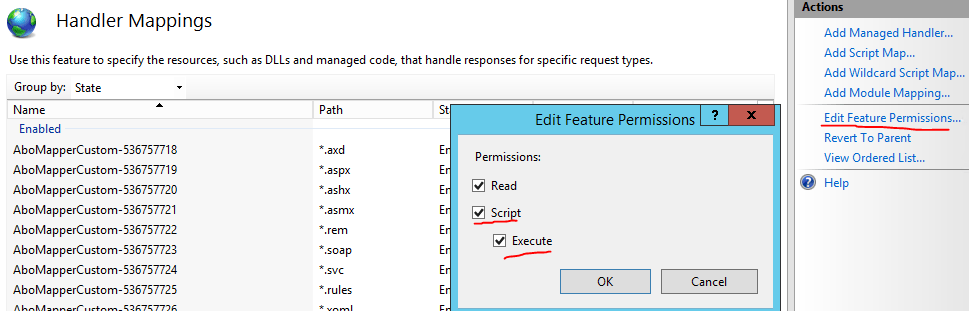
If you are having trouble getting IIS installed properly, you will probably have to get a network admin involved. If the website doesn’t seem to work, often if you go to the website and click the handler mappings, sometimes the permission is only set to read. So, you can click on the Edit Feature Permissions and make sure the Script and Execute is also checked.
You can also have issue with the user that is setup for the app pool to run as. You need to make sure your new site is using that new app pool and you properly gave rights to that user on the test servers.
It can be a lot of work to get the DBCopy databases setup and the website up and working, but once everything is in place, the system works really well.
Well, if you have made it this far, you may have seen PY in some of the naming of objects and the website. Just in case you are wondering it stands for PrototYpe.
I hope you have enjoyed this article series hopefully you have gotten something useful out of it.

