Problem
Most of us, developers, love to write SQL code on our local machines not only because they're executed faster, but also because we have a lot more control over the data as it is used only by us and is not team dependent. This was the case in my team until recently when the policy has changed and the new policy requires us to develop using a centralized database that was being hosted on one of the on-premise servers rather than using local SQL Servers for each individual developers.
There are both advantages and disadvantages to this approach. You can free up some space and RAM from your local machine by disabling the SQL Server Services, which can be an advantage for some. However, you'd need to connect to the server now and write queries keeping in mind that other developers are also using the same database. So, one should be aware of making any changes to the data.
The important steps to allow remote connections to an instance can be divided into the following parts, which are discussed in detail below.
- Allowing Remote Connections
- Add Remote User to the database
- Configuring the SQL Server Instance
- Configuring Windows Firewall
- Fetch the Connection Details
- Connecting to the remote machine
This article describes the steps on how to configure remote access on a SQL Server instance and connect to it from a developer's machine using SSMS.
Connect to a Remote SQL Server
In order to be able to connect to the remote database, we need to configure it to allow remote machines to connect to it.
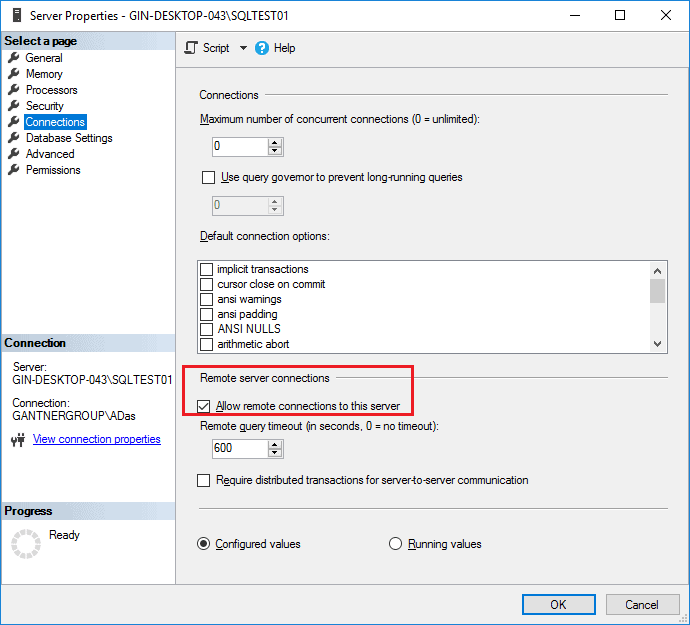
Allowing Remote Connections
- Right-click the on the SQL Server instance name and select Properties.
- Select Connections on the left-hand pane.
- Under Remote Server Connections, check the box against "Allow remote connections to this server".
- Leave the default value for the Remote query timeout to 600.
- Click OK.
The SQL Server is not configured to be able to allow remote machines to connect to this instance.
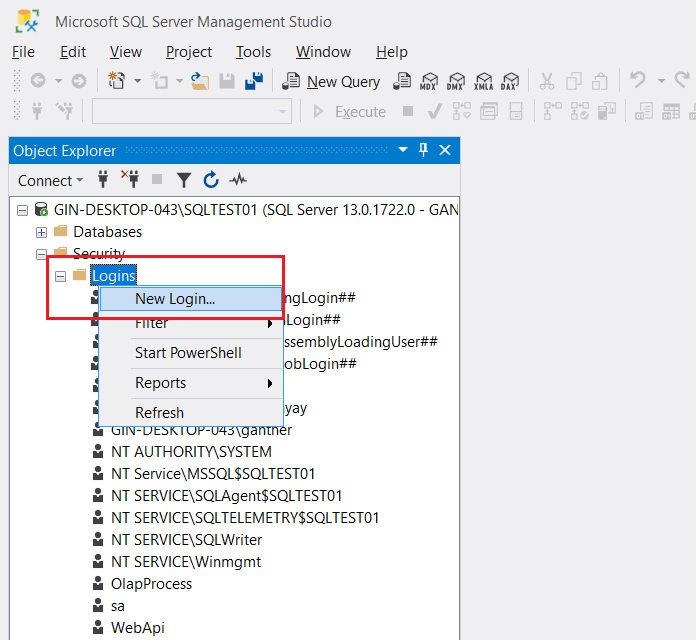
Add a Remote User to the database
Once the SQL Server is configured, we need to allow decide users should be able to connect and access the database objects. This is done by creating a SQL Login and then assigning specific database roles to those users.
In this case, since all the machines are in the same domain, we will proceed with the Windows Authentication mode.
- Connect to the SQL Server instance as a server admin.
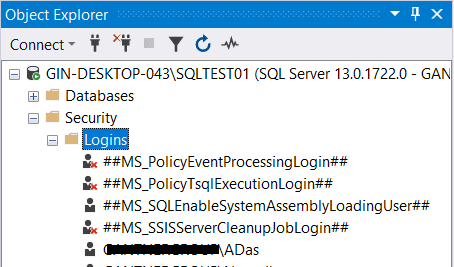
- Expand Security and right-click on Logins.
- Select New Login.

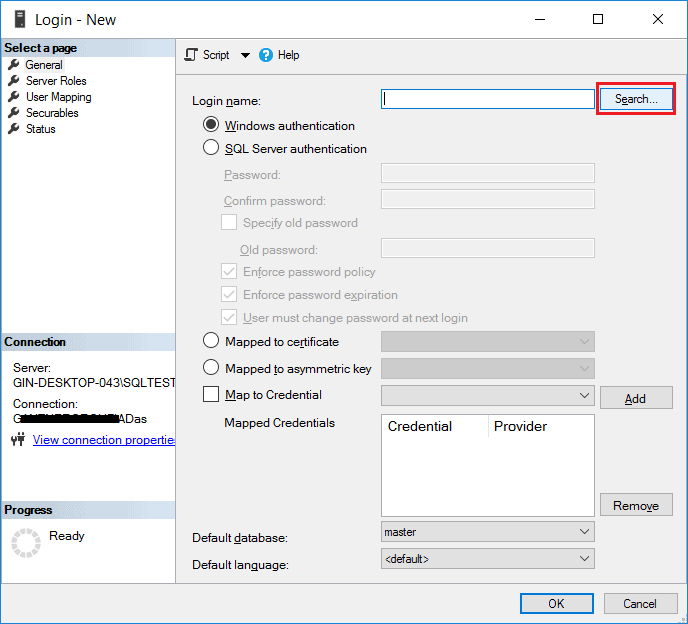
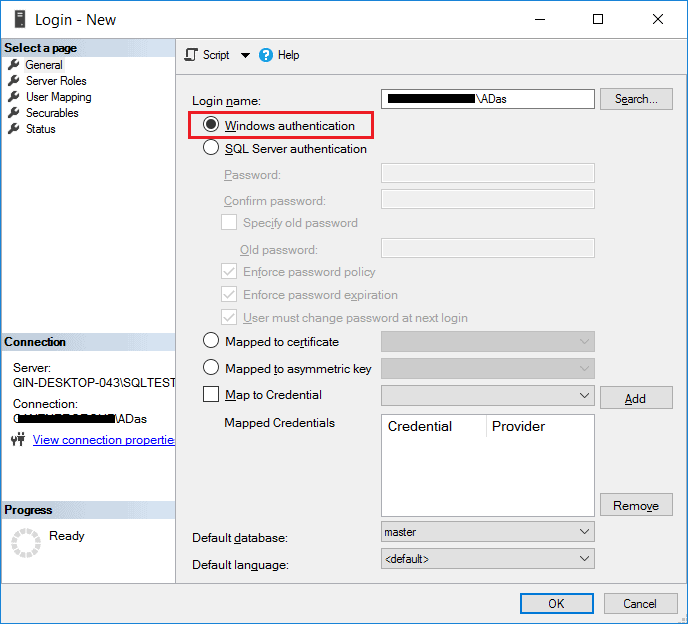
- The Login - New dialog box appears.
- On the General page, click Search.
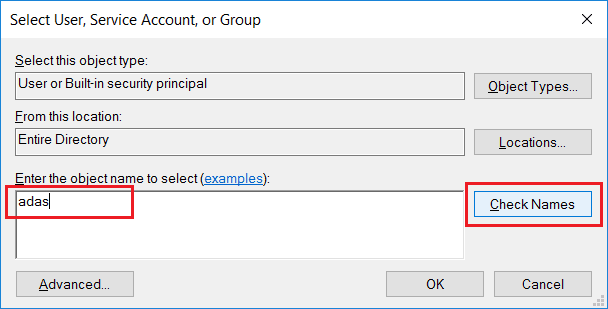
- The Search User, Service Account or Group dialog box appears.
- Type the username in the object name text box and click Check Names.
- This should automatically fetch the user details if there are any users with the same username.
- Keep authentication mode as Windows Authentication.
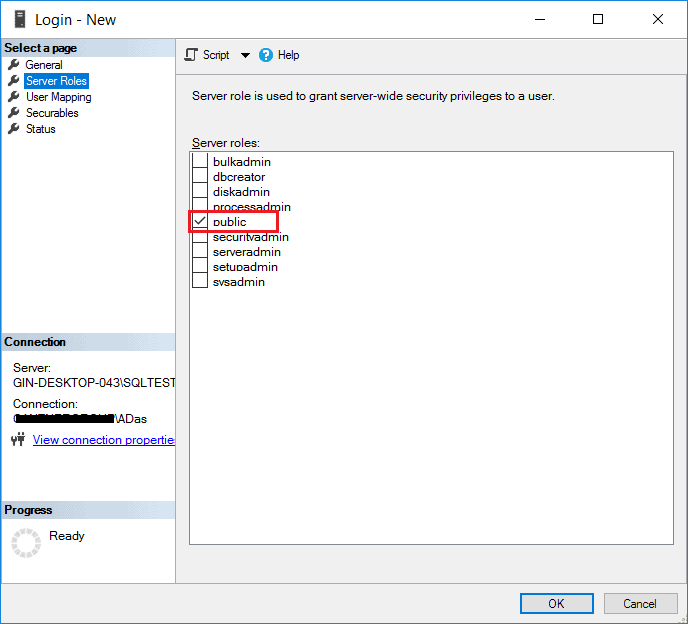
- Now, select Server Roles on the left-hand Page and select the checkbox against Public.
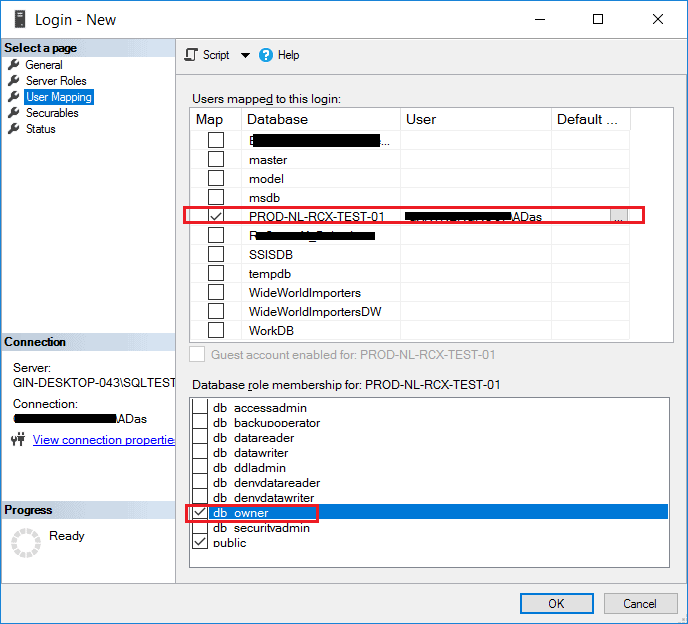
- Navigate to User Mappings, and select the database on which the user needs access to.
- We can assign any specific role as security demands. In this case, I'm assigning as db_owner.
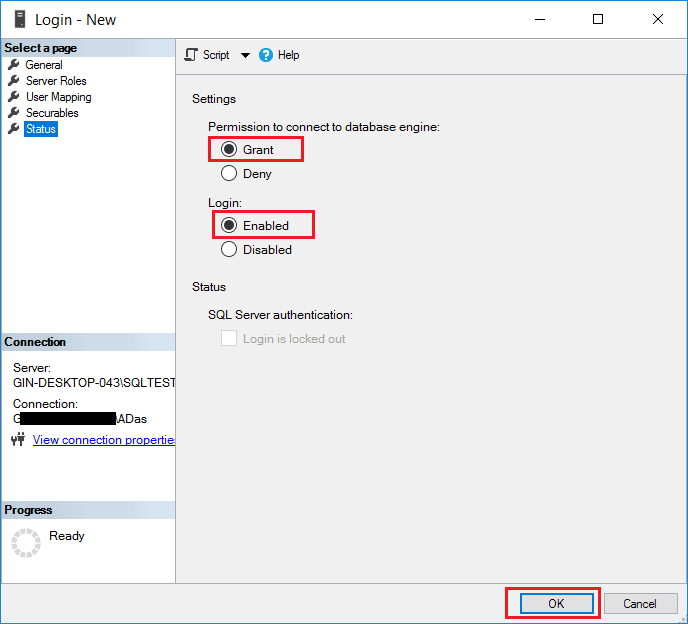
- On the Status page, select Permission as Grant and Login as Enabled and click OK.
- The new login will be visible under the logins in the SQL Server Object Explorer.

Configuring the SQL Server Instance
Now that the database instance is configured for remote connections, we need to allow remote traffic to be allowed on the server. This can be done by following the steps below:
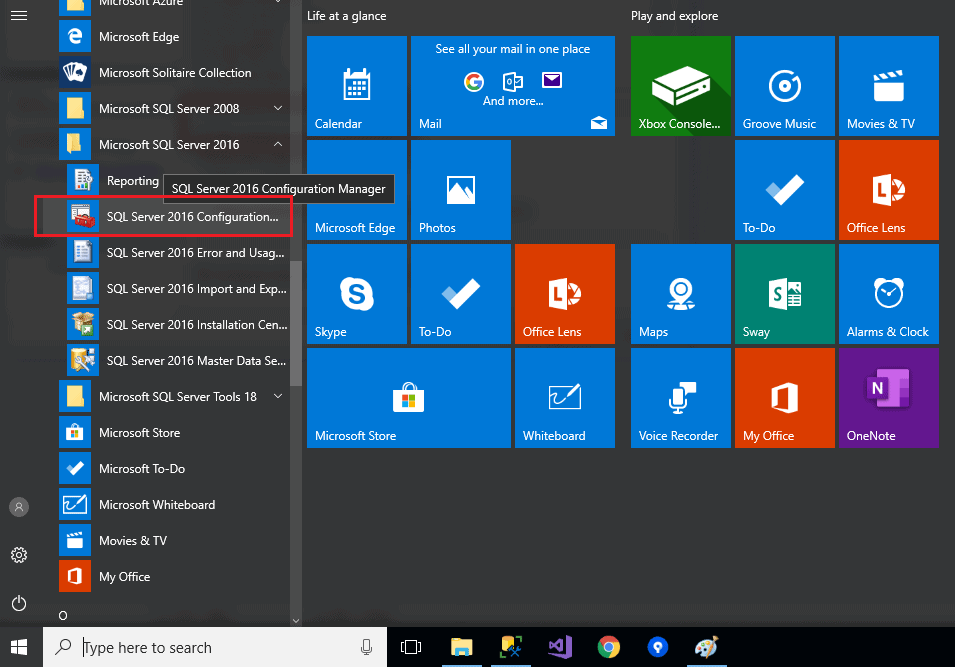
- Select SQL Server 2016 Configuration Manager from the Start.
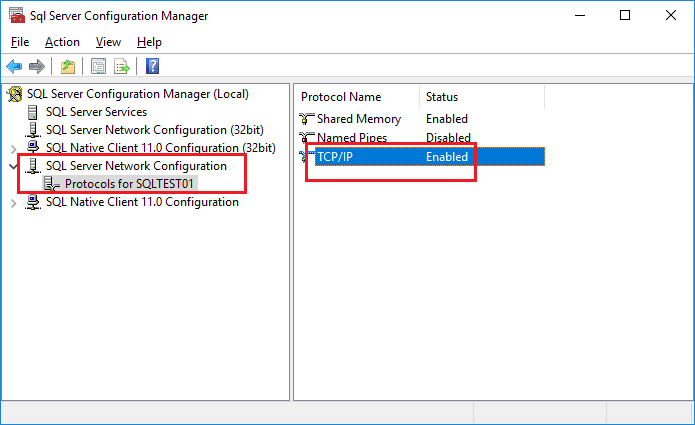
- Navigate to Protocols for <<YOUR SERVER NAME>> under SQL Server Network Configuration on the left-hand pane.
- Make sure that the TCP/IP Protocol Name is Enabled.
Once the TCP/IP Protocol is Enabled, we need to configure the port on which the SQL Server will allow inbound traffic.
- Right-click on TCP/IP Protocol Name and select the Property option.
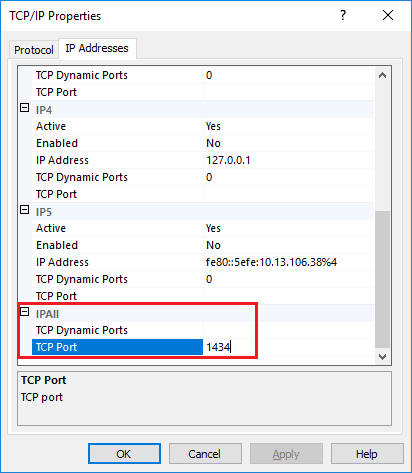
- Navigate to the IP Addresses tab and scroll down to the section named "IPAII".
- If the TCP Dynamic Ports is set to 0 (indicates the Database Engine is listening on dynamic ports), then remove the 0 and set it to blank.
- Update the value for TCP Port to 1434. This is the default port that is being used by the SQL Server Database Engine and click OK.
- A warning might be displayed which will prompt to restart the service.

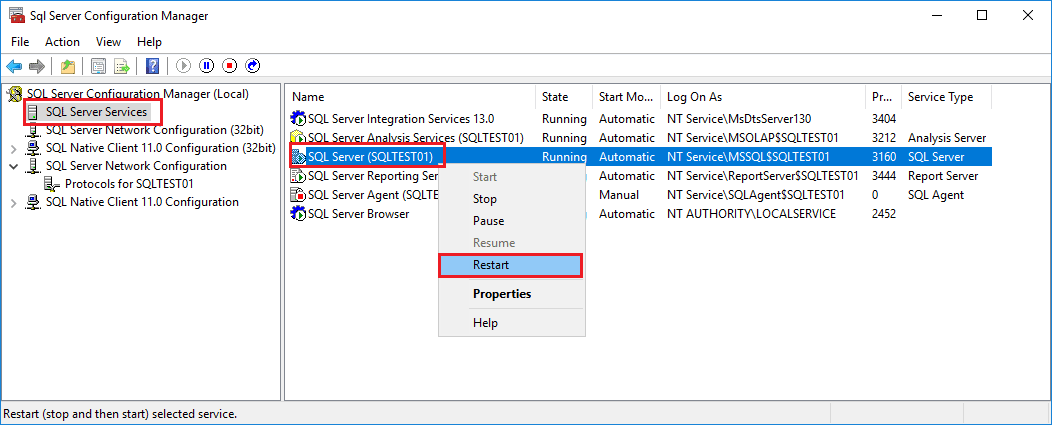
Now that the IP Ports are configured, we need to restart the SQL Server service, which will run the Database Engine on the ports as specified earlier.
- Select SQL Server Services.
- On the right-hand panel, right-click the SQL Server (Instance Name) and select Restart.
- The service will be restarted.
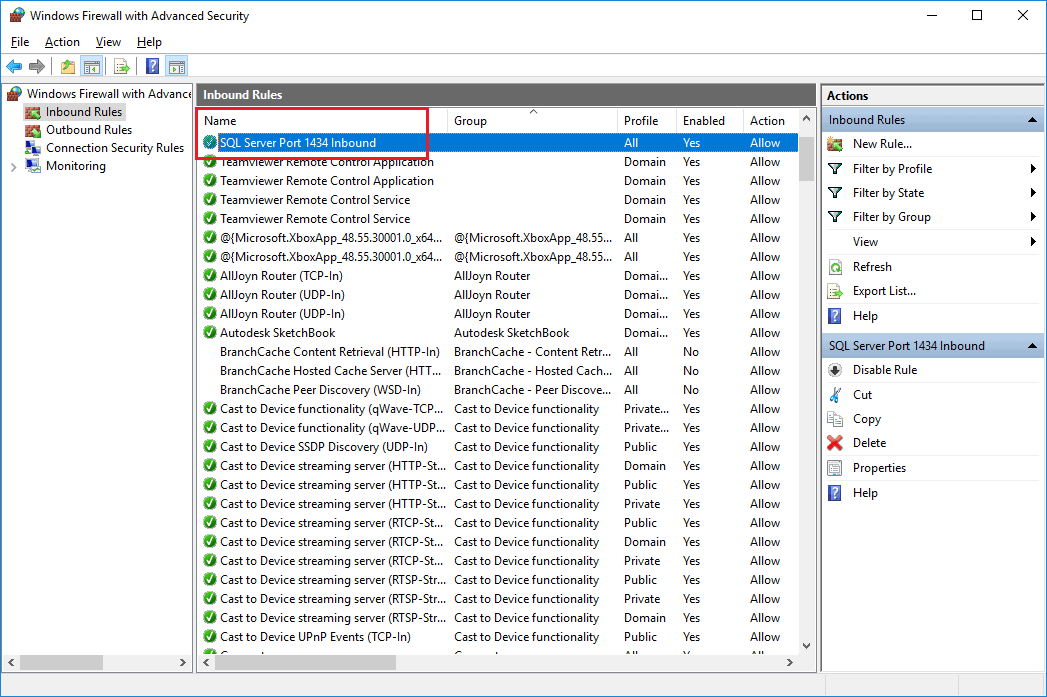
Configuring Windows Firewall
Once the database instance is configured to accept remote connections, we need to add an exception in the Windows Firewall for the port (1434) to allow TCP/IP traffic on this port.
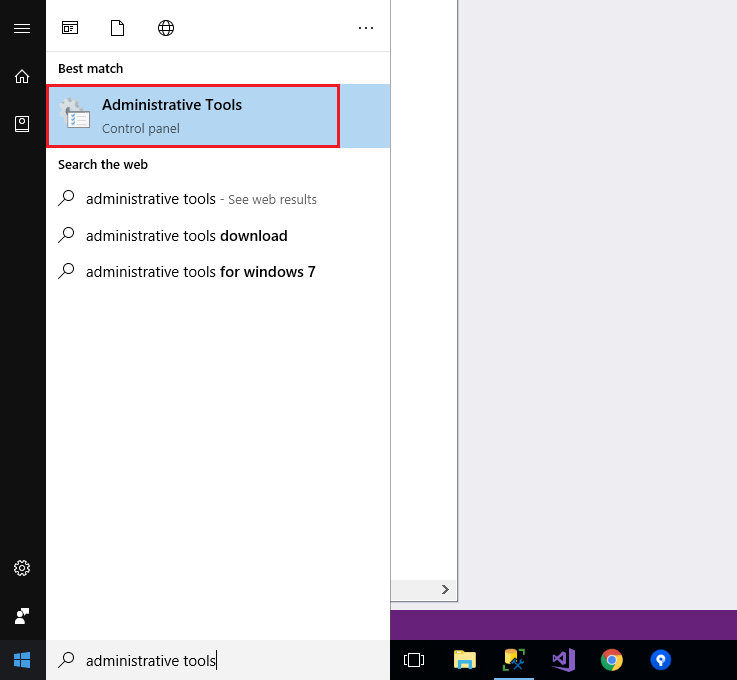
- Click Start and select Administrative Tools.
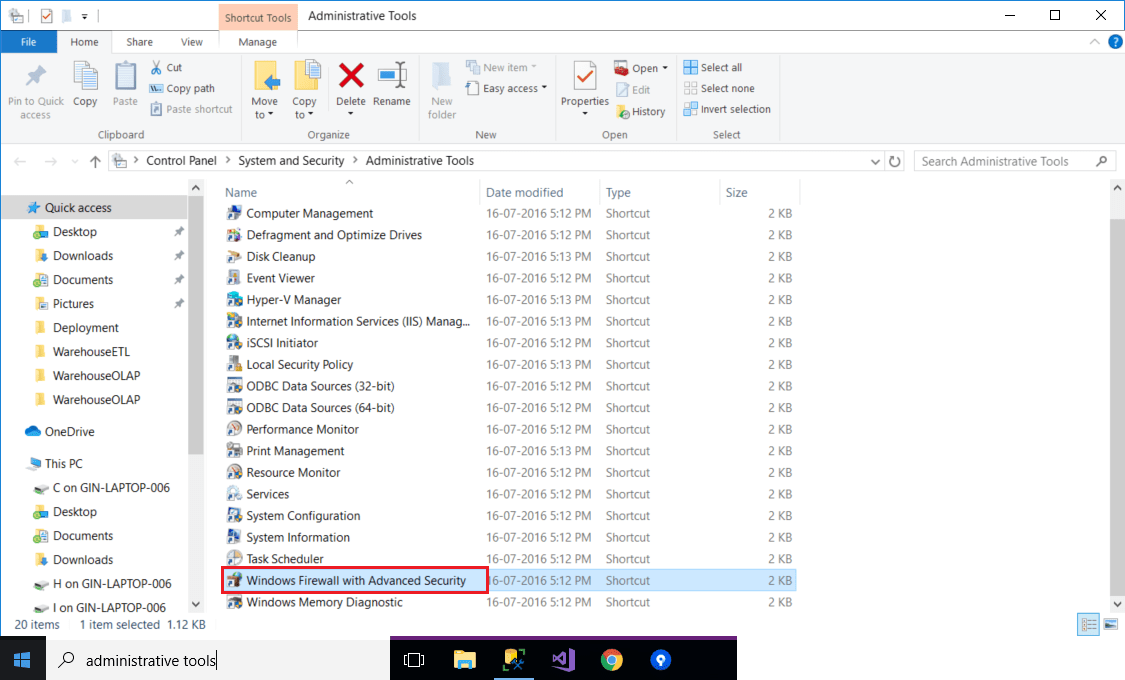
- In the Administrative Tools window, double-click Windows Firewall with Advanced Security.
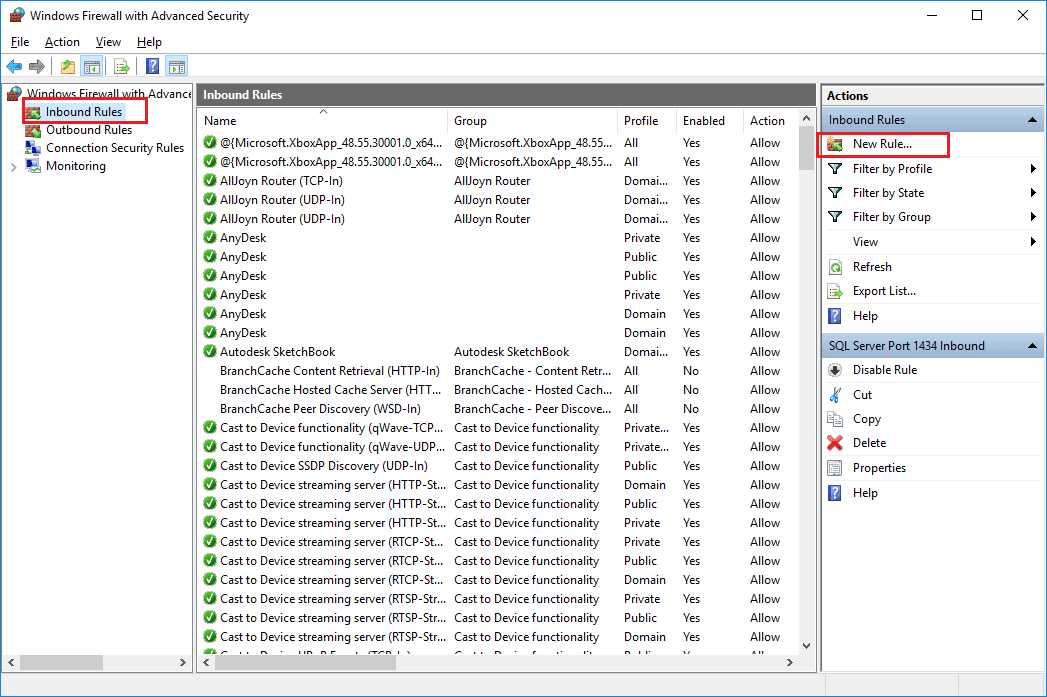
- The Windows Firewall with Advanced Security window opens.
- Click Inbound Rules on the left-hand panel.
- On the right-hand panel, click New Rule under Actions.
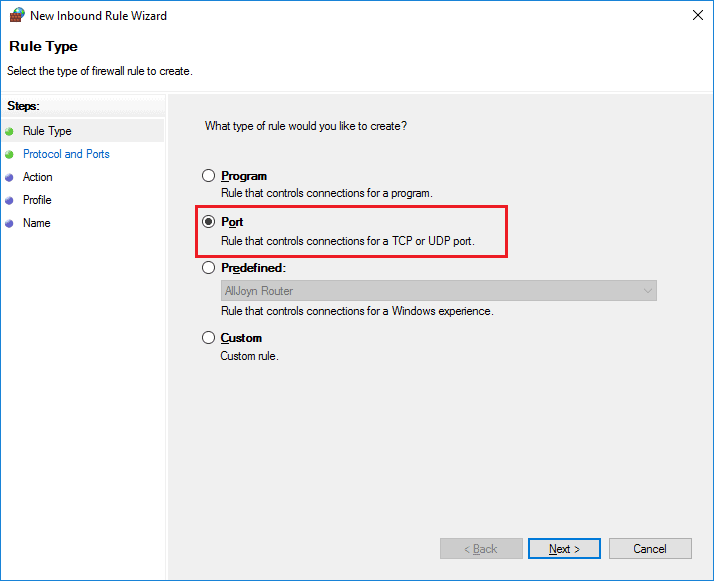
- The New Inbound Rule Wizards starts.
- Select the Port option under Rule Type and then click on Next.
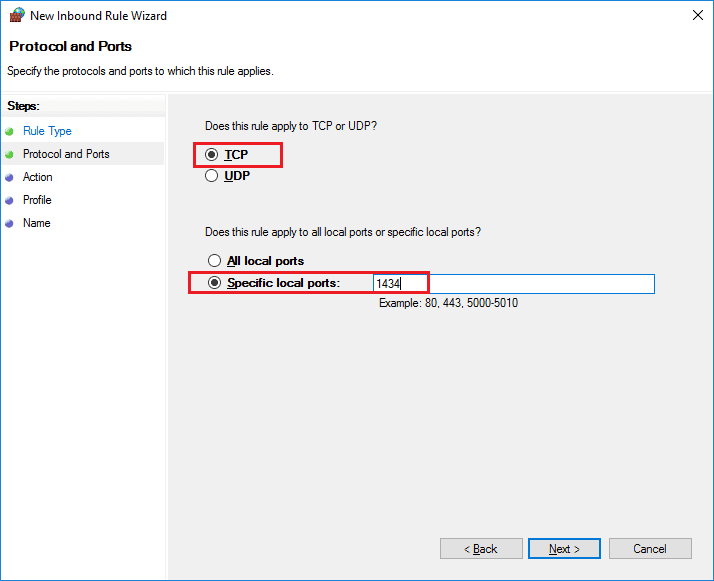
- Under Protocols and Ports, select TCP and Specified local ports as "1434" (since we want to allow traffic on this port).
- Click Next.
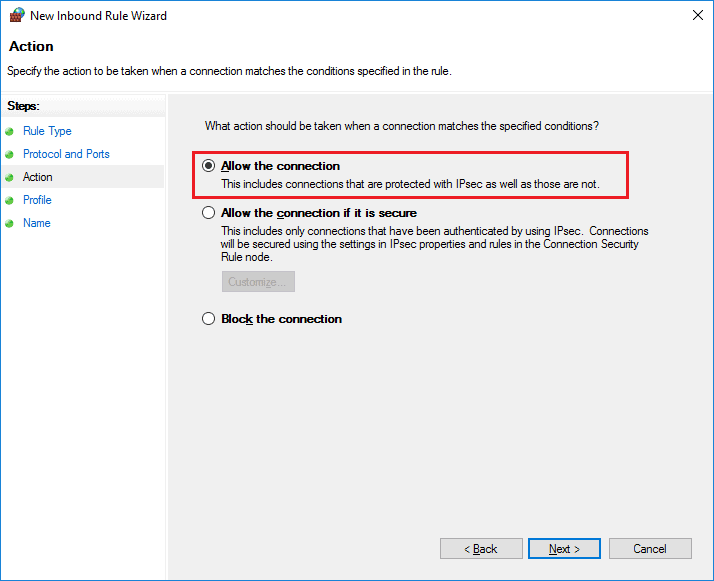
- Select Allow the connection under Action and click on Next.
- Select all the three options under Profile (This depends on whom do you want to allow access to the database instance).
- Click Next.
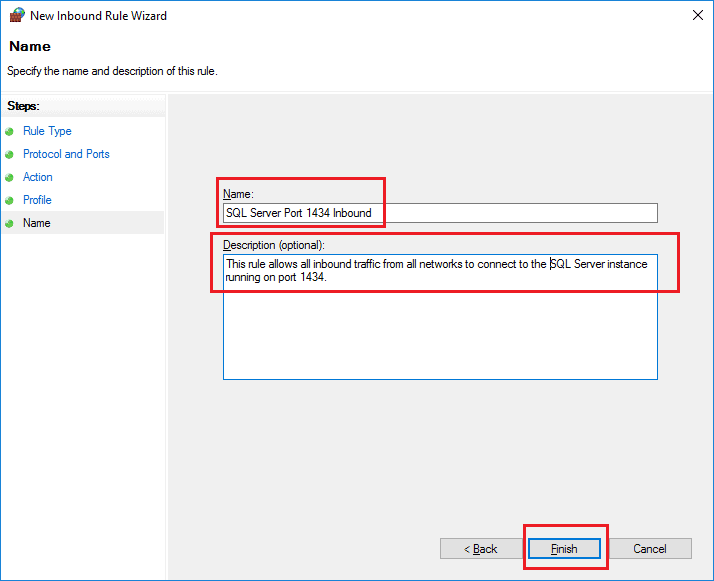
- The final step is to provide a Name to this new rule.
- The Description is not mandatory, so you may choose not to fill it in.
- Finally, click Finish.
- The new rule should now be visible in the Inbound Rules section.

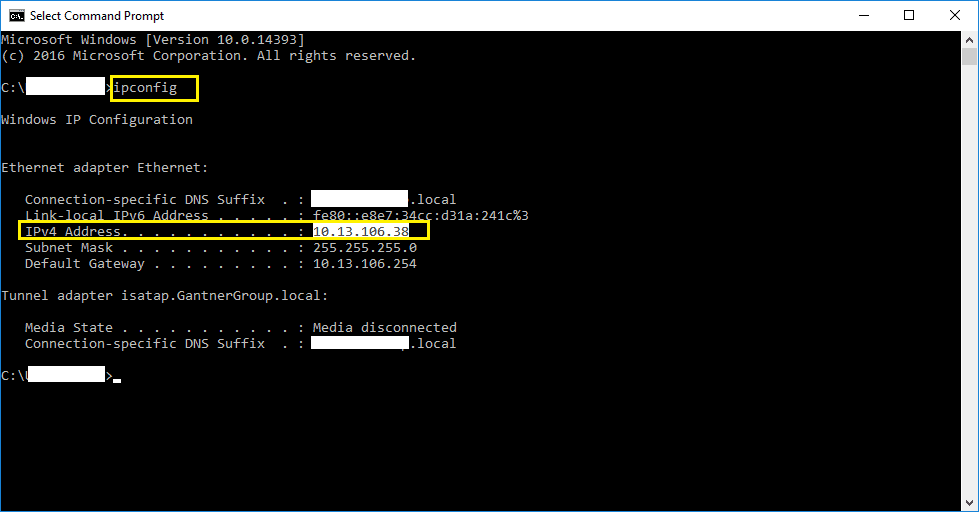
Fetch the Connection Details
Now that everything has been set up properly to allow inbound traffic over the firewall, we are ready to connect to this machine from any other machine in the network. For this, we need to get the correct IP Address of the machine and the Instance Name of the database (only in case of a named instance).
- Open Command Prompt and type ipconfig.
- Copy the IPv4 Address. In this case, it is "10.13.106.38".
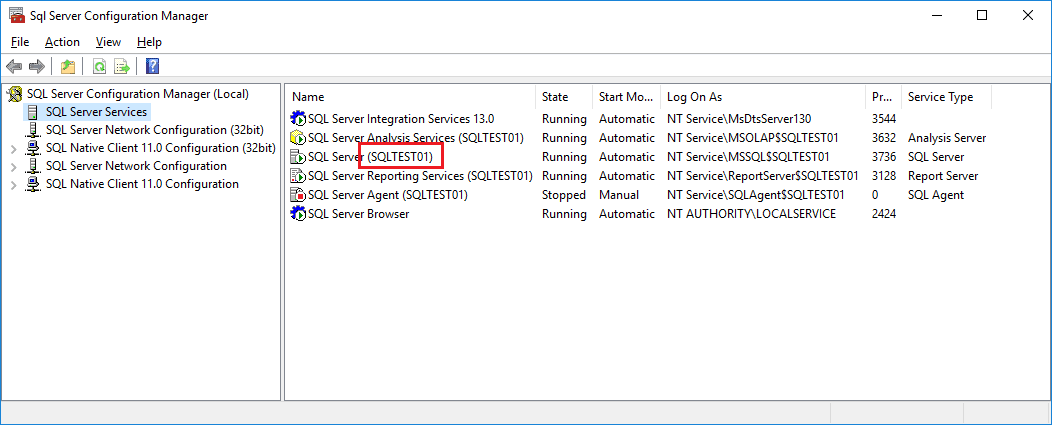
- Also, open SQL Server Configuration Manager.
- Select SQL Server Services on the left-hand panel and copy the name of the instance of the database. This is only required in case the database is running on a named instance.
- In this case, the name of the instance is SQLTEST01.
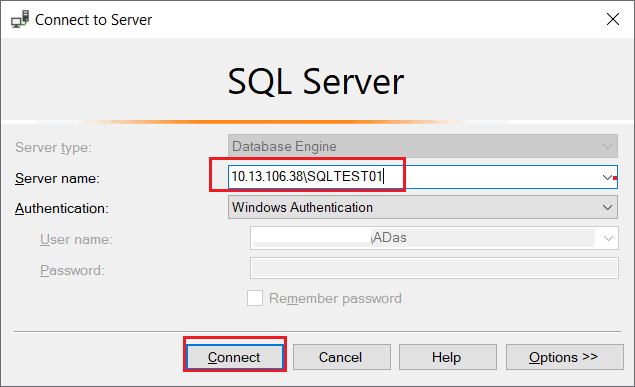
Connecting to the remote machine
Once the remote server is configured, now we should be able to connect to the SQL Database Instance from any other PCs.
- Open SQL Server Management Studio.
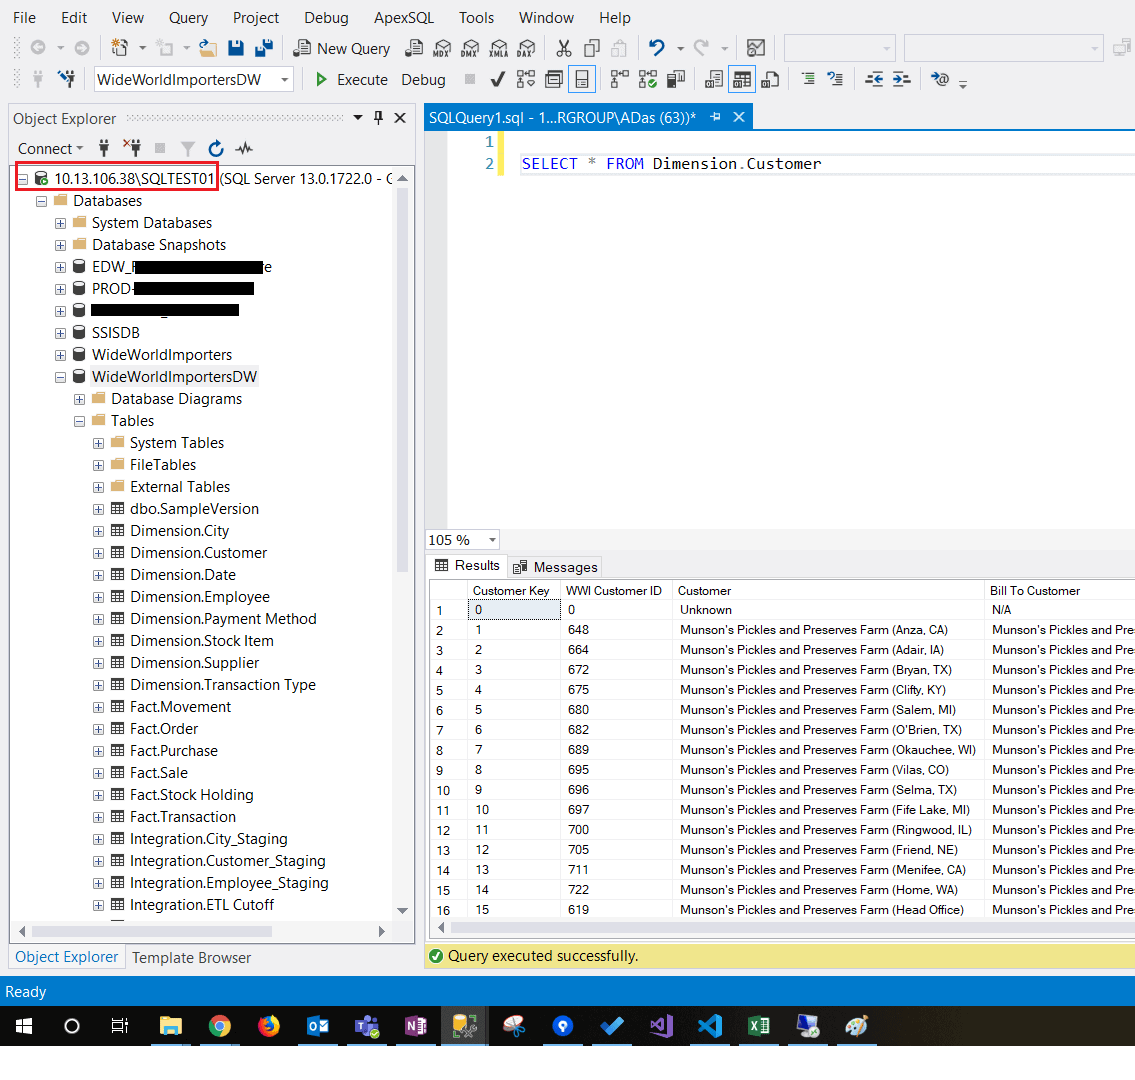
- Provide the Server name in the format <<REMOTE MACHINE IP>>\<<INSTANCE NAME>>.
- In this case, it is 10.13.106.38\SQLTEST01.
- Since I'm in the same domain as the remote server, I'd be using Windows Authentication.
- Click Connect.
- The remote database instance should be now accessible from the local machines.
- Now you should be able to browse all the databases that the user has been granted access with.
Take Away
This article describes how to set up a remote server to allow other users to connect to a named instance of the SQL Server Database Engine.
Official Documentation: https://docs.microsoft.com/en-us/sql/database-engine/configure-windows/configure-the-remote-access-server-configuration-option