

Managing SSRS report migrations can be a time-consuming and error-prone process, especially when dealing with large enterprise report servers that contain hundreds of reports, datasets, data sources, and subscriptions. To simplify this process, we created the SSRS Reports Migration Wizard, a Visual Studio extension and standalone utility that helps you automate and validate migrations with minimal manual steps. In this guide, we’ll walk through how to migrate SSRS reports to new server in just a few clicks.
What is SSRS Reports Migration Wizard?
SSRS Reports Migration Wizard is a tool that enables you to:
- Migrate reports, shared datasets, and shared data sources
- Copy standard subscriptions
- Migrate between servers, folders, or environments
- Export and import SSRS items using an export file format
- Perform offline review and validation before actual migration
The wizard is available as a Visual Studio extension and as a standalone tool.
Prerequisites:
Before starting, ensure:
1. You have access to both source and target SSRS servers.
2. Your user account has:
-at least Browser role on the source report server.
-at least Publisher role on the target report server.
If you’re unsure how to grant access, follow the instructions in the Granting Access Guide.
Use Cases
- Migrating from dev to test/prod environments
- Consolidating multiple SSRS servers
- Backing up and archiving SSRS artifacts
- Migrating within the same server to new folders
Steps to Migrate SSRS reports to new server
Follow the below steps to achieve SSRS report migration from one server to another.
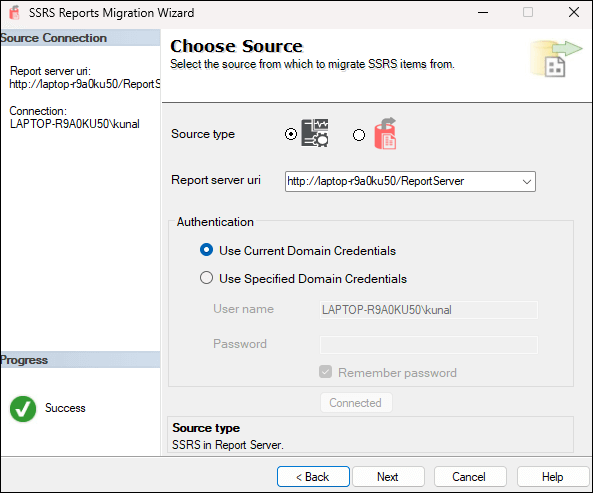
Step 1: Select the Source
Choose your source SSRS server or a .SRMW file created from a previous export.
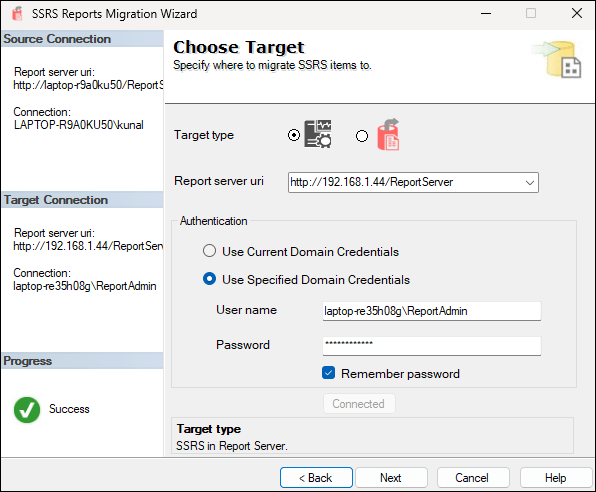
Step 2: Select the Target
Provide connection details for the destination SSRS server. You can migrate to a different server, or a different folder on the same server.
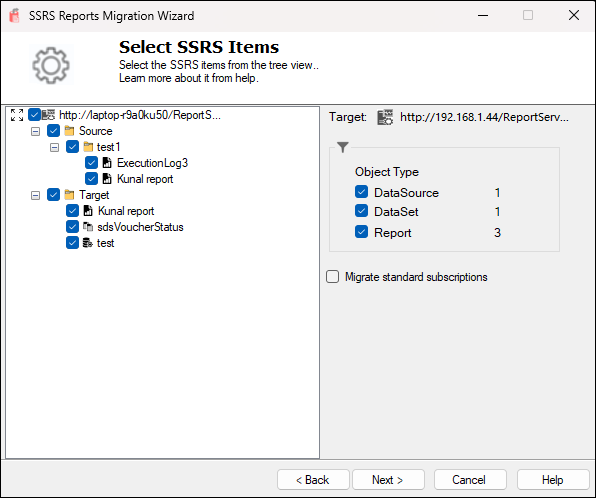
Step 3: Choose Report Items to Migrate
Select specific folders, reports, datasets, and data sources using a tree view. Filters and checkboxes make large-scale selection easy.
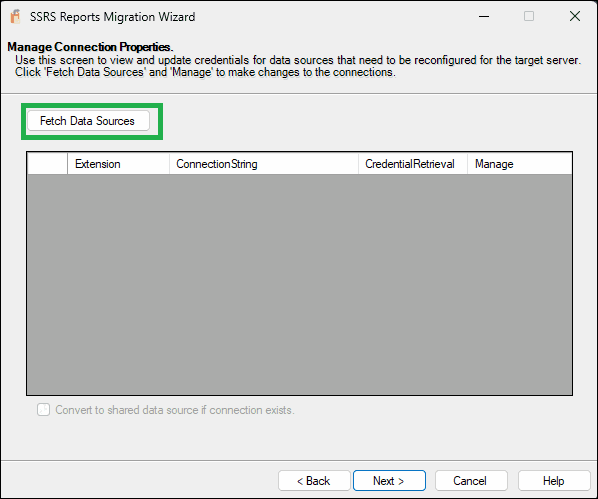
Step 4: Update Data Source Connection Strings
SSRS Reports Migration Wizard includes an optional step to update data source connection strings during the migration process. This is particularly useful when migrating reports and datasets from a source server to a target server that uses different connection details.
1. Fetch Data Sources
On this screen, click the Fetch Data Sources button. The wizard will scan the selected SSRS items (from previous screen) and populate a grid with all connections that can be updated.
2. View and Manage Connections
The grid displays the Extension, Connection String, and Credential Retrieval method for each data source. Click the Edit link in the Manage column, which allows you to modify the connection.
Convert to shared data sources if connection exists - If this option is selected, the wizard will attempt to convert embedded data sources in reports to shared data sources during deployment, provided a shared data source with the same connection details is available in the selected SSRS items for deployment.
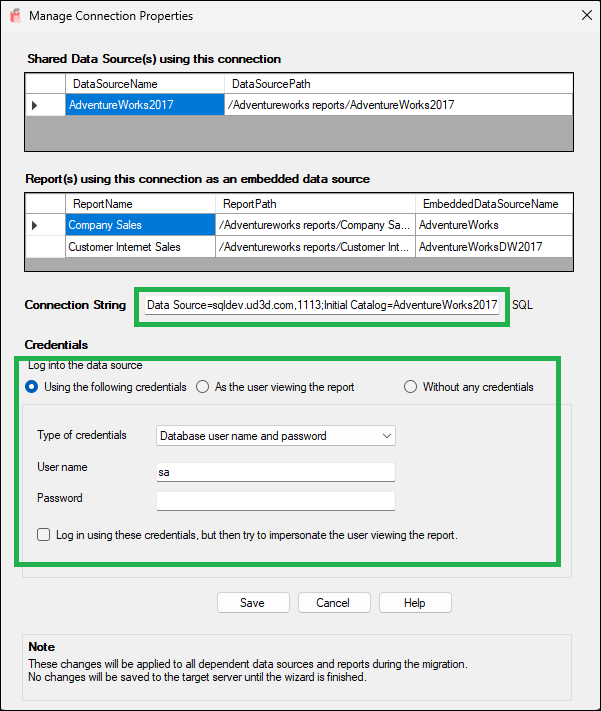
3. Update Properties
When you click Edit, a new dialog box appears (labeled “Manage Connection Properties”). Here you can:
- Review the Shared Data Source(s) using this connection and Report(s) using this connection as an embedded data source.
- Modify the Connection String.
- Specify Credentials (e.g., Windows credentials or a user name and password) under “Log into the data source”.
- Click Save to apply the changes.
Important Notes
- The SSRS Reports Migration Wizard cannot retrieve passwords from embedded data sources on the source server. It is therefore essential to manually manage and input the connection strings with their corresponding passwords on this screen.
- The Dependent Objects shown in the grid are those that have a connection embedded within them. These objects are directly using this connection.
- The changes you make are not committed to the target server until the wizard completes the migration.
- If no connections are found for the selected items, a message box will inform you that there are no connections available for update.
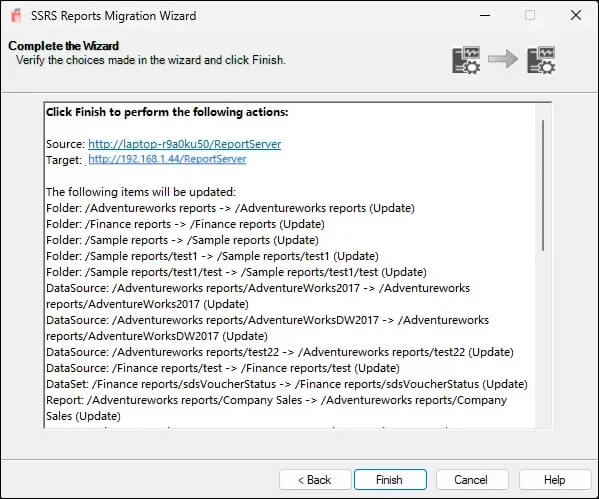
Step 5: Review Changes
The wizard shows a migration summary with new, changed, or skipped items. You can export this list or proceed with the migration.
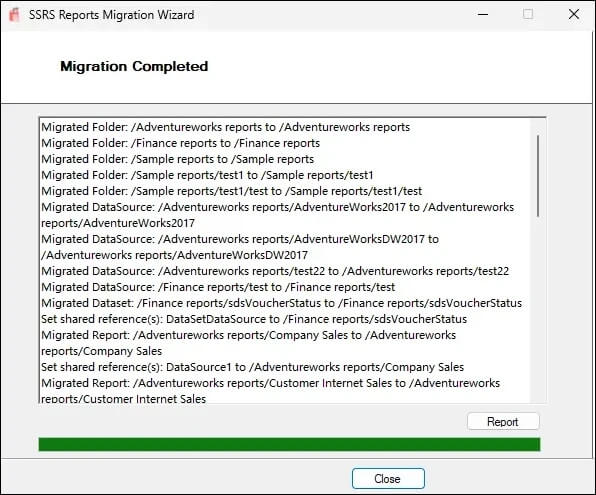
Step 6: Finish and Validate
Once migration is complete, a final summary screen shows migrated item counts and logs. You can rerun this process anytime.
Installation
SSIS Catalog Migration Wizard can be installed as an extension to:
1. Visual Studio 2017, Visual Studio 2019 & Visual Studio 2022.
2. SSMS 18, 19, 20, 21(preview)
3. Standalone tool.
Standalone Usage
Don’t use Visual Studio? You can still run the wizard as a standalone tool:
1. Download the .vsix from Visual Studio Marketplace.
2. Rename the .vsix to .zip and extract it.
3. Launch SSRS.Reports.Migration.Wizard.exe.