
SQL Server Auditing
Auditing in SQL Server is the means by which you can monitor events within a database or server instance. The audit log contains a listing of the events you choose to capture, forming a record of activity on the server for database and server objects, principals, and actions. You can capture data about almost anything that happens, including both successful and unsuccessful logins; data that is read, updated, and deleted; administrative tasks; and much more. Auditing can reach deep into a database and server.
It may seem strange to have a way to look back retroactively at events that have already occurred. But an audit log is often your first and best resource for detecting attacks, particularly when the attack has only probed the database and not yet succeeded in accessing data or doing damage. When a breech does occur, and regulators and press are coming down hard on you, the audit log is what will likely help you figure out what happened, what data was accessed, and the source of the breech. Without the log, you probably have to catch the attackers and question them before you can know for sure what happened!
SQL Server has long provided features that support auditing, but it wasn't until SQL Server 2008 that auditing really became a core feature, with built-in objects, T-SQL support, and a user interface in Management Studio. Microsoft learned a number of lessons from this initial version and made some nice enhancements in SQL Server 2012. One of the biggest changes was that Microsoft made auditing available in all editions of SQL Server, not just the Enterprise edition. This means that you can now create an audit specification across all databases in any edition. But the news is mixed: individual database auditing is only available in the Enterprise, Developer, and Evaluation editions. So if you are testing or evaluating SQL Server to ultimately use anything but the Enterprise edition in production, make sure that the edition you will use has the features you need.
Part of the push for auditing over the years was compliance requirements by various governments around the world for different kinds of organizations. As a result, SQL Server is now used to protect some of the most heavily regulated organizations, industries, and data in the world.
SQL Server Auditing Objects
Whether you interact with auditing using T-SQL or the user interface of Management Studio, you'll be working with three objects.
- Server Audit: The server audit object is the top-level container for your audits; you'll always use this object for an audit. Normally you'll create a server audit to group together one or more audit specifications for a particular purpose, such as compliance, or for a specific set of server or database objects. You'll use this object to specify the audit's name, where to save the audit log, limits on logging, and what happens in the event of an auditing failure. You can also define filters to give you fine-grained control over the events logged.
- Server Audit Specification: Use this object to define specific server-level events to capture in the audit log. This specification is associated with exactly one server audit that you created previously. Here is where you define which events on which objects you want to record.
- Database Audit Specification: This object is similar to the server audit specification, except that you'll use it to capture the events within a single database. It too is associated with exactly one server audit object.
You'll always use a server audit object, along with one or both of the other objects, depending on the types of events that you want to capture in the log. If all the events you want to log occur within a single database, use the database audit specification object. Otherwise, if the events span two or more databases, or are server-level events, use the server audit specification object.
When you create a server audit, you can choose one of three locations for the audit log: the Windows application log, the Windows security log, or a file in the file system. You'll want to be very careful where you write auditing data because it can easily include sensitive information like Social Security numbers, credit card numbers, salaries, corporate financial data, and so on. So you should use a location where unauthorized users cannot access it. This means that the Windows application log is probably not a good choice, because by default users don't need elevated permissions to view it. But the security log could be a good choice since access requires administrative permissions. Files in a folder could be a good choice as well, since you can secure a folder or the files within it using the security system built into Windows.
Creating a Server Audit
You can create a SQL Server audit either using the GUI tools in Management Studio or using T-SQL. It's easiest to see the big picture of audits using Management Studio, so that's where we'll start. Fire up Management Studio and connect to a local instance of SQL Server. In Object Explorer, navigate to the top-level Security node—not the Security node within a database—and expand the node so you see the Audits node. Right-click this node and select New Audit from the pop-up menu to open the Create Audit dialog box.
Tip:
In this stairway level, I'll use an instance of SQL Server 2014 with the AdventureWorks2014 sample database installed. Everything should work pretty much the same for SQL Server 2012 and later, and you should easily be able to adapt the steps and code for another database.
You can use this dialog box to set the various properties of the server audit object that you are creating:
- The audit name is initially set to an auto-generated value based on the date and time in the form Audit-20151003-142513, but you can set this to just about anything you'd like. I set this to Sample Audit to better identify the audit.
- Next you can set the queue delay in milliseconds, initially set to one second, which indicates the maximum amount of time you're willing to wait for the system to write log entries. This value is a tradeoff between performance and safety: a shorter time limit will make it more likely that crucial events are recorded before a catastrophic failure, but can adversely impact performance of the server. I left the default setting for this server audit, which means that at worst I could lose one second's worth of entries. That's acceptable for a sample audit!
- The next set of options determines what happens on auditing log failure, when SQL Server is unable to write an audit log entry, perhaps because of no available disk space. The default is Continue, which just raises an error in the Windows event log, but the underlying operation continues to execute. The Shut down server option is available when auditing is crucial and neither the operation nor server execution should continue in the face of an audit failure. This is a draconian option—shutting down the SQL Server service—but is necessary when auditing is crucial. The Fail operation option is somewhere between the two extremes, causing the transaction that caused the failure to roll back. I also left this set to the default Continue option.
- The remaining options on the dialog box relate to your selected audit destination. There are three options: File, Security Log, and Application Log. If you select either of the latter two Windows event log options, there are no other selections to make and it will disable the rest of the fields on the form, all of which apply to the File option.
If you select the File option, you will have to specify a file path. For this demonstration I chose d:\Junk, a scratchpad type of folder on my system that I know I can clean out any time I need to free up disk space. But you can place the audit files anywhere you'd like, such as on a different volume or even on a network drive.
The other options related to storing the log to files let you place various limits on the amount of data and the number of files. You can specify either a maximum number of rollover files or an absolute number of files. With the rollover files option, once the number of files in the folder reach the maximum SQL Server starts overwriting the oldest files with newer files. With the Maximum files option, once the specified number of files is reached, writing to the audit log fails. If you select the associated Unlimited option, there is no limit to the number of rollover files or number of files. You can also specify a maximum file size or set that option to unlimited as well. The final option on the dialog box, Reserve disk space, tells SQL Server to pre-allocate disk space equal to the maximum file size you specified, if any, and is only available if the unlimited option is not selected for the maximum file size. So you have plenty of options for controlling the amount of space that your auditing files take on the specified drive.
Figure 11.1 shows my completed Create Audit dialog box for the Sample Audit.

Figure 11.1: Creating a server audit object using the Create Audit dialog box in Management Studio.
You can also create audits using T-SQL code. Listing 11.1 shows the code that would create an identical Sample Audit with all the same settings, using the CREATE SERVER AUDIT statement. I generated this code using the Script button on the Create Audit dialog box after changing the settings I wanted, then cleaned up the code a bit.
USE master;
GO
CREATE SERVER AUDIT [Sample Audit]
TO FILE
(    FILEPATH = N'D:\Junk'
    ,MAXSIZE = 0 MB
    ,MAX_ROLLOVER_FILES = 2147483647
    ,RESERVE_DISK_SPACE = OFF
)
WITH
(    QUEUE_DELAY = 1000
    ,ON_FAILURE = CONTINUE
);
GO
Listing 11.1: T-SQL code you can use to create the Sample Audit.
Listing 11.2 shows how you could create a comparable server audit that writes the log to the Windows application event log instead of to files. There are no additional options that you can set for that destination, so the statement is quite a bit simpler than the previous example.
CREATE SERVER AUDIT SQLServerAudit
    TO APPLICATION_LOG
    WITH ( QUEUE_DELAY = 1000,  ON_FAILURE = CONTINUE);
GO
Listing 11.2: Code to create a SQLServerAudit audit that writes to the Windows application log.
Look at the Audits node in the server Security node in Object Explorer after creating these two audits (you may have to refresh the node content to see them), as shown in Figure 11.2. Notice that they both have a red down arrow icon overlaying the magnifying glass icon. This indicates that the audits are not enabled, which is their default state upon creation. You can enable an audit in Object Explorer by right-clicking the audit and selecting Enable Audit from the pop-up menu, or alter the audit with the ALTER SERVER AUDIT statement like that in Listing 11.3. Once you enable the audit, the red down arrow will disappear, although you may have to again refresh Object Explorer. If you're following along in Management Studio, go ahead and enable the Sample Audit so that it will be ready for use later.
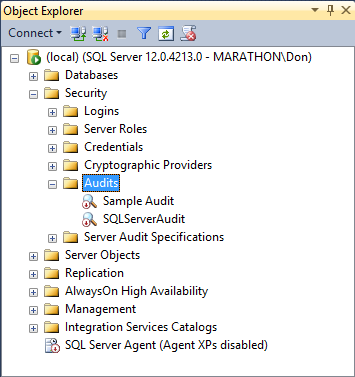
Figure 11.2: Newly created but disabled server audits in Object Explorer.
ALTER SERVER AUDIT SQLServerAudit WITH (STATE = ON);
GO
Listing 11.3: T-SQL code to enable the SQLServerAudit audit.
Creating a Server Audit Specification
Once you create a server audit, you can define the audit events that you want to write to it. A server audit is essentially a container for audit specifications. Remember that there are two types of audit specifications: server and database audit specifications.
The server audit specification I'll create here will log all failed SQL Server login attempts. This is a server-level operation that is outside the scope of any one database, so I need to create a specification at the server level rather than the database level. Using the GUI tools in Management Studio, right-click the Server Audit Specifications node in the server-level Security node and select New Server Audit Specification from the pop-up menu to open the Create Server Audit Specification dialog box.
You can accept the auto-generated specification name, but I named mine TestSQLServerAuditSpec. Then select the server audit from the Audit dropdown listbox, which contains all of the server audits that exist in this instance of SQL Server. I'll use the Sample Audit for this example, which means that the audit log items will go to the file system as defined in that audit.
Then you can use the Actions section of the dialog box to define the events or groups of events you want to record. The available list of action types is rather extensive, as shown in Figure 11.3. For this specification, select the FAILED_LOGIN_GROUP type.

Figure 11.3: There are a large number of server audit action types you can select to record.
The remaining columns for the failed login group action type are disabled, since there are no other available options for this type. But other types let you associate the action with various server objects. The dialog box should look like Figure 11.4, and it will create the specification when you click, the OK button.

Figure 11.4: Defining a new server audit specification using Management Studio.
The new server audit specification will appear in the Server Audit Specifications node in Object Explorer, and will be disabled. You can right-click the specification and select Enable Server Audit Specification from the pop-up menu to enable it.
You can also create a new server audit specification using T-SQL with the code in Listing 11.4. This code uses an optional WITH clause that accepts a STATE parameter with values of either ON or OFF to enable or disable the specification. If you omit this clause, the state will be set to OFF by default.
CREATE SERVER AUDIT SPECIFICATION TestSQLServerAuditSpec
    FOR SERVER AUDIT [Sample Audit] ADD (FAILED_LOGIN_GROUP)
    WITH (STATE = ON);
GO
Listing 11.4: Code to create a new server audit specification using the optional WITH clause to immediately enable it.
To test the audit, connect to the instance of SQL Server and attempt to log in with incorrect SQL Server login credentials. You can do this either with another instance of Management Studio or using the Connect button in the toolbar of Object Explorer.
Then you can view the log by right-clicking on the Sample Audit in Object Explorer and selecting View Audit Logs from the pop-up menu to open the Log File Viewer dialog box. It may take a moment or two to populate the list of log entries from the disk files, but eventually you will see the failed login as shown in Figure 11.5. Each row contains quite a bit of information about the event, making it unwieldy to scroll to the right to see all the data. But when you select a row, the data appears in the window below in a format slightly easier to read. But unfortunately, the columns are not well formatted as you can see in the figure.
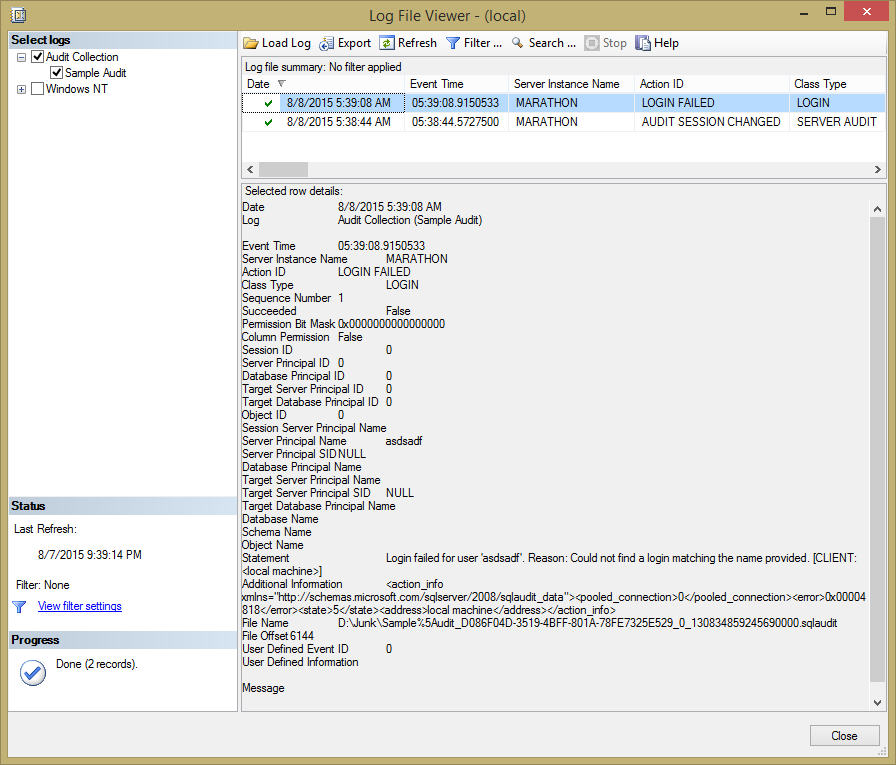
Figure 11.5: Viewing the server audit log entries for the Sample Audit.
Notice too that a server audit automatically captures events that modify the audit log, here when I enabled the server audit. That is the second row in the table shown in the figure.
Tip:
You need to enable both the server audit and the audit specification before they will capture and write events. Normally, you'll want to enable them when creating them so they are ready to go.
Creating a Database Audit Specification
Creating a database audit specification is pretty much the same process as for a server audit specification. The main difference is the scope of the events you can capture in the log. A database audit specification can capture only events that occur entirely within the scope of a single database, events such as accessing data through T-SQL statements, changing the structure or permissions of database objects, or executing stored procedures. The other significant difference is that you create the specification within the subject database instead of the server-level Security node in Object Explorer.
Say that you wanted to create an audit record whenever any user or process executes a SELECT statement against the Person.Person table in the AdventureWorks2014 database. In Object Explorer, drill down in the AdventureWorks2014 database node, expand the Security node, and right-click on the Database Audit Specifications node. Select the New Database Audit Specification item from the pop-up menu, which opens the Create Database Audit Specification dialog box, complete with yet another auto-generated name that you can change to whatever you want.
Figure 11.6 shows the dialog box with options set for a SELECT audit action type on the Person.Person table, associated with Sample Audit created earlier. For this specification, you have to select the OBJECT Object Class (other options are DATABASE and SCHEMA), the Person.Person schema and table, as well as the Principal Name. Unfortunately, you can't type the object and principal names directly into the table. Instead, you have to click the ellipsis button for each, which opens the standard Select Objects dialog box.
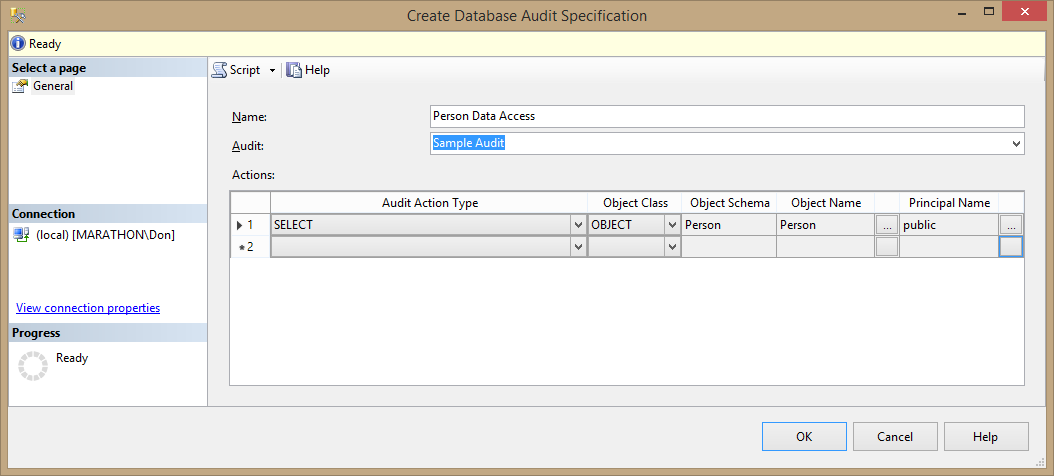
Figure 11.6: Creating a database audit specification to record when any user queries the Person.Person table in AdventureWorks2014.
You can set the Principal Name to any database user or role, including the public database role to cover everyone with access to the database. Like a server audit specification, you can add as many actions to the specification as you like.
Once you create the specification, remember to enable it.
As usual, you could also create this specification using the T-SQL code in Listing 11.5, with the option to immediately enable it using a WITH clause.
USE AdventureWorks2014;
GO

CREATE DATABASE AUDIT SPECIFICATION [Person Data Access]
    FOR SERVER AUDIT [Sample Audit]
    ADD (SELECT ON OBJECT::Person.Person BY public)
    WITH (STATE = ON);
GO
Listing 11.5: Code to create a database audit specification to log when Person.Person is queried.
Then you can test the audit specification by executing a SELECT statement against the table. Once you do that, again check out the audit log for the Sample Audit, as shown in Figure 11.7. As you can see, the log contains a rather complete set of information about the event, including the SQL statement that caused it.
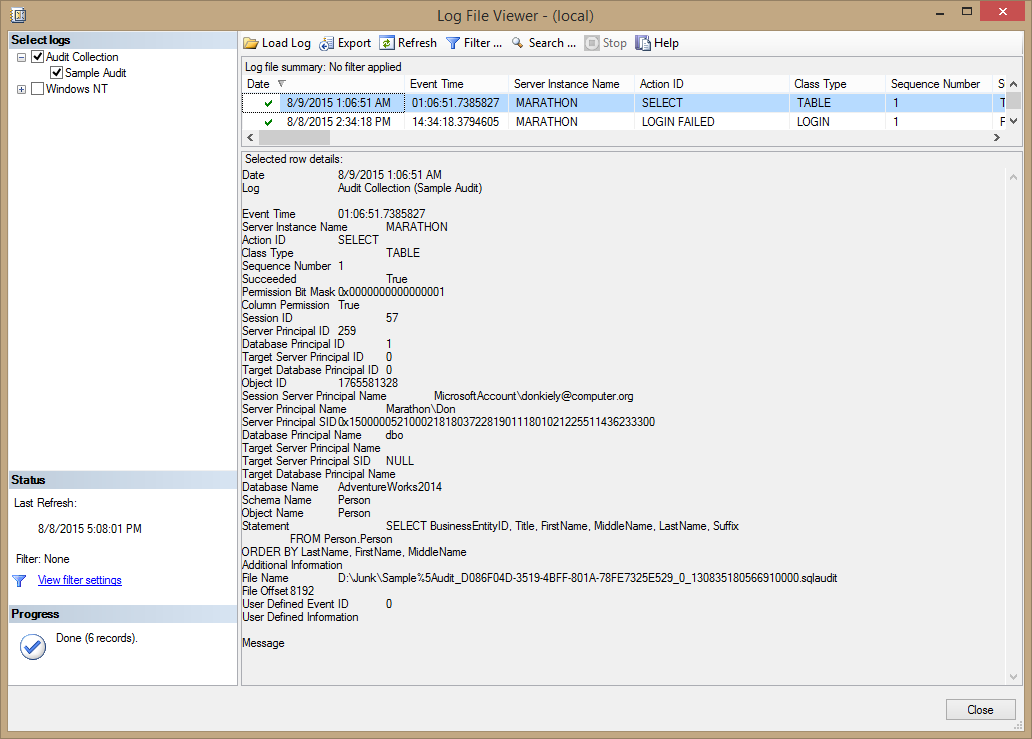
Figure 11.7: Audit log entry when querying the Person.Person table.
Notice in the figure that the Additional Information item has no content. This is because the event that generated the log entry was a direct SELECT statement. But when the SELECT statement executes within a stored procedure or other code module, Additional Information will contain the T-SQL stack frame information as a chunk of XML code. This is useful to identify whether the query was executed as a statement or a code module.
Say that you created a stored procedure called tempPerson that contained the SELECT statement shown in the Statement item in the figure, returning the full name information from Person.Person. After you execute the stored procedure, you'd get the results shown in Figure 11.8, again generated because someone executed a SELECT statement against the Person.Person table. But this time notice the Additional Information item.

Figure 11.8: T-SQL stack frame information included when executing the SELECT statement via a stored procedure.
Additional Information contains an XML snippet that includes a few pieces of information about the code that caused the audit log entry, the most important being the schema and name of the stored procedure.
Writing Custom Audit Information
You're not limited to writing log entries that capture only the default information for each kind of event. You can also create user-defined audit events, which allow you to write whatever you want to the audit log. The code in Listing 11.6 shows how to accomplish this. You can only modify an audit specification (either server or database) when it is disabled, so the code first does that. Then it adds the TestSQLServerAuditSpec that uses the USER_DEFINED_AUDIT_GROUP action type to the specification, and immediately enables it. The last line of code uses the sp_audit_write system stored procedure to write something interesting to the audit log.
USE master;
GO

ALTER SERVER AUDIT SPECIFICATION TestSQLServerAuditSpec
    WITH (STATE = OFF);
GO

ALTER SERVER AUDIT SPECIFICATION TestSQLServerAuditSpec
    ADD (USER_DEFINED_AUDIT_GROUP)
    WITH (STATE = ON);
GO

-- Write some custom audit information
EXEC sp_audit_write 9999, 1, N'Something in SQL Server succeeded!'
Listing 11.6: Code that adds a server audit specification that uses the USER_DEFINED_AUDIT_GROUP action type to write custom audit information.
You can, of course, also alter the server audit specification using the GUI tools in Management Studio.
If you execute the code in the listing and view the audit log, you'll see the item shown at the top of the list in Figure 11.9. You still get a ton of information about the context of the audit event, including the T-SQL statement that caused the event, but at the bottom you'll find the User Defined Information item with the contents of the custom information.
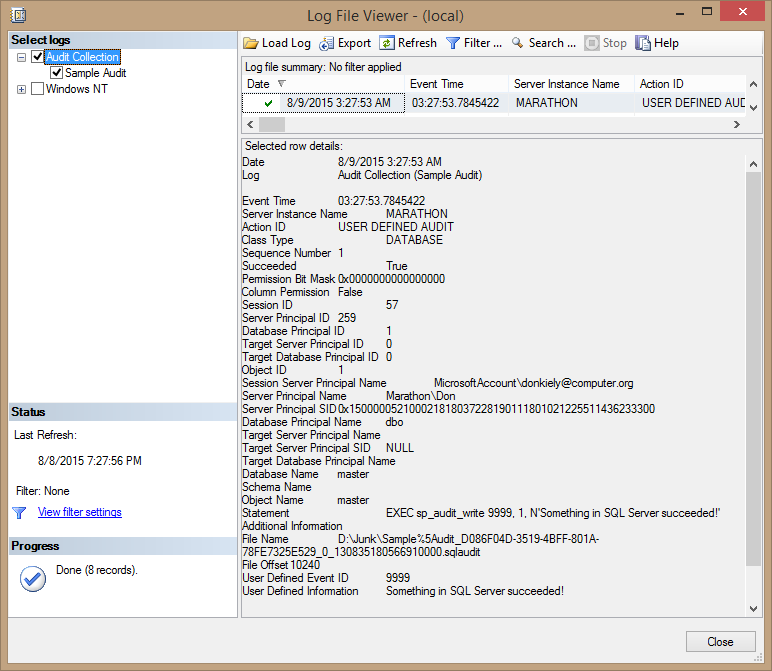
Figure 11.9: Audit log entry that contains user-defined information.
Tip:
If the USER_DEFINED_AUDIT_GROUP server audit specification is disabled, SQL Server will ignore sp_audit_write.
Filtering Audit Events
SQL Server also includes the ability to filter the events written to the audit log, which uses the same filtering mechanism as extended events. Filtering gives you fine-grained control over what SQL Server writes to the audit log. But it's important to understand that the server still generates all the log entries for the events you define in the specification, then uses the filter to determine whether to write an event to the log. So you still have the overhead of the log event generation, even if the entry isn't written to the log. This means that it is usually better to create audit events for specific objects instead of filtering them.
Say that you wanted to create an audit that recorded all events of a certain type except for those associated with a specific login. The code in part 1 of Listing 11.7 creates a carol login and user for that login in the AdventureWorks2014 database. It then uses the SUSER_ID method to retrieve the principal id for that new user (here 307). Then part 2 of the code creates a server audit with a WHERE clause to filter out events where the principal has id of 307, and enables the server audit. Now carol has free reign in the database, safe from server audit events!
-- Part 1: Create the login and database user
USE AdventureWorks2014;
GO

CREATE LOGIN carol WITH PASSWORD = 'GEP2zYDt+5Cqw';
CREATE USER carol FOR LOGIN carol;
SELECT SUSER_ID('carol');

-- Part 2: Create the server audit
-- Change principal id from 307 based on SUSER_ID from previous statement
USE master;
GO

CREATE SERVER AUDIT FilterAudit
    TO APPLICATION_LOG
WITH
(    QUEUE_DELAY = 1000
    ,ON_FAILURE = CONTINUE
)
WHERE server_principal_id <> 307;

ALTER SERVER AUDIT FilterAudit WITH (STATE = ON);
GO
Listing 11.7: Code to create a login and user in AdventureWorks2014, then create a server audit that excludes events associated with that user.
You can also filter events for a server audit using the Audit Properties dialog box, which you can open by right-clicking the server audit in Object Explorer and selecting Properties from the pop-up menu. Select the Filter page, as shown in Figure 11.10. Notice that the textbox contains only the predicate of the WHERE clause used in the CREATE SERVER AUDIT statement, enclosed in parentheses. There is no need to include the WHERE keyword.
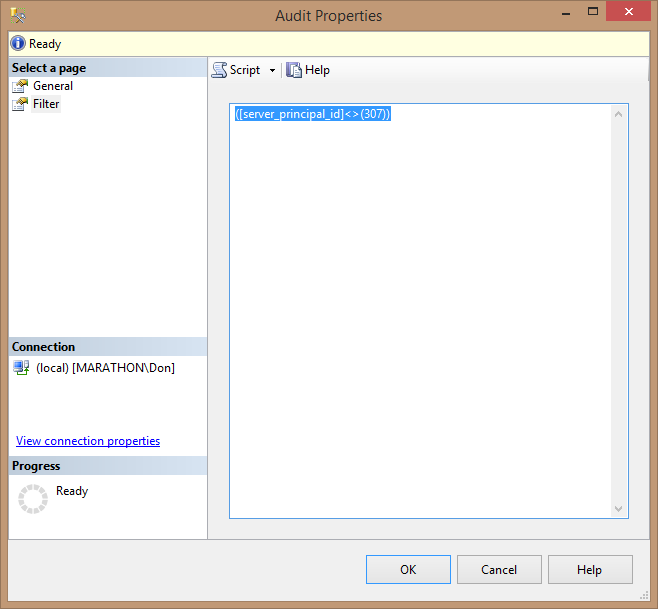
Figure 11.10: Using the Audit Properties dialog box to add a filter to a server audit.
Summary
The auditing features of SQL Server let you record log entries for a wide variety of events at both the server instance and database scopes. You can create the various audit objects using either the GUI tools in Management Studio or with T-SQL code, with lots of options to do things like filter the entries, write custom information to the log, and see T-SQL stack frame information. Auditing is an important security feature of SQL Server that helps you find suspicious activity in your database so that you can eliminate security vulnerabilities of your data.