In the second level of this series I outlined the process of connecting to a SQL Server Instance, the pros and cons of various ways of storing credentials, some cool operations that can be done using the server class, an example to how to automate a simple task using the server class and how to create a server inventory. Now in this level, we’ll take a closer look at the Database Class and demonstrate some useful things that you can do with it. The aim is to give this level a very practical bias so I’ll keep the explanation to what is necessary to play along in the PowerShell ISE.
Database Class
The database class represents a database in a SQL Server Instance. A SQL Server Instance is, in turn represented by the Server Class. Each Server object contains a list of database objects. You can use a database object to perform database operations such as to:
- Create, rename and drop databases, set the database online and offline and change owners
- Get a list of the database objects such as tables, stored procedures, tables, triggers, or users
- Setup and manage Database Mirroring and Full Text Catalog
- Create a Master Database key
- Perform integrity checks on data, catalog, allocations and tables
- Manage security at the user level (grant, revoke, deny) and enumerate object permissions
- Run T-SQL Statements
- Manage backup history to find the last backup dates (full, log diff), to drop history, and to enumerate the files in a backup set
- Perform administration operations on databases, such as updating statistics, shrinking databases, truncating logs and also scripting databases.
Creating databases
First, we will create a new database with the default database options:
To do this, we need to create the server connection and then instantiate the database class, as the listing below illustrates. It shows the creation of the database called MyNewDatabase:
Import-Module SQLServer #loading the assemblies

$Server = New-Object Microsoft.SqlServer.Management.Smo.Server localhost
try
{
    $server.ConnectionContext.ConnectTimeout = 1 #set a low timeout
    $server.ConnectionContext.connect() #connecting

    $database = new-object Microsoft.SqlServer.Management.Smo.Database $server, & #39;MyNewDatabase'
    $database.create() #creating the Database with default options

}
catch
{
    Write-Error $_.Exception.Message
}
finally
{
    $server.ConnectionContext.Disconnect()
}
Customizing Database Options:
We can use a refinement of this method to create a database with specific options set, rather than use all the configuration options that are set in the model database. All we need to do is to add the process of creating a DatabaseOptions object and set its properties as we wish.
Import-Module SQLServer #loading the assemblies

$Server = New-Object Microsoft.SqlServer.Management.Smo.Server localhost
try
{
    $server.ConnectionContext.connect() #connecting

    $database = new-object  Microsoft.SqlServer.Management.Smo.Database $server, 'MyNewDatabase2'
    $database.DatabaseOptions.AutoClose = $False
    $database.DatabaseOptions.AutoCreateStatistics = $True
    $database.DatabaseOptions.RecoveryModel = 'Simple'
    $database.DatabaseOptions.AutoShrink = $False
    $database.DatabaseOptions.AutoUpdateStatistics = $True
    $database.DatabaseOptions.AutoUpdateStatisticsAsync = $True
    $database.DatabaseOptions.BrokerEnabled = $True
    $database.Collation = 'SQL_Latin1_General_CP1_CI_AS'
    $database.CompatibilityLevel = [Microsoft.SqlServer.Management.Smo.CompatibilityLevel]::Version120
    $database.create()

    $database.SetOwner('SA')
    $database.alter()
}
catch
{
    Write-Error $_.Exception.Message
}
finally
{
    $server.ConnectionContext.Disconnect()
}
An interesting point is that, for the Owner property, we can’t just do it the way we have just done with all those other database options, by seeing the properties and then the database. You need to create the database first and then change the property by using the SetOwner() method. That is because the Owner property is read-only. How did I know that? I checked the MSDN documentation.
Tip: If you need to specify a different collation, you can avoid a possible error by checking the collations that are available by using the enumCollations enumeration:
$server.EnumCollations()
Now that we’ve tried out setting and changing database options, we can now drop all the databases we have created as a ‘tear-down’ procedure. As always, be careful with software tools like this. They are sharp!
Import-module SQLServer -DisableNameChecking -force #loading the assemblies
$Server = New-Object Microsoft.SqlServer.Management.Smo.Server localhost

try
{
    (($server.Databases).Where{ ($_.name -in 'MyNewDatabase', 'MyNewDatabase2') }).drop()
}
catch
{
    Write-Error $_.Exception.Message
}
finally
{
    $server.ConnectionContext.Disconnect()
}
Some cool operations using the SMO Database Class
Changing properties from a database:
As well as creating a database with specific database options, we can alter them easily whenever necessary. In this way, we can make sure that configurations are exactly what is required with no matter what someone else may have changed the setting to.
Before we can change setting we will need a database to work with, you can use this code to create one for the next example
<# Setup for configurations demo #>
$Server = New-Object Microsoft.SqlServer.Management.Smo.Server localhost

try
{
    $database = new-object Microsoft.SqlServer.Management.Smo.Database $server, 'MyExistingDatabase'
    $database.create() #creating the Database with default options
}
catch
{
    Write-Error $_.Exception.Message
}
finally
{
    $server.ConnectionContext.Disconnect()
}
Now that our database is setup, we will change the configuration properties to what we want them to be. Note that after we change whichever specific setting(s) we’re wanting to change, we still need to run the .Alter() method to tell SMO to go make the change to the database.
Import-module SQLServer #loading the assemblies
$Server = New-Object Microsoft.SqlServer.Management.Smo.Server localhost

try
{
    $server.ConnectionContext.ConnectTimeout = 10 #set a low timeout
    $server.ConnectionContext.connect() #connecting

    $database = $server.Databases['MyExistingDatabase'] #getting the Database Class for MyExistingDatabase
    $database.DatabaseOptions.AutoUpdateStatistics = $False
    $database.DatabaseOptions.AutoUpdateStatisticsAsync = $False
    $database.DatabaseOptions.BrokerEnabled = $True
    $database.Collation = 'SQL_Latin1_General_CP1_CS_AS'
    $database.CompatibilityLevel = [Microsoft.SqlServer.Management.Smo.CompatibilityLevel]::Version110
    $database.SetOwner('SA')
    $database.DatabaseOptions.Alter()
}
catch
{
    Write-Error $_.Exception.Message
}
finally
{
    $server.ConnectionContext.Disconnect()
}
While the example above illustrates changing options on a single database, more likely you would want to apply these setting across multiple databases, and probably across multiple instances. You could easily leverage PowerShell to accomplish that. In that scenario, you could either use a database on one SQL Server as a ‘template’, but then you have to be able to ensure that no unwanted changes have occurred to that database. Alternatively, you could export these settings to a text, CSV, or XML file.
Listing the Database Options:
Naturally, you will occasionally need to check what options are currently set at the database level. You can check properties like If Auto Close, Auto Shrink, Auto Update Statistic and Page Verify are enabled or not. For that there is a property called DatabaseOptions that includes all the properties. The SQL Tiger team calls out database properties as common performance mistakes. In the example below I am showing all the properties to the database MyExistingDatabase.
Import-module SQLServer #loading the assemblies
$Server = New-Object Microsoft.SqlServer.Management.Smo.Server localhost

try
{
    $server.Databases['MyExistingDatabase'].databaseoptions
}
catch
{
    Write-Error $_.Exception.Message
}
finally
{
    $server.ConnectionContext.Disconnect()
}

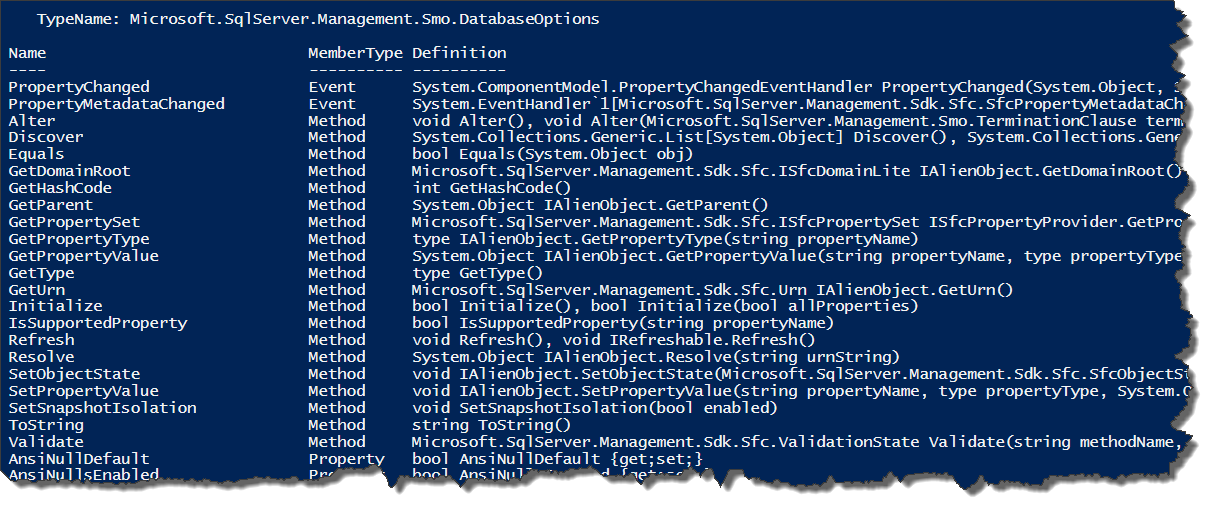
And as way of a reminder, we always will have Get-Member as our very good friend to tell us all the methods and properties of the database options collection:
$server.Databases['MyExistingDatabase'].databaseoptions |
Get-Member
Renaming Databases:
It isn’t a common requirement, but sometimes you need to rename a database. You can do that in the SSMS by clicking in the right button and choosing rename option, using SMO you can do the same. You get the point: There are many methods for the database object that can be used to automate anything you can do in SSMS. Their names give a pretty good hint as to what they do. Rename() is just an example of an SMO method. You can get a list of these methods by executing our old friend Get-Member:
$database | gm -membertype Method
Here is the script to rename a database. You can adapt this for whatever method you need to use.
Import-module SQLServer #loading the assemblies

$Server = New-Object Microsoft.SqlServer.Management.Smo.Server localhost
try
{
    $database = $server.Databases['MyExistingDatabase'] #setting the database to rename
    $database.Rename('MyNewNameToMyExistingDatabase') #renaming
    $database.Alter() # applying changes

}
catch
{
    Write-Error $_.Exception.Message
}
finally
{
    $server.ConnectionContext.Disconnect()
}
Listing the Tables from Database AdevntureWorks2014
All the various types of database object are held as collections by the database object. Here we list out all the tables in the database.
Import-module SQLServer #loading the assemblies

$Server = New-Object Microsoft.SqlServer.Management.Smo.Server localhost
try
{
    $database = $server.Databases['AdventureWorks2014'] #setting the database to rename
    $database.Tables
}
catch
{
    Write-Error $_.Exception.Message
}
finally
{
    $server.ConnectionContext.Disconnect()
}
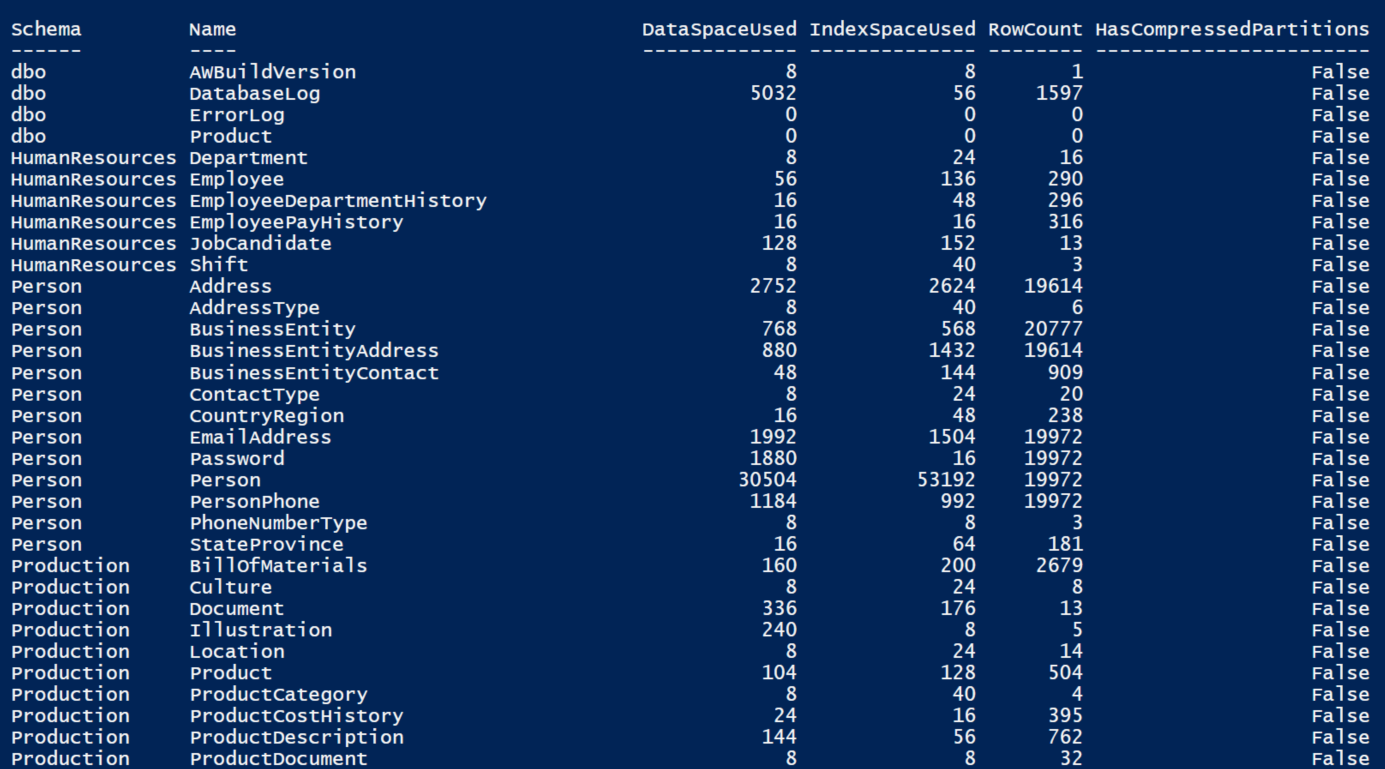
Once we have our object containing all the tables objects in the database, we can extract valuable information from them by asking for different properties that are important to us.
$database.Tables |
SELECT Schema, Name, DataSpaceUsed, IndexSpaceUsed, RowCount, HasCompressedPartitions |
Format-Table -AutoSize
Above we listed the tables, but it could just as easily be one of the other database objects such as views, stored procedures or functions.
$database.StoredProcedures
$database.Views
Executing a Query:
A lot of the time, it is easiest to execute some SQL directly rather than use an SMO method. We can execute a query or a batch very simply by using the connection that SMO is currently using to access the database. There are different ways of executing queries that return results and those that don’t. There are also ways to get the values returned by output variables, the error value returned from executing a batch, or the messages usually created by PRINT statements. This script simply returns a single result; in this example it is all the data in the HumanResources.Department table of AdventureWorks
Import-module SQLServer #loading the assemblies

$Server = New-Object Microsoft.SqlServer.Management.Smo.Server localhost
try
{
    $database = $server.Databases['AdventureWorks2014'] #getting the Database Class for AdventureWorks2014
    $database.ExecuteWithResults('Select * from HumanResources.Department').Tables.rows |
    Format-Table
}
catch
{
    Write-Error $_.Exception.Message
}
finally
{
    $server.ConnectionContext.Disconnect()
}

Doing DBCC CheckDB.
There are plenty of routine tasks that could easily be scripted via SMO. DBAs are often using DBCC checks, particularly CheckDb. You’ll see that there is no method in SMO called CheckDb. Instead, we use the checktables() method. This method has some overloads to use with it, such as choosing the repair type, repair options, repair structure that match those of DBCC CHECKDB. Please refer to Database.CheckTables Method for more details
The figure below shows the repair type overload and its options:
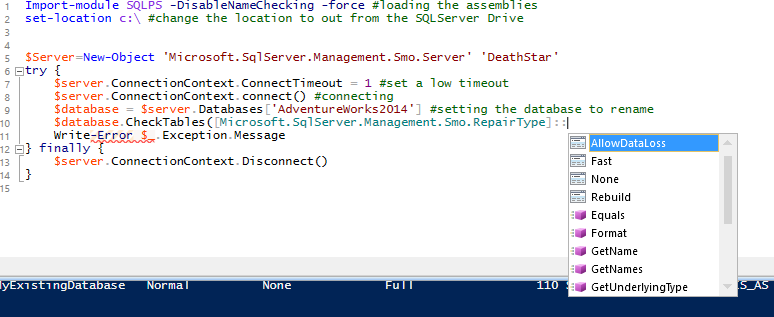
Using None is the same as DBCC CHECKDB WITH NO_INFOMSGS which is what is executed under the covers:
Import-module SQLServer #loading the assemblies

$Server = New-Object Microsoft.SqlServer.Management.Smo.Server localhost
try
{
    $server.ConnectionContext.ConnectTimeout = 10 #set a low timeout
    $server.ConnectionContext.connect() #connecting
    $database = $server.Databases['AdventureWorks2014'] #setting the database to rename
    $database.CheckTables([Microsoft.SqlServer.Management.Smo.RepairType]::None)
}
catch
{
    Write-Error $_.Exception.Message
}
finally
{
    $server.ConnectionContext.Disconnect()
}
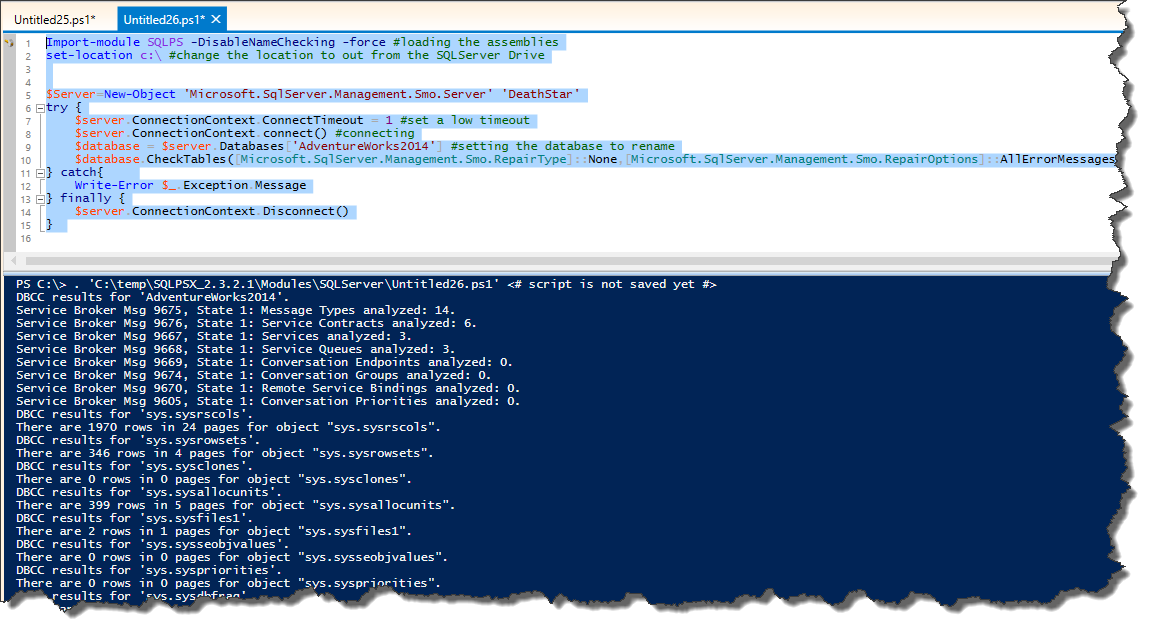
You will notice that it takes a parameter of a RepairType object so we can specify whether it attempts a repair and if so, then what type of repair. We also can use the overload to RepairOptions to specify options. In this example we specify that we want to show all error messages:
Import-module SQLServer #loading the assemblies

$Server = New-Object Microsoft.SqlServer.Management.Smo.Server localhost
try
{
    $database = $server.Databases['AdventureWorks2014'] #setting the database
    $database.CheckTables([Microsoft.SqlServer.Management.Smo.RepairType]::None, [Microsoft.SqlServer.Management.Smo.RepairOptions]::AllErrorMessages)
}
catch
{
    Write-Error $_.Exception.Message
}
finally
{
    $server.ConnectionContext.Disconnect()
}
You may want to save the output in a variable:
$messages = $database.CheckTables([Microsoft.SqlServer.Management.Smo.RepairType]::None, [Microsoft.SqlServer.Management.Smo.RepairOptions]::AllErrorMessages)
$messages
You can also check allocation pages and catalogs. Refer to Database.CheckAllocations Method and Database.CheckCatalog Method
Getting the information on backups:
Getting the backup history for a single database
One of the most important routine tasks for a DBA is to get all the information about backups, and to get control of your backups. (Believe me, it is) Of course, backups can save your life and your job.
SMO exposes three properties that can help you with your inventory to check the last backup date performed in the databases. The properties are:
- LastBackupDate – When the last full backup date was performed
- LastDifferentialBackupDate – When the last differential backup date was performed (if applicable)
- LastLogBackupDate - – When the last log backup date was performed
This check is very important since you will know whether the backup regime that you schedule is actually happening for your database. Of course, we know that this check does not actually say that you can restore the database from your backups and that you don’t need to worry. We know that backups always work (gulp) nd of course you need to have a procedure scheduled in your duties as DBA to test the restores. This check only will say to you: “Hey, your database X was backed up (log, full, diff) on those dates”. – Which is very important information but not sufficient for peace of mind.
Import-module SQLServer #loading the assemblies

$Server = New-Object Microsoft.SqlServer.Management.Smo.Server localhost
try
{
    $database = $server.Databases['AdventureWorks2014'] #setting the database
    [pscustomobject][ordered]@{
        'Last Backup Date ' = $database.LastBackupDate
        'Last Differential Backup Date' = $database.LastDifferentialBackupDate
        'Last Log Backup Date' = $database.LastLogBackupDate
    }
}
catch
{
    Write-Error $_.Exception.Message
}
finally
{
    $server.ConnectionContext.Disconnect()
}
Last Backup Date      Last Differential Backup Date Last Log Backup Date
-----------------     ----------------------------- --------------------
01-Jan-01 12:00:00 AM 01-Jan-01 12:00:00 AM         01-Jan-01 12:00:00 AM
Getting the backup history for all databases:
You’ve got more than one database to look after haven’t you? No matter: the same way we did in the example above, we can scale out the code to several databases or even for all user databases. The difference in the code will be just to choose the database or databases to check.
This example will get all the databases because you can see that I am not choosing a specific one as I did in the last example:
$database = $server.Databases['AdventureWorks2014']
but instead of that, I am getting all the databases
$server.Databases
and checking if they are online
Import-module SQLServer #loading the assemblies

$Server = New-Object Microsoft.SqlServer.Management.Smo.Server localhost
try
{
    ($server.Databases).Where({ $_.status -eq 'Normal' }) | #all databases
    ForEach-Object {
        [pscustomobject]@{
            'Database Name' = $_.name
            'Last Backup Date ' = $_.LastBackupDate
            'Last Differential Backup Date' = $_.LastDifferentialBackupDate
            'Last Log Backup Date' = $_.LastLogBackupDate
        }
    }

}
catch
{
    Write-Error $_.Exception.Message
}
finally
{
    $server.ConnectionContext.Disconnect()
}

Or we can just check the user databases by adding the check that they are NOT system databases in the where method:
($server.Databases).Where({ $_.status -eq 'Normal' -and !($_.issystemobject) })
Or we could just select the system databases if we wanted to:
($server.Databases).Where({ $_.status -eq 'Normal' -and ($_.issystemobject) })
Exporting backup history to a csv file:
By using PowerShell, it is easy to collect information from SQL Server and save it to disk or put it in an Excel spreadsheet. SMO really comes into its own if you need to maintain reports. Here is the way that we can easily save a PowerShell object to disk. We’ll use our Backup report, but the same method can be used for any tabular information from SMO.
Import-module SQLServer #loading the assemblies

$Server = New-Object Microsoft.SqlServer.Management.Smo.Server localhost
try
{
    ($server.Databases).Where({ $_.status -eq 'Normal' }) | #all databases
    ForEach-Object {
        [pscustomobject]@{
            'Database Name' = $_.name
            'Last Backup Date ' = $_.LastBackupDate
            'Last Differential Backup Date' = $_.LastDifferentialBackupDate
            'Last Log Backup Date' = $_.LastLogBackupDate
        }
    } |
    Export-Csv C:\temp\lastbackupdates.csv -NoClobber -NoTypeInformation

}
catch
{
    Write-Error $_.Exception.Message
}
finally
{
    $server.ConnectionContext.Disconnect()
}
Shrinking a database:
Shrinking a database is the operation that recovers space by moving page data from the end of the file to unoccupied space closer than the front of the file. It´s not a recommend operation because it will increase fragmentation and reduce performance, but eventually you may need to do it. As we know SMO exposes practically all the database operations using methods, and it is no different with Shrink operations. You will see that the Shrink() method uses a especial type of data called enumerations to specify the actual method of shrinking to use. Here is how you might specify NOTRUNCATE.
([Microsoft.SqlServer.Management.Smo.ShrinkMethod]::NoTruncate)
Enumerations are a distinct type that consists of a set of named constants called the enumerator list. This way I don’t need to know the value of the type but instead of that, the name. In this example, the value for ([Microsoft.SqlServer.Management.Smo.ShrinkMethod]::NoTruncate) is 0, but how can I be expected to know that ? Using enumerations, you just need know the name, and it’s very easy when using a IDE such as ISE, because it will show you the valid types in the intellisense. You just need to type the enumeration followed by :: and then the list will be appear to you via intellisense:
([Microsoft.SqlServer.Management.Smo.ShrinkMethod]::

Import-module SQLServer #loading the assemblies

$Server = New-Object Microsoft.SqlServer.Management.Smo.Server localhost
try
{
    $server.ConnectionContext.ConnectTimeout = 1 #set a low timeout
    $server.ConnectionContext.connect() #connecting
    $database = $server.Databases['adventureworks2014']
    $database.Shrink(40, [Microsoft.SqlServer.Management.Smo.ShrinkMethod]::NoTruncate)

}
catch
{
    Write-Error $_.Exception.Message
}
finally
{
    $server.ConnectionContext.Disconnect()
}
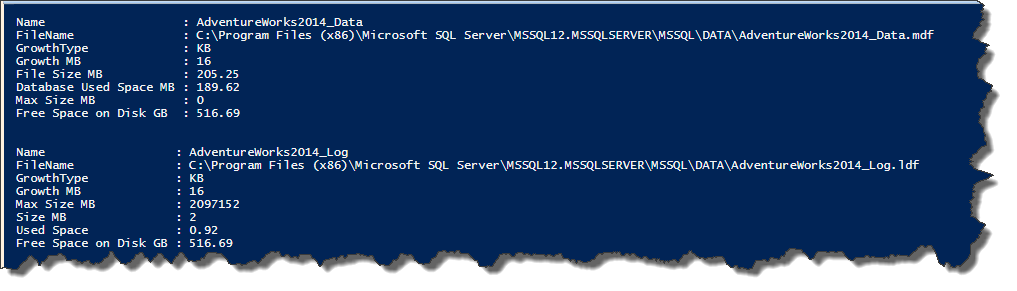
Listing the datafiles and logfiles:
You need to check on the health of your datafiles and logfiles, especially if you need to check for unexpected growth in a production system. You would probably want to know what the growth increment option is set to in MB or percentage, the size it is and how much free space you have left This operation also can be done using SMO, which is handy if you have a number of servers and databases to check regularly:
Note: PowerShell is smart enough to know how to convert bytes into megabytes and give you the correct number. However, the numbers that SMO provides for data sizes are often in kilobytes, that’s why you see the extra bit of math calculation going on.
Import-module SQLServer #loading the assemblies

$Server = New-Object Microsoft.SqlServer.Management.Smo.Server localhost
try
{
    $database = $server.Databases['AdventureWorks2014'] #getting the Database Class for AdventureWorks2014

    $database.FileGroups.Files |
    Select-Object Name,
                  FileName,
                  GrowthType,
                  @{ N = 'Growth MB'; E = { [math]::Round(($_.Growth * 1024)/1MB, 2) } },
                  @{ N = 'File Size MB'; E = { [math]::Round(($_.Size * 1024)/1MB, 2) } },
                  @{ N = 'Database Used Space MB'; E = { [math]::Round(($_.UsedSpace * 1024)/1MB, 2) } },
                  @{ N = 'Max Size MB'; E = { [math]::Round(($_.MaxSize * 1024)/1MB, 2) } },
                  @{ N = 'Free Space on Disk GB'; E = { [math]::Round(($_.VolumeFreeSpace * 1024)/1GB, 2) } }
    $database.LogFiles |
    Select-Object Name,
                  FileName,
                  GrowthType,
                  @{ N = 'Growth MB'; E = { [math]::Round(($_.Growth * 1024)/1MB, 2) } },
                  @{ N = 'Max Size MB'; E = { [math]::Round(($_.MaxSize * 1024)/1MB, 2) } },
                  @{ N = 'Size MB'; E = { [math]::Round(($_.Size * 1024)/1MB, 2) } },
                  @{ N = 'Used Space'; E = { [math]::Round(($_.UsedSpace * 1024)/1MB, 2) } },
                  @{ N = 'Free Space on Disk GB'; E = { [math]::Round(($_.VolumeFreeSpace * 1024)/1GB, 2) } }
}
catch
{
    Write-Error $_.Exception.Message
}
finally
{
    $server.ConnectionContext.Disconnect()
}
Listing the user and permissions:
“Every SQL Server securable has associated permissions that can be granted to a principal. Permissions in the Database Engine are managed at the server level assigned to logins and server roles, and at the database level assigned to database users and database roles.” You can read more on permissions in this link:
https://msdn.microsoft.com/en-us/library/ms191291.aspx
Fortunately, we can list out all the permissions via a method. In this example, we choose to only return part of the information that is available, using the PowerShell Select-Object cmdlet.
$database = $server.Databases['AdventureWorks2014'] #getting the Database Class for AdventureWorks2014
$database.EnumDatabasePermissions() |
Select-Object Grantee,
              GranteeType,
              PermissionType,
              PermissionState,
              Grantor
Grantee         : dbo
GranteeType     : User
PermissionType  : CONNECT
PermissionState : Grant
Grantor         : dbo


Grantee         : laerte
GranteeType     : User
PermissionType  : CONNECT
PermissionState : Grant
Grantor         : dbo
For more operations, type:
$server.Databases | Get-Member
Check the properties and methods and always use MSDN for full information of each member.
Changing the recovery model for all user databases:
Here, we connect to the ‘localhost’ instance and pipe each database object in turn, via a filter that only passes on the user databases, to a scriptblock that sets the database object’s recoveryModel property to ‘ Full’. Then we call the alter() method to actually make the change.
Import-module SQLServer #loading the assemblies

$Server = New-Object Microsoft.SqlServer.Management.Smo.Server localhost
try
{
    $server.ConnectionContext.ConnectTimeout = 1 #set a low timeout
    $server.ConnectionContext.connect() #connecting
    $server.Databases | .Where{ (!$_.IsSystemObject) -and ($_.IsAccessible) } | #only user databases and are accessible
    ForEach-Object {
        $_.recoveryModel = 'Full' #setting the recovery model
        $_.alter() #changing
    }
}
catch
{
    Write-Error $_.Exception.Message
}
finally
{
    $server.ConnectionContext.Disconnect()
}
Getting a history of database checks
You also may want to know the last date that DBCC ran in your databases. It could be useful to some best practice checks. There is no SMO method to check that, instead of we need to query the DBCC INFO and parse the information that is in the dbi_dbccLastKnownGood field returned by the query. We already saw we can execute T-SQL commands in the Database class, so that is just the way that we will do it:
Import-module SqlServer #loading the assemblies


$Server = New-Object Microsoft.SqlServer.Management.Smo.Server localhost
try
{
    ($server.Databases).Where({ $_.isaccessible }) | #all databases not offline
    ForEach-Object {

        $dbccLastKnownGood = [datetime]($_.ExecuteWithResults('DBCC DBINFO () WITH TABLERESULTS').Tables[0] |
            Where-Object { $_.field -eq 'dbi_dbccLastKnownGood' } |
            Select-Object -Last 1 -ExpandProperty value) #querying the information , sorting descending by date and selecting the first

        $daysdbccLastKnownGood = ($dbccLastKnownGood - (Get-Date)).days #getting the number of the days until today

        [pscustomobject] @{
            'Database Name' = $_.name
            'Last DBCC Ran' = $dbccLastKnownGood
            'Days With no DBCC' = $daysdbccLastKnownGood
        } #creating the output
    }

}
catch
{
    Write-Error $_.Exception.Message
}
finally
{
    $server.ConnectionContext.Disconnect()
}
Database Name                 Last DBCC Ran         Days With no DBCC
-------------                 -------------         -----------------
AdventuresWorks2014_Copy      01-Jan-00 12:00:00 AM            -42540
AdventureWorks2014            21-Jun-16 9:54:05 AM                  0
Alderaan                      01-Jan-00 12:00:00 AM            -42540
dagobah                       01-Jan-00 12:00:00 AM            -42540
DagoBah_Copy                  01-Jan-00 12:00:00 AM            -42540
master                        01-Jan-00 12:00:00 AM            -42540
model                         01-Jan-00 12:00:00 AM            -42540
msdb                          01-Jan-00 12:00:00 AM            -42540
MyNewNameToMyExistingDatabase 01-Jan-00 12:00:00 AM            -42540
Phoenix                       01-Jan-00 12:00:00 AM            -42540
tempdb                        01-Jan-00 12:00:00 AM            -42540
This is important information to have. When things are going wrong in your environment, you won’t want to be having to go out and collect this information, you will want it to already be stored in a table somewhere so that you can quickly access it. In our final demo we will take the data we collected and place it onto a .Net DataTable instead of a PSCustomObject, because the .Net DataTable will load into SQL Server more efficiently. Before we can do that, we will need to add a table to our SQL Server database to hold this data. The table is fairly simple, however a ‘DBCC Inspected Date’ column has been added to keep track of when the data was collected. In a multi-server environment, you’ll need to all another column to also store the instance name; for simplicity of this example, we’ll leave that out.
CREATE TABLE [dbo].[DBCCLastKnownGood](
[DatabaseName] VARCHAR(128) NULL,
[Last DBCC Ran] VARCHAR(128) NULL,
[Days with no DBCC] [SMALLINT] NULL,
[DBCC Inspected Date] [DATETIME2](7) NULL
After our SQL Server table is ready to receive the rows, we can go about collecting our rows to insert. In the code below, you will see that we have added a section at the top to construct the .Net DataTable ahead of time, add named columns to it, and add a default value to the ‘DBCC Inspected Date’ column.
Once all the data is collected, we will reuse our server connection, switch databases to the tempdb database (you may want to change that, depending on where you created your DBCCLastKnownGood table), next we insert our rows, and finally we disconnect. As you may have noticed, we have removed the try/catch/finally code to make the example easier to follow along.
Import-module SqlServer #loading the assemblies

<# Additional Section to spin up the DataTable that we use for
    collecting & inserting the rows into SQL Server         #>
$datatable = New-Object System.Data.Datatable
$null = $datatable.Columns.Add("DatabaseName")
$null = $datatable.Columns.Add("Last DBCC Ran")
$null = $datatable.Columns.Add("Days with no DBCC", [int])
$column = $datatable.Columns.Add("DBCC Inspected Date", [datetime])
$column.DefaultValue = Get-Date

<# Collect the data from all of the databases and place into $datatable #>
$Server = New-Object Microsoft.SqlServer.Management.Smo.Server localhost

($server.Databases).Where({ $_.isaccessible }) | #all databases not offline
ForEach-Object {

    $dbccLastKnownGood = [datetime]($_.ExecuteWithResults('DBCC DBINFO () WITH TABLERESULTS').Tables[0] |
        Where-Object { $_.field -eq 'dbi_dbccLastKnownGood' } |
        Select-Object -Last 1 -ExpandProperty value) #querying the information , sorting descending by date and selecting the first

    $daysdbccLastKnownGood = ($dbccLastKnownGood - (Get-Date)).days #getting the number of the days until today

    [void]$datatable.Rows.Add($_.name, $dbccLastKnownGood, $daysdbccLastKnownGood)
}

<# Now we need to reconnect and write the rows we just connected
    We could connect to a different instance and write the rows there #>
$server.ConnectionContext.Connect() #connecting
$server.ConnectionContext.SqlConnectionObject.ChangeDatabase("tempdb")

$bulkCopy = New-Object Data.SqlClient.SqlBulkCopy $server.ConnectionContext.SqlConnectionObject
$bulkCopy.DestinationTableName = 'dbccLastKnownGood'
$bulkCopy.WriteToServer($datatable)

$server.ConnectionContext.Disconnect()
Summing up
In this stairway, I wanted to give you a taste of all the useful operations you can perform on the database class. I can’t show everything, but I’m hoping that you can use what I’ve provided to get you started in trying things out and exploring the documentation that Microsoft provides. The documentation on SMO isn’t intended for beginners but once you are familiar with the ways that SMOs jargon and conventions you will find that it is easy to make sense of what is published by the SMO programming team. In the meantime, this stairway is here to help you.