
This is the sixteenth article in a series entitled Stairway to Integration Services. Previous articles in the series include:
- What is SSIS? Level 1 of the Stairway to Integration Services
- The SSIS Data Pump - Level 2 of the Stairway to Integration Services
- Adding Rows in Incremental Loads – Level 3 of the Stairway to Integration Services
- Updating Rows in Incremental Loads – Level 4 of the Stairway to Integration Services
- Deleting Rows in Incremental Loads – Level 5 of the Stairway to Integration Services
- Basic SSIS Workflow Management – Level 6 of the Stairway to Integration Services
- Intermediate SSIS Workflow Management – Level 7 of the Stairway to Integration Services
- Advanced SSIS Workflow Management – Level 8 of the Stairway to Integration Services
- Control Flow Task Errors – Level 9 of the Stairway to Integration Services
- Advanced Event Behavior – Level 10 of the Stairway to Integration Services
- Logging – Level 11 of the Stairway to Integration Services
- Advanced Logging – Level 12 of the Stairway to Integration Services
- An Overview of SSIS Variables - Level 13 of the Stairway to Integration Services
- An Overview of Project Conversion - Level 14 of the Stairway to Integration Services
- An Overview of SSIS Parameters - Level 15 of the Stairway to Integration Services
Introduction
In the previous installment we took a look at SSIS parameters. In this article, we are going to leverage SSIS parameters, variables, and the Foreach Loop Container to load data from a dynamic number of sources.
Before we begin, please click this link (http://andyweather.com/data/WeatherData_Dec08_Apr09.zip) to download more source data collected from my weather station in Farmville. Decompress the file wherever you would like, but I like putting test data in the SSIS solution folder as shown in Figure 1:
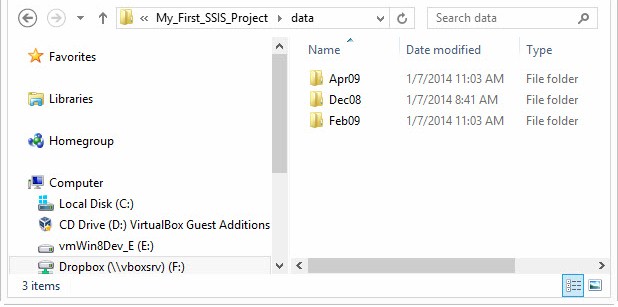
Figure 1
Each MonthYear folder contains a subfolder named TH. Each TH folder contains a file named sensor1-all.csv. These files represent temperature and humidity data collected between December 2008 and April 2009. The files are cumulative – the February 2009 file includes all the data from the December 2008 file plus the records added between December 2008 and February 2009, and the April 2009 file includes all the data from the December 2008 file plus the records added between December 2008 and April 2009. All three files begin with records look like those shown in Listing 1:
Date,Time,Min T,Max T,Average T,Min H,Max H,Average H,Comfort zone,Min DP,Max DP,Average DP,Min HI,Max HI,Average HI,Low Batt
2008-12-25,19:00,8.5,10.9,9.71,32,36,33,2,-6.0,-5.0,-5.71,--,--,--
2008-12-25,20:00,6.3,8.5,7.21,36,40,38,2,-6.0,-5.0,-5.95,--,--,--
2008-12-25,21:00,5.3,6.7,6.37,39,43,40,0,-6.0,-6.0,-6.00,--,--,--
Listing 1
Because of the contents of these files, we will be best served using an incremental load strategy. We covered incremental loads earlier in:
- Adding Rows in Incremental Loads – Step 3 of the Stairway to Integration Services
- Updating Rows in Incremental Loads – Step 4 of the Stairway to Integration Services
- Deleting Rows in Incremental Loads – Step 5 of the Stairway to Integration Services
It is very important to know your data. This is data collected from a weather station. How often to you read the morning newspaper or watch the evening news and read or hear, “We were wrong about the high temperature yesterday. It wasn’t 71°F, it was really 70.5°F.” This may have happened but I haven’t ever seen it.
Our data is “forward-only.” There will be no updates and no deletions. Because of the nature of our data, we will only be loading new rows. Our incremental load strategy will reflect this, and the design pattern we will use is found in Adding Rows in Incremental Loads – Step 3 of the Stairway to Integration Services.
Open the converted version of My_First_SSIS_Project in SQL Server 2012 Data Tools – BI as shown in Figure 2:
Figure 2
My_First_SSIS_Project opens and Solution Explorer appears as shown in Figure 3:
Figure 3
Open the LoadWeatherData.dtsx SSIS package as shown in Figure 4:
Figure 4
Double-click the “DFT Stage Temperature and Humidity” data flow task to open the editor, as shown in Figure 5:
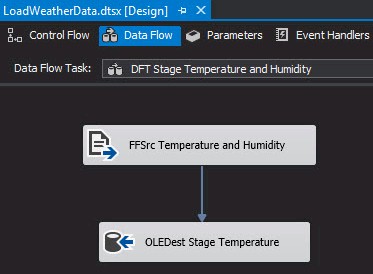
Figure 5
Click on the data flow path connecting the “FFSrc Temperature and Humidity” flat file source adapter to the “OLEDest Stage Temperature” OLE DB destination adapter and delete the data flow path as shown in Figure 6:
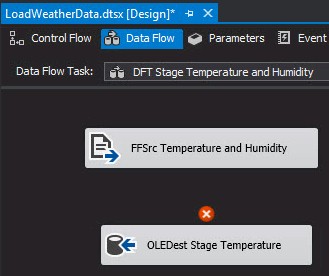
Figure 6
Drag a Lookup Transformation from the SSIS Toolbox onto the Data Flow surface as shown in Figure 7:
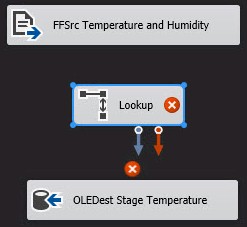
Figure 7
Connect a data flow path from “FFSrc Temperature and Humidity” flat file source adapter to the new Lookup transformation as shown in Figure 8:
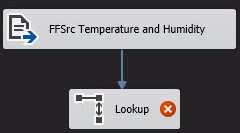
Figure 8
Double-click the Lookup transformation to open the Lookup Transformation Editor. The editor opens to the General page. The only change we want to make here is to the “Specify how to handle rows with no matching entries” dropdown – we want to change the value to “Redirect rows to no match output” as shown in Figure 9:
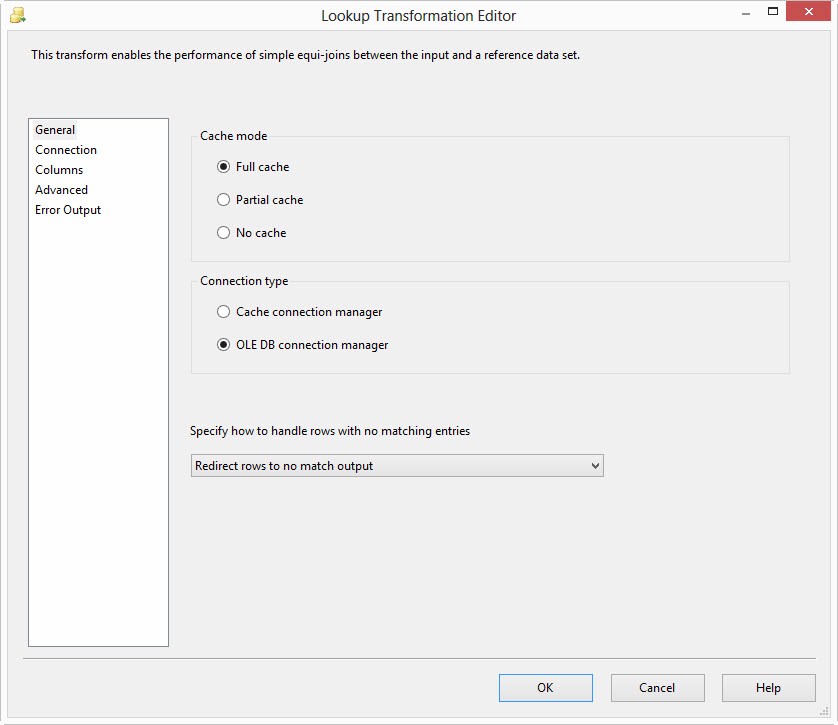
Figure 9
Click the Connection page and make sure the “(local).WeatherData” connection manager is selected in the “OLE DB connection manager” dropdown. Add the statement in Listing 3 to the “Use results of a SQL query” textbox, as shown in Figure 10:
Select [Date], [Time]
From dbo.StageTemperature
Listing 3
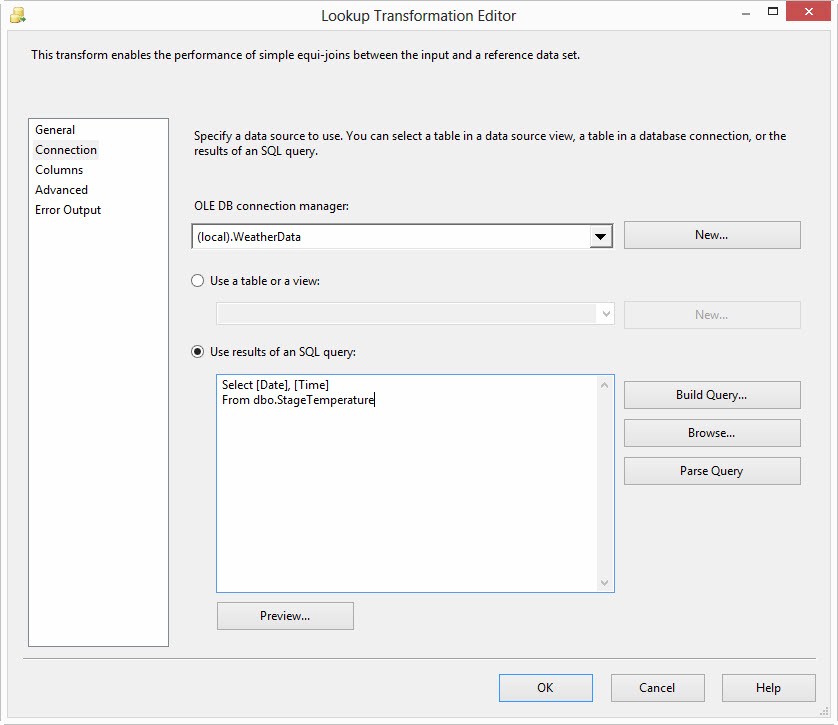
Figure 10
Click the Columns page and map the Date column from the Available Input Columns grid to the Date column in the Lookup Columns grid and the Time column from the Available Input Columns grid to the Time column in the Lookup Columns grid as shown in Figure 11:
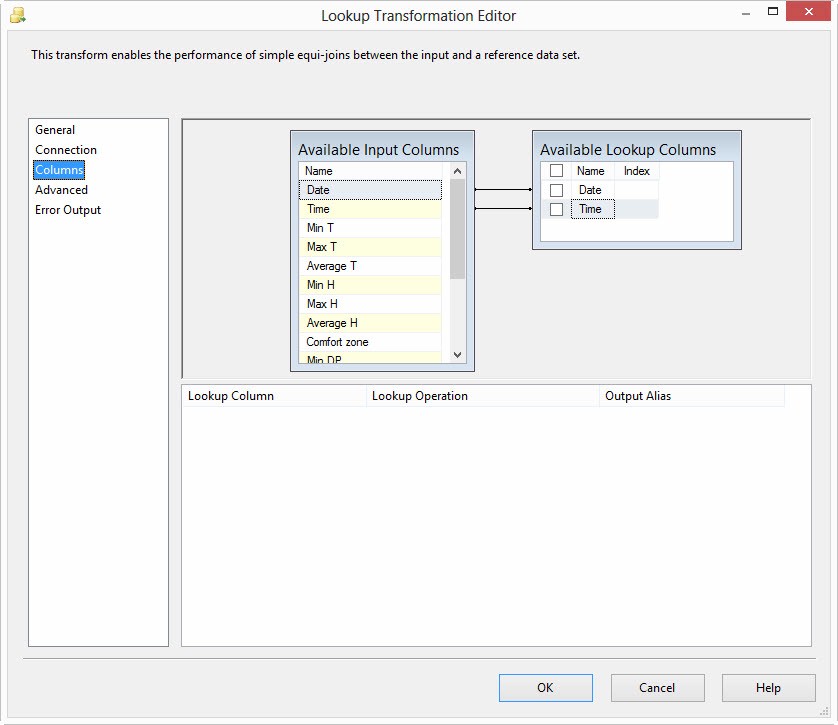
Figure 11
Click the OK button to complete configuring the Lookup transformation.
“How does the Lookup transformation work, Andy?” I’m glad you asked! We configured the lookup to use Full Caching (the default cache mode), which means the lookup transformation is going to populate a chunk of RAM with the cached data it acquires. In Figure 9, you can see the Cache Mode setting along with the type of connection we intend to use: an OLE DB Connection Manager. Figure 10 provides connection details, beginning with the Connection Manager we will use to connect to the database – (local).WeatherData. We have two ways to reach data in the database exposed by the connection manager:
1. Use a table or view.
2. Use the results of a SQL query.
If we select table or view, the contents of the entire table (or the contents returned by the view) will all be stored in RAM by the lookup during the cache operation. If we use an OLE DB Connection Manager connection type and we configure the lookup for Full Cache, the lookup cache operation takes place during the PreExecute event of the Data Flow Task.
On the Columns page (Figure 11), we configure which columns the lookup will compare to check for matching rows. We mapped the Available Input Columns Date column to the Available Lookup Columns Date column and the Available Input Columns Time column to the Available Lookup Columns Time column. This means both columns must contain matching values for Date and Time to trigger a Match. We configured the “Specify how to handle rows with no matching entries” dropdown on the General tab to send No Match rows to the NoMatch lookup output (see Figure 9).
Remember: Know your data. There is a single entry in the sensor1-all.csv file for each date/hour combination. If the Date and Time match, this row already exists in the WeatherData.dbo.StageTemperature table. We only want to load new rows, so we will ignore these matched rows.
Figure 12 shows the Input Output Selection window that displays when we drag an output from the Lookup transformation to the “OLEDest Stage Temperature” OLE DB destination adapter:
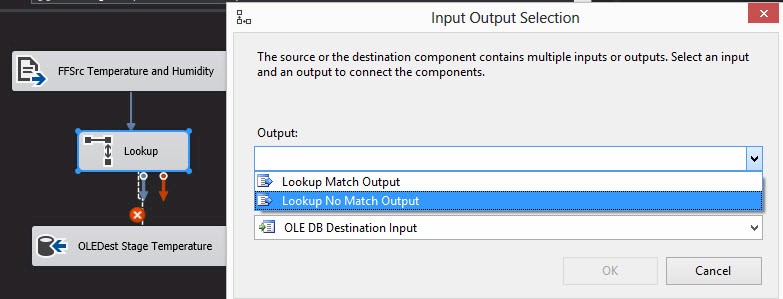
Figure 12
Select the “Lookup No Match Output” and click the OK button to complete the data flow path connection, as shown in Figure 13:
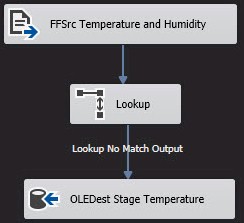
Figure 13
There is probably data in the WeatherData.dbo.StageTemperature table that we need to clear out. Connect to the instance of SQL Server that contains the WeatherData database you created in An Overview of SSIS Parameters – Step 15 of the Stairway to Integration Services. Execute the script in Listing 2 to accomplish this:
Use WeatherData
go
Truncate Table StageTemperature
Listing 2
After cleaning out the destination staging table, execute the package. Your data flow should appear similar to that shown in Figure 14:
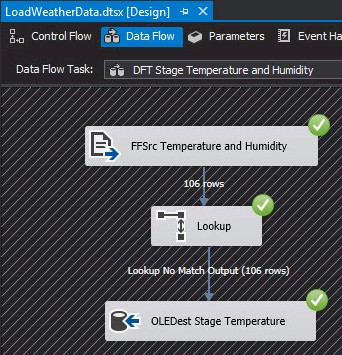
Figure 14
Now, re-execute the package. Your data flow should now appear similar to that shown in Figure 15:
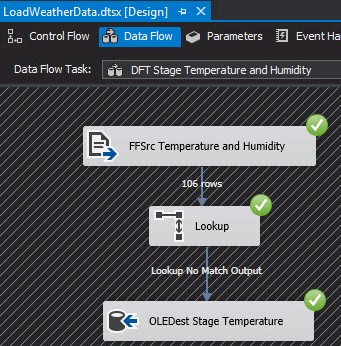
Figure 15
Notice the original 106 rows are loaded from the file into the data flow via the “FFSrc Temperature and Humidity” flat file source adapter, but a matching row is located in the WeatherData.dbo.StageTemperature table, so the Lookup transformation sends no rows through the Lookup No Match Output.
This SSIS package is now re-executable. It will only load rows that are not currently stored in the destination database table.
Loop It!
You will recall from An Overview of SSIS Parameters – Step 15 of the Stairway to Integration Services that we have a package parameter named $Package::SourceFilePath, and that this parameter value is used to set the ConnectionString property of the “FFCM Temperature and Humidity” flat file connection manager. We will next make some changes to how we manage this ConnectionString.
First, open the Package Parameters tab and delete the SourceFilePath parameter as shown in Figure 16:
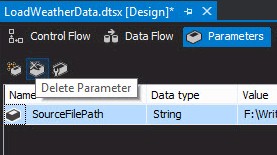
Figure 16
Next, open the Project Parameters by double-clicking Project.params in Solution Explorer as shown in Figure 17:

Figure 17
Click the Add Parameter button and configure the parameter with the following property values (and shown in Figure 18):
- Name: SourceFolder
- Data type: String
- Value: <the path where you decompressed the WeatherData_Dec08_Apr09.zip file>
- Sensitive: False
- Required: False
- Description: The folder containing the weather data files.

Figure 18
Click the Save All button and close the Project Parameters window.
Return to the Control Flow of the LoadWeatherData.dtsx SSIS package. Drag a Foreach Loop Container onto the Control Flow canvas as shown in Figure 19:
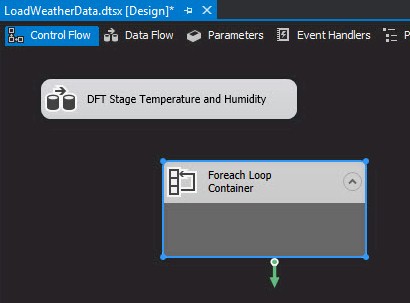
Figure 19
Drag the “DFT Stage Temperature and Humidity” data flow task into the Foreach Loop Container as shown in Figure 20:
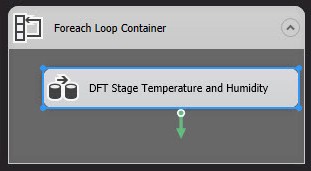
Figure 20
Rename the Foreach Loop Container to “FOREACH Temperature File” as shown in Figure 21:
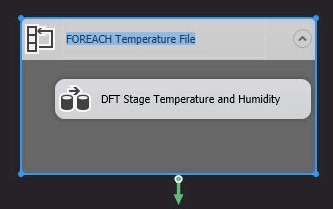
Figure 21
We are going to configure the Foreach Loop Container to search for *.csv files in the subfolders in our data folder. Double-click the “FOREACH Temperature File” foreach loop container to open the editor as shown in Figure 22:
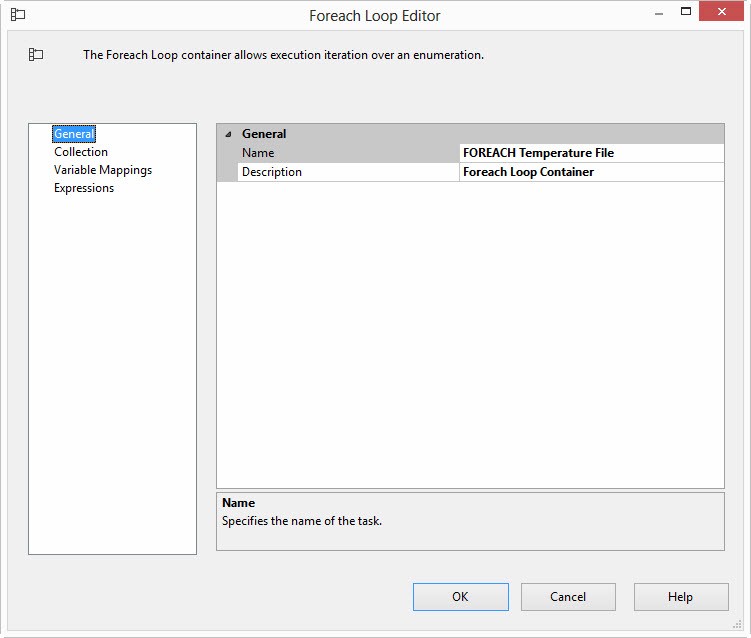
Figure 22
Click on the Collection page. The default enumerator is the “Foreach File Enumerator” and that’s the one we want – shown in Figure 23:
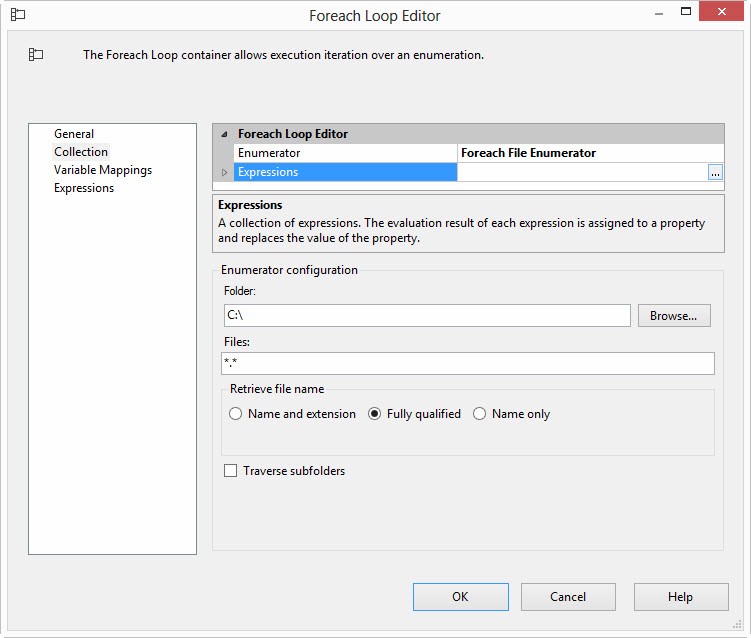
Figure 23
There are several types of enumerators available. We are not going to look at them now, but I want you to be aware that they exist. You can also develop your own custom foreach enumerator – again, that’s more than we will go into in this article. Each enumerator – whether built-in or custom – can expose properties that can be dynamically updated at runtime. These properties are exposed via Enumerator Expressions and Enumerator Expressions are accessed by clicking the ellipsis in the Expressions textbox located just below the Enumerator property. Clicking the ellipsis opens the Property Expressions Editor shown in Figure 24:
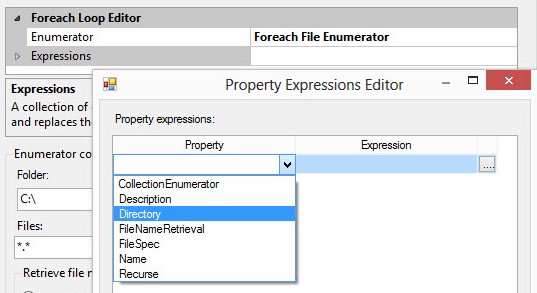
Figure 24
In this case, we want to make the folder (Directory property) of the Foreach File Enumerator dynamic. Select the Directory property in the Property dropdown, and then click the ellipsis in the Expression textbox to open the Expression Builder. Expand the Variables and Parameters virtual folder in the upper left listbox in the Expression Builder window. Click and drag the $Project::SourceFolder project parameter into the Expression textbox. Click the Evaluate Expression button to check the value of the $Project::SourceFolder parameter, as shown in Figure 25:
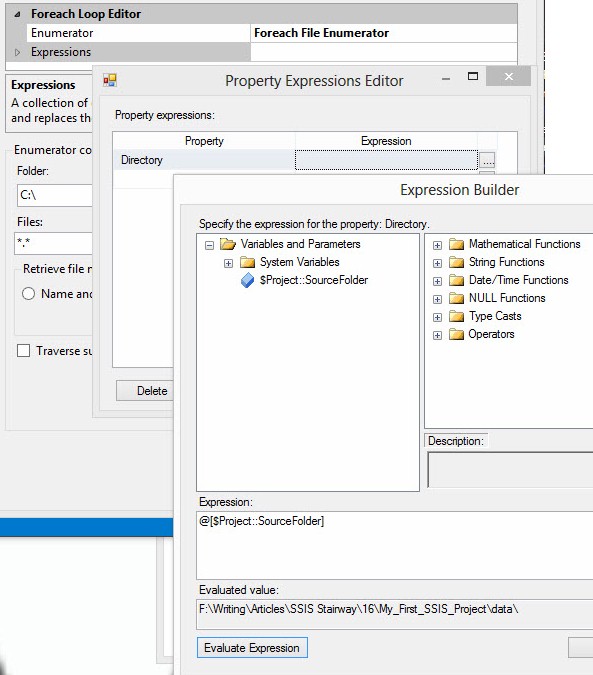
Figure 25
Click the OK button to close Expression Builder. The Property Expressions Editor may appear as shown in Figure 26. If it doesn’t – and I’ve noticed the expression doesn’t always display – clicking the ellipsis again and again clicking the OK button to re-close the Expression Builder seems to work:
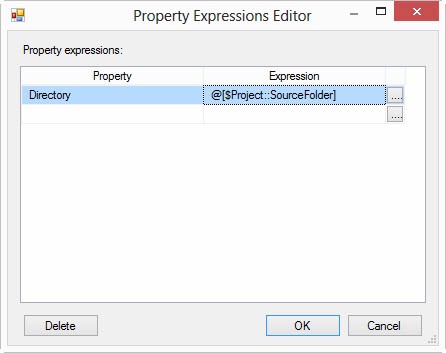
Figure 26
Click the OK button to close the Property Expressions Editor. If you expand the Expressions property beneath the Enumerator property on the Collection page, you should now see the Directory property is dynamically coupled to the $Project::SourceFolder project parameter. Change the Files value from “*.*” (the default) to “*.csv” to configure the enumerator to only return CSV (comma-separated values) files. To retrieve the full path of each CSV file, check the “Fully qualified” option. Lastly, check the “Traverse subfolders” checkbox so the enumerator will “drill down” into sub folders in search of CSV files, as shown in Figure 27:

Figure 27
What’s happening on this page? Because of our current configuration, the Foreach File Enumerator will go to the directory specified (and now dynamically linked to the $Project::SourceFolder project parameter) and return the full path of CSV files found in the specified folder and subfolders.
The full path of each CSV file will be returned one at a time, and the contents of the Foreach Loop Container will be executed. Another way to look at this is: The container will loop once for each CSV file it finds. Each time the container loops, the contents of the loop will be executed.
We need a variable to store the full path of each CSV file identified because we intend to incrementally load the contents of the identified CSV file each time the loop iterates. We can create this SSIS variable on the Variable Mappings page. Click the Variable dropdown and then click “<New Variable…>” as shown in Figure 28:
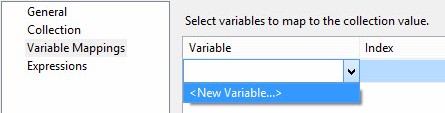
Figure 28
The Add Variable window displays. Set the Variable Name to SourceFileName. Make sure the Container is set to the Package (LoadWeatherData) scope. The default Namespace is User and the default data type is String. We do not need to supply a default value to add the variable, as shown in Figure 29:
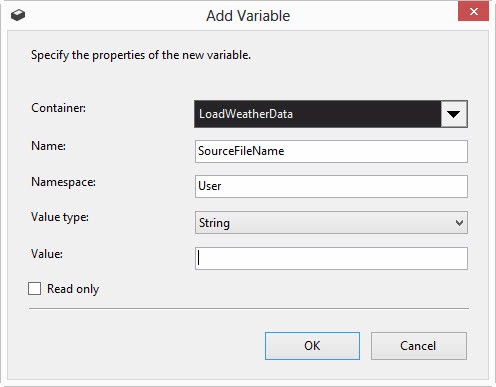
Figure 29
The Index value defaults to 0, which is the appropriate value for the return value (the fully-qualified path of the detected CSV file), as shown in Figure 30:
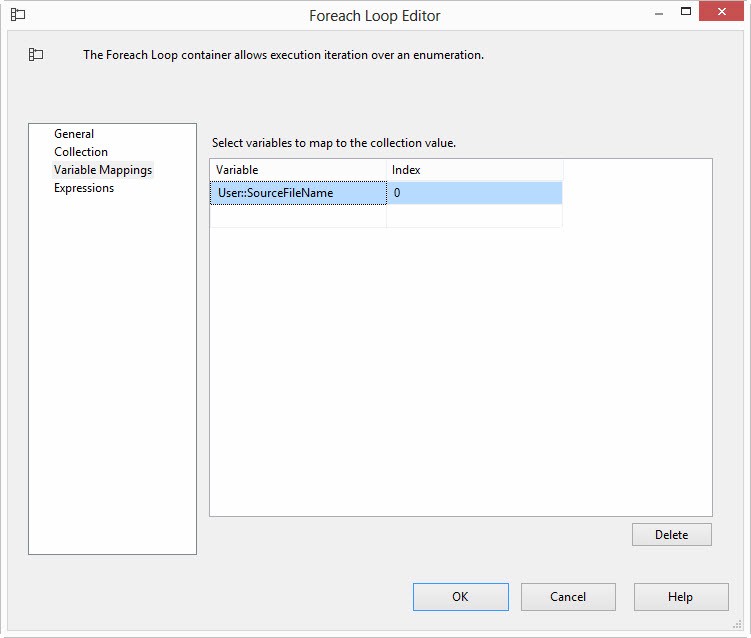
Figure 30
The last step is to change the “FFCM Temperature and Humidity” flat file connection manager’s ConnectionString property so it now uses the new variable named User::SourceFilePath. Click on the connection manager and press the F4 key to display Properties, as shown in Figure 31:
Figure 31
Click the ellipsis in the value textbox to open the Property Expressions Editor as shown in Figure 32:
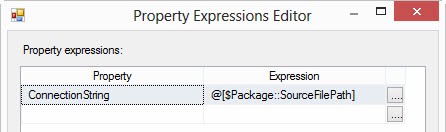
Figure 32
The current configuration is displayed, but is no longer valid because we deleted the SourceFilePath package parameter. Click the ellipsis in the Expression textbox to display the Expression Builder window. Delete the value in the Expression textbox (@[$Package::SourceFileName]). Expand the Variables and Parameters virtual folder and drag User::SourceFilePath into the Expression textbox, as shown in Figure 33:
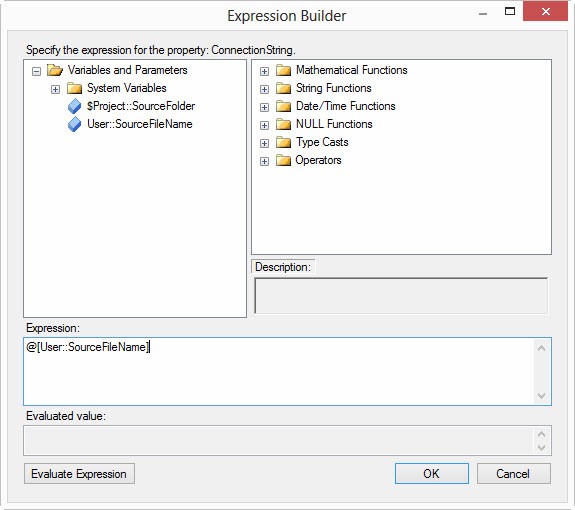
Figure 33
Click the Ok button to close the Expression Builder window. The Property Expressions Editor should now appear as shown in Figure 34:
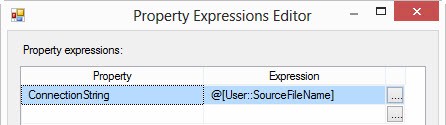
Figure 34
Click the OK button to close the Property Expressions Editor.
We are ready to test. Before we do, let’s set a breakpoint on the “DFT Stage Temperature and Humidity” data flow task. Right-click the “DFT Stage Temperature and Humidity” data flow task and click “Edit Breakpoints…” as shown in Figure 35:
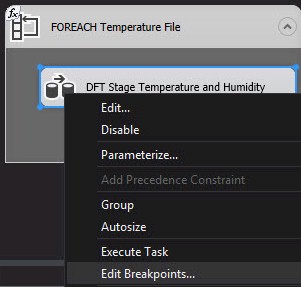
Figure 35
When the Set Breakpoints window displays, click the “Break when the container receives the OnPostExecute event” option as shown in Figure 36:
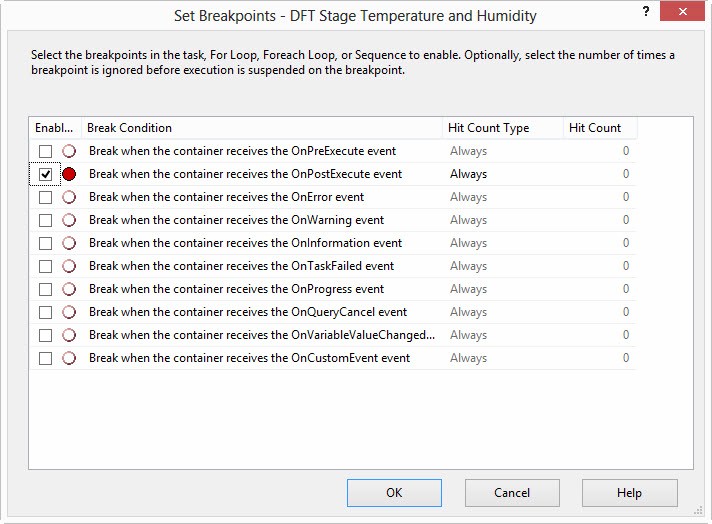
Figure 36
Selecting the “Break when the container receives the OnPostExecute event” option will allow the data flow task to execute for each iteration – for each CSV file found by the Foreach Loop Container. Because we read the full file path into the User::SourceFilePath variable from the Foreach Loop Container, and then use that value to dynamically update the flat file connection manager, the breakpoint will interrupt execution after the contents of each file have been processed by the data flow task.
Now, there’s a lot of information in that last sentence. Let’s break it down differently, looking at each step in the process:
- The “FOREACH Temperature File” Foreach loop container goes to the folder specified in the value of the $Project::SourceFolder project parameter.
- For each CSV file identified, one file at a time, the full path of any CSV file found in (or beneath) this folder is read into the User::SourceFilePath variable.
- The User::SourceFilePath variable controls the ConnectionString property of the “FFCM Temperature and Humidity” flat file connection manager.
- The DFT Stage Temperature and Humidity” data flow task executes once for each CSV file identified.
- The “FFSrc Temperature and Humidity” flat file source adapter is coupled to the “FFCM Temperature and Humidity” flat file connection manager, which is aimed at the identified CSV flat file.
- Data from the identified CSV file is incrementally loaded by the “DFT Stage Temperature and Humidity” data flow task.
I hope that helps and makes more sense. This is not a trivial process.
Press the F5 key to start package execution in the debugger. When the breakpoint is “hit,” the Control Flow will appear as shown in Figure 37:
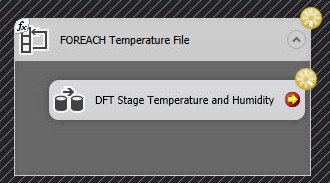
Figure 37
Because of the configuration of the breakpoint – break on the PostExecute event – the “DFT Stage Temperature and Humidity” data flow task will have already executed. The data flow tab will appear as shown in Figure 38:
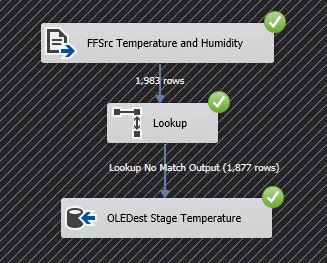
Figure 38
Note that 1,983 rows were read by the flat file source adapter, but only 1,877 rows were loaded. Why is that? The Dec08 data – 106 rows – was previously loaded into the table. This data is from the Apr09 file. Remember, this data flow loads only new rows – data not previously loaded. 1,877 + 106 = 1,983.
To quote Foghorn Leghorn, “…figures don’t lie.”
One cool feature of the debugger is Watch Windows. I like using the Locals window to check the state of variable values during execution. To reach e Locals wind, click Debug -> Windows -> Locals as shown in Figure 39:
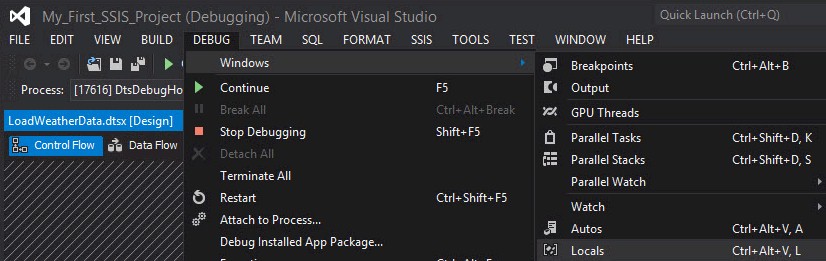
Figure 39
Once the Locals window displays, expand the Variables node. Scroll until you find the User::SourceFilePath variable. Note the value is the sensro1-all.csv file located in the Apr09 folder, as shown in Figure 40:
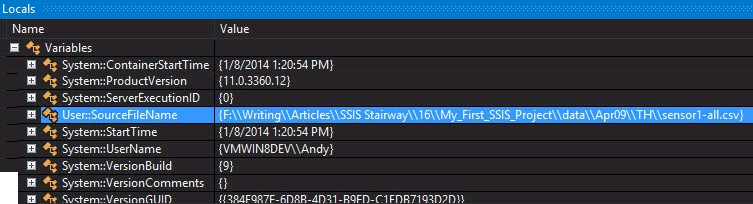
Figure 40
Press the F5 key to continue execution. When the breakpoint is reached again, the Dec08 file has been processed. Note that no rows are loaded to the destination table, as shown in Figure 41:
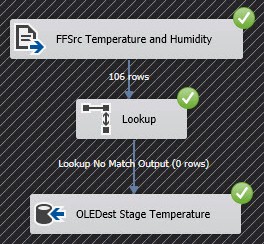
Figure 41
The Locals window verifies the value of the User::SourceFilePath variable contains the Dec08 folder, which means the “FFCM Temperature and Humidity” flat file connection manager is being dynamically connected – via the ConnectionString Dynamic Property Expression – to the Dec08 data file, shown in Figure 42:

Figure 42
Press the F5 key again, and we advance to the Feb09 data. The data flow is shown in Figure 43:
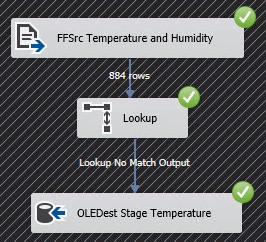
Figure 43
Press F5 one last time to complete execution. Your Control Flow should appear as shown in Figure 44:
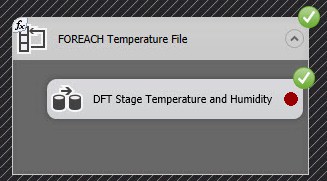
Figure 44
Our test was successful!
Conclusion
In this article, we leveraged SSIS parameters, variables, and the Foreach Loop Container to load data from a number of sources. The Foreach Loop allowed us to load from three sources, but we could have easily loaded from 30 sources or from an unknown number of sources.