
This is the fifth article in a series entitled Stairway to Integration Services. Previous articles in the series include:
- What is SSIS? Level 1 of the Stairway to Integration Services
- The SSIS Data Pump - Level 2 of the Stairway to Integration Services
- Adding Rows in Incremental Loads – Level 3 of the Stairway to Integration Services
- Updating Rows in Incremental Loads – Level 4 of the Stairway to Integration Services
- Deleting Rows in Incremental Loads – Level 5 of the Stairway to Integration Services
Introduction
In previous installments, we have focused on loading data using Incremental Loads. In this article, we will focus on managing workflow in the SQL Server Integration Services Control Flow using Precedence Constraints. You will add a new SSIS package to the existing solution as we take a “test-and-see” approach. Ready? Good. Let’s dive in!
Adding a Package
The SSIS Control Flow contains Tasks, Containers, and Precedence Constraints. Tasks and containers are executable objects in the SSIS Control Flow; Precedence constraints govern when – or if –tasks or containers will execute.
To begin working with the Control Flow, open your existing SSIS solution called “My_First_SSIS_Project”. Once open, right-click the “SSIS Packages” virtual folder in Solution Explorer and click “New SSIS Package” as shown in Figure 1:

Figure 1
When you click “New SSIS Package”, a new package named Package1.dtsx is created and displayed. To rename this package, right-click Package1.dtsx and click Rename as shown in Figure 2:

Figure 2
The package enters “rename mode” as shown in Figure 3. Rename the package Precedence.dtsx:

Figure 3
After you rename the package and press the Enter key, you will be prompted to rename the package object as shown in Figure 4:
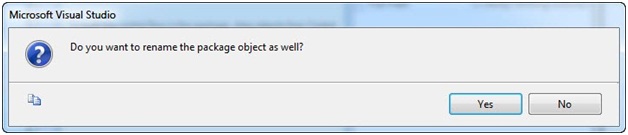
Figure 4
“Why, Andy?” Excellent question! The SSIS packages displayed in Solution Explorer represent the file named Package1.dtsx in the Solution\Project folder and the package object in Business Intelligence Development Studio (BIDS). When you see the prompt shown in Figure 4, you have already renamed the file; the prompt is asking if you want to rename the package object in BIDS. Do yourself a favor: Always answer this prompt by clicking the “Yes” button. If you do not, your file and package object will be named differently and that is simply confusing.
Adding a Script Task
The absence of Precedence constraints is valid, as we will see in our first demo. Let’s begin by adding a Script Task to the Control Flow from the Control Flow Toolbox. Click on the Script Task in the Toolbox and drag it onto the Control Flow surface as shown in Figure 5:

Figure 5
The Script Task is arguably the most powerful SSIS task in SQL Server Integration Services. You can use it to create much of the functionality contained in other SSIS tasks. You can also use the Script Task to add new functionality to the SSIS Control Flow.
Right-click the Script Task and click “Edit” to open the Script task Editor shown in Figure 6:
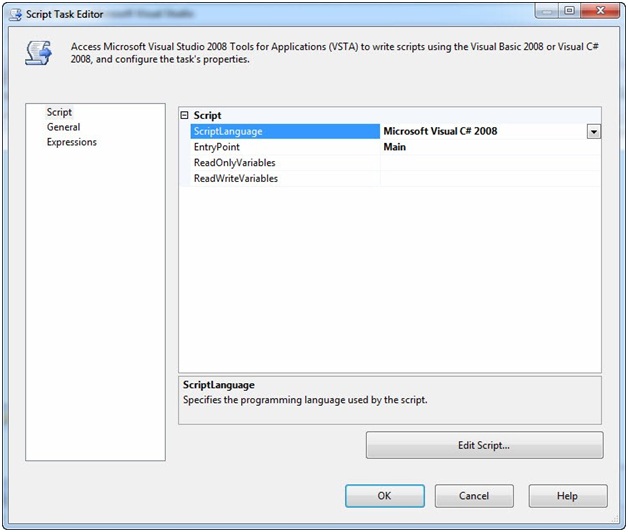
Figure 6
We will not exhaust Script Task functionality in this article, but we will get started. The first property you want to examine is the ScriptLanguage property. You can select Visual Basic or C# as your programming language in each Script Task. You can change the default language of the Script task from the BIDS dropdown menus by selecting ToolsàOptionsàBusiness Intelligence DesignersàIntegration Services Designers. I prefer using Visual Basic as shown in Figure 7:

Figure 7
Click the General page and change the Name property to “Script Task 1” as show in Figure 8:
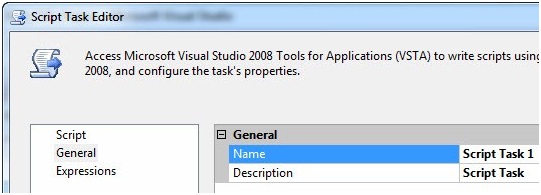
Figure 8
Return to the Script page and click the ReadOnlyVariables property. When you do, an ellipsis will display in the Value textbox as shown in Figure 9:
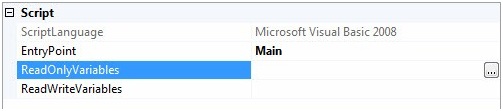
Figure 9
Click the ellipsis to display a list of available Variables. I do not like the way this list displays, I wish the checkbox was closer to the Variable name. I have learned I can double-click the separator between the checkbox and the Name columns in the grid header to adjust the column width. Select the “System::TaskName” variable as shown in Figure 10:

Figure 10
Once you click the OK button, the Script Task ReadOnlyVariables property will appear as shown in Figure 11:
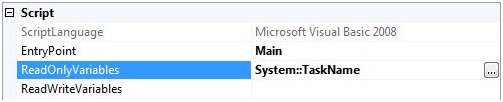
Figure 11
For our purposes, this is all we need to configure on this screen at this time. Click the “Edit Script” button to open the Visual Studio Tools for Applications script editor as shown in Figure 12:

Figure 12
Scroll until you see Public Sub Main(). Add this code to the subroutine:
        Dim sTaskName As String = Dts.Variables("TaskName").Value.ToString
        MsgBox(sTaskName & " completed.")
Your code should appear as shown in Figure 13:

Figure 13
What does this code accomplish? The first statement creates a variable in Visual Basic (VB). The variable is named “sTaskName” and is created as a String variable. sTaskName is assigned a value when it is created. The value it is assigned is the value of the “System::TaskName” variable added to the Script Task’s ReadOnlyVariables list earlier. We reach the SSIS Variable value by accessing the Dts namespace’s Variables collection. That explains the “Dts.Variables” part of the assignment. This is followed by the name of the SSIS Variable – TaskName – quoted within parentheses. That explains the ("TaskName") part.
In SSIS, variables have scope and belong to namespaces. Scope refers to the container to which the SSIS Variable belongs. Every SSIS Variable is associated with a Namespace. By default, there are two namespaces: System and User. TaskName belongs to the System namespace, denoted by the <NameSpace>::<VariableName> notation. Variable names must be unique at a given scope, regardless of namespace. Because there is a TaskName variable in the System namespace, I cannot have a TaskName variable in the User namespace.
We next obtain the Value property, which is an Object. Because it is an Object, we have to cast the property to a String in order to assign it to String variable inside the VB script. We accomplish the casting via the ToString method.
This is how we read a value from an SSIS Variable into a Script Task variable (in VB).
The next line displays a popup message box containing the name of the task – from the sTaskName variable – plus the string " completed.".
Close the Script Task Code Editor by clicking the red “X” in the upper right corner. The script is automatically saved when you do this. Click the OK button in the Script Task Editor to complete the Script Task configuration.
We are ready for a test! Click the Play button or press the F5 key to start the SSIS package in the debugger. You should see a message box similar to Figure 14:
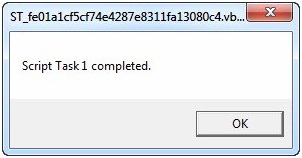
Figure 14
Stop the debugger by clicking the VCR-style Stop button.
Adding a Second Script Task
Why did we go to all that trouble? Adding the TaskName variable seemed like a lot of extra work for no good reason. There was a good reason, though. To demonstrate, right-click Script Task 1 and click Copy. Next, right-click in the whitespace of the Control Flow – anywhere except on Script Task 1 – and click Paste. A new Script Task is added to the Control Flow, named “Script Task 1 1” as shown in Figure 15:

Figure 15
Right-click Script Task 1 1 and click Rename. Change the name of the Script task to “Script Task 2” as shown in Figure 16:
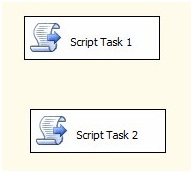
Figure 16
Re-execute the SSIS package in the SSIS debugger. Two message boxes should display (most likely stacked on top of each other) as shown in Figure 17:

Figure 17
Since the name of the Script Task (from the System::TaskName variable) is displayed in the message box, we can make lots of Script Tasks by copying and pasting. Cool, huh?
Stop the debugger.
Use Cases 0 and 1
The preceding sample is an example of a “use case”. This use case demonstrates what happens if there are no Precedence constraints. I call this “Use Case 0”. For Use Case 1, let’s add a Precedence constraint between Script Task 1 and Script Task 2. To accomplish this, first click on Script Task 1. A Precedence Constraint appears as a green arrow extending below Script Task 1 as shown in Figure 18:

Figure 18
Click and drag this Precedence constraint to Script Task 2, then release the mouse button. I see a lot of people try to “hit the edge” of the next task. Don’t. Drop the end of the Precedence constraint in the middle of the next task as shown in Figure 19:
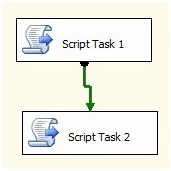
Figure 19
Execute the package in the SSIS debugger. Note Script Task 1 executes first as shown in Figure 20:

Figure 20
Click the OK button to complete Script Task 1. Next, Script Task 2 executes as shown in Figure 21:

Figure 21
Note that Script Task 2 executes after Script Task 1 completes and not before. Another note for future reference: The precedence constraint shown here is the default “OnSuccess” type. This means the preceding task – Script Task 1 – must complete and Succeed before the precedence will “evaluate”.
The semantics here are important. The precedence constraint originates at Script Task 1 and terminates at Script Task 2. The originating task connects to the precedence constraint startpoint which has the “half-bubble” where it connects to the originating task. The endpoint has an arrow where it connects to the terminating task.
Precedence constraints evaluate. They test one or more conditions and, if the conditions are true, the constraint allows the terminating task to start execution.
Stop the debugger.
“Single-Threading"
“Single-threading” is one way to describe doing one thing at a time. Using a precedence constraint is one way to accomplish “single-threading” in the SSIS Control Flow. Using a precedence constraint is the only way to accomplish deterministic workflow in the Control Flow.
Is non-deterministic workflow possible in the SSIS Control Flow? Yep. To demonstrate, right-click the precedence constraint connecting Script Task 1 to Script Task 2, and then click Delete. Click the whitespace in the Control Flow and press the F4 key to display Package properties. The MaxConcurrentExecutables property controls how many executables can execute concurrently in the SSIS Control Flow. By default, MaxConcurrentExecutables is set to -1. The default number of concurrent executables SSIS will allow is equal to the number of detected CPU cores plus two. For example, if you have a four-core server SSIS will permit six concurrent executables.
Set the MaxConcurrentExecutables property to 1 as shown in Figure 22:
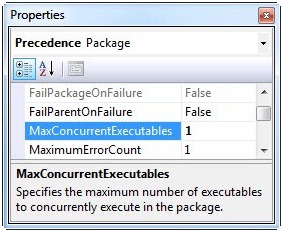
Figure 22
Re-execute the package in the SSIS debugger. Now, only one Script Task executes at a time, followed by the other. The order is non-deterministic and therefore unpredictable.
Stop the debugger, reset the MaxConcurrentExecutables property to -1, and save your SSIS package.
Conclusion
In this article, we added a new SSIS package to our solution, built our first Script Tasks, and connected them via an OnSuccess precedence constraint. We examined reading SSIS Variable values from inside an SSIS Script Task, and the MaxConcurrentExecutables property. In the next Stairway Step, we will look at more features of SSIS Precedence Constraints.