
We are now on level four of the stairway series. So far we have created an Azure account with an active subscription, created a logical SQL Server and created a database within this server meaning we are ready to connect to the database.
To do this we need to make some security configuration changes to the firewall to allow us to connect to the database using the server admin account. Our tool of choice for connecting will be SSMS (SQL Server Management Studio).
Server Details
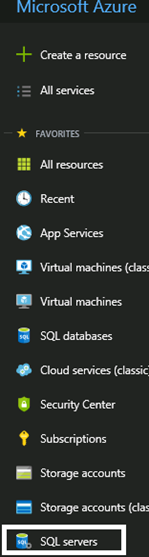
Let's examine how to determine the server URL to use for connections. On the main resource bar navigate to SQL Servers.
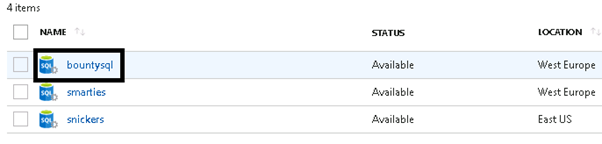
Click SQL Servers and then select the server of interest from the blade that opens. For our example, that would be bountysql.
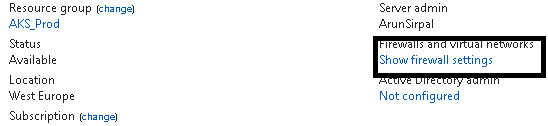
This will take you to the main overview page. There are a number of items shown here, but we want to select “show firewall settings”. This is located hear the top, to the right of the Resource group and Status.
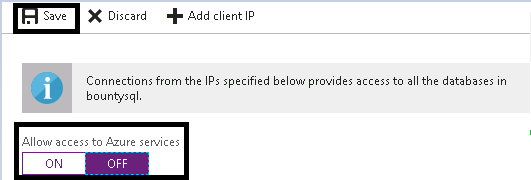
You will be presented with something similar to the image below. This blade controls the various rules for access to your database.
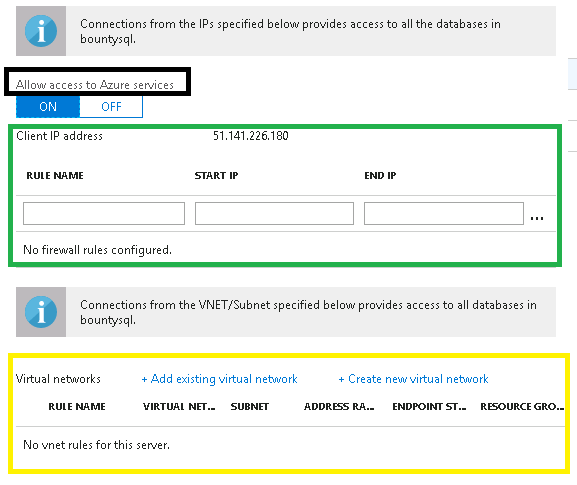
Let’s discuss a couple of important sections. The "Allow access to Azure services shown" highlighted by the black box is ON by default. Personally I turn this off. Why? When enabled it allows any traffic from resources/services hosted in Azure (not just your Azure subscription) to access the database.
As you can see in the section outlined with the green box, we currently have no firewall rules setup. If we create firewall rules here. These rules are known as server-level firewall rules. We can be more granular and create database level rules which is done via T-SQL. The below diagram shows you the relationship between the different types of firewall rules and how connection access works in relation to IP addresses.
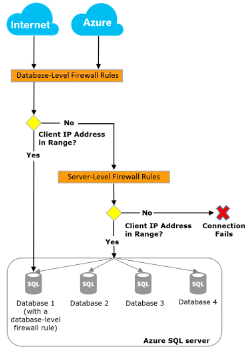
Microsoft recommends using database level firewall rules whenever possible to enhance security and to make your database more portable. This idea of portability comes down to the fact that if you opt to use active geo-replication for your databases, then you should use database level firewall rules because you would want the rules to be replicated with the database. This ensures all secondary databases have the same firewall rules as the primary. If active geo-replication is not used and all databases on the server have the same access requirements, then I tend to stick with server level firewall rules (This is what we will create later on).
The yellow box is the virtual network endpoint section. We will not be configuring these for this series, but they are absolutely useful in enterprise deployments because it gives you the ability to isolate connectivity to your logical SQL server from only a given subnet or set of subnets within your virtual network. You can read more about this on the Microsoft Documentation site.
We will turn the Allow access to Azure services option to OFF. Now click save.
Let’s try and connect via SSMS. We will need:
- The server name, which is in the following structure <servername>.database.windows.net. Hence it is bountysql.database.windows.net in our example
- The server admin account details that we created in Level Two. This would be the user name and password.
- Ensure that your client computer firewall allows outgoing TCP communication on TCP port 1433.
We can enter this information in the SSMS connection dialog, as shown below:
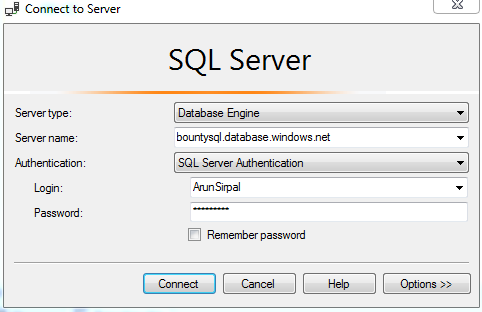
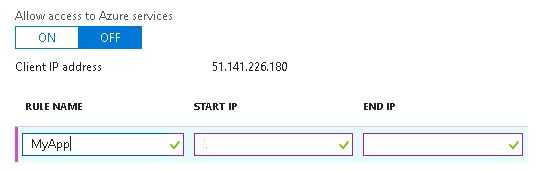
Click connect, which will fail as shown below. This is expected, so take note of the IP address shown in the dialog. We will use that to create the server level firewall rule.
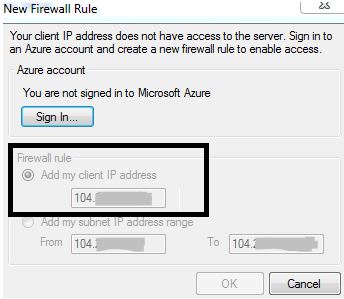
Go back to the blade in your portal that contains the IP address. Enter a name for a rule, as shown below, and then use the IP address for both the start and end values. Click Save to add the rule to your server.
Now re-try connecting via SSMS. This time the connection should succeed and you will see a server in your Object Explorer.

We have successfully connected to the Azure SQL Server. You can see your sample database under the Databases folder. Under the Logins node, we see our server admin account.
Now, let us issue a query against the master database. First switch to the master database and then select New Query.

Type this
SELECT @@VERSION AS [version]
Click execute and you should get results similar to those shown below.

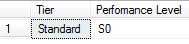
We can also execute queries in the context of the database we created. Another handy query is shown below which will return the service tier and performance level that you have set when we execute this in the context of twitterdb.

Let's choose twitterdb in the database drop down and click New query. Then issue the below T-SQL statement.
SELECT [Tier] =
              DATABASEPROPERTYEX('Twitterdb', 'Edition'),
              [Perfomance Level] =
              DATABASEPROPERTYEX('Twitterdb', 'ServiceObjective')
You should get results similar to these:
Next Steps
Now that we have connected to the server via SSMS in the last level we will look at some very common admin tasks that you will very likely be asked to carry out on your Azure SQL Database.
If there are any questions on this, please leave them in the discussion below. If there are other tasks you would like to see, please leave a note in the discussion or contact the author.